? trying to understand starter motor connections
#1
 10-15-2021, 05:19 PM


hi: i'm trying to understand what the multiple terminal connections are for on the starter for my 87 xj6. this first photo is from the rebuilt lucas starter from oriellys that i installed 2 months ago. it worked good until yesterday when i only a single click noise when i turned the ignition key to start.

when i installed this 2 months ago, i connected the cable to the left post (the one with the nut on it) and i attached the red/white wire with the female connector to the one of the two male prongs but i don't remember which one.
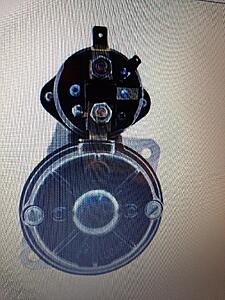
this is the replacement starter orielly gave me to install. apologies for the photo quality as i had to take a photo of my computer screen since the starter is still installed. i connected the cable to the post that's on the bottom in this photo (a the 6 o'clock position) but it's on the left if you looked at it from a side view just like i did with the firstly installed stater. i connected the red/white wire to prong at the 3 o'clock position. with these connections the starter motor spins (the engine does not crank as the solenoid is not being engaged) when i connect the battery without the key in the ignition at all.
? why is just the starter motor spinning when the battery is connected
? why are there 2 posts on the solenoid
? why are there 2 smaller width prongs and one large width prong on the solenoid
? is there any other way to check the wiring connections other than dropping the starter
#2
10-15-2021, 06:19 PM


Veteran Member
Join Date: Mar 2008
Location: Pacific Northwest USA
Posts: 24,847
Received 10,904 Likes
on
7,165 Posts
Your big cable goes on the upper lug.
The white/red wires goes on one of the smaller male terminals at 1:00 or 3:00 o'clock. I don't know which one. Try both and see what happens....with a bit of 'fingers crossed'.
The small male terminal connected to the larger upper lug is just an extra "+" connection point for additional wires/function that you don't have. The white/red wire does not go there.
It's common for replacement starters to have different configurations and extra, unused terminals. They're made with enough terminals to work in a variety of applications. The instructions will usually give a clue. What do they say?
Cheers
DD
The following users liked this post:
LT1 jaguar (10-15-2021)
#3
10-15-2021, 07:50 PM

Veteran Member
Join Date: Mar 2014
Location: Tehama County, California, USA
Posts: 25,503
Received 9,260 Likes
on
5,410 Posts
#4
10-15-2021, 08:32 PM
Your big cable goes on the upper lug.
The white/red wires goes on one of the smaller male terminals at 1:00 or 3:00 o'clock. I don't know which one. Try both and see what happens....with a bit of 'fingers crossed'.
The small male terminal connected to the larger upper lug is just an extra "+" connection point for additional wires/function that you don't have. The white/red wire does not go there.
It's common for replacement starters to have different configurations and extra, unused terminals. They're made with enough terminals to work in a variety of applications. The instructions will usually give a clue. What do they say?
Cheers
DD
The white/red wires goes on one of the smaller male terminals at 1:00 or 3:00 o'clock. I don't know which one. Try both and see what happens....with a bit of 'fingers crossed'.
The small male terminal connected to the larger upper lug is just an extra "+" connection point for additional wires/function that you don't have. The white/red wire does not go there.
It's common for replacement starters to have different configurations and extra, unused terminals. They're made with enough terminals to work in a variety of applications. The instructions will usually give a clue. What do they say?
Cheers
DD
#5
10-15-2021, 08:47 PM
The following users liked this post:
LnrB (10-16-2021)
#6
10-15-2021, 09:20 PM
Veteran Member
Join Date: Mar 2008
Location: Pacific Northwest USA
Posts: 24,847
Received 10,904 Likes
on
7,165 Posts
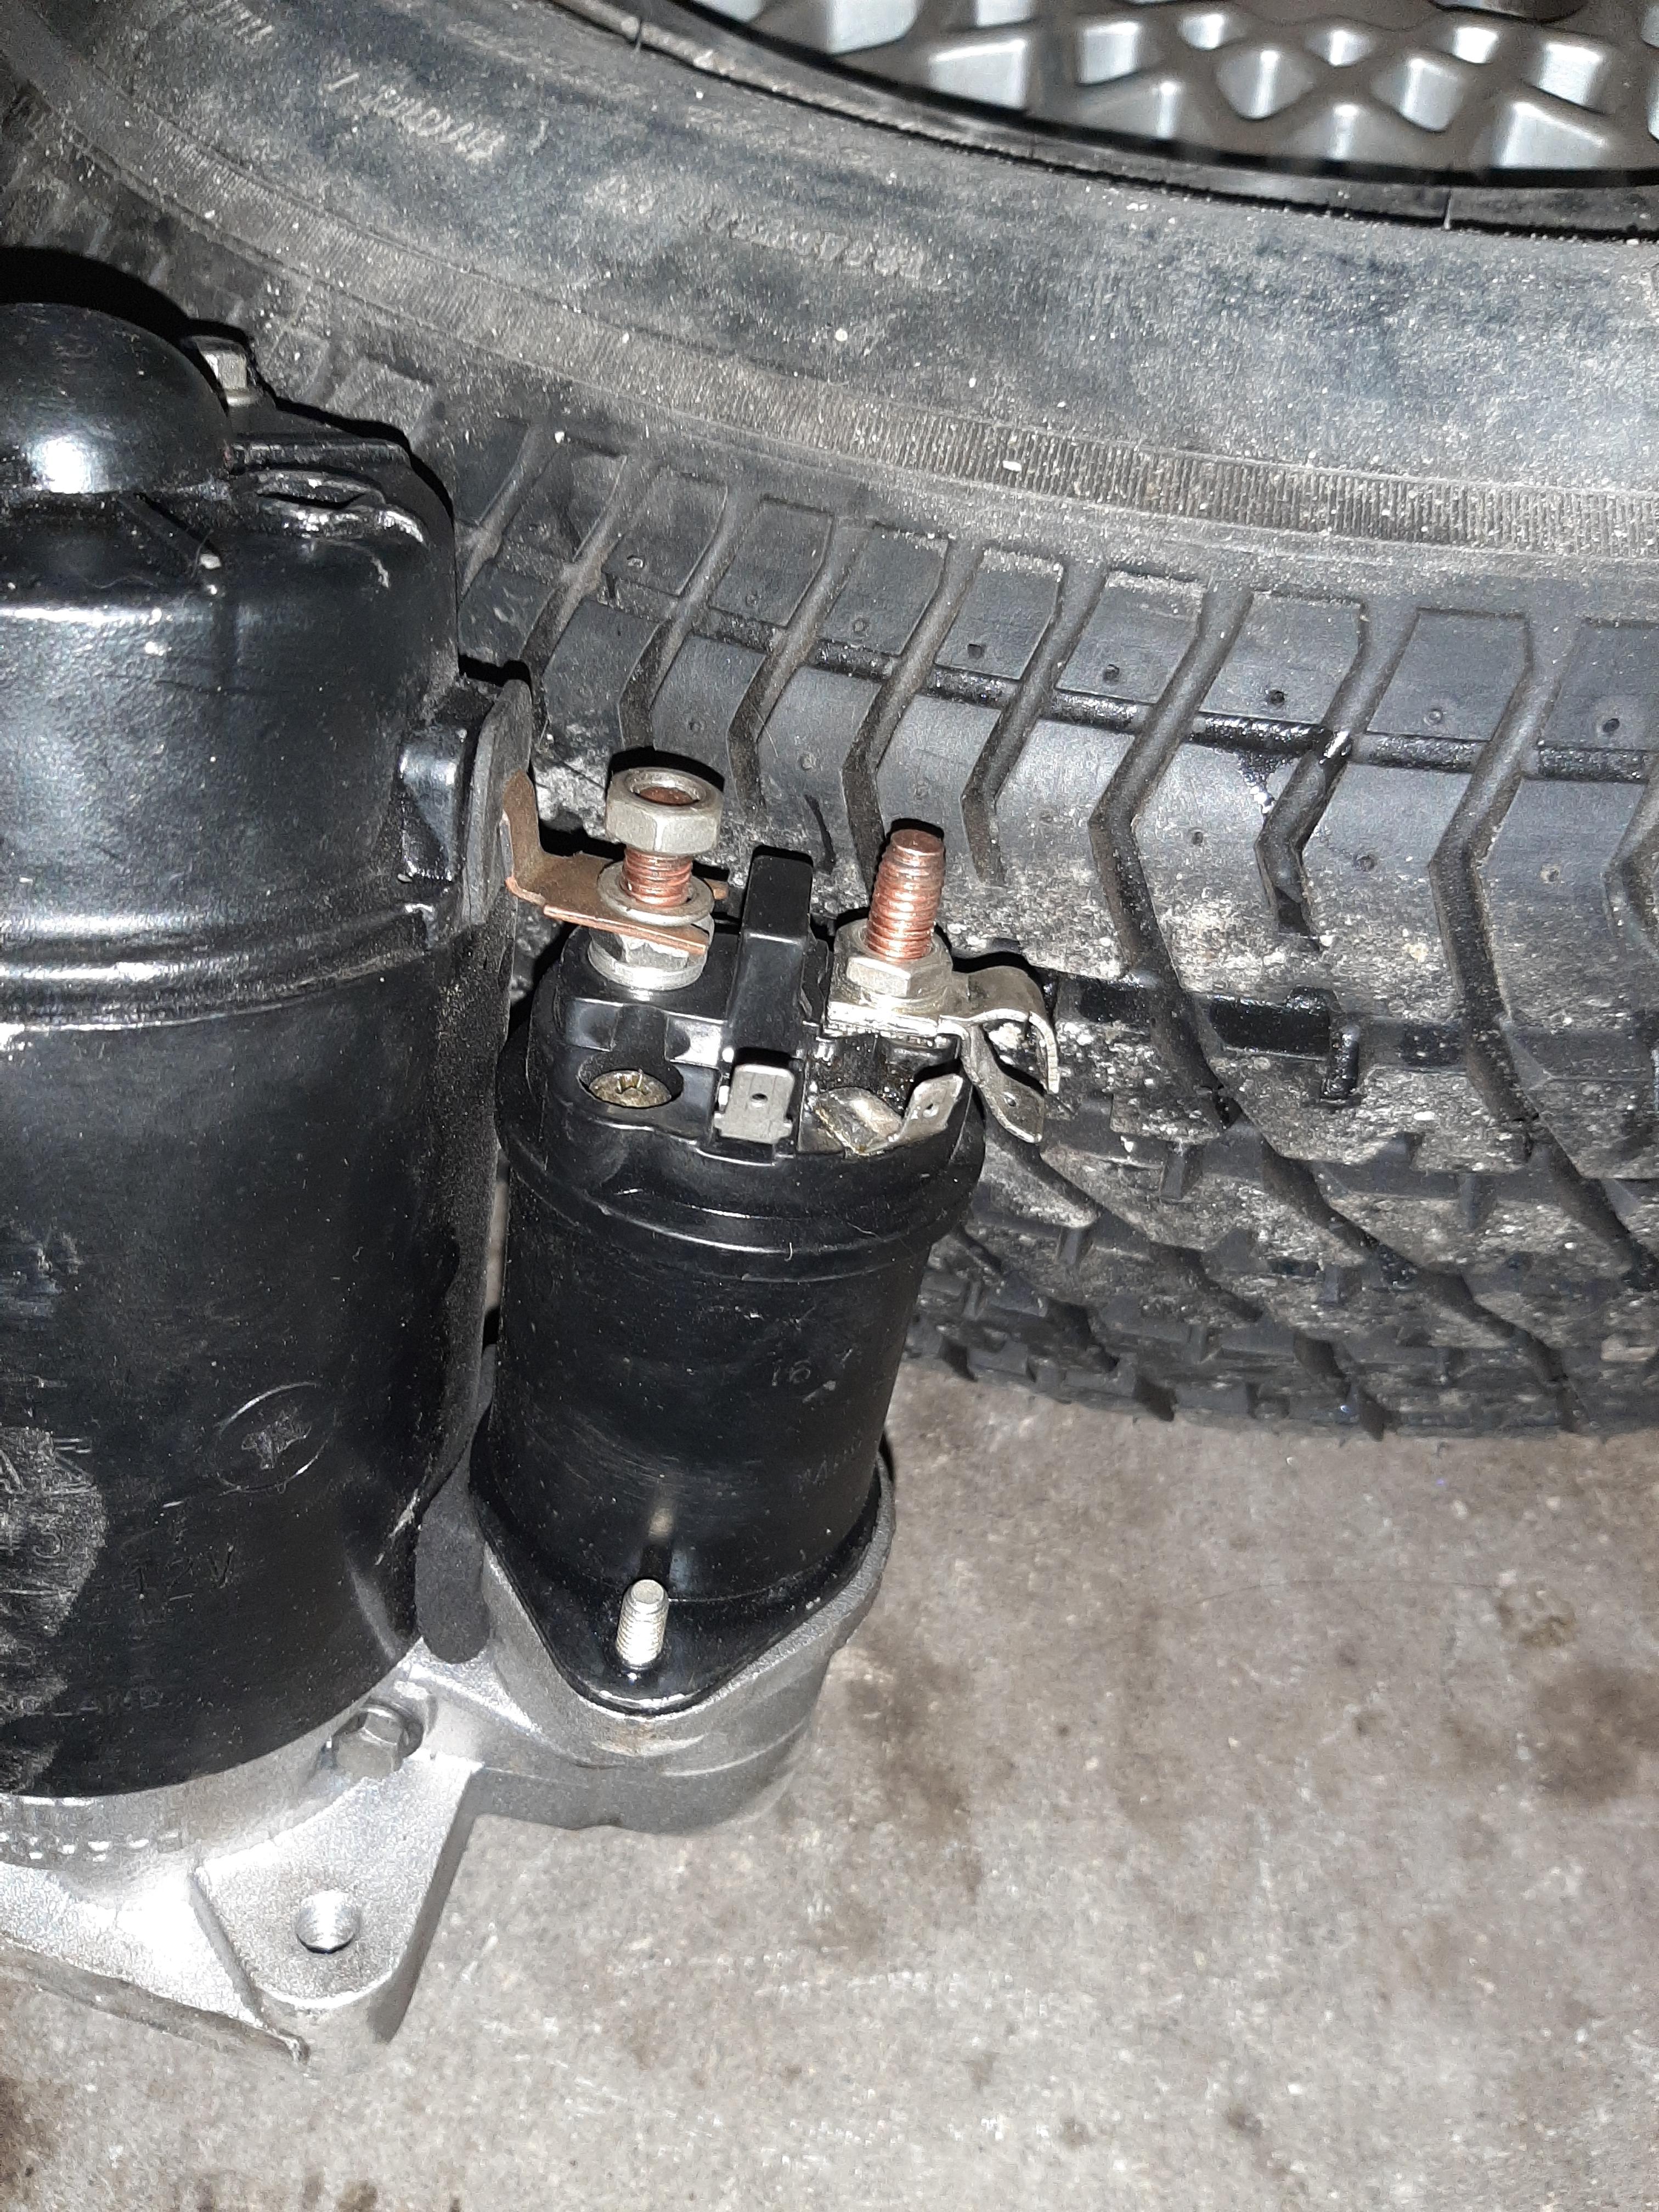
if that's the case then i have the installed starter wired incorrectly as i have the big cable attached to the bottom (6 o'clock position) as shown in the second/lower photo.
Cheers
DD
#7
10-15-2021, 09:46 PM
Veteran Member
Join Date: Mar 2014
Location: Tehama County, California, USA
Posts: 25,503
Received 9,260 Likes
on
5,410 Posts
Ren, take a look at this photo and see if it helps you with wiring.
All starters are wired basically the same. At the top of the solenoid, the Large bolt Opposite the starter body connects to the battery lead.
Notice that the Lower bolt (may or may not be the same size) *Always* connects the solenoid to the starter windings. It sounds in your first post that you connected the Battery lead to the wrong bolt. That would certainly cause the starter to run as soon as you connected the ground strap to the master ground/earth.
You may have slightly different small wires as Doug mentions, they may be mirrored to mine and I don't have spade connectors, but ALL starters of this era are basically the same. Only the bolt-up pattern and snout configuration changes from one brand to the next.
(';')
The following users liked this post:
LT1 jaguar (10-15-2021)
Trending Topics
#9
10-16-2021, 09:28 AM
Ren, take a look at this photo and see if it helps you with wiring.
All starters are wired basically the same. At the top of the solenoid, the Large bolt Opposite the starter body connects to the battery lead.
Notice that the Lower bolt (may or may not be the same size) *Always* connects the solenoid to the starter windings. It sounds in your first post that you connected the Battery lead to the wrong bolt. That would certainly cause the starter to run as soon as you connected the ground strap to the master ground/earth.
You may have slightly different small wires as Doug mentions, they may be mirrored to mine and I don't have spade connectors, but ALL starters of this era are basically the same. Only the bolt-up pattern and snout configuration changes from one brand to the next.
(';')
All starters are wired basically the same. At the top of the solenoid, the Large bolt Opposite the starter body connects to the battery lead.
Notice that the Lower bolt (may or may not be the same size) *Always* connects the solenoid to the starter windings. It sounds in your first post that you connected the Battery lead to the wrong bolt. That would certainly cause the starter to run as soon as you connected the ground strap to the master ground/earth.
You may have slightly different small wires as Doug mentions, they may be mirrored to mine and I don't have spade connectors, but ALL starters of this era are basically the same. Only the bolt-up pattern and snout configuration changes from one brand to the next.
(';')
#10
10-16-2021, 11:27 AM
Ren, take a look at this photo and see if it helps you with wiring.
All starters are wired basically the same. At the top of the solenoid, the Large bolt Opposite the starter body connects to the battery lead.
Notice that the Lower bolt (may or may not be the same size) *Always* connects the solenoid to the starter windings. It sounds in your first post that you connected the Battery lead to the wrong bolt. That would certainly cause the starter to run as soon as you connected the ground strap to the master ground/earth.
You may have slightly different small wires as Doug mentions, they may be mirrored to mine and I don't have spade connectors, but ALL starters of this era are basically the same. Only the bolt-up pattern and snout configuration changes from one brand to the next.
(';')
All starters are wired basically the same. At the top of the solenoid, the Large bolt Opposite the starter body connects to the battery lead.
Notice that the Lower bolt (may or may not be the same size) *Always* connects the solenoid to the starter windings. It sounds in your first post that you connected the Battery lead to the wrong bolt. That would certainly cause the starter to run as soon as you connected the ground strap to the master ground/earth.
You may have slightly different small wires as Doug mentions, they may be mirrored to mine and I don't have spade connectors, but ALL starters of this era are basically the same. Only the bolt-up pattern and snout configuration changes from one brand to the next.
(';')
#11
10-16-2021, 01:58 PM

Veteran Member
Join Date: Jul 2012
Location: Walnut Creek, California
Posts: 6,796
Received 2,399 Likes
on
1,880 Posts
#12
10-16-2021, 02:49 PM
Veteran Member
Join Date: Mar 2014
Location: Tehama County, California, USA
Posts: 25,503
Received 9,260 Likes
on
5,410 Posts
hi again: i removed the starter. upon inspection, i noticed the male prong at the 3 o'clock position is narrower and the connection is very loose. now the male prong that is at the 1:30 clock position has a much better fit. now i'm thinking i should attach the red/white wire to the male prong at the 1:30 clock position.
In the case of spade connectors, I have found several different sizes. If you have one female that seems too big, then by all means try it on the other male especially if it seems to fit better there.
I can't speak to the proper Jaguar wire colors as mine are Green and Black, it being a Restomod of some decades back and seriously messed with.
(';')
#13
10-16-2021, 04:01 PM
Veteran Member
Join Date: Jul 2012
Location: Walnut Creek, California
Posts: 6,796
Received 2,399 Likes
on
1,880 Posts
#14
10-17-2021, 07:04 PM
#15
10-17-2021, 07:32 PM
Veteran Member
Join Date: Mar 2014
Location: Tehama County, California, USA
Posts: 25,503
Received 9,260 Likes
on
5,410 Posts
The following users liked this post:
retroren (10-18-2021)
#16
10-18-2021, 01:18 PM
Veteran Member
Join Date: Jul 2012
Location: Walnut Creek, California
Posts: 6,796
Received 2,399 Likes
on
1,880 Posts

Thread
Thread Starter
Forum
Replies
Last Post
retroren
XJ6 & XJ12 Series I, II & III
2
10-15-2021 02:19 PM
Currently Active Users Viewing This Thread: 1 (0 members and 1 guests)