When you click on links to various merchants on this site and make a purchase, this can result in this site earning a commission. Affiliate programs and affiliations include, but are not limited to, the eBay Partner Network.
Seriously, Alex, have you some sort of mechanical lock on the lift, to prevent it coming down if a 30 year old hydraulic seal fails on the lift rams, etc etc?
If not, run one up ASAP.
Last edited by Greg in France; 09-13-2019 at 04:14 AM.
As Greg says, please don't get under that car without mechanical locks. I'm sure it must have something as I can't believe it functioned previously without a strut lock or similar.
As a very polite suggestion, perhaps a leafblower is next on your list?
Maybe I'm related to Heath Robinson? although I am ashamed to say there's only one bodge on there, which would be the Hose Clip on the Low Pressure Return Hose as I hadn't got a fitting with the right thread
The Car Lift does have Mechanical Locks but these locks only come into Play, when the Car Lifter is up at its Full Height, which would give an under Car Clearance of about 5ft but with the Canopy over the Top it wont go up that far
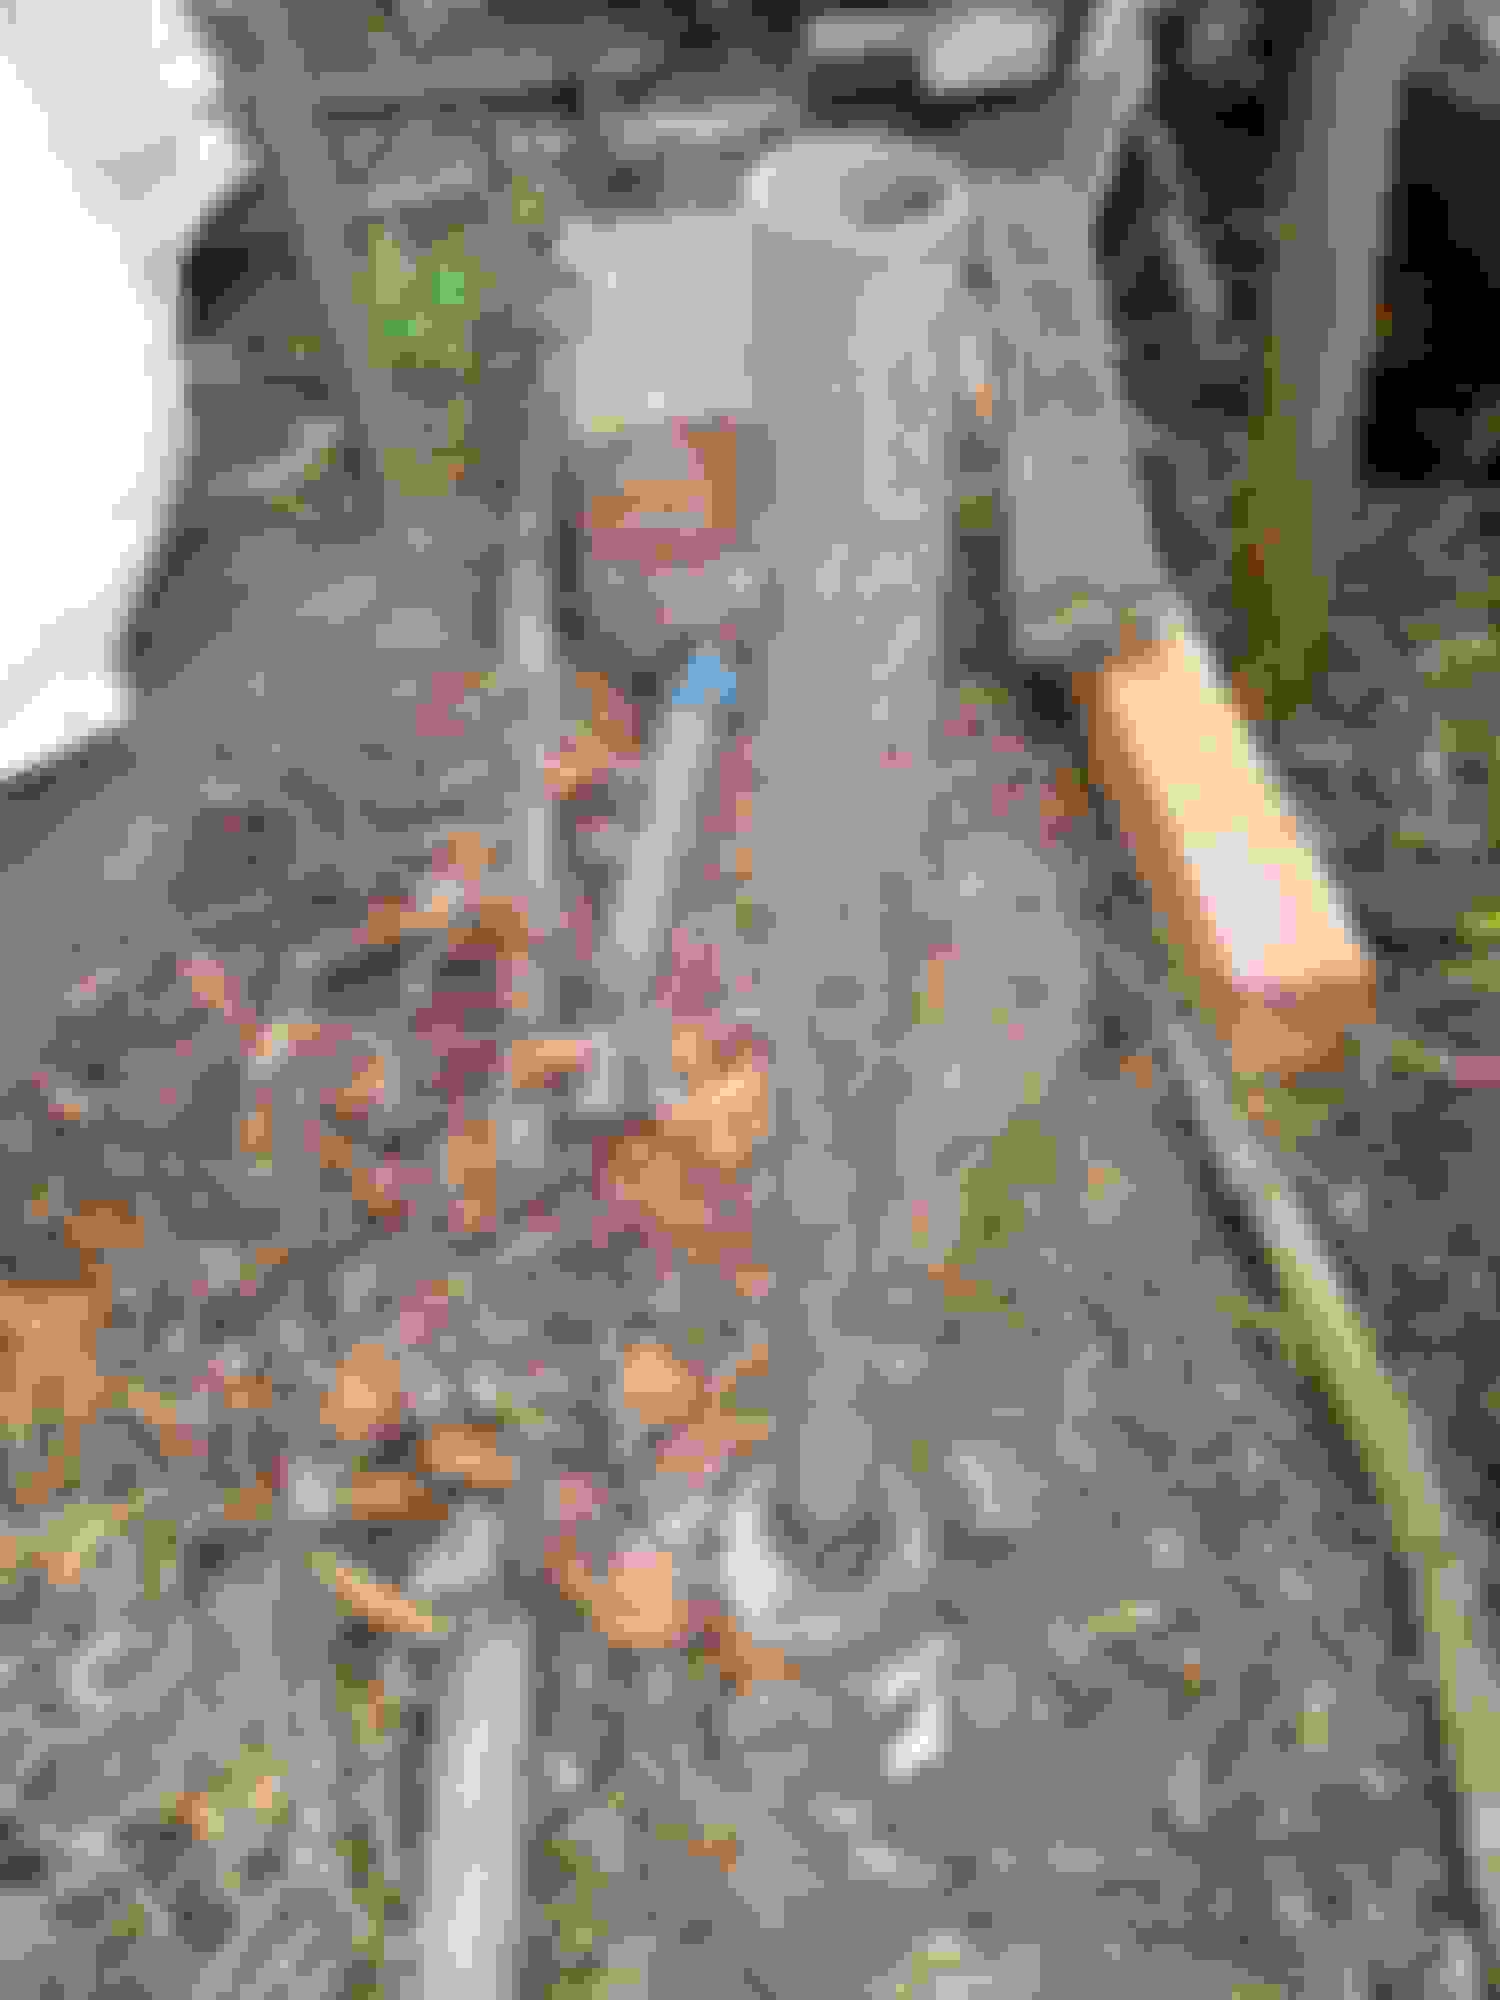
And so instead what I have done is to make 4 Pit Props, which go underneath the Running Tracks that the Car drives onto and even better these Pit Props are locked into Key Klamp Sockets, underneath the Running Track so that they can't fall out, as the means of locking them is with an Allen Key
As things stand at the moment I've got an Under Car Clearance of about 38 inches, which sure beats having to lay on your back and shimmy yourself underneath, while leaving the vital Spanner you need only just out of reach
You can just about see one of these props underneath the Runner Track on the Left of the Tape Measure
If you're bored with Watching Paint Dry, then you could try this instead, 'The Ice Princess' returning to Earth Very, Very, Slowly!
This Video was of an early Test of Lowering the Car Ramp as we didn't quite know what would happen and didn't want her plummeting to the ground but after some 'Beta Testing' She will lower down as quickly as She lifted up, without any problems
Out of all the Jobs I've been dreading, dropping the rear IRS Cage is right at the top of the list and all because of one broken Caliper Bleed Screw, as ironically everything else is looking ok
But in case I forget to mention it 'The Ice Princess' also has a Burnt out Brake Pump, which I removed to try and fix but inside it had melted and was unrepairable
So after due deliberation, I have now decided to 'Retro Fit' a Brake Booster in place of the ABS Master Cylinder Actuator, which was originally slated in to go on 'Cherry Blossom' as the Brakes on her have also Failed, though may be fixable if I Bench Bleed them, as suggested by Paul (ptjs)
Since 'The Ice Princess' has been off the road longer than 'Cherry Blossom' over 15 years! I will tell my Insurance Company all about this modification, as they always ask you to declare any modifications you may have made
Where not declaring something like that could invalidate your Insurance and so it is best to advise them about what you've done
And so depending on the Weather, both these projects could be running at the same time, though as of now The Search is on for 'Nemo'
'Nemo' being another Job I've been dreading!
Aka. Removing the 'Speedo Sensor' from the Crown Wheel and Pinion, which is inside the IRS Cage before you drop the Cage
Looking underneath the Cage, you can see the 'Speedo Sensor' with its Curly Wire Covering, held in place by a couple of Bolts which look deceptively easy to undo, the only problem being that they are Not!
As getting a Spanner anywhere near to either one of those is a real 'Nightmare'
Though what could be even worse than that is if a Miracle happened and you somehow managed to get that Sensor out and then put it back in again before you replaced the Cage, only to find that your Speedo is no longer working!
In which case you would possibly have to drop the Cage a Second Time and then start all over again OMG!
The Simple answer being: Do Not take the Sensor out, Not unless you absolutely have to, as there is a much easier way and that way is to unplug it from inside the Car
My Car being a 1990 XJS pre-facelift V12
But where the heck was that plug? (This felt like searching for 'Nemo')
In order to try and find it, you have to remove a couple of pieces of Trim inside the Boot/Trunk, which is dead easy and doesn't require any tools!
Then look underneath the Hook that holds the Spare Wheel in place and down at the bottom of this you will see a Grey Wire which goes through a Grommet to the Outside of the Car
And on the other side of that Grommet (where it exits outside the Car) this same piece of Wire has a Curly Protective Covering, which then goes into the Speedo Sensor
While back inside the Boot/Trunk you can easily follow this length of Grey Wire to its plug and then once you've unplugged it and pushed the Grommet right through, you can feed this wire out of the Car before you drop the Cage
Just one little problem!
Yes you've guessed it, It's a Jag!
Where the Grey Wire with the Plug on is tucked behind a semi rigid pipe
An interesting idea, I think you'll agree especially since that Wire has a Plug on the end!
The good news is that you can get it out with a bit of jiggling about but whatever you do, don't damage that wire as they are NLA as far as I know and so with that little problem out of the way, we can then get to work on problem Number 2.
You can see the Speedo Sensor Wire poking through that hole, that went through a Rubber Grommet to the outside of the Car before I pushed it out
Another view of that Speedo Sensor Wire
With the Trim pulled out of the way, you can see it all but where that Wire goes into a 'V' that's because it goes behind the Fuel Filler Breather Pipe, which makes it just a Tad awkward! to get out
With a little perseverance, you can get that Plug out from behind that Pipe!
Speedo Sensor now unplugged, so you can now feed the Wire and its Plug through that hole and out of the Car before you lower the Cage, without the need to remove the Speedo Sensor
Last edited by orangeblossom; 09-17-2019 at 12:46 AM.
Well done! It may not be so relevant now you've got the wire undone, but I will commit to jacking up my 4 litre at the weekend and looking at my speedo sensor for you. It may be that the 5.3 HE is different from the 4.0 but I know that I've taken the sensor out of my diff twice a few years ago and managed it without too much effort. So, I'll look at it at the weekend and let you know how I did it. I just don't remember it being too bad.
The Cage on the 4.0L may be a little bit different to the Cage on the V12 where one of the problems being that the Bolts on the V12 Sensor look so easy to undo, except the reality is that they are not, as you can't seem to get a Spanner or a Socket anywhere near them
Also like me I'm sure you have read of some of the problems encountered when trying to do this job from dropping the Cage and breaking the Wire because it wasn't unplugged to knocking out one of the 'Paint Lids' to put your hand through with a Spanner
As well as many other epic Horror Stories, of removing the Sensor to drop the Cage and then putting it back only to find that the Speedo no longer works
So better to leave the Sensor alone and not to remove it, unless you absolutely have to, like for instance to have to replace it, if that is you are lucky enough to find another one, as they are NLA as far as I know
The thought of removing that Sensor in order to drop the Cage has been my own personal Nightmare, that has kept me from doing this job but once you know where to find that Wire and where it is plugged into, then its really a 'Walk In The Park'
Then there is the Hand Brake and the Brake Pipes to contend with which could well throw up a lot of different problems of their own and so we will just have to wait and see
Last edited by orangeblossom; 09-16-2019 at 06:21 PM.
As Work Continues To Remove The IRS Cage On A Jaguar XJS V12
Its at times like this you wonder how I ever managed to work without a Car Lift, which in my view is a 'must have' piece of kit, if you need to do any serious work on your XJS such as dropping the rear Suspension Cage as I am doing now
Or should I say attempting to do, as this makes changing the Spark Plugs feel like a 'Walk in the Park' and even now I'm not sure I can do it, as this is a Fridge Full Of Bears Job, if ever there was
This is not so much a Sprint but more a Marathon, so I will be taking it just one small step at a time where hopefully I will get there in the end but having said that, I'll never know how I managed without this Car Lift, which almost turns even the worst jobs into a Joy!
'Well sort of anyway'
So when I lifted 'The Ice Princess' up in the Air today, I took every precaution to ensure she couldn't fall especially as in 'couldn't fall on me!' and so having got the weight of her supported on 'Pit Props' while also using the Car Lift itself as a back up
I also put a couple of empty Gas Cylinders underneath as well and then when I packed things up for the night, I also put a couple of empty Oil Drums underneath
While the First Job that I did today was to remove the Silencer/Muffler on the Passenger Side and so with only 3 Bolts to undo and plenty of room to Work underneath, I wondered how hard could it be!
The Answer being it wasn't just hard but much more of a 'Nightmare' than I could have ever imagined, as all 3 Bolts were really rusted solid, as well as being very awkward to get to, where being so near to the Petrol Tank using the Angle Grinder, wasn't really an option that I wanted to consider
So in the end those 3 Bolts took almost exactly 3 Hours to undo!
Then it was onto releasing the Handbrake Cable, which is still a 'Work in Progress' as the Lock Nut on the Adjuster is proving a bit of a PIA to undo and so I've left that soaking in Penetrating Oil
Where in someways it was quite a blessed relief to be called away to go Shopping but Tomorrow is another day and so I'll try again
For a bit of extra Safety I put a couple of empty gas cylinders underneath, no weight on these at the moment as they are there just in case and also come in very handy for supporting the Exhaust Pipes
Only 3 Bolts but they took 3 Hours to undo!
Those Bolts were as Rusty as Hell and one of them even snapped off but now with that 6ft long Cushion, at least I can go to Hell and Back in Comfort!
Before I packed up work for the night I also slid a couple of empty Oil Drums underneath
OB - Good work, always a pleasure watching you work. Never a dull moment. 3 bolts 3 hrs - hell that would have had me getting my angle grinder out for sure... "bang" but with some carefully placed cardboard you would have been good to go, until it caught fire and "bang"... LOL.
I like the way you (girlfriend) got your lift working, true kiwi ingenuity if you lived in NZ or ... not sure what you call it when an Aussie has a good idea, its rare and usually not!. They have Darwin awards for many that try...I love my ramps but they don't go as high as yours or even close. My question is, you need to remove the rear wheels to get the cage out... so my question is is that what the drum is for? Supporting the rear of the car?
Only asking as this will be my question one day. Or is the plan to use the jacking point on the ramps?... would be my method...
Not being a 'Snowflake' I've done the Angle Grinder thing before, until one day I realized how 'Dangerous' it was because you only need a little bit of Fuel Vapour and then 'It's Bang and Thank you and Good night!' especially as 'The Ice Princess' still has a Full Tank of Gas!
The 45 Gallon Oil Drums were just an extra overnight Safety Precaution, which I will take out of the way before I start working again
Though apart from removing the Hand Brake Cable which also looks a 'Fun Job' my next problem is going to be disconnecting the Trailing Arms, which I don't have any idea how to do!
Though apart from removing the Hand Brake Cable which also looks a 'Fun Job' my next problem is going to be disconnecting the Trailing Arms, which I don't have any idea how to do!
OB
Undo the large bolt that goes up through the middle of the large bush on the car end of the trailing arm (it should be safety wired) and loosen the safety strap's smaller bolt on the body. Take the approved watchmaker's tool number 1 (A 4 llb lump hammer) and a cold chisel. Above the bush you will just see a circular joint going round the cup welded to the body. This is the join between the cup in the bush and the cup on the body it fits over and locates on, one inside the other. Place chisel on join and hit with W.T. no.1 as hard as you possibly can. After several attempts it will pop off.
Do you do this from under the Car or from the road side of the Sill?
From under the car, wheel off the ground. Even better take the wheel off the car, otherwise it gets in the way a bit, but doable wheel on.
With your sort of ramp, I think you will need to find a way to support the car so the back wheels are not on the ramp decks, otherwise the axle cannot be removed.
If you can jack the car up (the jacks each side on the ramp decks, forward of the axle on the jacking points) then the axle will come out backwards, on its wheels, ramp now lowered, provided the car is high enough to give clearance under the boot floor.
But Stop me if you think this is a really Bad Idea, as what I was thinking of doing was to have 2 X 45 Gallon Oil Drums on either side of the Car Lift. then Lift the Car to just above the height of the Oil Drums and slide a couple of long 4 X 4 inch Timbers underneath the Front and Rear Jacking Points of the Sills
With Holes drilled in for the Jacking Point Pegs
At this Stage the Car is Level and Stays Level throughout the process, as the Cage is then unbolted with the Wheels Still on and then Sat on the Deck Runners, where the Car Lift is then used to Lower the Cage to the Ground, while leaving the Car Suspended on the 4 X 4 Timbers
Then once the Cage has been Lowered and Rolled off the Deck Runners on its Wheels, The Car Lift can then be raised again to collect the Car and lower it down, either that or else leave it Suspended up in the Air
I think that is a great idea. Leave the car in the air. BUT, are the drums strong enough? Maybe a bit of scaffolding tube next to each one under the wood, just for safety.
Sounds good, but you want to try a straight edge across the car at the jacking points as they might not be the lowest points and you don't want to crush exhaust or other pipes etc.
As a result of checking that the Barrel idea won't work, as like you say the Exhaust System could get Crushed
The only way it could work, as far as I can see is if you can support the Weight of an XJS on Two Barrels, with one under the Front Beam and the other one at the back behind the Cage and then drag the IRS out from the side
Not sure if I really want to Roll the dice on that, as if the Barrel collapses 'its game over!'
OB
Fabricate high-level axle stands, or, fabricate a wooden cross-beam with bolted on higher bits each side, (a very wide U in effect) so the exhaust is in thee bottom of the U.
By the way, you could unbolt the exhaust from the downpipes anyway, and this will help, of not actually solve the problem.
As Work Continues To Remove The IRS Cage On A Jaguar XJS V12
Removing The Hand Brake Cable
"I Kept Wishing That Michael Caine Had Turned Up To Blow The Blinking Doors Off"
My next job was to remove the Hand Brake Cable, I mean how hard can it be?
A lot depends upon the State of your Hand Brake Adjuster but first you've got to find it! as its squirrelled away just behind the drivers seat of the Car, where its completely hidden from view under the Side Carpet, where its also let into the Sill
When you eventually manage to find it, this consists of a Threaded Rod with an Adjuster Nut together with a Lock-nut, which you had better hope and pray hasn't gone Rusty, or you could be there for some time!
And in case I forget to mention it, they are not the easiest nuts in the World to get to, as you can only turn them about one face at a time as you really need to slacken this cable off as much as you are able
One thing to watch out for, Is To In No Way Be Tempted To Pull On The Hand BrakeLever just to see how much slack you are making in the Cable as you undo the Adjuster, because in doing so you will pull up the Slack with the Hand Brake Lever but you won't be able to release it!
'Not with out a lot of messing about' Because its a 'Fly Off Handbrake' which needs to be under some Tension before you push the Button and then drop the Hand Brake Lever down, so before you even think about Slackening off the Hand Brake Adjuster, Take off the Hand Brake and do not touch it again!
Except of course in my case there was just one little problem (make that quite a Big one!) as I couldn't open the door of the Car, which was up on the Car Lift and chocked into position with some extra Safety 'Pit Props' as well as a couple of Barrels underneath!
The Window of the Car was in the Way, as it was catching a Pole on the side of the Canopy that the Car was under
So all I had to do was drop the Window to open the Door then I'd be 'Good To Go!'
Who put that Pole there! "If only Michael Caine had turned up to Blow the blinking doors off" (The Italian Job)
Never mind all I've got to do, is to drop the Window and then I can open the Door (Yay!)
Except I'd taken the Battery off, as I wouldn't be using the Car for a While but then as the Boot/Trunk was now up so high on the Car Lift, I had to get out some Tower Scaffolding to reach it
Don't Look down! (and by the way that isn't Rust) I had to use Tower Scaffolding to put the Battery back, which believe it or not was easier than lowering the Car Lifter, because of all the Safety 'Pit Props' that I'd put underneath
Once I'd got the Window down, then I could open the door to Slacken Off the Cable Adjuster
Anyway 2 Hours Later!.................
I was finally underneath the Car, unsuccessfully Struggling to undo the Spring that keeps Tension on the Cable and this is a Total PIA to even try and do, unless you get lucky and somehow manage to unhook it, as its one of those jobs where you need 3 pairs of hands, or even 4!
All you have to do is to unhook that little Spring to release the Tension which is maybe not as easy as it looks!
Anyway 3 Hours Later! I still hadn't got it undone!
Which was when I suddenly realized you don't have to OMG!
I was able to pull the Cable out without releasing the Spring! (I didn't use the pliers you see in the Photo) instead I used a long pair of smooth jawed ones, which kept falling down while I was taking the Photo, so these lock ones are just for illustration obvs!
After I had released the end as in the Previous Photo, then I just pulled the Brass Sleeve out of that Holder 'Thingy' with the Slot in and 6 Hours Later 'Bang the Job was done!'
As Work Continues To Remove The IRS Cage On A Jaguar XJS V12
Having disconnected the 'Speedo Sensor' and 'The Handbrake Cable' it was time to Jack her up and take the Wheels off, so following up some advice from 'Greg' I got a long lenght of 4 X 4 Timber then put it under the Rear Jacking Points from one side of my Car Lift to the other
Although before I let the Car down, I cut some more pieces of 4 X 4 Timber in which I drilled some holes to accommodate the Jacking Points, so that it raised the rear end of the Car an extra 4 ins off the ground, so that the Exhaust Pipes wouldn't get crushed
With those extra Blocks of Wood in place just under the Jacking Points and on to of my Full Width Span of 4 X 4 Timber, I was able to take the Wheels off and then rest the Car on the Timber Blocks so that it did not Crush the Exhaust Pipes
Once that job was out of the way and taking every precaution that the Car couldn't fall, even if the Car Lift decided to fail, the next job on the list was to undo the 8 Bolts that Secure the Cage to the Chassis
How hard can it be?
Not exactly difficult but 'Awks' is a word that comes to mind, as whenever time allows I like to Waxoyl the under side of the Car at least once a Year and while its easy to put on, its quite hard to get off especially round the Bolts I was undoing, so it was a bit of a Struggle to get a Spanner to fit
And so I had to scrape all the Waxoyl off around from these Bolt Heads with a sharp Screw driver, which was a bit of a PIA to have to do on the side I couldn't see but eventually we got these and all the Bolts that you see in the Photo are only finger tight and ready to come out
And then of course 'Rain Stopped Play' complete with Thunder and Lightning but if it ever stops raining, then the next job will be to either disconnect the Prop-shaft or else try and hammer off the 'Trailing Arms'
As a Self Confessed 'Shopaholic' and Self Styled 'Bargain Hunter' There is nothing I love better than trawling round the Charity/Thrift Shops on a Saturday Morning in Search of a Bargain or Two
But not today (or should that be yesterday Saturday September 28th) oh No! because after a spell of Bad Weather, that has returned today, the Sun is actually Shining and was also feeling Hot
So I don't want to go Shopping, as all I want to do, is to get on with dropping the IRS Cage on the Jag but since the GF had been so helpful in sorting out the
Hydraulic Pipes on the Hiab and has since been promoted to the position of 'Muse'
I simply had to ask myself how could I refuse, as that was a problem that I couldn't solve by myself (or at least that was what I told her!) and in case I forget to mention it, She also loves Shopping as well
Where under the circumstances, it seemed to be a Case of there never being a better time than now, so off we went
And a very good job we did, as we struck Gold!
Which Started with a dig in the ribs from the GF er...I mean my 'Muse'
"The Box"
What Box?
"That Box over there!"
What Box over where?
"That one, that one with Jump Leads written on the side, look they're only �8 and could come in handy if we breakdown in our XJS"
I think that She meant my XJS! but we can have a talk about that later
But as of now we had a problem, because as these Jump Leads were Brand New and still sealed in their Box, the Shop Assistant did not want to open it so we could see inside and some Jump Leads are rubbish, as I'm sure that many of you know
So now the only Question, was should we take a punt on a Set of Jump Leads that we couldn't even see before we bought them but this box was very heavy and so I thought that I would 'Roll the Dice' where the way it worked out I was so glad that I did
As when we got home and opened it, I really just could not believe my eyes, as these Jump Leads were Top of the Range and 18ft Long! and when we checked the Website that was on the Safety Instructions inside
The Retail Price was �68-19p OMG!
18ft Long Jump Leads! I've never seen a pair of leads as long as these before, so my Gut instinct in buying these for only �8 did not let me down
But it didn't end there, as in another Charity/Thrift Shop, I came across a Film Camera for �5 which was really all it was worth, as not too many people seem to use these Film Cameras these days and that includes myself
As with the advent of Digital, unless you have a thing about Film Cameras then why would you? and I was almost tempted to leave it on the Shelf, were it not for the fact it was fitted with a somewhat more expensive Canon Lens!
Which was a Canon USM f1.4 5.6 Ultrasonic which was the same fitting as my Canon 700D which was better than the Lens that was on there already and this New Lens has now been fitted on my Canon now
Old Canon Film Camera only �5 but it did have a very nice Lens which has since been fitted to my Canon 700D
Not a bad little Lens for a Fiver! that came with a Shoulder Strap and a Camera Bag!
 09-13-2019, 01:35 AM