When you click on links to various merchants on this site and make a purchase, this can result in this site earning a commission. Affiliate programs and affiliations include, but are not limited to, the eBay Partner Network.
As Work Continues To Remove The IRS Cage On An XJS V12
'If I Had A Hammer'
Having no choice but to drop the Cage of the IRS on 'The Ice Princess' my XJS V12 having loosened all the Bolts I got to the part I was dreading! which was to take off the Trailing Arms by using a Hammer and Chisel as well as other various types of pry bars
Although many others have done it this way and had complete success, I just so Paranoid of doing any damage to either the Car or the Trailing Arms, I started thinking that maybe there was another way
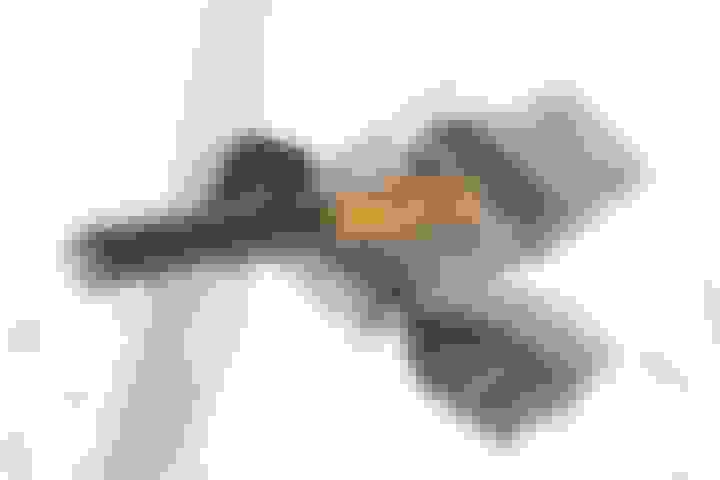
And came up with the idea of using a 'Slide Hammer'
Since this would have to be 'Modded' there wasn't any sense in buying one, so decided that I would make one from scratch, out of various odds and ends that were laying around the House
Starting with an Old Saw Bench that I had broken up for a Welding Table that had just the piece of Rod I needed to make the 'Slide Bar'
'Can you tell what it is yet?'
The Rod to make the Slide Bar of the Hammer, which by way of a bonus was already bent to shape!
The First Job was to Cut a Notch which would sit on the Rim of the Trailing Arm near to the Pin
In order to get the best possible fit, I filed a shallow indent on the end of the Rod to fit round the Circular inner ring of the Trailing Arm
For the Hammer I used an Anchor Fairlead that came off an Old Boat
Where now all that I had to do was to slide on the Hammer and then Weld a Nut on the end to keep it in place
Slide Hammer completed and ready to go, that only took about an hour to make
Pushing the Hook of the Slide Hammer through the Rubber Doughnut of the Trailing Arm
Once the Hook of the Slide Hammer has been 'Jiggled' through the hole in Rubber Doughnut of the Trailing Arm which involves a bit of twisting and turning from various angles, the Hook is Finally Twisted Round until it sits on the Inner Rim of the Trailing Arm up against the Peg
Just a couple of 'Zonks' with the Slide Hammer and the Trailing Arm was off, without any damage!
Job done and the Trailing Arms were off!
'You can just see the Snapped Off Bolt through the hole in the Trailing Arm'
The only problem encountered, was when I was undoing one of the Bolts that Bolt the big end of the Trailing Arm onto its Peg, it would only undo half way before it got too tight to turn
So with the Aid of an Impact Wrench, I tightened and un-tightened, this Bolt multiple times in order that I could try and free it off but as it didn't loosen up I tried a 3ft Breaker Bar which then snapped the Bolt off, so once the Cage is out the way I'll have to drill it out
Which I will also have to do with the Broken Caliper Bleed Nipple
Although the Slide Hammer works so well that I am almost looking forward to dropping the IRS Cage on my Car 'Cherry Blossom' which also needs New Rotors as does 'The Ice Princess'
As Work Continues To Remove The IRS Cage On An XJS V12
'Nearly There!'
'Just Tidying Up The Loose Ends'
The Weather Conditions haven't been ideal to say the least as its been Raining almost every day, so not exactly the ideal job to be starting at the onset of Winter but at least we've had a few nice days in which I could get on
But now I'm very nearly there and very close to actually taking the Cage out!
So what do I think of it so far, how hard has it been?
Well I can hardly believe I'm saying this as originally I had this down as a PIA Job
Though on reflection its 'Really A Walk In The Park'
Where the hardest part is getting over the Mental Block of thinking you can't do it
As after all it must be hard, as if you gave this Job to a 'Shop' it could cost you at least 2 Grand! and maybe as much as �500 to get as far as I have now
And so today it was more of a question of tying up the loose ends on one or two jobs I've deliberately left until last
The First one being undoing the last 2 Bolts on the Propshaft, which I've left 'finger tight' for quick removal when the time comes
Undoing the last 2 bolts on the Propshaft
After undoing the Propshaft Bolts, I took out the 'Wheel Speed Sensors'
'Removing The Wheel Speed Sensors'
'Don't lose that Black Sealing Ring'
'As I couldn't undo the Cable Clamps I decided to cut them off and remove them later
'The Reluctor Wheel in the Hub Carrier'
'Blocking Off the Hole of the Hub Carrier to keep the dirt out during IRS Cage Removal'
That was just about it for the time being, where the very last job would be to either undo or else cut off the rear Flexy Brake Pipe, as there will probably never be a better time to get this done than now
But as there was some daylight left, I thought I would make up a couple of Axle Stands, which could come in handy when it comes to dropping the Cage, which I made from Scrap that was lying around
Nothing fancy just a piece of Tube and a Piece of Channel
Now onto the Base Plate, for which I used an Old Rotor
Looking a bit Grotty but I'll soon clean that up!
That looks a bit better those flapwheel discs are epic!
Take one worn out Rotor and a Magnetic Parts Dish
Place the Parts Dish inside the Old Rotor
Turn the Rotor upside down with the Magnetic Parts Dish still inside and then providing you've cut the Tube off Straight, the Magnet will hold the Pipe up Straight while you Weld it
Which is a Job I'm leaving until Tomorrow, as its starting to get a bit dark and this is a Job I'd rather do in daylight as welding round a Tube like that isn't very easy at the best of times
As Work Continues To Remove The IRS Cage On An XJS V12
'The Hardest Job So Far'
Well so far this Job's been easier than I ever imagined but if I start to hit any snags, then they will be included to help anyone else who is faced with the daunting prospect of having to do this job
So here are Two of those I found today, which while they seemed to be something of a 'non event' they took quite a long time to sort out starting with the Flexy Rear Brake Hose, which one way or another did have to come off
As you can see, the Flexy Brake Pipe on the Rear has got the 'Rust Bug' where trying to remove it in such a confined space could have done more damage than waiting until the Cage had been removed and so I decided to cut it and sort it out later
Which was a little bit easier said than done!
As in the position that it was in, the cutters wouldn't cut it and I couldn't even get a sharp knife near it, which would have been quite risky as I couldn't really see what I was doing
So I decided to go with the 'Nuclear Option'
Just the Job for Cutting the Brake Hose, all except for one small problem!
In the position the Brake Hose was in, I couldn't managed to get it inside the jaws, as it was one of those jobs where you need 3 pairs of hands but eventually solved the problem, by using one hand and my knee to keep the Tree Loppers open, while pulling the Brake Hose into the Jaws with a Hook
They look like a Specialized Tool of some kind and though I'm not sure what they're for, they were just perfect for pulling the Brake Hose down into the Jaws of the Tree Lopper (Another 'Yard Sale' find that's come in useful)
Cutting the Rear Flexy Brake Hose with the Tree Loppers
The next problem encountered was removing the Rear Exhaust/Muffler the first one came out easy a few days ago but this other one just didn't want to move and though I was tempted to leave it, until I got the Cage out I had a feeling this might cause an even bigger problem later on
Where completely by accident, I came across one of the reasons they are so hard to remove, where to overcome this you have to slide the Flange down the multiple bends of the Pipe and out of the Cage as far as you can, in order to try and prevent it from getting jammed up
Its not a 'Magic Bullet' but it certainly does help and so I eventually managed to remove the Exhaust/Muffler which is a PIA Job, at the best of times
Sliding the Flange down certainly helps when trying to remove the Exhaust/Muffler
Finally after what seemed like for ever I managed to get the Exhaust Pipe/Muffler out from under the Car!
Now all the Bits and Bobs are done and dusted, the only thing left to do is take out the Cage and although I've got a few ideas, I haven't yet decided on the best way to go, so we shall see
As Work Continues To Remove The IRS Cage On An XJS V12
'Hold The Front Page-Let's Not Drop The Cage'
At Least For The Moment!
As I wanted to try and remove the Rotors in a way I thought a Shop might do it but without the massive Price Tag of �500-�1,000
Which would only really involve dropping the Rear Wishbones, pulling out the Drive Shafts and then removing the Rotors
Where even the thought of doing that really filled me with dread but then how hard could it be?
The Answer to that Surprised me, as this is so simple that even your 'Granny' could do it and has to be one of the easiest jobs that I have ever had to do on my XJS
'Breeze' doesn't even describe this, it's almost a non-event! or at least it would have been, were it not for the 'rust bug' that we have in the UK where removing the Bolts that hold on the Rotors, is going to need as strong Spanner as well as a FBH
But in the event that you're doing this where rust does not exist, then it could almost certainly be a bit of 'A Walk In The Park' providing you have something to lift your Car up high, as if you are able to do so then the rest is easy or at least it should be
As all you really have to do, is to start by removing the Plate that is under the Diff, which is held on by a few nuts and Bolts, which apart from 4 of them are Captive
Then while supporting the Wishbone Arm, undo the Nut on the end of the Shaft that goes the Springs and pull it out, which is very easy as all you do is slide it through
The Diff Cover Plate Comes Off Easy, its only held on by 4 Nuts and Bolts and some others that are Captive
This Shaft Slides Through The Wishbone Arm As Well As The Springs (just undo a nut and pull it out)
Bolt Removed From The Shaft That Goes Through The 'Wishbone And The 'Hub Carrier' Ready To Be Pulled Through
The Shaft Now Being Slid Out 'But Mind Your Fingers' And Lower It Down, as once you pull that Shaft out, the 'Wishbone' will drop like a Stone
The Hole on the Left was for the Shaft that Held the Hub Carrier to the 'Wishbone Arm'
The Hole on the Right was for the Shaft that Held the 'Springs' to the 'Wishbone Arm'
You need to be a bit Careful and mind your Fingers here, as once you pull that pin out, the 'Wishbone Arm' will swing down, which will also include the 'Trailing Arm' if you haven't already taken it off
Next to come off is that Rubber Cup that is held in place by a Jubilee Clip and then Slid down the 'Drive Shaft' out of the way
It was going all so well, until I hit the Buffers with the 'Rust Bug' on those Nuts, which are the only thing holding the 'Drive Shaft' and the 'Rotors' to the 'Diff'
Maybe not quite so easy as something like Checking the Oil!
Although in the Scheme of things, if it were not for the Rust Bug, then this could be a very easy job and though the Cage still has to come out, I wanted to try it this way for Fun just to see the way a Shop might do it
Good work, but I'm slightly confused on one point:
If the shocks are disconnected, can't you just disconnect the wishbone at the disc end and pivot it down at the hub end without disconnecting the hub attachment to the wishbone?
OB
Those nuts are an absolute sod after a few years in the English salt and rain. You MUST use a single hex socket on them, as if they round off you are in deep trouble. When I did my rear brakes I needed a very long breaker bar to get them moving (at the time I did not have the electric rattle gun you told me to get) and they resisted to the last thread turn. They also needed a long extension on the socket to get enough space to turn the bar. I suggest a good soak in The Mixture, followed by the rattle gun treatment. The nuts are metlocs and you must use new ones on reassembly. I also retapped the threads on the flange studs when it was all apart, they are a UNF thread, which greatly helps reassembly and getting the correct torque. After that, and I really strongly advise this, once the nuts are torqued up (not before) coat the exposed threads with copperease, and then slide a short length of rubber or plastic tube so that it is a real tight push to get it on them, over the exposed threads. This treatment means next time it will be far easier.
+1 on all those comments on the output shaft bolts.
I thought whoever had been in there before must have crossed the threads as they resisted strongly until the last very turn. I also didn't have a rattle gun when I took them off.. so long bar was the order of the day.
I would also go slowly when undoing these nuts as I am sure (but could be completely wrong!!) that a contributory factor/reason that sheared off the trailing arm bolt was because I undid it too quickly and the heat generated by the resistance weakened the bolt and made it snap off.
To be absolutely honest I don't know, although I did consider pulling the Pin at the 'Diff' end or even taking the 'Wishbone Arm' off altogether, which I still might end up doing anyway
But doing it the way I did seemed to work better for me, as once dropped down then the Arm completely cleared the inside edge of the Car Lift and was also well out of the way
The Cage was always going to have to come out because of that Broken Bleed Nipple in the Rear Caliper, so I honestly did this just for Fun and just as a bit of an exercise, as this is the way I thought a 'Shop' might do it, as I really couldn't imagine them taking the Cage out, as their First Option
If we were in a 'Rust Free' Zone then I'm sure we would be 'laughing Sandbags' but as we don't we would have fallen into the hands of a 'Shop' who charging by the Hour as they do, would have been wetting their Pencils and writing out a Bill for a couple of Grand
Although the Cage is not out yet, everything's disconnected and the very last bolts to come out are only finger tight, so its only the Bad Weather that has really been holding me up but Yesterday was better and I was able to do a bit more 'quite a lot more in fact'
And while I may be getting ahead of myself and could go 360 on this, taking the Cage out has been up to now a very unexpected 'Walk in The Park' where the Scary bit for me was taking off the Trailing Arms, as I didn't want to Hammer them and end up ripping the Peg out of the Sill
Which could possibly happen on a Car with Rusty Sills
But having made that Slide Hammer with a Hook on the end, because the Downward Shock Force, is exactly where you need it on the Rim of Trailing Arm right next to the Peg, they practically fell off with a couple of taps and so there's nothing hard about this job so far
As really the only problem, is getting over the Mental Block that this looks such a very big and complicated job, that there isn't any way that I could possibly do it and in this case I'm doing it all on my own without any Mates to help me, because they try and cut corners and get in the way
All I need is the GF to keep me supplied with Sandwiches and Endless Cups of Tea!
In conclusion if you're doing this Job, the only thing I can say, is that its a whole lot easier than some of those YouTube Videos make it look and this is coming from a 'Non Mechanic' who had almost never lifted a Spanner before I joined this Forum
So if I can do this, then anybody can!
Except the Biggest Problem is surely going to be undoing those 4 very rusty Nuts on the Drive Shaft!
Last edited by orangeblossom; 10-16-2019 at 04:00 AM.
I've not undone those nuts on an inboard disc car (yet!) but everyone I know who's done it says they are a pain. Maybe make up some "cups" of plasticine to put under the nuts and let them soak in penetrating fluid for a day. Greg has mentioned the necessity of using an extension bar. I also know a few people who used a number of extension bars so that they stood outside the wheel and could then use a breaker bar easier from that position. And maybe a bit of loosen, tighten, loosen a bit more, tighten routine might help as well to break the corrosion seal.
At my end, the white spirit approach to my rear cage has proved incredibly messy and I've achieved very little apart from covering my clothes and the floor in black sticky mess. So, I'm just about to try this morning with a small hand-held steam-cleaner and see if that can soften the underseal easier. Horrible, horrible task!
OB
About sheering the studs: I thought I might when I undid mine, but they did not sheer, and I could only just turn the socket using a long lever. So i suspect the studs are made of very strong steel and all will be well. The rattle gun with an extension long enough to get the thing useable, would do it I believe, with far, far less chance of damaging the studs. I have sheered/had to cut front brake calliper bolts, but since you gave me the rattle gun tip, out they come like gangbusters!
Unless you're going the 'Concourse' route, then I don't think I would bother to make that sort of work for myself, although I'd probably whip her down to the local Steam Cleaners in order to give her an under body Wash �5-�10
A normal chrome vanadium extension will be fine, OB, just use one long enough to comfortably get the gun aligned OK. You can also turn the diff flange to get the best position for each nut.
 10-05-2019, 05:57 PM