When you click on links to various merchants on this site and make a purchase, this can result in this site earning a commission. Affiliate programs and affiliations include, but are not limited to, the eBay Partner Network.
Your Shocks and or your Set Up might be different to mine but the Cage Set Up on both my Cars is exactly the same with a Single Bolt going through the Shock and its Holding Bracket and then a Flat Washer and Locknut on the outside of the Cage (done up in the way that 'Greg' describes)
The Link Above is the Cage Rebuild on '50 Shades' My Grey XJS just in case you may want to compare the difference on Rebuilding the Cage on 'Orange Blossom'
At Last It Has Stopped Raining So Time To Get On With The Job!
The GF was right I was being a 'Wimp' working in the pouring Rain is no different to taking a Shower (apparently!) so Rain or no Rain it was time to really get stuck in, which was not as much fun as it sounds
But as soon as I picked up the Spanners, 'The Jaguar Gods' decided to come to the rescue and the Rain just stopped as quickly as it started and so there was no time to lose before it was time for yet another Cold Shower!
Yass! very nearly there now and only needs a couple of tweeks before I wire up the Calipers and put the New Brake Pads in
The Filler Plug for the Diff will not come undone! As following Pauls (ptjs) advice 'Never Drain The Diff Unless You Can Get The Filler Plug Undone'
Guess What! I cannot get the Filler Plug in the Diff Cover undone!
Not even with the Rattle Gun!
Even though I haven't given it too much of that, in case it breaks the Diff Cover and I really don't want to have to take the Diff Cover off if I don't have to just in case it doesn't go back as Oil Tight as it is now
Plan 'A' Keep going with the Rattle Gun and hope the Cover doesn't Shatter
Plan 'B' The Safer Option: Drain and Refill it through the Drain Plug, as I've got to turn the Diff Upside Down at some Stage
Any ideas!
Even the Rattle Gun won't undo the Diff Drain Plug
Question has to be is it easier to resolve now or back in the car - could you live with it ? - what happens if you want to check the level ? - sure you can invert it and install the specified quantity now but it is kind of hard to tip the car over - consider yourself lucky you have a drain - I don't (Dana).
Not all rattle guns are born equal too ... I have one air and one battery each capable of well over 1000nm torque, not sure what yours is capable of. Whilst I know you've come so far and it is tempting to continue the path I'd be applying a bit of heat and trying to shock it loose - it may come out with the threads of course but this is less likely with impact than a scaffold pole - combine heat on the cover with a freeze spray on the plug and a decent penetrant (which is not WD40). Worst case if you can't shift it and if it were me I'd be pulling the cover back off to work on it in a more affable environment - like the lounge - sure the GF would love that.
I think personally that this is one of those things that has to be functional.
My Mains Powered Rattle Gun would probably undo it if I put a shorter extension bar on it, so I guess I'll have to roll the dice and risk breaking the Cover
Hard to believe its so hard to undo with all that Oil inside just sloshing about inside
GF is Ok about Spare Parts around the House, we even had a great big Coffee Table where the round Glass Top used to sit on 3 XJS Wheels
Yes
OB, a shorter extension, or a long socket and none at all, will be far better. It is surprising how much of the shock effect is lost on longer ones. Either way, it has to be undone.
OB
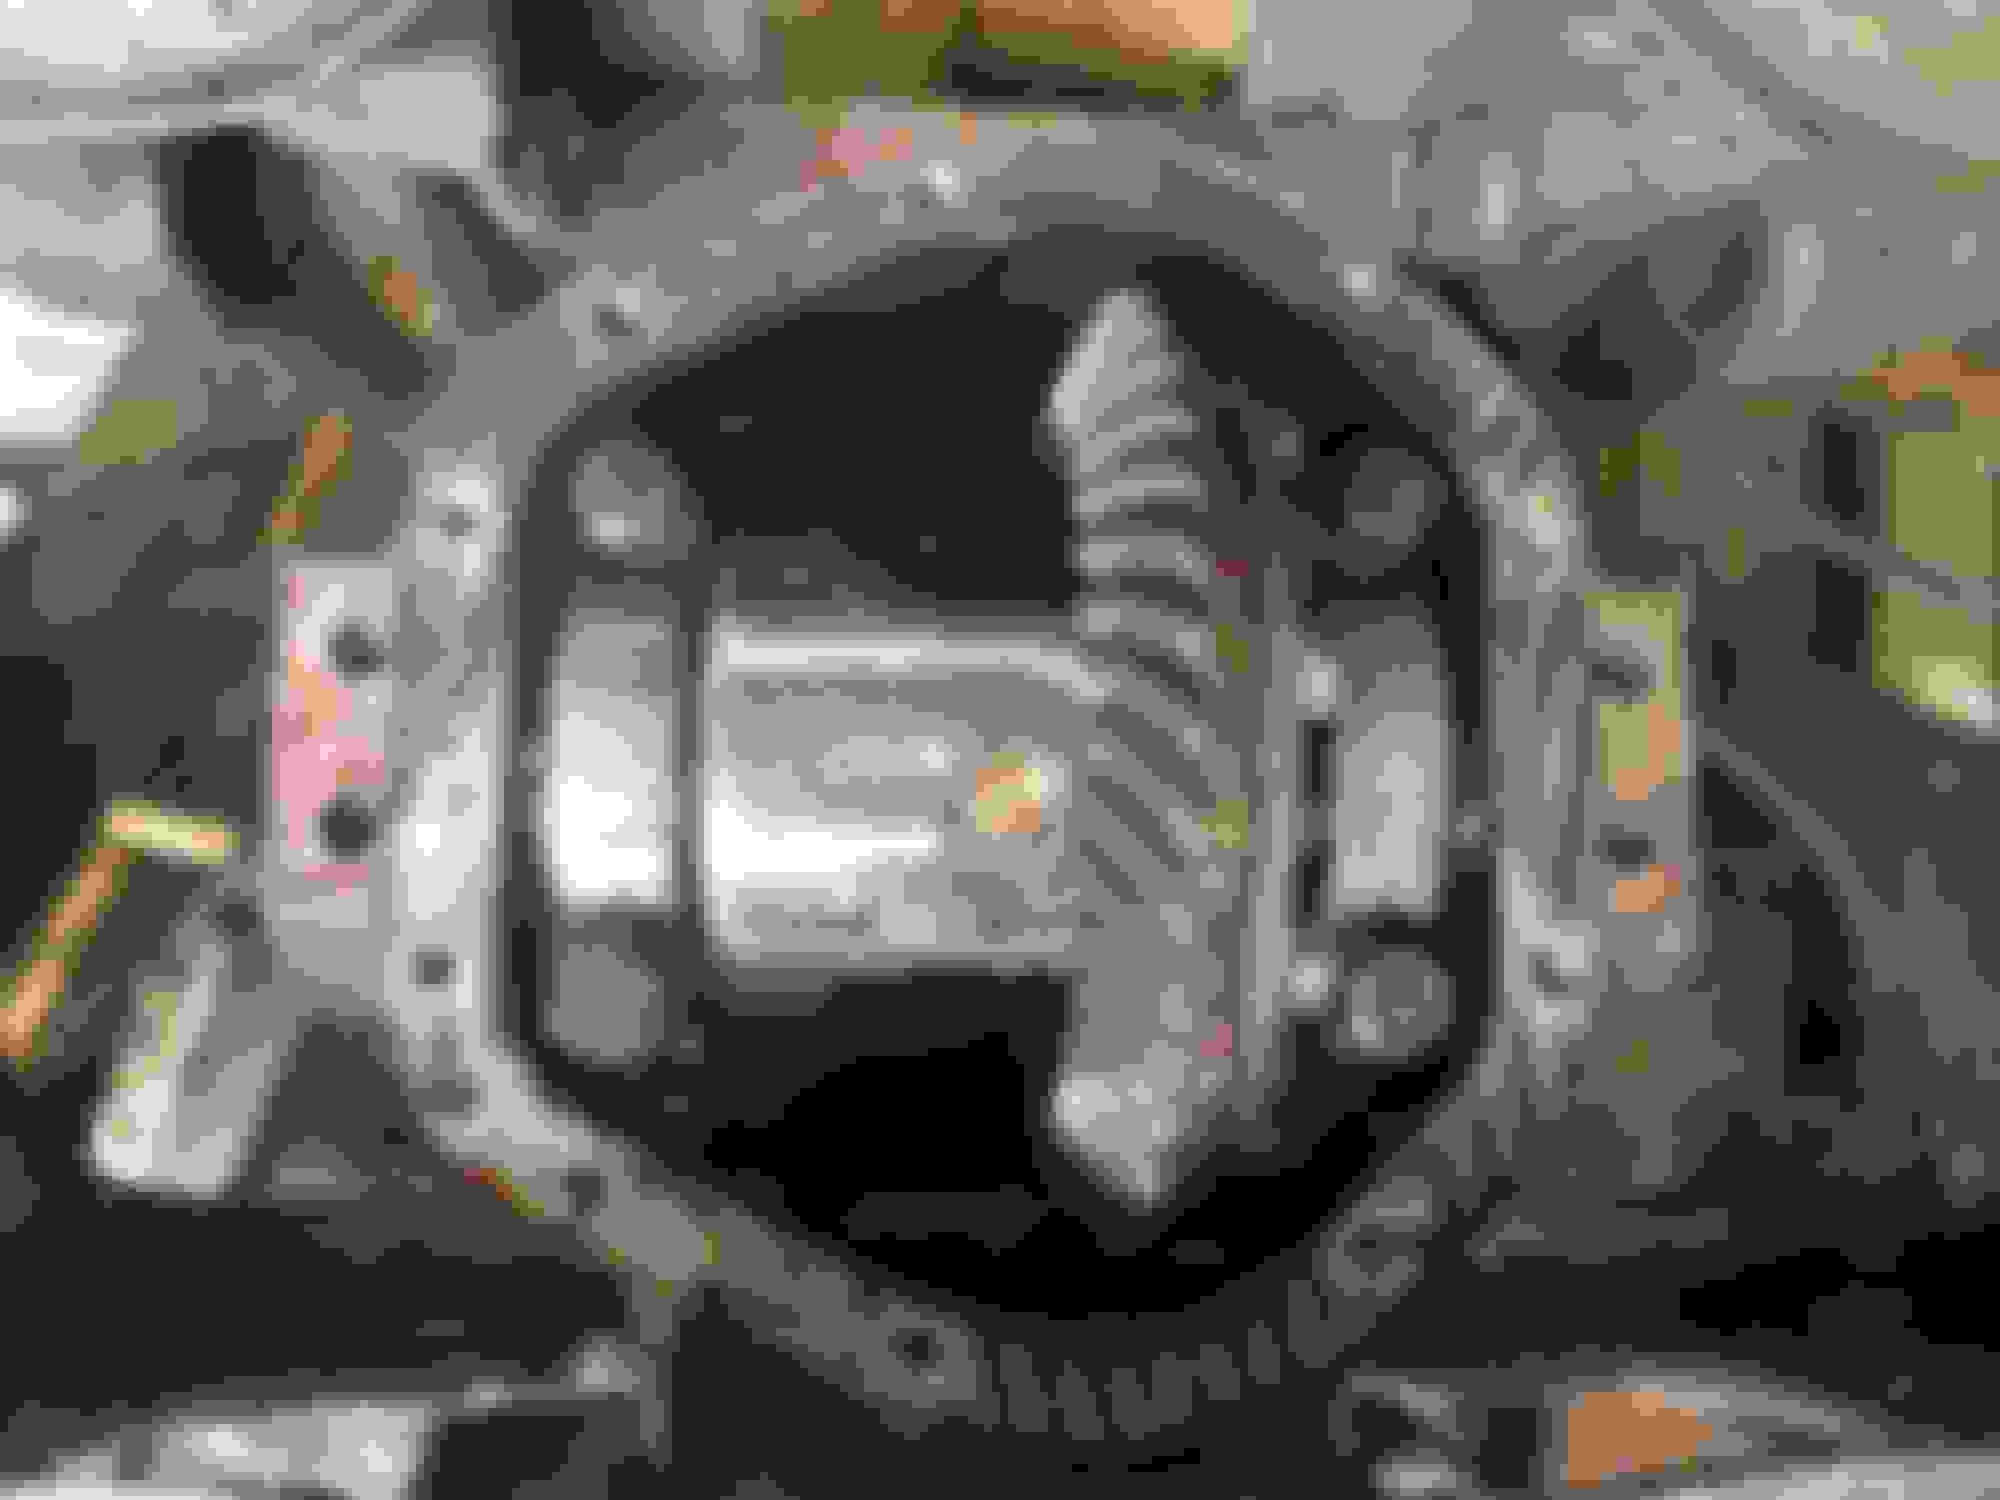
When I removed the faulty LSD unit from my DANA diff, one of huge bolts holding the LSD unit bearing caps in place (see the four bolts in this photo) did not want to come undone. It undoubtedly had been locked up by the vibrations from the faulty unit. Your famous mains powered rattle gun (your advice to buy it I am eternally grateful for) with an short extension just would not move it, even at full power for 15 second bursts.
So I took off the extension and gave it the works, and I reckon about after 7 seconds, off it came. I calculated it must have needed over 200 ft/llbs of torque to shift it!
Yesterday was perfect, with lots of lovely Sun instead of Rain and so for once I was able to make some real progress at last, apart from a 'glitch' where Filler Plug wouldn't unscrew from the 'Diff' and so I had to take the 'Brave Pills' and give it the 'Rattle Gun' treatment while hoping and praying it didn't strip the threads!
Thankfully the Filler Plug decided to play ball and then decided to unscrew without any damage at all, where by way of a Bonus, the 'Diff' was reassuringly full to the brim with Oil, although I am going to change it 'Just Because'
So next or maybe before that I decided to Torque the Rotors to the recommended 55ft lbs and though some go a bit more than that 55lbs just felt right, as I didn't want to cross the line and risk the possibility of having the Threads strip out, or something like that
Torquing up the Rotors did feel a little bit Scary, as if I were to Strip the Threads then it would be 'Game Over' but all was ok!
Having done that the next job was to re-fit the Calipers which I had just rebuilt with New Pistons and saved a Shedload of money in the process of doing that, which is nowhere near as difficult as it looks, once of course you have acquired 'The Knack' which I seem to think I sort of have (ish!)
The Calipers went on easy with no problem whatsoever! (and that makes a change!)
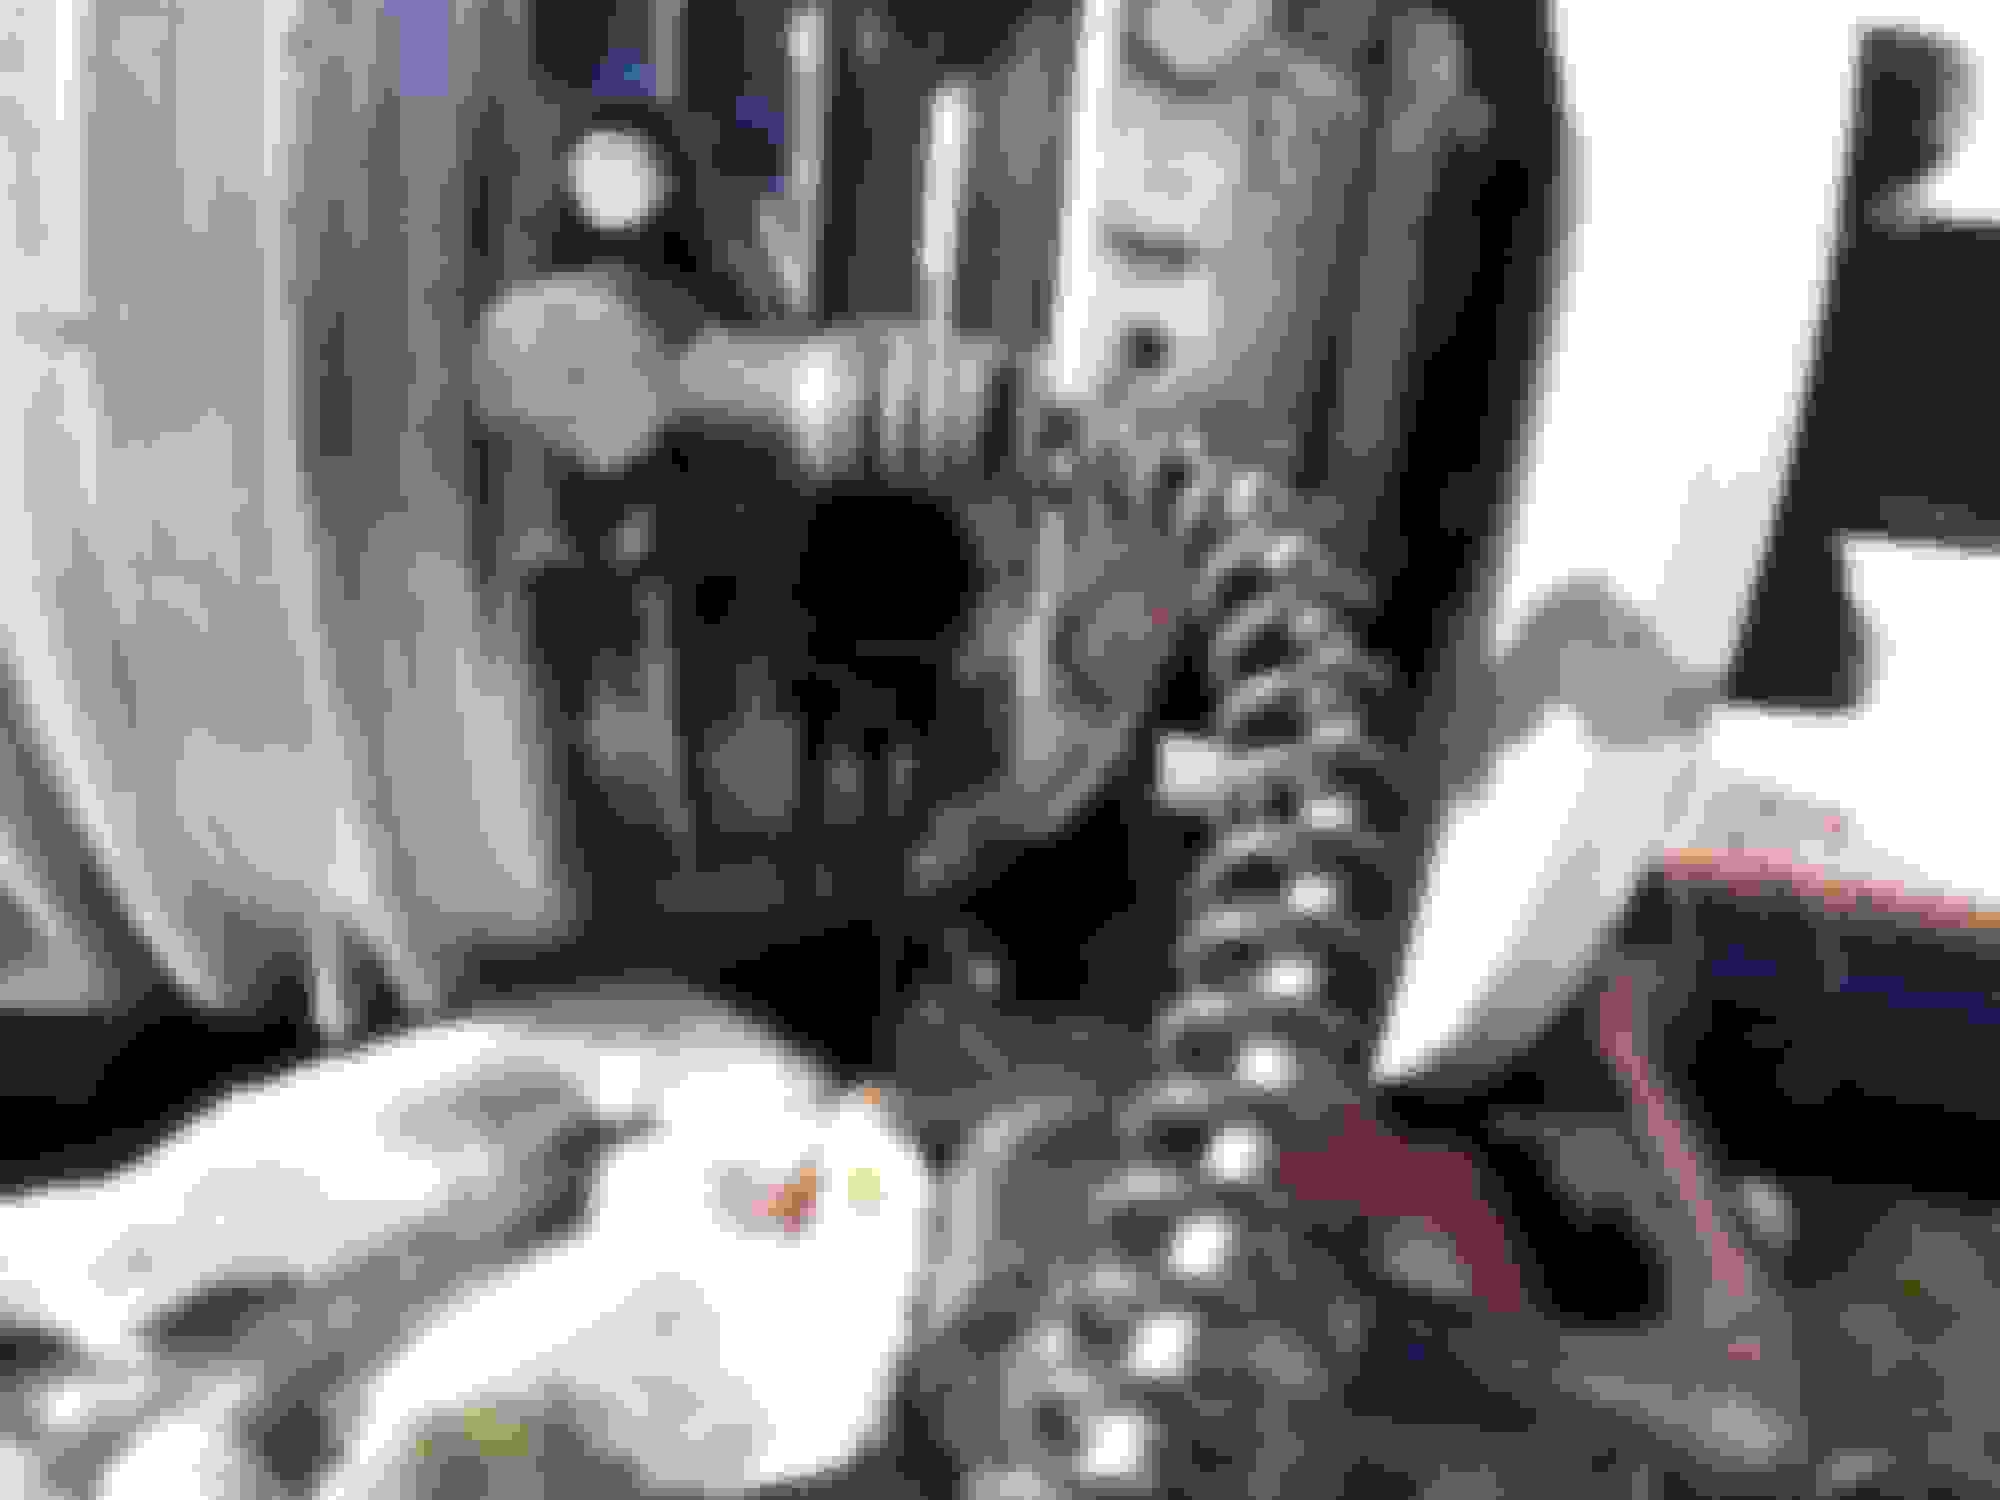
Having done that and done them up Tight (but not 'Stupid Tight' as 'Grant' would say) it was time to put the lock wire on and in this respect I was inspired by a method used by Paul (ptjs) and this too also did an excellent job
Starting with the Lower Caliper Bolt, I threaded the Stainless Steel Lockwire through the pre-drilled holes
And Then,,,,,,,,,,,,,
And Then I got a Flat Wooden Drill Bit and threaded the Stainless Steel Lock Wire in opposite directions through the pre-drilled hole in the Bit that was already there, which was a slight variation on Pauls (ptjs) great idea, as when he did this he used a Wooden Dowel, which I unbelievably didn't have!
Which meant that I had to improvise 'as you do' and it all worked out well
I won't claim that its Perfect but it was plenty good enough to satisfy the OCD in me!
Nice OB - looking good, no mucking around....your progress gives me some things to do...
I have used Loctite on the caliper bolts but I might wire them as well, piece of mind.
What are you going to use to seal up your diff drain plug?
I used white plumbing tape last time and it leaked....I have tried a white Loctite thread sealant used on pipe work this time.
Can you get the cage over the hand brake calipers?
I tried the cage yesterday and it was tight without - rubbing on the discs and back of the diff cover.
Though I'm not in a rush and it takes as long as it takes, the main thing is to do your best to try and get it right so you don't have to go and re-visit this job for quite some time to come
In my own opinion Locktite on the Caliper Bolts is a not a good Idea!
As the Spring Washers and Lockwire should be more than enough as if you have to change the Caliper on my Diff anyway, it should be easy enough to do so without dropping the Cage and also it occurred to me that if I had to Change the Hand Brake Pads which I have Modified (more on that later)
Then it might be easier to remove the Caliper with or without the Handbrake Mechanism Still attached and though I haven't tried that yet I think it may be possible to do it that way but if you have used Locktite on the Caliper Bolts, then that could be a massive problem in store for the future
As if you need to undo them you could easily round off the Heads of those Caliper Bolts as even at the best of times they can be quite hard to undo and then you could have a really major problem on your hands, where removing the Cage again could be the least of your worries!
As for the Diff Plug I'll probably use Copper Grease or maybe PTFE as its on a Taper, so will not be expecting it to unscrew itself anytime soon
Congratulations on a very nice job!
One of the Best I've seen
Alex
Last edited by orangeblossom; 10-06-2021 at 04:00 PM.
The Handbrake design on an XJS leaves a lot to be desired and especially so when I comes to the Handbrake 'Brake Pads' that seem to very little in the way of bonding to their backing Pads
Where not for the First Time, I've had the Brake Pads ripped away from their mountings, during the Annual MOT Test on 'The Rolling Road' and subjected to the kind of Torque that I doubt they were designed to handle
As for me I've never used the Handbrake on any Automatic Car that I have ever owned, as I just leave it in Park although I need the Handbrake Working not only to lower the Soft Top but as already mentioned to Pass the Annual MOT Inspection
So whether the Brake Pads get ripped off or not, is really down to the 'Luck Of The Jaguar Gods'
Or at least it used to be till 'Greg' came up with a Plan, which was to Custom Make some more durable Brake Pads out of the kind of Material that might be used for putting the Brakes on a Rotor
Where after experimentation, I made some XJS Handbrake Pads by cutting some out of the Footbrake Brake Pads out of a Merc 190e which also happens to be my Daily Driver, where I always have another set of Spare ones standing by, as I change them every year regardless
Unlike the poorly bonded XJS Handbrake Pads on the Right the Merc 190e Footbrake Pads are Plug Bonded all the way through and don't require too much in the way of a modification to get them to Fit the Handbrake of an XJS
I started by Cutting the Pad in half down the groove that was already there, which was enough to make a pair of XJS Handbrake Pads
Merc 190e Brake Pad cut straight down the middle
Width wise it seemed perfect and so all I really needed to do was chop a bit off each end to square it up
Just got to Chop a bit off the Top and the Bottom
Then I used the Bench Grinder in order to get the Perfect Fit for the XJS Handbrake
Just a Couple of Chops with a Cutting Wheel in the Angle Grinder and that part of the job was done
Using the Bench Grinder the Heavy Duty Backing Plate of the Merc 190e Footbrake Pads gave me a perfect fit
Drilling a Pilot Hole right through the Brake Pad and the Backing Pad
Having done that I Countersunk a Hole for the Fixing Bolt and also drilled the Fixing Hole in the Handbrake to Take a 10mm Bolt which only required a clearance hole of about 1/2mm as the existing Hole was just a Fraction too small
The existing hole was only a fraction too small and only required a clearance drill to get this much bigger bolt in
Just for a comparison you can see how much bigger the 10mm Bolt is to the Original Fixing Bolt underneath
Job done! Heavy Duty Brake Pads Custom Made from Footbrake Pads (As per 'Gregs' Suggestion) you can make these out of any Pads as long as they are well bonded to their Backing Plates but as I had some spare Pads for a Merc 190e that were almost the right size I decided to use those
Except that I was overcome with a strange desire to build a better Mouse Trap, which in this case took the form of Modifying some Jaguar Handbrake Pads, where although I was using pattern Parts were of the Original OEM design
The only problem being that the OEM design, has a problem standing up to the Torque of the Rolling Road that takes place every year during her annual UK MOT Test as apart from using it to operate the Soft Top, I never use the Handbrake for anything else, as I always prefer to leave her in Park
So just for Fun I bought myself a set of Handbrake Pads to experiment on
OEM design Handbrake Pad
On more than one occasion, the Rolling Road Torque Forces have literally ripped the Handbrake Pads off their Backing Plates and so I decided to do a little Mod
Refill Printer Cartridge Syringe
JB Weld
Using the Printer Refill Syringe I filled it up with JB Weld and Injected it into the Handbrake Pad to Bond the Friction Material to the Backing Plate
Having done that I also filled the Slot with JB Weld then let it Cure for a couple of days and then Sanded it off
Sanding excess JB Weld off the Backing Plates
Pilot Hole right through the Handbrake Pad already for drilling out
Drilling a Hole the same size as Head of a much bigger bolt that with replace the OEM one
Checking the Depth of the Bolt Hole with a Gauge
Test Fitting the Bolt into its now recessed hole
Bolt dropped into the Recessed Hole
Having Bonded the Backing Plate to the Brake Pad, I used JB Weld to Bond The Bolt into the Brake Pad Hole and then level it off
The JD Weld will be left to Cure before any surplus is Sanded off and the piece of Paper is only there just to make sure the Brake Pad doesn't decide to glue itself to the Handbrake Mechanism before the Paper is removed and finally tightened up
 10-02-2021, 11:38 AM