Cherry Blossom - Restoration 1990 XJS V12
#1601
 01-15-2018, 11:07 PM

Veteran Member
Hey OB,
Did you replace the NBR seals between the actuator unit and the control unit? As your brake actAutor is out, it is worth doing it. They are just a standard size (metric) and ready available...
I've got to order some yet. As my Shabuar XJ8 now should need less of my rare money, I can hope fully mobe back to the XJ-S.
Last edited by Daim; 01-16-2018 at 11:14 AM.
The following users liked this post:
orangeblossom (01-16-2018)
#1602
01-16-2018, 06:37 AM


#1603
01-16-2018, 11:11 AM
Veteran Member
Google 'NBR' (that is the material) in combination with the diameters (mine are in the garage, packed away and it is currently -3�C, bit cold) but the NBR rings are available in any size you can ever think of. Don't worry about the thickness. Go a little thicker than you have, they will be compressed and seal tighter... Not kidding.
PS: before buying, read through the list of what fluids it can tolerate. NBR isn't always NBR. SOME can withstand brake fluid (hydraulic fluid) others can't. HNBR is even better but costs a few bob more.
Last edited by Daim; 01-16-2018 at 11:15 AM.
The following users liked this post:
orangeblossom (01-16-2018)
#1604
01-16-2018, 12:56 PM
Hi Daim
Cheers!
Nice find, I've got a Micrometer to measure them and found a firm that sells every type you can think of
But what is so weird is that all the Jag Parts Suppliers that I have come across are listing these as NLA
When there are 'Shedloads' available from 'O' ring Manufacturers
Cheers!
Nice find, I've got a Micrometer to measure them and found a firm that sells every type you can think of
But what is so weird is that all the Jag Parts Suppliers that I have come across are listing these as NLA
When there are 'Shedloads' available from 'O' ring Manufacturers
#1605
01-16-2018, 07:16 PM
Packing Up The Calipers For 'The Ice Princess'
Packing up the Old Calipers for 'The Ice Princess' to send off for rebuilding
Where the only reason for the delay was in not having a Strong enough Box to Post them
Except that today when I went to get some Anti Splatter Spray for my Mig which the GF's Father gifted me
I also found the perfect Box in the Dumpster of this Car Accessory Shop which they said I could have
And so tonight we have been busy packing them up although unusually I haven't got a price yet
The ones I got for 'Cherry' my Red XJS were New! for which I only paid �100
So if I can get anywhere near that then I will be happy enough with the Rebuilt ones

Packing up the Calipers off 'The Ice Princess' to be Rebuilt
and managed to find a Box just the right size!

I hope they come back a bit better looking than this

Lucky I had lots of Bubble Wrap

Bubble Wrapped and ready to go in the Box

The Box was just the right size and very Strong

Topped up the Box from the Shredder

Topped off the Packing with Foam
These were the 'New Calipers' I put on 'Cherry Blossom'
Packing up the Old Calipers for 'The Ice Princess' to send off for rebuilding
Where the only reason for the delay was in not having a Strong enough Box to Post them
Except that today when I went to get some Anti Splatter Spray for my Mig which the GF's Father gifted me
I also found the perfect Box in the Dumpster of this Car Accessory Shop which they said I could have
And so tonight we have been busy packing them up although unusually I haven't got a price yet
The ones I got for 'Cherry' my Red XJS were New! for which I only paid �100
So if I can get anywhere near that then I will be happy enough with the Rebuilt ones

Packing up the Calipers off 'The Ice Princess' to be Rebuilt
and managed to find a Box just the right size!

I hope they come back a bit better looking than this

Lucky I had lots of Bubble Wrap

Bubble Wrapped and ready to go in the Box

The Box was just the right size and very Strong

Topped up the Box from the Shredder

Topped off the Packing with Foam

These were the 'New Calipers' I put on 'Cherry Blossom'
Last edited by orangeblossom; 01-16-2018 at 09:08 PM.
The following users liked this post:
Greg in France (02-16-2018)
#1606
01-17-2018, 02:15 AM
Veteran Member
The following users liked this post:
orangeblossom (01-17-2018)
#1607
01-17-2018, 06:20 PM
#1608
01-17-2018, 06:31 PM
Cleaning The Brake Reservoir On 'The Ice Princess'
The Weather hasn't been the best for making meaningful progress so a few days ago I cleaned out the 'Brake Reservoir'
This was a full on clean inside and out and has since been in the Airing Cupboard thoroughly drying out

Cleaning the 'Goo' off the outside of the 'Brake Reservoir'

Getting there! She looks much Cleaner now

Looking almost like new and now drying off inside our Airing Cupboard
The following users liked this post:
Greg in France (01-18-2018)
#1609
01-17-2018, 10:31 PM
Veteran Member
Definately. There are people who like being challenged to find the parts. I don't. I want to type the part into Google and get it on the spot...
The following users liked this post:
orangeblossom (01-18-2018)
#1610
01-25-2018, 07:30 PM
Refitting The Master Cylinder Actuator
To 'The Ice Princess'
The last time I drove 'The Ice Princess' which was too long ago to remember
I was sailing along in 'The Sunshine' with hardly a care in the World until that is I had to jam the Brakes on
When someone pulled out of a side road right in front of me!
As far as Braking is concerned an XJS can stop much quicker than most people think and really give those 'tailgater's' a scare
Except to day I felt my Car could well be trying to kill me because at the moment I hit the Brakes Hard
She suddenly took a sharp dive to the 'Right' and tried to ****** the Wheel out of my hand
So I just eased off the Foot-brake and got her back under control
'Having been there more than once' I instantly knew what was wrong
The possible cause was either a blockage in one of the Valves in the Valve Block of 'The Master Cylinder Actuator'
Or else a broken ribbon in it's Valve Block
At which point a 'Big Shout Out' to Forum Member 'Dave Dental' who showed me what to do and how to fix it
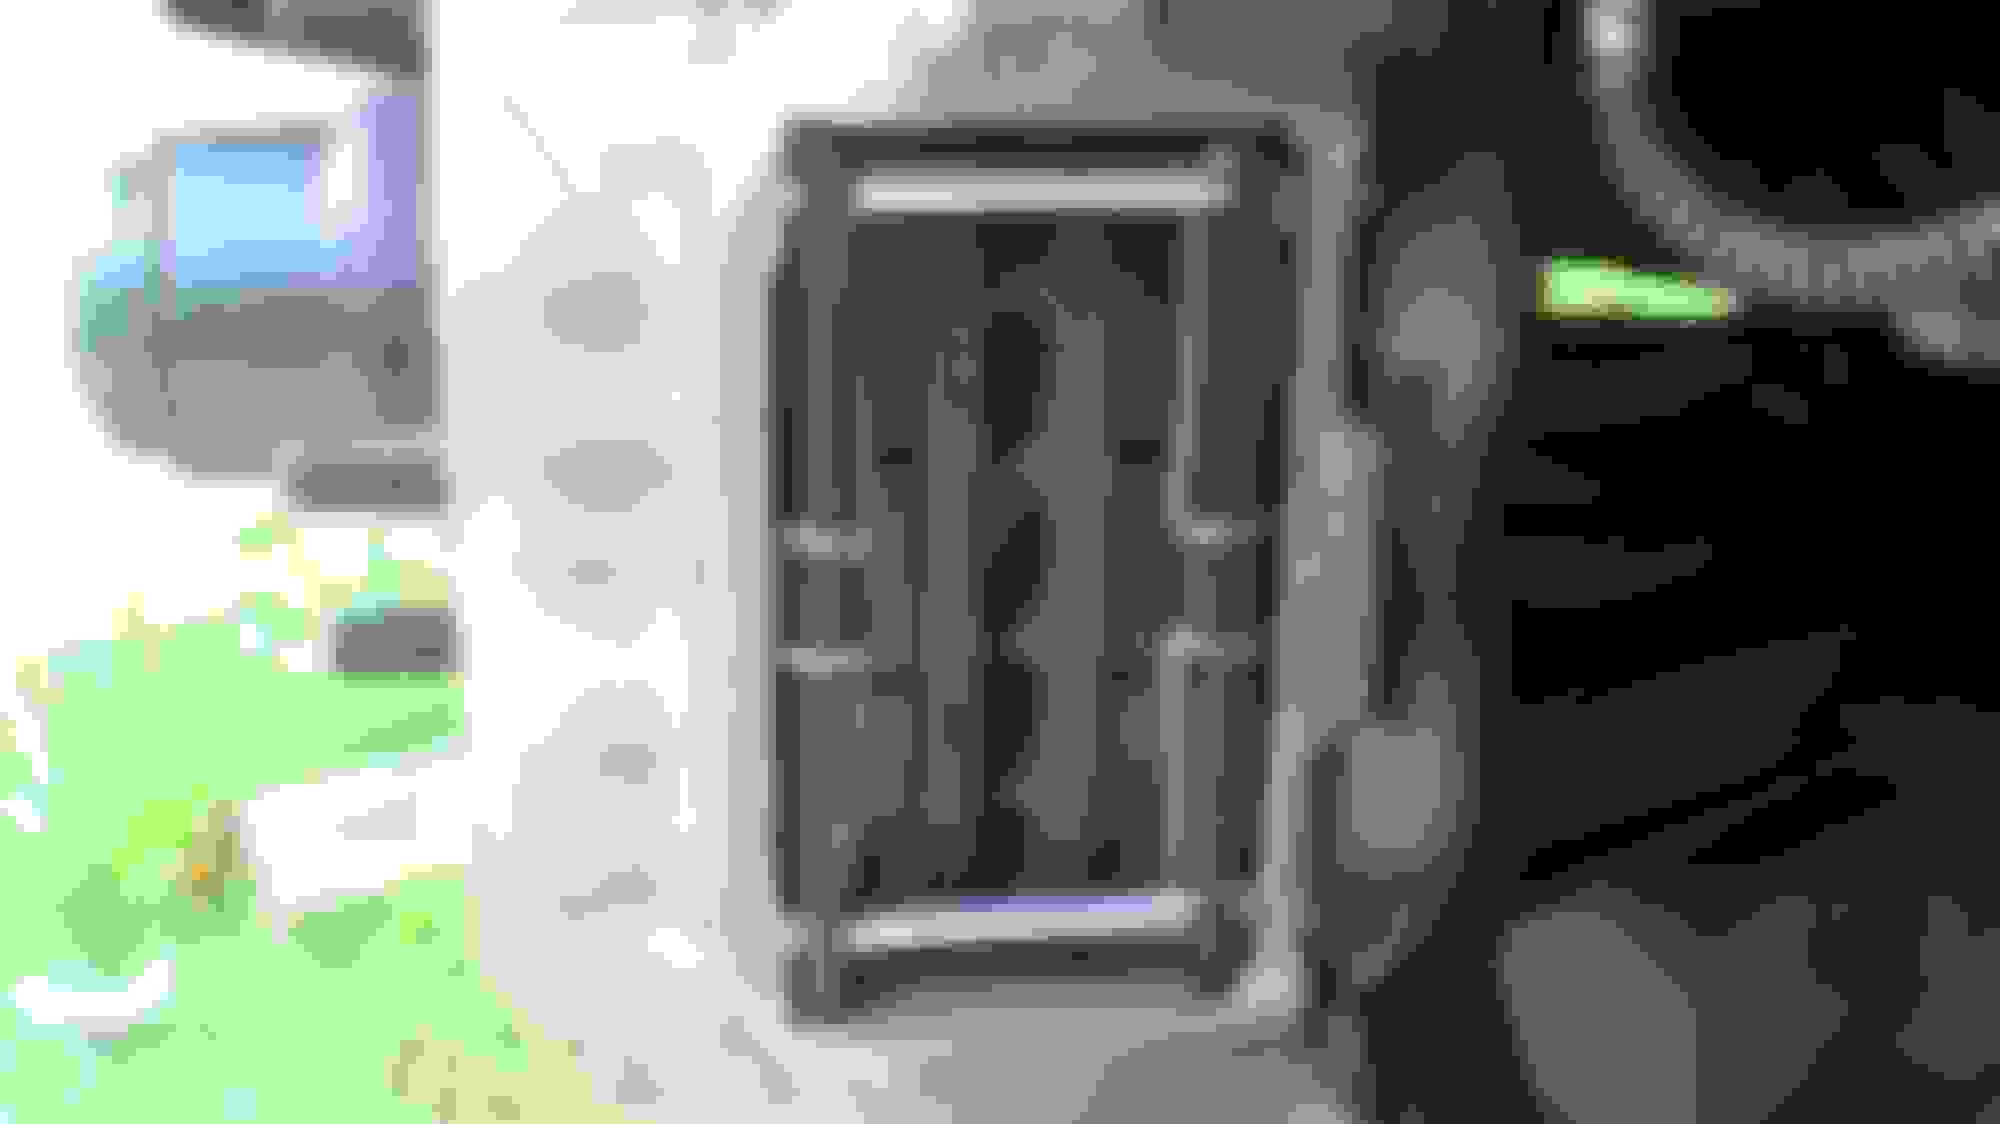
Providing the Valves in the Valve Block look in good condition and not red with rust like this one in this Photo

The Valves in this Valve Block of the Brake Master Cylinder Actuator
have gone red with rust

Something tells me this Valve 'may' be beyond repair
This rust was almost certainly caused by not changing the 'Brake Fluid' on a regular Basis
Repairing it is a fairly simple process and though it can't be guaranteed the success rate seems to be quite high
So after making a diagram of what wire goes where then you can carefully take the Valves out
And remove their little gauze filter with a pin or small screwdriver
And have them cleaned in an Ultrasonic Cleaner and preferable an industrial one
As used by Dentists or Jewelers as some of the DIY ones are not quite up to the job
Then once having done so rewire it with High Temp Silicon Wire
If you are not Trained in Soldering then don't do this yourself
Instead take it along to your Radio Shop and let them do it for you which shouldn't cost you more than $25-$50
Just don't lose the 'O' rings or the little rubber strip that goes inside underneath the electric plug

Don't lose these 'O' rings if you need to reuse them
'I think that 'Daim' may know a place where you can get some new ones that are square cut and made of special material
Then when it comes back from rewiring give it a Test with a Battery
So you can hear all the Valves 'Clicking'
Which is also a test that you can do before you take 'The Brake Master Cylinder Actuator' out of the Car or do a 'bench test' when you have
Where then providing it all Checks out then you can put it back in the Car
Just be Very Careful NOT to Spill Brake Fluid on the Paint Work as other wise it will Strip the Paint in an instant
So Cover all Exposed Paint Work including the Engine Bay
Because to all intents and purposes it's going to make a mess
So have lots of Rag and Water Handy to mop up any spills
Refitting 'The Brake Master Cylinder Actuator'
Is a fairly easy job which can all be done from Inside the Bonnet/Hood so no real need to stand on your head underneath the Dashboard
Just make sure when refitting it that you don't go and Break the 'Brake Light Switch'

Fitting 'The Brake Master Cylinder Actuator' in 'The Ice Princess'
Fitting it is an easy job that can all be done from underneath the Bonnet/Hood
To 'The Ice Princess'
The last time I drove 'The Ice Princess' which was too long ago to remember
I was sailing along in 'The Sunshine' with hardly a care in the World until that is I had to jam the Brakes on
When someone pulled out of a side road right in front of me!
As far as Braking is concerned an XJS can stop much quicker than most people think and really give those 'tailgater's' a scare
Except to day I felt my Car could well be trying to kill me because at the moment I hit the Brakes Hard
She suddenly took a sharp dive to the 'Right' and tried to ****** the Wheel out of my hand
So I just eased off the Foot-brake and got her back under control
'Having been there more than once' I instantly knew what was wrong
The possible cause was either a blockage in one of the Valves in the Valve Block of 'The Master Cylinder Actuator'
Or else a broken ribbon in it's Valve Block
At which point a 'Big Shout Out' to Forum Member 'Dave Dental' who showed me what to do and how to fix it
Providing the Valves in the Valve Block look in good condition and not red with rust like this one in this Photo

The Valves in this Valve Block of the Brake Master Cylinder Actuator
have gone red with rust

Something tells me this Valve 'may' be beyond repair
This rust was almost certainly caused by not changing the 'Brake Fluid' on a regular Basis
Repairing it is a fairly simple process and though it can't be guaranteed the success rate seems to be quite high
So after making a diagram of what wire goes where then you can carefully take the Valves out
And remove their little gauze filter with a pin or small screwdriver
And have them cleaned in an Ultrasonic Cleaner and preferable an industrial one
As used by Dentists or Jewelers as some of the DIY ones are not quite up to the job
Then once having done so rewire it with High Temp Silicon Wire
If you are not Trained in Soldering then don't do this yourself
Instead take it along to your Radio Shop and let them do it for you which shouldn't cost you more than $25-$50
Just don't lose the 'O' rings or the little rubber strip that goes inside underneath the electric plug

Don't lose these 'O' rings if you need to reuse them
'I think that 'Daim' may know a place where you can get some new ones that are square cut and made of special material
Then when it comes back from rewiring give it a Test with a Battery
So you can hear all the Valves 'Clicking'
Which is also a test that you can do before you take 'The Brake Master Cylinder Actuator' out of the Car or do a 'bench test' when you have
Where then providing it all Checks out then you can put it back in the Car
Just be Very Careful NOT to Spill Brake Fluid on the Paint Work as other wise it will Strip the Paint in an instant
So Cover all Exposed Paint Work including the Engine Bay
Because to all intents and purposes it's going to make a mess
So have lots of Rag and Water Handy to mop up any spills
Refitting 'The Brake Master Cylinder Actuator'
Is a fairly easy job which can all be done from Inside the Bonnet/Hood so no real need to stand on your head underneath the Dashboard
Just make sure when refitting it that you don't go and Break the 'Brake Light Switch'

Fitting 'The Brake Master Cylinder Actuator' in 'The Ice Princess'
Fitting it is an easy job that can all be done from underneath the Bonnet/Hood
Last edited by orangeblossom; 01-25-2018 at 07:34 PM.
The following users liked this post:
Greg in France (01-26-2018)
#1611
02-15-2018, 05:35 PM
The Curse Of The In-Tank Fuel Pump Strikes Again!
Just when I was thinking that it was 'safe to go back in the Water'
The Curse of the In-Tank Fuel Pump Strikes Again!
As if I haven't already got enough to do with getting 'The Ice Princess' back on the road
The Fuel Pump has gone on 'Hot Choco' My 1995 4.0L Morocco Red Celebration Convertible
She is a real Stunner in Morocco Red with Cream Connelly Hide with FMDSH and on 25,000 Miles on the Clock
So first of all apologies for the Photo as I bought this Car so long ago that multi mega pixels
Were the stuff that dreams were made of so I didn't really take that many Photos

Sorry about the poor Photo but at the time I took it Multi Megapixels were no more than a Pipedream
And about as much of a 'Pipedream' as ever getting my hands on this Wonderful Car
To say that I got lucky was a bit of an understatement as in the ad in the paper She was described as an XJS
With almost nothing in the way of description having been bought as a Firms Car
With no mention of her being a Celebration Model which was certainly not reflected in the price
As basically She was advertised as being open to offers so I had to go along and take a look
She was sitting in the Car Park looking suitably drop dead gorgeous in a 'Love at first sight' sort of way
Where the people who were selling her didn't seem to have much they could tell me and as such indicated
To take a look and 'Make of her what I will' and then make them an offer if I was interested
'Let me think about that for a Second'
Course I was!
As I slowly walked towards her the Sun Shone off the Gold Badge on the Bonnet
Like a blinding Flash from an Arc Welder
OMG!
I never saw that coming!
Could this be a 'Celebration Model'?
At which point I felt my Heart Stop Beating when I saw the Wood and Leather Steering Wheel
Harmon Kardon Stereo and Embossed Leather Seats
I'd already seen enough in just 20 Seconds
To have me knowing this Car would be mine and so I headed straight back to their Office
Where my opening gambit was to make what I considered to be a low offer
And where to my amazement they said Yes!
On a Car on which I'd never heard the engine run or even taken her out for a Test Drive!
On reflection I was bonkers but sometimes 'you just know!'
And so I handed them 'The Plastic' and they handed me the Keys and off we went!
Make no mistake this Car was Amazing! and almost too good to take on the road
But sadly not my Favorite Car as that accolade has to be bestowed on my V12
Consequently I very seldom took 'Hot Choco' out where after a Year of Ownership the Fuel Pump packed up
And since this was an 'In-Tank Pump' putting in a New one was 'The Job From Hell'
To a Non Mechanic with very little experience of working on Cars like myself
As you have to pull the Tank out far enough to do the job which is hidden behind a Steel Baffle
Having first disconnected the Fuel lines which are up inside the IRS Cage in a very awkward place to get to
Its was certainly not 'a walk in the Park' to put in a new pump
As well as being something that I didn't ever really want to do again
Except when I went to Start her today She didn't want to know and having gone through all the Tests
It turns out that the Fuel Pump is on the 'blink' again and needs replacing
Certainly not my Favorite Job but no surprise that some Shops
Can charge �500 plus the parts if you want them to this for you
But since I won't let a Garage go anywhere near my Car
As soon as the Weather gets better
Then I will do it myself
Last edited by orangeblossom; 02-15-2018 at 05:38 PM.
The following users liked this post:
Greg in France (02-16-2018)
#1612
02-16-2018, 02:39 AM

Veteran Member
OB
Have you tried connecting the pump direct to a 12 volt source? If that new pump has not had much use, it might just need a wakeup? Even maybe a loom or relay problem. Of course the fuel may have gelled too, if it is old, in which case the tank coming out and a full blow though of the fuel system is called for!
Have you tried connecting the pump direct to a 12 volt source? If that new pump has not had much use, it might just need a wakeup? Even maybe a loom or relay problem. Of course the fuel may have gelled too, if it is old, in which case the tank coming out and a full blow though of the fuel system is called for!
The following users liked this post:
orangeblossom (02-16-2018)
#1613
02-16-2018, 11:02 AM

The following users liked this post:
orangeblossom (02-16-2018)
#1614
02-16-2018, 01:57 PM
Hi Brinny
My Celebration Convertible is virtually as New and almost too nice to take out on the road, as I really bought her more as an
investment than to use
The lack of which is now the reason why She's broken down, where replacing the fuel pump on one of these is a 'Nightmare'
The last time that I did this it took a Week to fix not counting a month of cleaning the Tank with Apple Cider Vinegar
And so I don't suppose that this time will be any different, as everything has to come out of the Boot in order to get the Tank
out, including the CD player
#1615
02-16-2018, 05:29 PM
OB
Have you tried connecting the pump direct to a 12 volt source? If that new pump has not had much use, it might just need a wakeup? Even maybe a loom or relay problem. Of course the fuel may have gelled too, if it is old, in which case the tank coming out and a full blow though of the fuel system is called for!
Have you tried connecting the pump direct to a 12 volt source? If that new pump has not had much use, it might just need a wakeup? Even maybe a loom or relay problem. Of course the fuel may have gelled too, if it is old, in which case the tank coming out and a full blow though of the fuel system is called for!
Its definitely the Fuel Pump and I bet it will be as rusty as hell when I get it out and is only about half the size of the V12 one
Which unlike the 4.0L Pump can be changed in under an hour
Not so with this, its a 'Nightmare' to even get to and has taken me nearly all day just to get the Fuel Tank Hoses off
As there is a Special Tool for this which I hadn't got and up in the most awkward place that you can imagine
Where the IRS Cage is right in the way
One of the 'Slings and Arrows' of Owning a 4.0L XJS
The following users liked this post:
Greg in France (02-17-2018)
#1616
02-17-2018, 02:31 AM
The following users liked this post:
orangeblossom (02-17-2018)
#1617
02-17-2018, 01:18 PM
#1618
02-17-2018, 05:21 PM
Taking Out The Fuel Tank
Of
'Hot Choco'
My 1995 XJS 4.0L Celebration Convertible
Having replaced the Fuel Pump just a Couple of Years ago this is a PIA Job if ever their was one
As its quite a lot more difficult than having to change the Fuel Pump on an XJS V12
Which only takes about an hour to do
The major difference being that my 4.0L Celebration Convertible has an In-Tank Fuel Pump
Which means that in order to change it the Fuel Tank has to come out
Or at least be pulled back far enough to take the Fuel Pump out which was the way that I decided to do it
Which ever way you want to go its not what you would call 'A Walk in the Park'
So maybe not surprising that some Shops would want to charge you �500 plus the Parts for doing this
But as this job is so much agro some might well consider that a Bargain!
The Fuel Pump sits in the Top of the Tank which is behind a Steel Baffle with lots of awkward Nuts and Bolts to undo
And if that isn't bad enough in the Case of a Convertible
The Hydraulic Pump to lower the Soft Top is also right in the way
Before you even start this job almost every piece of Trim has to be removed
Which on my Car included the CD Player
After which you then need to get under the Car to disconnect the Fuel Pipes one for Flow and the other for Return
In order to disconnect these pipes you need to 'push and twist' them with a Special Tool I didn't have
As in order to get to these pipes you have to reach right through the IRS Cage to 'push and twist' these fittings
Since I didn't have this 'Special Tool' I had to improvise by using a pair of Blacksmiths Tongs
Which I got in a Car Boot Sale

I used this pair of 'Blacksmiths Tongs' to 'push and twist' the fittings on the Fuel Pipes
Once you've got the Baffle Plate out and the Pump that operates the 'Soft Top' with the Fuel Pipes disconnected
You can disconnect the Filler Tube and the Breather Pipes and then pull the Tank out
There are no other Bolts to be undone as the Tank is tightly wedged in place with some rubber wedges on each side
'Although it feels like its been Welded in!'
Once the Tank is out of the Car the Locking Ring can be removed underneath which is the Fuel Pump
Which can be removed and replaced with a New one
Where while you are about it then it would make a lot of sense to also fit the Tank with a New Sender
After which its just a case of bolting it all back together the way it came out
Although it may be a good idea to see if the Engine runs before replacing the Baffle
Warning!
Disconnect The Battery
And Take It Right Out Of The Car Before You Start
DO NOT ATTEMPT TO USE THE BATTERY
AS A SUPPORT TO REST THE TANK ON WHEN YOU PULL THE TANK OUT
OR YOU AND YOUR CAR WILL BE TOAST!
Siphon out all the Fuel from the Tank before you remove it
Although I've done this Job before it has taken me Two Days just to get the Tank out
Though maybe you might do it a bit quicker

The Fuel Tank on a 'Face Lift' XJS Convertible with an In-Tank Fuel Pump which is the Smaller Rusty one of the Two
Laid Side by Side with the Fuel Pump from an XJS V12
which does look a lot smaller by comparison

Apart from the Fuel Tank Filler and one or two breather Pipes these Fuel Pipe Connectors are all that holds the Tank in apart from the fact its wedged in tight with rubber blocks on each side
Next Job is to order a New Fuel Pump and Sender then put it all back together and hope that She runs
Last edited by orangeblossom; 02-18-2018 at 04:51 AM.
The following users liked this post:
Greg in France (02-18-2018)
#1619
02-27-2018, 04:13 AM
Should I Steer Clear Of This Garage?
Long Story Short:
I have been using the same Garage for Years to do the MOT's on all my Cars and have so far not had any problems
But Yesterday I took one of my Cars (Not an XJS) to this Garage for an MOT, where they had a New Device I've never seen before
They had a Special Car Lift Ramp with Two Small Turn Tables right on the end of the Ramp
Which the drove they Front Wheels of the Car onto
These Two Turntables are Mechanically Operated and Turn both Front Wheels Left and Right
Instead of Turning the Wheels Left and Right by using the Steering Wheel
It was really Scary to watch, as these Two Front Wheel Turntables were Rocking the Front Wheels Left and Right like Crazy!
(Full Lock Left and Right)
I was having Nightmares that they might do that to my Grey XJS when She is due for an MOT next month
Am I just being Paranoid or could they do Serious Damage by Rocking the Front Wheels Left and Right in this way?
Last edited by orangeblossom; 02-27-2018 at 05:03 AM.
#1620
02-27-2018, 04:43 AM
Veteran Member
The following users liked this post:
orangeblossom (02-27-2018)