Droopy Exhaust problem
#1
 04-21-2014, 04:20 AM

Hi Guys
As you will see from the Photo, My XJS V12 has a 'Drooping exhaust' which if left that way will sooner or later get ripped off on a 'Road hump' of which we have too many in the UK!
Having taken both straight pipes off, I cannot see anything wrong with them at all, as they both look exactly the same and cleaned up like new with my Sander before I repainted them.
I have re fitted these countless times but always the same one 'droops' down and the only way to counter that is to hammer it in to the other one to reduce the gap.
The problem being, the peg on the end of the Silencer which is at the rear, falls out of the rubber bracket so there is nothing to hold it up.
Should there be an Exhaust mounting bracket somewhere in the middle, as I can't see one!
The whole Exhaust appears to be held by just one rubber mount right at the back.
Anyone else had this problem?
http://

#2
04-21-2014, 05:23 AM


Veteran Member
The exhaust is hung in two places. The back box in the tunnel, as you already know, and by two similar pegs on the underside of the top panel of the rear axle cage. The contorted pipes through the cage have a peg on their topmost part that slots into a rubber holder bolted to the cage. The peg also has a bakelite-type insulator over it, that protects the rubber bush from conducted heat. Other than these two, that's it.
Mounting the whole thing is a morning's labour of love, that's for sure. The bolted swivelable fixing, between the silencers in front of the cage and their respective pipes though the cage, is crucial. What I do is to support the under floor pipes at the correct height, then add the silencers and do the same, then add the cage-pipes and ensure their pegs are into their mountings, then tighten the silencer/cage pipe swivel joints. If this is done right (after several goes) then the under floor pipes, silencers and cage pipes are all OK and at least 1" from anything they can knock on. Then the back boxes in the tunnel can be added but you may have to unbolt, and then rebolt after assembly the back box peg/chassis fixing, as the peg may not go in otherwise, owing to the pipe joint male/female slip fit being the wrong way round. An extra person is a great help, as it the Grant Francis JD lubricant!
Alternatively, you can loosely assemble the entire thing, but you need a helper really, and working from the front to the back, adjust and tighten at each join. The real difficulty is the join between the convoluted cage pipe and the back boxes: you can have all Ok but the pipe joining the back box is at the wrong angle for the back box to sit evenly in the tunnel. If this happens, it is a case of loosening the swivel joint and fiddling until each end of the cage pipe is 'good enough'. On mine I actually removed the RHS cage pipe and heated and bent it to adjust the pipe angle a bit to get it correctly into the tunnel.
Greg
Last edited by Greg in France; 04-21-2014 at 07:00 AM.
The following users liked this post:
orangeblossom (04-21-2014)
#3
04-21-2014, 05:01 PM
The exhaust is hung in two places. The back box in the tunnel, as you already know, and by two similar pegs on the underside of the top panel of the rear axle cage. The contorted pipes through the cage have a peg on their topmost part that slots into a rubber holder bolted to the cage. The peg also has a bakelite-type insulator over it, that protects the rubber bush from conducted heat. Other than these two, that's it.
Mounting the whole thing is a morning's labour of love, that's for sure. The bolted swivelable fixing, between the silencers in front of the cage and their respective pipes though the cage, is crucial. What I do is to support the under floor pipes at the correct height, then add the silencers and do the same, then add the cage-pipes and ensure their pegs are into their mountings, then tighten the silencer/cage pipe swivel joints. If this is done right (after several goes) then the under floor pipes, silencers and cage pipes are all OK and at least 1" from anything they can knock on. Then the back boxes in the tunnel can be added but you may have to unbolt, and then rebolt after assembly the back box peg/chassis fixing, as the peg may not go in otherwise, owing to the pipe joint male/female slip fit being the wrong way round. An extra person is a great help, as it the Grant Francis JD lubricant!
Alternatively, you can loosely assemble the entire thing, but you need a helper really, and working from the front to the back, adjust and tighten at each join. The real difficulty is the join between the convoluted cage pipe and the back boxes: you can have all Ok but the pipe joining the back box is at the wrong angle for the back box to sit evenly in the tunnel. If this happens, it is a case of loosening the swivel joint and fiddling until each end of the cage pipe is 'good enough'. On mine I actually removed the RHS cage pipe and heated and bent it to adjust the pipe angle a bit to get it correctly into the tunnel.
Greg
Mounting the whole thing is a morning's labour of love, that's for sure. The bolted swivelable fixing, between the silencers in front of the cage and their respective pipes though the cage, is crucial. What I do is to support the under floor pipes at the correct height, then add the silencers and do the same, then add the cage-pipes and ensure their pegs are into their mountings, then tighten the silencer/cage pipe swivel joints. If this is done right (after several goes) then the under floor pipes, silencers and cage pipes are all OK and at least 1" from anything they can knock on. Then the back boxes in the tunnel can be added but you may have to unbolt, and then rebolt after assembly the back box peg/chassis fixing, as the peg may not go in otherwise, owing to the pipe joint male/female slip fit being the wrong way round. An extra person is a great help, as it the Grant Francis JD lubricant!
Alternatively, you can loosely assemble the entire thing, but you need a helper really, and working from the front to the back, adjust and tighten at each join. The real difficulty is the join between the convoluted cage pipe and the back boxes: you can have all Ok but the pipe joining the back box is at the wrong angle for the back box to sit evenly in the tunnel. If this happens, it is a case of loosening the swivel joint and fiddling until each end of the cage pipe is 'good enough'. On mine I actually removed the RHS cage pipe and heated and bent it to adjust the pipe angle a bit to get it correctly into the tunnel.
Greg
This has come as a big surprise! as I can't find any mountings on the Cage and the only pegs on the Silencers are the ones on the Rear Boxes.
So the whole system is suspended by the rubber mountings at the rear, which the 'peg' on the Back Boxes slots into.
It looks as if this could have been an Aftermarket Exhaust, which didn't have the IRS Cage Mountings.
But as I didn't know that, I made up an extra bracket that actually hooks right over the rear mountings, as a bit of a 'fail safe' in order to prevent the 'peg' that is on the rear Silencer from slipping out of the mountings.
The whole thing was a nightmare job to hook up on my own, as you don't want the Exhaust Pipe that goes over the axle, falling over onto a spinning drive shaft.
So although I've stopped it drooping by pushing it much further into the other tube.
Thanks to you, I can now see the cause of the problem so I may have to make some more brackets to stop it from drooping again!
http://

http://
http://

http://

#4
04-22-2014, 03:49 AM
Veteran Member
OB
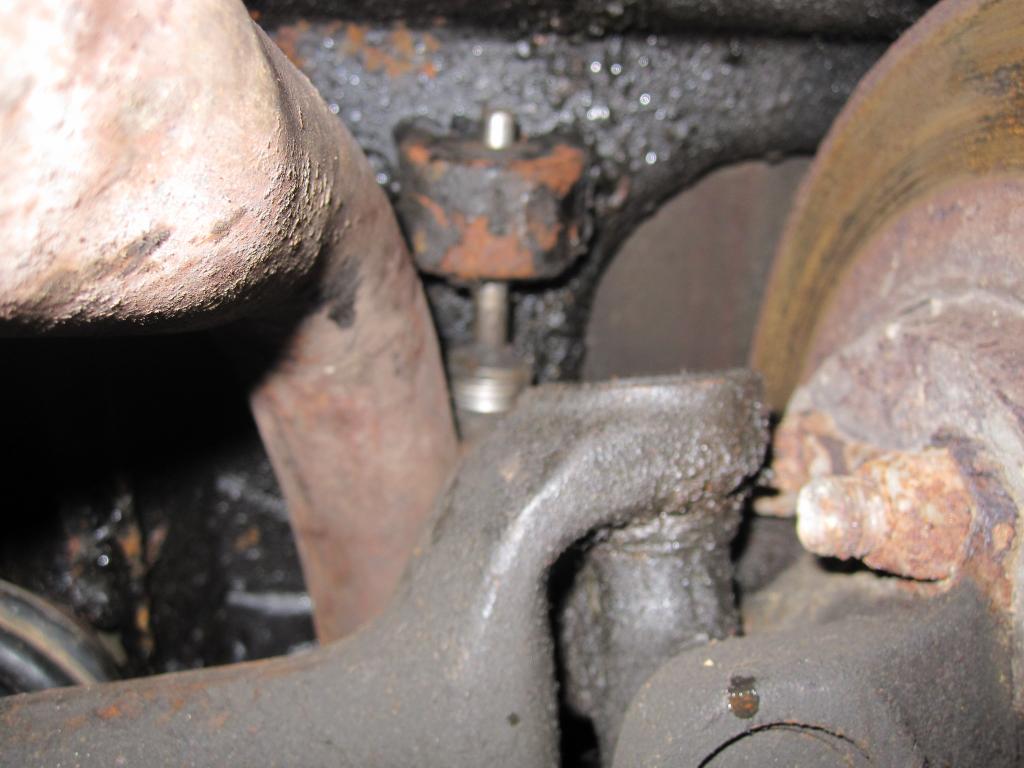
A pic or two to show the system. On my exhaust the pins are mounted on the side of the axle pipes. I would be surprised if the brackets on the the cage are not there, but they are bolt-on and can be replaced. Pretty essential to have these working if the though-axle pipes are to be retained.


Greg
A pic or two to show the system. On my exhaust the pins are mounted on the side of the axle pipes. I would be surprised if the brackets on the the cage are not there, but they are bolt-on and can be replaced. Pretty essential to have these working if the though-axle pipes are to be retained.


Greg
The following users liked this post:
orangeblossom (04-22-2014)
#5
04-22-2014, 07:20 PM
OB
A pic or two to show the system. On my exhaust the pins are mounted on the side of the axle pipes. I would be surprised if the brackets on the the cage are not there, but they are bolt-on and can be replaced. Pretty essential to have these working if the though-axle pipes are to be retained.
Greg
A pic or two to show the system. On my exhaust the pins are mounted on the side of the axle pipes. I would be surprised if the brackets on the the cage are not there, but they are bolt-on and can be replaced. Pretty essential to have these working if the though-axle pipes are to be retained.
Greg
There is nothing like that on mine, even the 'Scrapper' hasn't got them on, so I'll take her for an MOT, then get underneath (Again!) and make some brackets up.
Thanks for the Pics, which were very helpful.
#6
04-23-2014, 02:25 AM
Veteran Member
Assuming it is the 4 litre convertible we are talking about, OB here is the JCP diagram
Intermediate/Rear Silencer-4.0 Litre - Parts For XJS from (V)179737 to (V)226645 | Jaguar Classic Parts UK
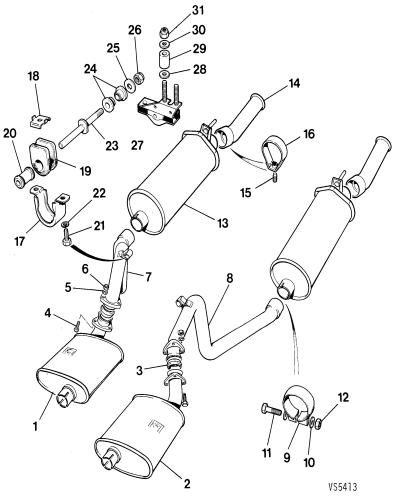
Intermediate/Rear Silencer-4.0 Litre - Parts For XJS from (V)179737 to (V)226645 | Jaguar Classic Parts UK
The following users liked this post:
orangeblossom (04-23-2014)
#7
04-23-2014, 12:18 PM
Assuming it is the 4 litre convertible we are talking about, OB here is the JCP diagram
Intermediate/Rear Silencer-4.0 Litre - Parts For XJS from (V)179737 to (V)226645 | Jaguar Classic Parts UK
Intermediate/Rear Silencer-4.0 Litre - Parts For XJS from (V)179737 to (V)226645 | Jaguar Classic Parts UK
Hi Greg
The Exhaust in question is on my XJS V12, maybe that is why it doesn't have any extra supports.
But I am still faffing around with it and still trying to line it up!
Trending Topics
#8
04-24-2014, 01:56 AM
Veteran Member
The V12 is EXACTLY the same:
Intermediate/Rear Silencer-5.3 Litre - Parts For XJS from (V)139052 to (V)179736 | Jaguar Classic Parts UK
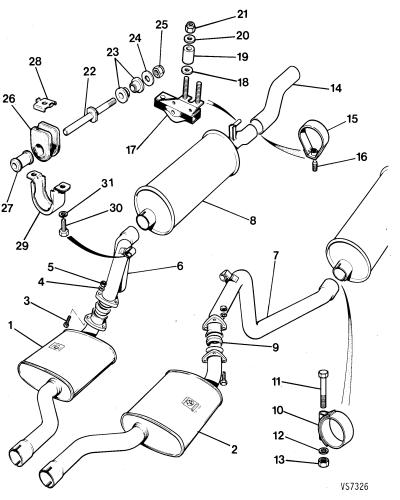
Intermediate/Rear Silencer-5.3 Litre - Parts For XJS from (V)139052 to (V)179736 | Jaguar Classic Parts UK
The following users liked this post:
orangeblossom (04-24-2014)
#9
04-24-2014, 05:40 AM
The V12 is EXACTLY the same:
Intermediate/Rear Silencer-5.3 Litre - Parts For XJS from (V)139052 to (V)179736 | Jaguar Classic Parts UK
Intermediate/Rear Silencer-5.3 Litre - Parts For XJS from (V)139052 to (V)179736 | Jaguar Classic Parts UK
The only pegs on my system, are the ones on the rear boxes with no other supports whatsoever.
So it must have been some 'el cheapo' aftermarket system that someone put on.
So I'm about to jack the back up for the umteenth time and affix some flexible hangers to the IRS cage which I will connect to the 'loopy tubes' with exhaust clamps.
As if they fall in the drive shaft, it will be 'thank you and goodnight' in a very big way!
But by 'artificially' moving the rear rubber hanger more forward with that clamp I made, this then allowed me to bang the straight pipe into the middle silencer a lot more, which seems to have taken the 'droop' out altogether.
So the 'loopy tubes' through the IRS Cage is the problem I need to sort out.
#10
04-24-2014, 06:10 PM
The V12 is EXACTLY the same:
Intermediate/Rear Silencer-5.3 Litre - Parts For XJS from (V)139052 to (V)179736 | Jaguar Classic Parts UK
Intermediate/Rear Silencer-5.3 Litre - Parts For XJS from (V)139052 to (V)179736 | Jaguar Classic Parts UK
I don't know how to Thank You enough!
For Insisting and Persisting that the Silencer Tube through the IRS was fitted with a Peg just like the Rear One!
Together with all Those Diagrammes you were kind enough to send.
When I jacked the Car up again! and had another look underneath I still couldn't see any Peg or any Mounting.
So I made an attempt to take the Rear Silencer out, although I didn't think that I would have enough height to do so.
But it kept getting caught up on something that I couldn't see, so I went and bought a mirror on a stick.
And then when I looked round with this, I suddenly saw the Peg and Socket you were talking about! and so shocked and delighted was I, that I nearly fell over!
As I picked up the Rear Silencer, 'The Jaguar Gods' were with me, as it slotted in First Time!
Then as I looked along the Pipe it was 'Bullet' Straight! and the Droop was Gone!!!!
First the Windscreen Washers and Now This! Genius or What!
What you don't know about these Cars you don't need to know!
Without your help I would have done Serious Damage to my Car as the 'Loopy Tube' was actually Touching the Drive Shaft!
So Thank You once again Greg You Are A Hero!
And will be getting a mention in Despatches!

#11
04-25-2014, 01:47 AM
Veteran Member
I only know the straightforward stuff. It is the Great XJS Prophet Grant Francis who knows it all, including all about the complicated Lucas magic-smoke containing parts, and Doug too!. As soon as I have anything complicated go wrong, just watch out for the shouts for help from France. Anyway, I am very glad that you have it sorted. Congratulations.
The following users liked this post:
orangeblossom (04-25-2014)
#12
04-25-2014, 03:53 PM
I only know the straightforward stuff. It is the Great XJS Prophet Grant Francis who knows it all, including all about the complicated Lucas magic-smoke containing parts, and Doug too!. As soon as I have anything complicated go wrong, just watch out for the shouts for help from France. Anyway, I am very glad that you have it sorted. Congratulations.
You saved the day yet again! and in my haste, I even forgot to thank you for the Photos!
How on earth did you manage to take them? As even though I now know where that 'bracket' is, I still need my 'mirror on a stick' just to be able to see it!
I've got a bit of a feeling that the people who must have done something to the Exhaust for the previous owner.
Never had it hooked up on that bracket because it had such a 'droop' in it, that I thought it would hit a road hump and fall off.
But the moment that I hooked it up on that 'invisible bracket' It balanced the whole system and evened everything out.
Its absolutely perfect now, with no 'drooping' whatsoever!
Thanks Again for your help.

Thread
Thread Starter
Forum
Replies
Last Post
Aus V8S
F-Type ( X152 )
50
11-13-2015 11:01 AM
joesoap
XJ XJ6 / XJ8 / XJR ( X350 & X358 )
13
09-10-2015 01:09 AM
Currently Active Users Viewing This Thread: 1 (0 members and 1 guests)