Easy Solve found for dim Warning/Indicator Lights!
#81
 10-12-2014, 07:10 PM

Veteran Member
Jomo,
I'm sorry to hear about your problems. I got my lights from the same supplier (superbrightleds.com) and had no problems. All my lights work fine. As I said, I left the original bulbs in the check engine, seat belt, sport, and /1st gear per SomeGypsy's recommendation. I had tried an LED for the check engine light but it stayed on all the time so I switched it back to the factory bulb. The light doesn't stay on anymore.
The LED's all work. I did have about half that originally didn't work but I just turned them upside down and then they worked. I wish you had the same luck as me. I know how frustrated you must feel.
The following users liked this post:
gerryxjs (02-02-2016)
#82
10-12-2014, 07:46 PM

Senior Member
Jomo,
I'm sorry to hear about your problems. I got my lights from the same supplier (superbrightleds.com) and had no problems. All my lights work fine. As I said, I left the original bulbs in the check engine, seat belt, sport, and /1st gear per SomeGypsy's recommendation. I had tried an LED for the check engine light but it stayed on all the time so I switched it back to the factory bulb. The light doesn't stay on anymore.
The LED's all work. I did have about half that originally didn't work but I just turned them upside down and then they worked. I wish you had the same luck as me. I know how frustrated you must feel.
I'm sorry to hear about your problems. I got my lights from the same supplier (superbrightleds.com) and had no problems. All my lights work fine. As I said, I left the original bulbs in the check engine, seat belt, sport, and /1st gear per SomeGypsy's recommendation. I had tried an LED for the check engine light but it stayed on all the time so I switched it back to the factory bulb. The light doesn't stay on anymore.
The LED's all work. I did have about half that originally didn't work but I just turned them upside down and then they worked. I wish you had the same luck as me. I know how frustrated you must feel.
As I stated before I am glad that these bulbs worked for others. In my case the orientation of the bulb did not matter as the contacts on most of the bulbs are not touching the circuit board even though the bulbs themselves are in securely. I verified this by checking for continuity. I am glad that you are having better luck then me but I just don't get why we have opposite results with the same type of car. I hate to ask this but did you check to make sure that there is continuity between the contacts on the bulbs and the circuit board for the bulbs that do not light up when you 1st start the car. I would check this if I was you and I certainly wish you luck. i tried to move the contacts on the bulbs in hopes that would help but no luck at all. Did you have to modify the bulbs at all or did you simply take out the old bulbs and screw in the new ones?
Jomo
#83
10-13-2014, 01:13 AM

Senior Member
#84
10-13-2014, 09:56 AM
Veteran Member
Jomo,
I didn't test for continuity. I just turned on all the switches and things to make the LEDs light up. I had written down what each light was on a checklist and checked them off one-by-one as they lit. I don't think I missed any but I suppose I could have. The light I really cared about was the parking brake light because I wanted to be able to see it when my top is down. Once I achieved that, I was pretty satisfied. The other bulbs were just a bonus.
I don't understand why yours aren't working. I can only think you got a bad batch of bulbs, which is very odd since all of mine worked and we got them from the same supplier. Maybe try another supplier? Wish I could help in some way...
#85
10-13-2014, 11:36 AM
Senior Member
Jomo
Last edited by jomo; 10-13-2014 at 11:42 AM.
#86
10-13-2014, 02:52 PM
Senior Member
Hi,
Here is my final update. I took out the bulb from the socket of 16 replacement bulbs and then I easily took out the the bulbs from 16 original sockets. I took one of the new bulbs and placed it into one of the old sockets and just as expected it did not make contact as it is using the same exact contacts as before. I just do not know why I removed all 16 bulbs. So all this accomplished was another wasted afternoon and the inability to return any of the bulbs. Very very disappointed with this result.
Jomo
#87
10-13-2014, 03:13 PM
Senior Member
#88
10-13-2014, 04:29 PM
Senior Member
Jomo
Last edited by jomo; 10-13-2014 at 04:34 PM.
#89
10-13-2014, 04:54 PM

First let me say I 100% agree with Jomo - more technical detail, links to websites, etc. would be very helpful, especially from those of you who have made the LEDs work...
Here's where I am in this project:
I did exactly what Jomo describes in post #72 of this thread and got the results I reported in my post #69. Since both Jomo and I got the same results when measuring where ground/earth is on the different sockets it most likely right. We also got very similar results when we put the LEDs in the sockets - none of the nine that should light up for a second or two when starting the car worked for either of us. I find it hard to believe that both of us would have had contact problems on all of these bulbs in the same positions, so there is something else going on.
Some research shows that the original Osram 12/1.2 bulb has a B8.3D base (Osram 891225 - OSRAM 2721 MF Miniature Automotive Light Bulb at eLightBulbs.com). Those of you who have made this work: Is that what you installed, or did you all, like SouthernGypsy, install B8.5D-based bulbs? I happened to have a B8.5D lying around (bought from Superbrightled's a while back) and the base is decidedly different from the Osram bulb's (IMG_3142.JPG).
Looking into what the difference between a 3D and a 5D base is I found the following: "The difference between the B8.5D and the B8.3D is the location of the electrical contacts. The B8.5D makes contact by clamping the foil between the bulb flange and the contact and the B8.3D presses the contact against the foil. The B8.3D is held in the circuit board by a pair of small tabs on the holder. The B8.5D is held in by the contacts."
Does anyone know if there is circuitry inside the cluster that the bulb should make contact with, or are all contacts on the flimsy circuit board on the outside? If the former, the marginally larger space between the "teeth" on the LED's, compared to the Osram, might make a difference. I will experiment and report - I've converted one of the Osram sockets (that had a burned out bulb in it) into a LED by removing the bulb and bending the contacts on a LED (IMG_3148.JPG) I got from 10x T5 Twist Socket PC74 Instrument Panel Cluster White Dash Light Bulb 37 73 | eBay (Notice the price! And being of type 5050 they are just as bright as the ones from Superbrightled's.), and putting it in the socket. I haven't soldered it in yet, don't think that is going to be necessary, it's pretty snug.
One last thing - If B8.5D bulbs really work this Wholesale Product Snapshot Product name is Free shipping 10XFree shipping Car Auto LED T5 B8.5D 1 led smd 5050 Wedge LED Light Bulb Lamp 1SMD White/Green/Blue/Red/Yellow must be the best deal around, $0.33/bulb. Sure beats Superbrightled's $2.59.
#90
10-13-2014, 05:38 PM
Senior Member
I did exactly what Jomo describes in post #72 of this thread and got the results I reported in my post #69. Since both Jomo and I got the same results when measuring where ground/earth is on the different sockets it most likely right. We also got very similar results when we put the LEDs in the sockets - none of the nine that should light up for a second or two when starting the car worked for either of us. I find it hard to believe that both of us would have had contact problems on all of these bulbs in the same positions, so there is something else going on.
Thinking that this was an easy fix when I read your earlier post I did not notice that you wrote that you too had trouble.
If you look at the circuit board you will see that the 'lines' go from the bulb contacts to where the big plugs go to (I only followed two lines), so I doubt that there is another circuit board on the inside. Beside it would be strange in my opinion to have two circuit boards doing the same thing. Thanks for looking into this more thoroughly. It is amazing that we have the exact same trouble. I do not want to do this but I bet if we were to put something (non conductive) under the circuit board, which will raise the contacts on the board, I bet this will work. I just do not want to spend time cutting out 20 holes in this sheet only to find out that it is too thick, not thin enough or simply does not work for all bulbs at the same time. I may not be happy at the moment but I bet in the end we will figure this out.
Thanks!
Jomo
#91
10-13-2014, 08:04 PM
This is getting curiouser and curiouser.
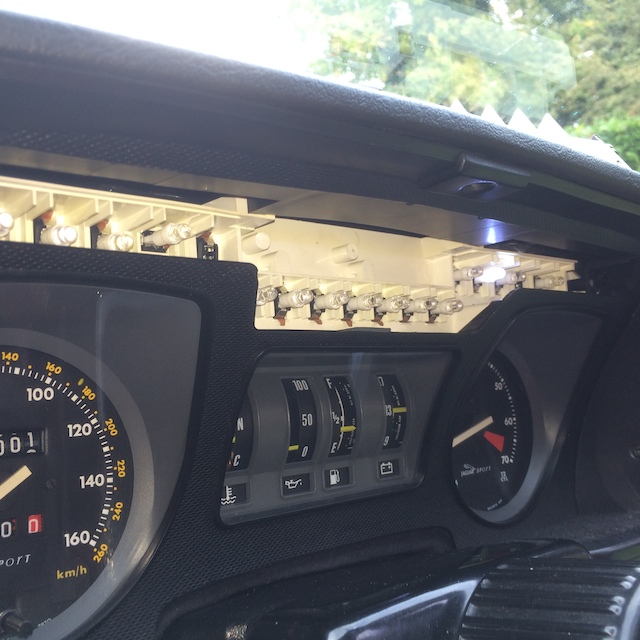
I just tried the Superbrightleds unit (part# B8-HP) and my homebrew original-socket-converted-to-LED unit in position 11 (Parking brake) since this is one of the indicators I, like so many others, am most interested in.
The Superbrightleds unit didn't work in either orientation, but my homebrew unit did. BUT WITH THE NEGATIVE POLE DOWN, NOT UP, as I had expected since my, and Jomo's, measurements showed this was ground. Weird! This requires further investigation. I know this is an English car, but surely they don't have a converter and apply -12V.... do they....?
I then tried the Superbrightleds unit again. Still no go, so i pried the lugs that connect to the flexible circuit board so that they stuck out a little more above the seating ring, and voil� it worked!
#92
10-13-2014, 08:51 PM
Senior Member
The Superbrightleds unit didn't work in either orientation, but my homebrew unit did. BUT WITH THE NEGATIVE POLE DOWN, NOT UP, as I had expected since my, and Jomo's, measurements showed this was ground. Weird! This requires further investigation. I know this is an English car, but surely they don't have a converter and apply -12V.... do they....?
Can you please explain this more clearly? It does not take much to confuse me.
Thanks,
Jomo
Last edited by jomo; 10-14-2014 at 11:46 AM.
#93
10-14-2014, 03:21 PM
Yes, Jomo, I'm 100% certain. I've rechecked the polarity and orientation of the LED bulb three times since it makes no sense.
What I did to the Superbrightleds bulb was to bend the contacts that touch the foil a little bit more away from the plastic (see arrow), so they stick out more. This meant I had to push a bit harder to seat the bulb, but it made contact! Sorry about the fuzzy pic - my phone takes lousy close-ups.
Now that I know B8.5D bulbs work I've ordered 20 from here Wholesale Product Snapshot Product name is Free shipping 10XFree shipping Car Auto LED T5 B8.5D 1 led smd 5050 Wedge LED Light Bulb Lamp 1SMD White/Green/Blue/Red/Yellow. Sure can't beat the price! It'll be a while before they arrive, but I'll follow up once I have got and, hopefully, managed to install them.
#94
10-14-2014, 04:13 PM
Senior Member
What I did to the Superbrightleds bulb was to bend the contacts that touch the foil a little bit more away from the plastic (see arrow), so they stick out more. This meant I had to push a bit harder to seat the bulb, but it made contact! Sorry about the fuzzy pic - my phone takes lousy close-ups.
Jomo
Last edited by jomo; 10-14-2014 at 04:17 PM.
#95
10-29-2014, 12:03 PM
The 20 LEDs I bought from China for $6.65 arrived yesterday. They are as bright as the ones from SuperBrightLEDs.com, so a real bargain.
I put them in, and with minor tweaking/bending the contacts managed to get them all to work. Was so happy I forgot to record the final orientations, and I.am.not taking it all apart again. Fed up with this "easy solve" project.
On to bigger things - front brake job is next, and bolts holding calipers are frozen. But that's for another thread.
#96
11-07-2014, 12:59 PM
Senior Member
I too ordered the lights from china which arrived last week. Today I spent more hours trying this easy fix. The bulbs do not make contact with the circuit board. There is a limit to how much bending and tweaking I can do to the bulb before the bulb is shot. So much for an easy fix.
I just finished replacing my transmission cooler lines where I expected some things not to go smoothly and I was right. In end changing the cooler lines was not more than the headache that I expected but I just can't say this about the bulbs AND I never got it working!
To AndersA--I am glad that you got it working.
Jomo
#97
11-07-2014, 03:28 PM
Senior Member
#98
11-07-2014, 08:41 PM
Senior Member
BB,
You asked me in an earlier post to post pictures of what I am doing and I did post the pictures. But instead of responding to my pictures you post once again that I am doing it wrong. Who knows maybe you are right but if you nor anybody else helps me then I will never get it right.
Jomo
You asked me in an earlier post to post pictures of what I am doing and I did post the pictures. But instead of responding to my pictures you post once again that I am doing it wrong. Who knows maybe you are right but if you nor anybody else helps me then I will never get it right.
Jomo
#99
11-08-2014, 12:06 AM

Senior Member
I've heard conflicting tales of service from SuperBright. I don't know about their customer service or quality, but their website appears to have gotten steadily better.
I went with the set from V12s. I replaced my gauge lights, opticell, and gear indicator.
The gauge lights I ordered in "standard" which is where I think I made a mistake. I'm assuming they're green, and with the green filters that are in there, everything is well illuminated, but pretty washed out. In retrospect, I should have ordered white LED replacements. That would have kept the color closer to stock, I believe, as pulling the little green shields might not give me the right shade. If I can find a 2721 (or 74) LED locally in white, I'll get a few and test out my theory.
The bulbs from V12s are polarized, so getting them in the right way took a little doing (it was like plugging in a USB cable, third time's a charm!) and I had to chop down the base that the LEDs came in to fit into the cluster.
The Opticell unit is probably the biggest ROI. It's much brighter than stock, and won't melt anything. I still suspect that something's gotten dirty or disconnected because the temperature dial isn't fully illuminated.
The LED for the gear indicator is probably the only one I'm not thrilled about. It's just too bright. I'm glad I can see what gear I'm in after dark, yeah, but it's almost distracting.
#100
11-08-2014, 10:45 AM
Senior Member
BB,
You asked me in an earlier post to post pictures of what I am doing and I did post the pictures. But instead of responding to my pictures you post once again that I am doing it wrong. Who knows maybe you are right but if you nor anybody else helps me then I will never get it right.
Jomo
You asked me in an earlier post to post pictures of what I am doing and I did post the pictures. But instead of responding to my pictures you post once again that I am doing it wrong. Who knows maybe you are right but if you nor anybody else helps me then I will never get it right.
Jomo
now i have, i am confused at why you are pulling the metal parts( contacts ) from the plastic lamp holder along with the push in ' wedge ' lamp ?
the wedge lamp is a cap-less lamp with two thin wires that make contact with the side of the holder contacts when inserted
as advised in other posts, the LED's are polarity sensitive, and you can tell by the thickness of the wires on each side, usually the thicker with is the positive , but a quick test will confirm with regard to ' your ' LEDs
the LED wedge replacement will simply push into the holder that still has the contacts inside it , should be as easy as that
then you insert this into the circuit board of the cluster
thats all i can add, as i showed in my pictures ?
IMG_1966 by MyPix on Talk Photography
BB