Long term body care
#1
 10-17-2015, 01:42 PM

What do people do about long term XJS body care? By this I mean the body and underneath of the vehicle, and exclude a regular wash and wax.
Do people get a body shop to inspect the car maybe once per year?
How much do people get special undercoatings added?
When do people get a car repainted? (ignoring those who don't repaint the car because they want the original paint whatever the condition. My car was repainted before I bought it anyway, though in the same colour as original).
If there is some minor damage, do you immediately completely repair it or put a dab of paint on and hope it doesn't get more serious?
I have noticed that in both front wheel wells of my 92 XJS there is a small cut in the steel, where the metal wraps around inside. It is in both front parts of the front wheel wells and in the same position in both. I have wondered if this was done working on the brakes? Also, what to do about it.
Bill
#2
10-17-2015, 07:02 PM

Bill,
A lot depends on how you use the car and what weather it is exposed to, for example salt and road grime from driving. Mine sits in the garage for the winter being driven on nice days when the sun is out, not in rain. The underneath of my car is very clean and there are no leaks. It is not a daily driver. If yours is, then you would want to take precautions to protect it as much as possible from the hostile environments. I think you will get a lot of responses on your quest for good responses. I am not helping out very much, just letting you know how fortunate I am !!!!! lol
Ken in WV
#3
10-17-2015, 09:20 PM


Veteran Member
Join Date: Mar 2008
Location: Pacific Northwest USA
Posts: 24,822
Received 10,871 Likes
on
7,150 Posts
Frequent rinsing of the undersides....as much as you can get to with your garden hose... is a good idea to remove mud and debris from the nooks and crannies. Doubly so if you drive on salted roads in the winter.
Make sure water drains...such as you'll find in the bottom edges of the doors... are clear.
I use this in as many nooks, crannies, and crevices as I can reach...as well as inside the doors, behind the fenderwell splash shields, etc
Rust Proofing Products in the United States & Canada
Cheers
DD
#4
10-19-2015, 03:25 AM

Veteran Member
When I rebuilt my car I went to endless lengths to try to stop it rusting. There are water traps everywhere, like all cars of its era. To do a really sound job, it is an interior out task, pretty much; but this is worth it if you want to keep the car for many years. In no particular order, these are the areas that had to be fixed in my car, and which I treated. Layers of protection are very important, just wax, for example, will not do it as I found to my cost, pre rebuild. I used a three layer strategy: starting with some fantastic stuff called AquaSteel straight on the metal, then followed that with zinc chromate paint (or modern equivalent), then wax. Whatever you use has to be sprayable in with a sraygun, as most parts are inaccessible to a brush. On all exposed seams besides being treated (eg wheel arch/body crimps etc) I try to get the accumulated earth and grit out of when I wash it, so they can dry out.
Greg
- Floor pans: these rot mainly from the inside as the carpets hold moisture. There is also a heel reinforcement plate on the underneath each side. This is a perfect rust trap, either cut it off, or fill all the gaps with gunk to keep water and mud out.
- Rear wheel arches: there is a crimped and spot welded double skin where the body comes down to meet the inner arch. Using a long flexible probe spray into the arch from both the interior and the boot.
- Under the back seat: The floor under the back seat you cannot get to, but on the inside corner by the sill, on the vertical metal below the seat front there is a hole. You can get your probes in here. This panel supports the radius arm mount so is important.
- Sills: I drilled a hole each end on the vertical endface and also a hole under the middle about by the door ends. The sill has bracers in it, but you can wriggle a probe in OK.
- Wheelarches: remove the front wheelarch plastic protectors and do the job here too. Check the sill top for rust and fix if needed. When you put back the arch protectors, seal them thoroughly all round their perimeter against the body. Ensuring water cannot get behind them is very important, as if it does rot will come and it will never dry out and you will never see it.
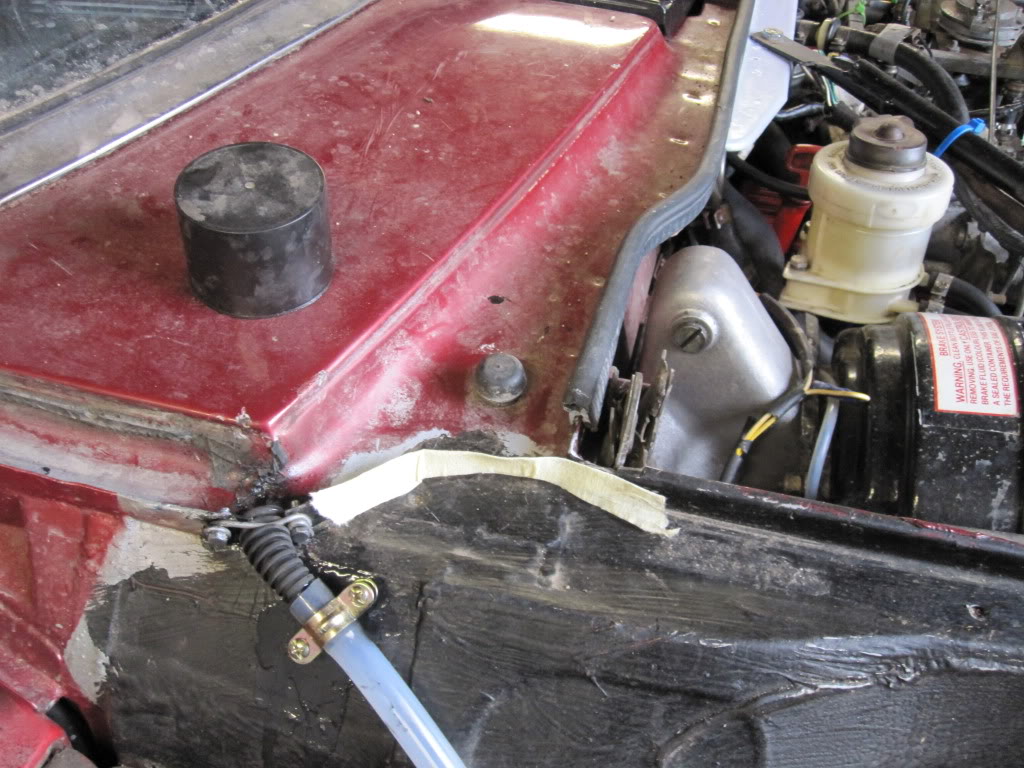
- Chassis top rails: The engine bay top rail is a known bad area. To do it really well requires the wingtop securing screws to be loosened, not too difficult although it worries you the first time!. But most important, (and as Michael Caine so famously claims he did not say) not a lot of people know this, if you remove the headlight, right at the back of the headlight nacelle is a large square rubber bung. Pull this out and you can get your probe right along the entire inside length of the toprail as far as the A pillar.
- If you do loosen the wingtops, then you get access to a very rust-prone area below where the scuttle-side and the wing meet. water drains off the windscreen and roof into this area and has nowhere to go, and as far as I can see there is no drain of any sort for it. This is a photo of the area I am trying to describe. In my case I fitted a drain tube, that works really well; but the important thing is to treat the entire area very thoroughly, so any pooled water cannot get to the metal.
- Bottom rails: the engine bay bottom rail has loads of OEM holes in it to get your probe in.
- Chassis rails above rear wheels. Drill a hole in each about level with the wheeltop and do the business
- Under-radiator cross member: If your airdam and tray is fitted, this vital piece is invisible. They rot dreadfully and this is a really important structural piece that holds the front two sides of the car together. Treat it inside and out.
- Outboard side of the exhaust tunnels in the boot. Water gets in here and has nowhere to go, so treating this is vital

Greg
The following 3 users liked this post by Greg in France:
#5
10-19-2015, 08:44 AM
Veteran Member
Join Date: Mar 2008
Location: Pacific Northwest USA
Posts: 24,822
Received 10,871 Likes
on
7,150 Posts
#6
10-19-2015, 10:48 AM
Veteran Member
Incidentally, I forgot in my previous post to mention the A pillars. Remove the trim, inside and out and treat them, inside and out. There is also a designed water path off the roof side-rails down the outside of the A pillar, but under the chrome trim into the scuttle area I posted a pic of. I truly believe it is best to block up the gap above the A pillar with gunk, so no water ever takes this path, which was intended as a roof drain. I have never had a problem with water from the roof wetting me on entry or exit with the drain closed off.
Greg
The following users liked this post:
orangeblossom (10-19-2015)
Currently Active Users Viewing This Thread: 1 (0 members and 1 guests)