New owner - 1992 XJS V12
#21
 02-15-2016, 04:53 PM

Veteran Member
I made a quick and dirty exhaust Separator, out of a couple of Manifold Clamps+Four Eyebolts and a couple of pieces of Threaded Rod.
Any Exhaust pipe place will have loads of Manifold Clamps and you can get the Eyebolts and Threaded Road at any Hardware Store.
The Photo pretty much explains how it works.
Just Clamp a Couple of Manifold Bolts at either end of the join, then when you UN-Tighten the Threaded Rod, it Will/Should force the Two Sections Apart.
With a bit of Heat and a Bit of Oil, not forgetting a FB Rubber Hammer!
The Bolts are not Shown in the Photo but they go on the Threaded Rod, on the Inboard Side of the Eyebolts.

Last edited by orangeblossom; 02-15-2016 at 04:56 PM.
The following 2 users liked this post by orangeblossom:
Greg in France (02-16-2016),
msteiner805 (02-17-2016)
#22
02-15-2016, 06:37 PM
Veteran Member
The following 2 users liked this post by superchargedtr6:
Greg in France (02-16-2016),
orangeblossom (02-15-2016)
#23
02-15-2016, 10:09 PM

Thanks Greg, I decided those exhaust pipes weren't worth anymore frustration so I got a pipe cutter and with a few twists I got a nice clean cut.
I then had a heck of a time with the large bushings that attach to the body. Those are awful LOL... the driver's side one ripped so the center ring (with some chunks of rubber) is still on the car. Anyhow, they needed to be replaced regardless... any advice on how to remove/press in the replacements? I don't have a press in my garage but I can get access to one.
Next came the removal of the calipers and rotors ... I decided to keep the cage on the assembly and I was able to get the parts out. This part of the job also took it out of me as most of the caliper and rotor bolts needed a lot of persuasion. So far probably a good 6-8 hours of labor to have everything apart and ready. I have replacement parts coming in 4-6 days so in the mean time I'll spend some time on the idle issue.
Supercharged,
Overall, this brake job is a PIG! I was expecting some issues, but, between all the gunk and stuck bolts I'd put this one up there as a total pain in the a$$ LOL.
Mike
Last edited by msteiner805; 02-15-2016 at 10:12 PM.
The following users liked this post:
orangeblossom (02-16-2016)
#24
02-16-2016, 01:58 AM

Veteran Member
I then had a heck of a time with the large bushings that attach to the body. Those are awful LOL... the driver's side one ripped so the center ring (with some chunks of rubber) is still on the car. Anyhow, they needed to be replaced regardless... any advice on how to remove/press in the replacements? I don't have a press in my garage but I can get access to one.
On the large end of the radius arm bush, where it attached to the body is cup shaped. It fits over a mirrored cup shape welded to the body. Get a cold chisel and place the sharp end against the just-perceptible join at the top of the bush inner, where the cups fit together. What this REALLY HARD with a lump hammer. It will come off. The bush outers are very hard to remove from the arms. If you do not have a press and a tool of the right size, and the bush outer only comes out on one side there is a shoulder on the other but tiny, either buy a new arm with the bushes already in it, or CAREFULLY cut through the bush outer steel with a hacksaw from the inside outwards, but STOP before you cut the actual arm outer. This will be sufficient to release the grip of the bush outer and you can then get it out.
The small end bush must only be tightened once the weight of the car is back on the wheels.
Greg
The following 2 users liked this post by Greg in France:
msteiner805 (02-17-2016),
orangeblossom (02-16-2016)
#25
02-16-2016, 01:29 PM

Senior Member
What brand rotors and calipers did you go with? I may be doing this job soon also. I've replaced the rear pads but the calipers are sticking a bit.
#26
02-16-2016, 04:13 PM
Hi Noah,
CENTRIC 14220501 Reman; Posi-Quiet; Loaded
CENTRIC 14220502 Reman; Posi-Quiet; Loaded
https://www.rockauto.com/catalog/mor...104&cc=1178872
These seemed like a good combo of quality & price. I hope these fit OK... we'll see.
Here are the rotors:
https://www.rockauto.com/en/moreinfo...178872&jsn=454
Mike
#27
02-16-2016, 04:45 PM

Senior Member
Radius arm removal:
I just removed my IRS a week ago. I had read where taking a large open end wrench (spanner) and inserting it into the area where you removed the radius arm to body bolt and prying up on it will pop it off. Mine came off with very little effort. So, if the remainder of the bushing is still attached try the wrench technique.
I just removed my IRS a week ago. I had read where taking a large open end wrench (spanner) and inserting it into the area where you removed the radius arm to body bolt and prying up on it will pop it off. Mine came off with very little effort. So, if the remainder of the bushing is still attached try the wrench technique.
The following users liked this post:
msteiner805 (02-17-2016)
#28
02-16-2016, 09:36 PM

#29
02-17-2016, 08:14 AM
Last night I managed to squeeze these nitrile bushings in... not too bad. I had to shave a bit off of the beveled edge so that they'd fit. These bushings make a significant difference in the amount of play in the throttle linkage (especially considering the car had *no bushings* when I got it  )
)
)
#30
02-17-2016, 01:32 PM

The following users liked this post:
orangeblossom (02-17-2016)
#31
02-21-2016, 05:43 PM
Hi All,
So I made some decent progress on the rear brakes and rear suspension/bushings! Everything is back in place and the system is bled - however, I had to bleed the system using my mighty vac as the pedal movement wasn't giving much pressure. The parking brake pads are new and I had to take out the driver's side seat to get the adjustment right, but, the parking brake now works well. I took the car for a short drive and the rear suspension feels sooo much better! New shocks made a significant difference.
Couple of items of concern:
- The Anit-Lock light is on
- The brake light is on
- The parking brake light goes on/off correctly now though
- The pedal is stiff and I really have to step hard to get the car to stop (but it does stop LOL).
There's plenty of new brake fluid and there are no leaks anywhere so I have to do some research - or maybe someone here can advise on how to test the accumulator?
Regards,
Mike
Last edited by msteiner805; 02-21-2016 at 05:54 PM.
#32
02-21-2016, 06:58 PM
Veteran Member
Was the pedal always Stiff before?
Job No1. is to Check the Two Fuses, which are on the Passenger Side underneath the dash at about knee height.
Very easy to get to and they are behind a small panel, held in place by a Plastic Turn Screw.
There are lots of Fuses in there but the Two you need to Check are Clearly Marked.
One of them will say ABS and the Other one will say Pump. and they will be grouped together on their own.
If the ABS fuse has Blown, then the ABS light will stay on, which means that you would still have Brakes but you wouldn't have ABS.
But if its the Pump fuse that has Blown, then don't attempt to drive the Car, as the BRAKES WON'T WORK!
So Check that first!
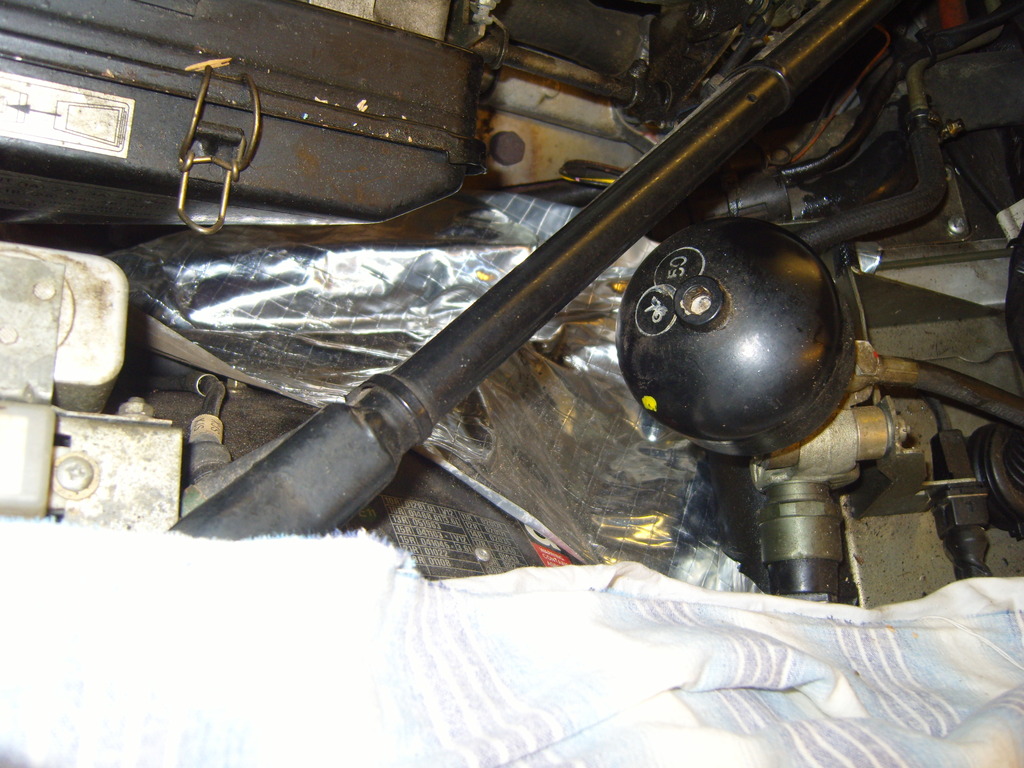
Otherwise a Stiff Pedal, could be an indication of a faulty Accumulator, that's the Black (Tennis Ball 'Thingy' $200)
But when you have taken the Brakes apart, as much as you have, its absolutely essential to Bleed the Low Pressure part of the System before you Bleed the Callipers (ptjs)
Then you might get lucky.
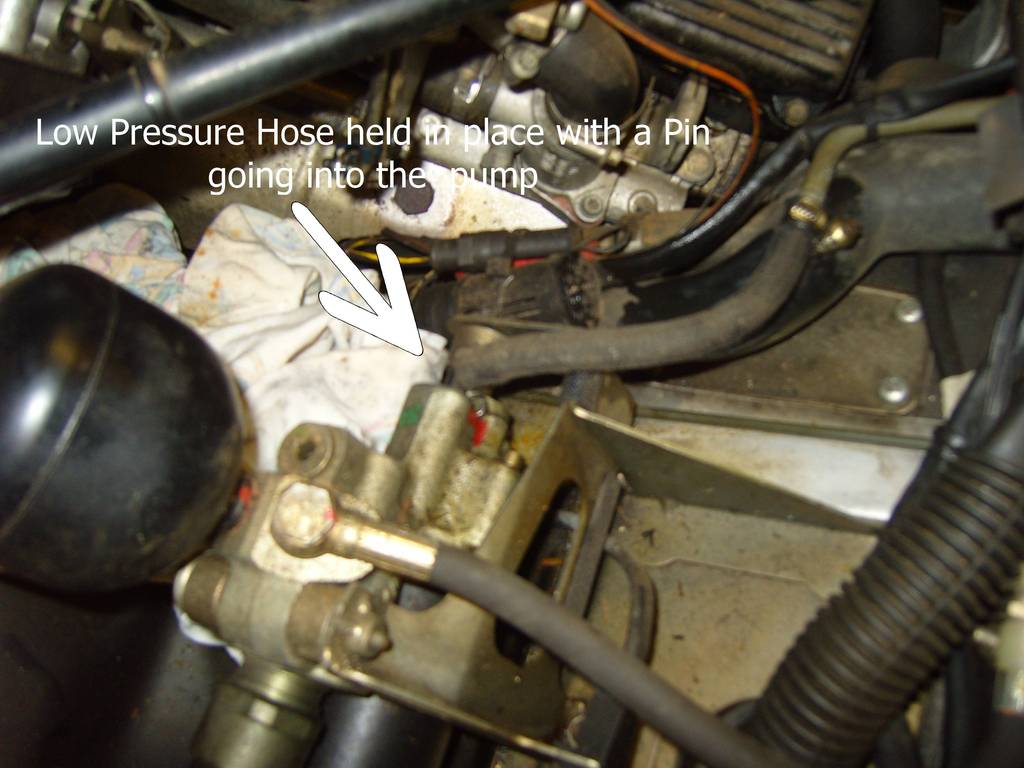
In order to Bleed the Low Pressure Side, by the Black Accumulator Ball, you will see a Pipe going into the Pump, that is held in place by a little spring pin.
You have to Pull this Spring Clip out (Don't Loose it!!!!!) then pull the pipe out from the Accumulator Motor.
The Pipe has an 'O' ring on it and it can be a PIA to pull out (WD and lots of Jiggling helps)
But before you do any of that, give the Pedal about 20 pumps to de pressurize the Ball and then get some Tin foil and construct a sort of channel underneath the pump,
a little bit like a water slide you might see in a theme park, only smaller lol.
To divert any Brake Fluid into the Bowl underneath as it runs out, or it will ruin the paint work in the Engine Bay.
And have a tray ready underneath the Car (old washing up bowl) and more rag than you think you'll ever need because when you pull that Pipe out, Brake Fluid will come pouring out all over the place.
So not only pack rags everywhere but also Cover the ball with a Towel before you pull the Pipe out, just in case the fluid, is still under pressure.
Also Cover the Wings with Towels and also below the Windscreen and the roof and have a bucket of Soapy water handy to mop up any spills.
This might seem like overkill as the Chances are the Brake Fluid will only Trickle out but it might not and Brake Fluid is deadly to Paintwork, as I'm sure you know.
So better safe than sorry.
Any rag that gets soaked in Brake Fluid is better pulled out from underneath the Car, rather than risking dripping it on the Bodywork.
Then Bleed all the Brakes again including the Front ones and then see if the Brakes are any better and then get back.
Having the Brake light staying on could also be down to Dirty or Faulty or Broken, Wheel Speed Sensors.
Were you very Careful when you took them out and did you Clean them?
Job No1. is to Check the Two Fuses, which are on the Passenger Side underneath the dash at about knee height.
Very easy to get to and they are behind a small panel, held in place by a Plastic Turn Screw.
There are lots of Fuses in there but the Two you need to Check are Clearly Marked.
One of them will say ABS and the Other one will say Pump. and they will be grouped together on their own.
If the ABS fuse has Blown, then the ABS light will stay on, which means that you would still have Brakes but you wouldn't have ABS.
But if its the Pump fuse that has Blown, then don't attempt to drive the Car, as the BRAKES WON'T WORK!
So Check that first!
Otherwise a Stiff Pedal, could be an indication of a faulty Accumulator, that's the Black (Tennis Ball 'Thingy' $200)
But when you have taken the Brakes apart, as much as you have, its absolutely essential to Bleed the Low Pressure part of the System before you Bleed the Callipers (ptjs)
Then you might get lucky.
In order to Bleed the Low Pressure Side, by the Black Accumulator Ball, you will see a Pipe going into the Pump, that is held in place by a little spring pin.
You have to Pull this Spring Clip out (Don't Loose it!!!!!) then pull the pipe out from the Accumulator Motor.
The Pipe has an 'O' ring on it and it can be a PIA to pull out (WD and lots of Jiggling helps)
But before you do any of that, give the Pedal about 20 pumps to de pressurize the Ball and then get some Tin foil and construct a sort of channel underneath the pump,
a little bit like a water slide you might see in a theme park, only smaller lol.
To divert any Brake Fluid into the Bowl underneath as it runs out, or it will ruin the paint work in the Engine Bay.
And have a tray ready underneath the Car (old washing up bowl) and more rag than you think you'll ever need because when you pull that Pipe out, Brake Fluid will come pouring out all over the place.
So not only pack rags everywhere but also Cover the ball with a Towel before you pull the Pipe out, just in case the fluid, is still under pressure.
Also Cover the Wings with Towels and also below the Windscreen and the roof and have a bucket of Soapy water handy to mop up any spills.
This might seem like overkill as the Chances are the Brake Fluid will only Trickle out but it might not and Brake Fluid is deadly to Paintwork, as I'm sure you know.
So better safe than sorry.
Any rag that gets soaked in Brake Fluid is better pulled out from underneath the Car, rather than risking dripping it on the Bodywork.
Then Bleed all the Brakes again including the Front ones and then see if the Brakes are any better and then get back.
Having the Brake light staying on could also be down to Dirty or Faulty or Broken, Wheel Speed Sensors.
Were you very Careful when you took them out and did you Clean them?


Last edited by orangeblossom; 02-21-2016 at 07:09 PM.
The following 2 users liked this post by orangeblossom:
Greg in France (02-22-2016),
msteiner805 (02-22-2016)
#33
02-21-2016, 07:05 PM

#35
02-22-2016, 09:53 AM
Thanks Orange,
The brakes were non-existent on the car before - there was no brake fluid in the reservoir as it all leaked out of the broken rear caliper. I don't recall if the pedal was more or less stiff, but, I would say about the same - lots of play for about 1" then very stiff.
Thank you for the debug path - I will do the following and report back:
- Check ABS Fuse
- Check Pump Fuse
- Remove pipe to Accumulator and bleed low pressure side : which side will the fluid be coming out under pressure, will it be from the disconnected hose, or from the accumulator fitting? And in order to bleed the system, can I use a vacuum pump here to suck clean fluid through?
- Clean and Check wheel speed sensors. I was careful but they are easy to check again
Very helpful post - thank you.
Mike
#37
02-22-2016, 11:46 AM
Veteran Member
Thanks Orange,
The brakes were non-existent on the car before - there was no brake fluid in the reservoir as it all leaked out of the broken rear caliper. I don't recall if the pedal was more or less stiff, but, I would say about the same - lots of play for about 1" then very stiff.
Thank you for the debug path - I will do the following and report back:
- Check ABS Fuse
- Check Pump Fuse
- Remove pipe to Accumulator and bleed low pressure side : which side will the fluid be coming out under pressure, will it be from the disconnected hose, or from the accumulator fitting? And in order to bleed the system, can I use a vacuum pump here to suck clean fluid through?
- Clean and Check wheel speed sensors. I was careful but they are easy to check again
Very helpful post - thank you.
Mike
The brakes were non-existent on the car before - there was no brake fluid in the reservoir as it all leaked out of the broken rear caliper. I don't recall if the pedal was more or less stiff, but, I would say about the same - lots of play for about 1" then very stiff.
Thank you for the debug path - I will do the following and report back:
- Check ABS Fuse
- Check Pump Fuse
- Remove pipe to Accumulator and bleed low pressure side : which side will the fluid be coming out under pressure, will it be from the disconnected hose, or from the accumulator fitting? And in order to bleed the system, can I use a vacuum pump here to suck clean fluid through?
- Clean and Check wheel speed sensors. I was careful but they are easy to check again
Very helpful post - thank you.
Mike
You won't need to use the vacuum pump or any bleeding device on the low pressure side, as when you pull that Pipe out, after removing the pin, Brake fluid should come flooding out by gravity.
In the very unlikely event, that it doesn't happen (maybe an Airlock) there is a joiner by the Reservoir that you can 'Crack' again you need to be prepared for Brake Fluid to come out, so have lots of rag handy.
So its handy to have a mate handy to Top The Reservoir up as it flows out, although I managed to do it by myself.
Since the Brake Fluid only has a very Short distance to travel, from the Reservoir to the Pump (from one side of the car to the other) You shouldn't need to let that much Fluid pass through, before you see clean Fluid with No Bubbles.
Although you need to put the Pipe back while the Fluid is still Flowing, to prevent any Air from getting back in.
So what you are actually doing, is Bleeding out the Air from the Pipe that connects the Reservoir to the Pump.
Be Warned it will make one hell of a mess, with Brake Fluid flowing all over the place, which will attack any Paintwork that it comes into contact with, and also don't pull that Pipe out, without a Towel draped over the Pump, just in case it is still under pressure.
Also the pipe that you pull out, has a plastic connector on the end, so when you are trying to pull it out, be careful you don't break it as it is very unlikely to come out without a bit of a struggle.
It would also be a good idea to Spray a Can of Spray Grease or even WD over all the Paintwork in the engine bay, where any Brake Fluid may come into contact with the Paint but don't rely on that alone, have rags stuffed everywhere.
Once you've got that job out of the way, you can Bleed the System as normal, using your vacuum device, but don't let any fluid flow back up into the System, as this can very easily destroy the Valves in the ABS Actuator.
Where any spare parts to fix it are virtually unobtainable, where one of the only options is to get one from a Scrap Yard or Try and Rebuild it yourself.
Which I have done a couple of times before, so lets hope that you get lucky.
You use the Accumulator Pump to Bleed the Rear Brakes and the Pedal to Bleed the Front Brakes.
But don't let the Pump run for more than about 15 seconds or it may overheat and Burn Out, without a pause in between.
PTJS is a bit of an Expert on this so hopefully he will chime in.
Last edited by orangeblossom; 02-22-2016 at 12:35 PM.
The following users liked this post:
msteiner805 (02-22-2016)
#38
02-22-2016, 12:34 PM
Veteran Member
Hi Mike
All Credit to PTJS Paul for this next bit, I managed to find the Post where he helped me.
TURN ON IGNITION AND WAIT UNTIL BOTH ABS AND LOW PRESSURE LIGHTS HAVE EXTINGUISHED AND ALSO THE MOTOR PUMP HAS CUT OUT.
THEN, OPEN REAR LEFT BLEED NIPPLE AND HOLD BRAKE PEDAL DOWN, WITH IGNITION ON FOR 15 SECONDS � NO MORE
TIGHTEN BLEED NIPPLE, TURN OFF IGNITION, RELEASE BRAKE PEDAL.
WAIT ONE MINUTE AND REPEAT FROM RESTORING SYSTEM PRESSURE AS ABOVE FOR OTHER NIPPLE IF FITTED.
THEN WAIT ONE MINUTE AT LEAST BEFORE MOVING TO FRONT BRAKES � THIS PREVENTS THE MOTOR PUMP FROM OVERHEATING.
AT THE FRONT, ENSURE SYSTEM PRESSURE IS CREATED AND THEN BLEED CALIPERS CONVENTIONALLY WITH IGNITION ON, USING SLOW STROKES AND GO THE FULL TRAVEL BUT DO NOT FORCE.
ONCE THE LEFT SIDE HAS BEEN DONE, AGAIN WAIT ONE MINUTE AND THEN RESTORE SYSTEM PRESSURE.
This means that the pump drives the fluid and air when you bleed the rear circuit.
It also means that the pumped fluid ensures you have boost pressure providing 4:1 assistance acting on the master cylinder circuit when you bleed the front brakes.
Paul
The following users liked this post:
msteiner805 (02-22-2016)
#39
02-22-2016, 03:34 PM
Success!
I pulled the two 30 amp fuses (ABS & Pump) from the fuse box under the passengers glove box and noticed that while both were solid (not blown), one was dark grey on the metal contacts (heavily oxidized). Some q-tips plus a heavy application of deoxit and voila, on ignition the pump started running! The brake and ABS lights went off and the pedal stiffened up. I took a short drive and the brakes are working well, clean tight stops with no jerks or pulls.
Thanks Orange (and others) for your help!
Mike
The following users liked this post:
orangeblossom (02-22-2016)
#40
02-22-2016, 04:49 PM
Veteran Member
Success!
I pulled the two 30 amp fuses (ABS & Pump) from the fuse box under the passengers glove box and noticed that while both were solid (not blown), one was dark grey on the metal contacts (heavily oxidized). Some q-tips plus a heavy application of deoxit and voila, on ignition the pump started running! The brake and ABS lights went off and the pedal stiffened up. I took a short drive and the brakes are working well, clean tight stops with no jerks or pulls.
Thanks Orange (and others) for your help!
Mike
I pulled the two 30 amp fuses (ABS & Pump) from the fuse box under the passengers glove box and noticed that while both were solid (not blown), one was dark grey on the metal contacts (heavily oxidized). Some q-tips plus a heavy application of deoxit and voila, on ignition the pump started running! The brake and ABS lights went off and the pedal stiffened up. I took a short drive and the brakes are working well, clean tight stops with no jerks or pulls.
Thanks Orange (and others) for your help!
Mike
That's Amazing!
Its usually not that Simple so Congratulations and Well done.
Assuming both fuses are the Same, it might pay to put the Best one (cleanest one) in the Holder that operates the Pump, as its not the end of the World if the ABS fuse goes, at least you can get home like that.
Or if the Pump fuse goes, you could borrow the ABS fuse to do the same thing.