When you click on links to various merchants on this site and make a purchase, this can result in this site earning a commission. Affiliate programs and affiliations include, but are not limited to, the eBay Partner Network.
I thought the "shaft" was always supposed to be on the bottom and the "tube" on top, but I did some research and that doesn't always hold true.
Then I thought about the front shocks on my car and they have the tube on the bottom and the shaft on the top and that's how they're designed to go in.
It's called a load dump module. It's designed to prevent the alternator from killing itself if a large electrical load is suddenly removed, such as the battery cable becoming disconnected. Only the later XJS' have them, when they started putting on alternators with more capacity.
I need to be more careful with this car. When I pulled the rear quarter window I just cut the seal as with every other window I’ve ever pulled out. Bad move as they are NLA. After stewing on it for a few days I finally found some seals on E-Bay. Whew!
frustrating that so many things are NLA on a fairly modern car. Guess it’s just part of fun.
hope to get time to finish pulling the engine next week.
Making progress. Only took about an hour to pull it as I had it all disconnected and ready to pull. Found the ground strap once I lifted the engine a bit, and got that disconnected. I also lowered the front end as the engine wa going up, so by the time I pulled the engine assembly over the front, the front wheels were almost on the ground.
I have pulled all the head nuts off and am trying penetrating oil to hopefully make the heads come off easier, Just need to disconnect the cam sprockets, and they should be ready to come off. Happy that cams look really good and not worn or scored,
I assume that I don’t need to remove the camshaft and camshaft holder from the top of the head to pull the heads?
While working on stripping the block I ran into a small problem pulling the water pump. After pulling off all the (many) bolts holding it to the block, it still would not release. I finally realized that there was a screw (!!) hidden in the bottom. What kind of sick person designed this? I used my large Posidrive screwdriver and attached a wrench to the handle to get some leverage, but just managed to strip the end of the screw. So as a last resort, I used a slightly smaller driver, and it held enough to get it loose. Whew! Wasn’t looking forward to trying and drilling it out. Wasn’t too hard with the engine out on the ground. I can’t imagine doing it with the engine in the car without pulling the radiator and fans.
While most of my rotating parts seem fine, the water pump is toast, so adding that to the list.
Still don’t have the heads off, but continuing to soak the studs with penetrating oil and tapping on the heads with a rubber mallet. Worse case I’ll take the whole mess to the machine shop and let them deal with it. It’s all going there anyway.
A little progress today. Even half off the heads are not giving up easily. Can’t get to it for a few days now, so letting it marinate in penetrating oil and will get back to it next week. Good news for me is that a quick peek into the cylinders and they look good. We shall see next week.
Well done; great progress. I think that the pozi screw will be either metric or UNC, either way if you can replace it with a torx or allen key'd countersunk screw it would be worth the effort of tracking one down.
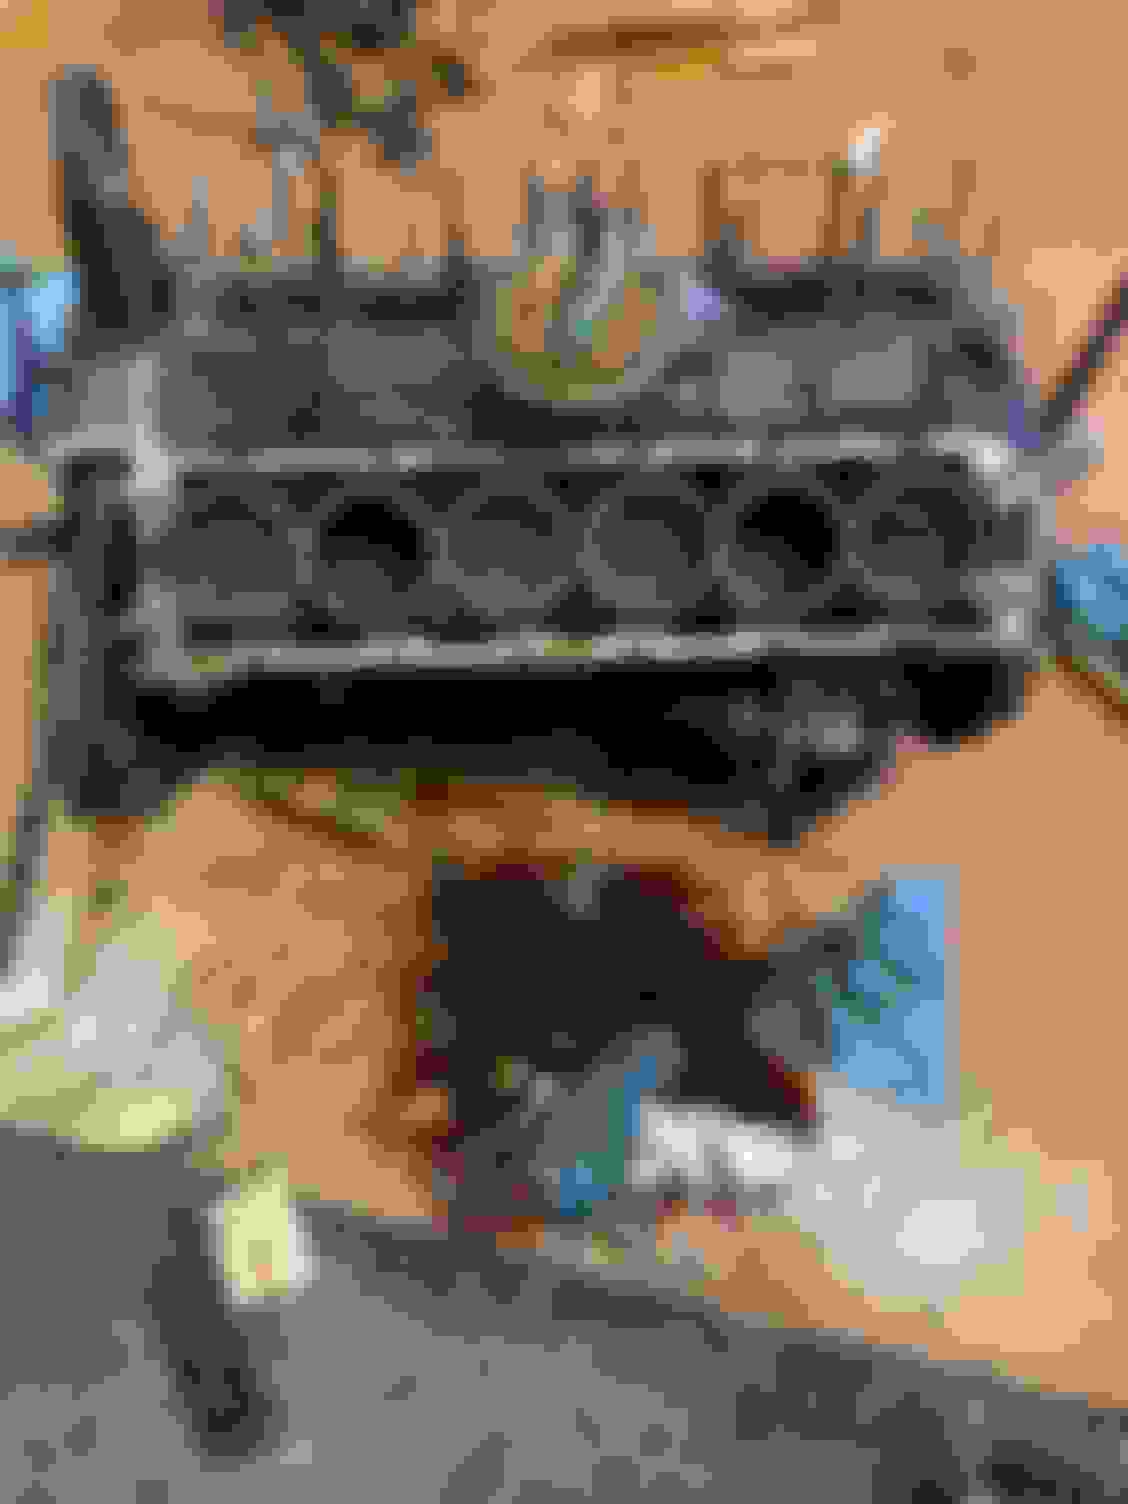
Finally got the heads off. It was as much of a pain as advertised. Many cycles of pressure and penetrating oil over a few days. Had to use more force than I would have liked, but I didn’t break anything. Had one head stud caught up on the b bank side, and even with the head up by 4 inches, it still would not come free so I just cut it. Will be replacing it and perhaps a few other crusty ones.
surface of the heads looks good but they are off to a local machine shop to be checked out with an emphasis on making sure all the valve seats and guides are good. They will also make sure they are flat and do a surface skim.
pistons and cylinders look good as do all the other internals. Bottom end, chain guides and such all look good as well. Not even much sludge in the oil pan.
So my plan at this point is just to do the top end, clean every thing very well and put it back together. The engine is relatively low miles and I don’t think I would gain a lot redoing the bottom end.
Great pics, please keep them coming. Wise decision on leaving well alone in the block. It is worth renewing the sump oil feed pipes' O rings, even though that means removing the sandwich plate and the sump baffle.
Last edited by Greg in France; 03-20-2022 at 03:42 AM.
The trouble started when I cut the head stud. As I mentioned before I had to cut one of the head studs to get the last head off. I figured it would be easy enough to get it out. It was pretty long, so I threaded the top and put a couple of nuts on it to pull it out. Could not get them to hold, so welded them to the stud. That didn’t work either- despite using heat and anti-seize lubricant, the stud just broke.
At this point I figured I needed some professional help. I loaded the engine in my truck and took it to the machine shop that was doing the heads. They took one look at it and said it would be too hard to get at it and they didn’t want to do it. After some cajoling they said they would do it if I pulled the cylinder sleeves so they could get better access.
They were not hard to get out. I pulled the pistons, and with some light tapping, the sleeves slid right out.
Engine back into the truck and off to the machine shop. With a couple of days they had it out. They had to cut off at the surface and then drill it out. It still would not break free so they drilled some more at the top and that was enough to break it free, Amazingly enough the threads came loose and they were able to unscrew the stub.
While I had planned to just clean up the engine and put the heads back on, the rod bearings are worn and the pistons are very dirty- so I’m going to pull all the pistons, clean everything really well and put in new rod bearings.
One question- when I put the cylinder sleeves back in, is there any kind of sealant that goes on on the surface where they seal to the block? I was thinking of using a light coat of the spray Permetex copper sealant.

 02-22-2022, 07:51 PM