Replacing cam covers gaskets
#1
 10-27-2013, 11:37 PM


Hello everyone, I’m a fairly new member. Last year Iinherited a 89 xjs conv, V-12 with 51000 miles. I’ve had the common problems,window motors not working, fuel sending unit not working, and groundingproblems. Currently I need to replace both cam cover gaskets, they are leakingin the rear and the oil is running down onto to exhaust. I’ve did some readingand going to use Gortex gaskets with new bolts. Was wondering if anyone has anytips on replacing these, or is there anything I should know before starting,what else should I replace when I have the intakes off? I thought I read somewhere to take the fuel rail,injectors, intake off together. Any suggestions would be appreciated
#2
10-28-2013, 03:27 AM

Veteran Member
I did this about 2 years ago. Engine out is easiest, but it is quite doable engine in, but do remove the bonnet (hood). There are about 24 nuts securing the inlet manifolds to the heads. Then undo the fuel feed and return from the regulators, unplug injection loom (and undo the clips holding it to the bottom of the V) and other small pieces such as temp sender wires, kickdown wires, dizzy vent tubes etc etc. Remove air filters and covers, leaving just the bit attached to the throttles, remove any vac tubes etc. Then the entire lot, injectors and all, lifts off vertically, which is when you need a friend to help, one each side. Here is a photo of them going back in after the refurb:
Immediately place bungs, or ***** of kitchen paper into the now open intake holes in the heads! You can now have the joyous task of cleaning up the V.
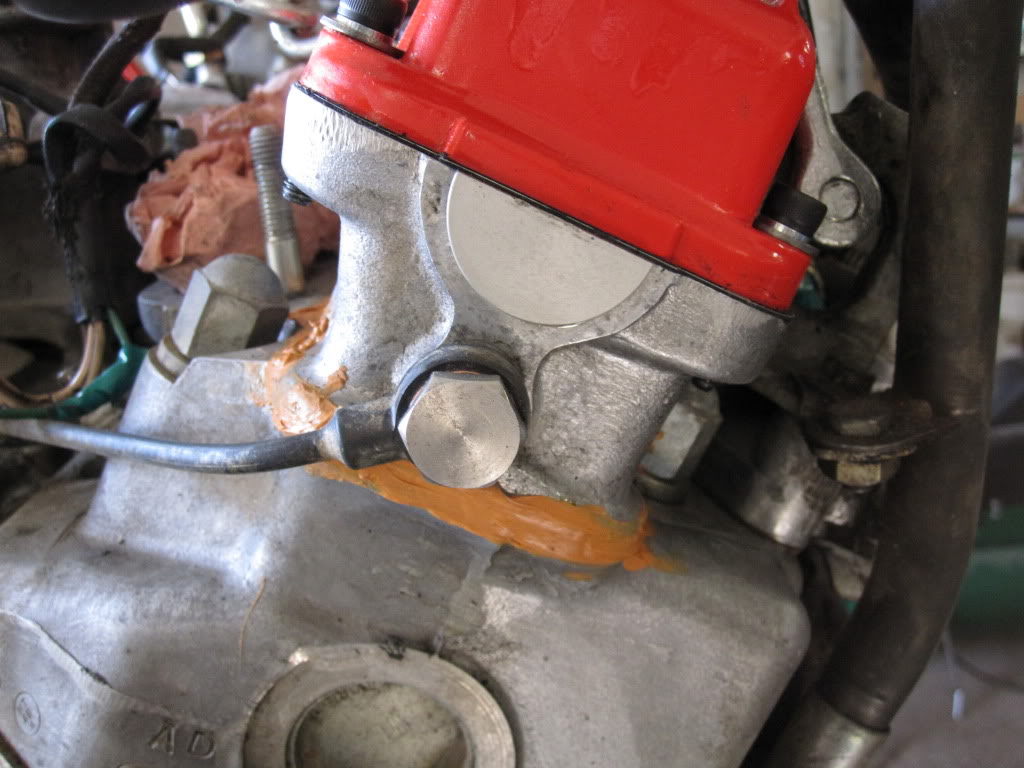
The oil will be leaking from three sources almost certainly. The cam covers, the half moon seals AND the join between the 'tappet block' and the head casting itself (the tappet block is the bit on top of the actual head casting that holds the camshaft and valve gear). There are two ways to fix this: remove the valve train entirely and seal (as described in the Great Palm's Book); or, after a thorough cleaning and roughing up a bit with sandpaper round the join, bodging high temp silicone round the join. I, of course, did the latter, and it works brilliantly:
The list of things to do once the intakes are off is pretty extensive, but IMO they all need to be done if you want a reliable car:

Immediately place bungs, or ***** of kitchen paper into the now open intake holes in the heads! You can now have the joyous task of cleaning up the V.
The oil will be leaking from three sources almost certainly. The cam covers, the half moon seals AND the join between the 'tappet block' and the head casting itself (the tappet block is the bit on top of the actual head casting that holds the camshaft and valve gear). There are two ways to fix this: remove the valve train entirely and seal (as described in the Great Palm's Book); or, after a thorough cleaning and roughing up a bit with sandpaper round the join, bodging high temp silicone round the join. I, of course, did the latter, and it works brilliantly:

The list of things to do once the intakes are off is pretty extensive, but IMO they all need to be done if you want a reliable car:
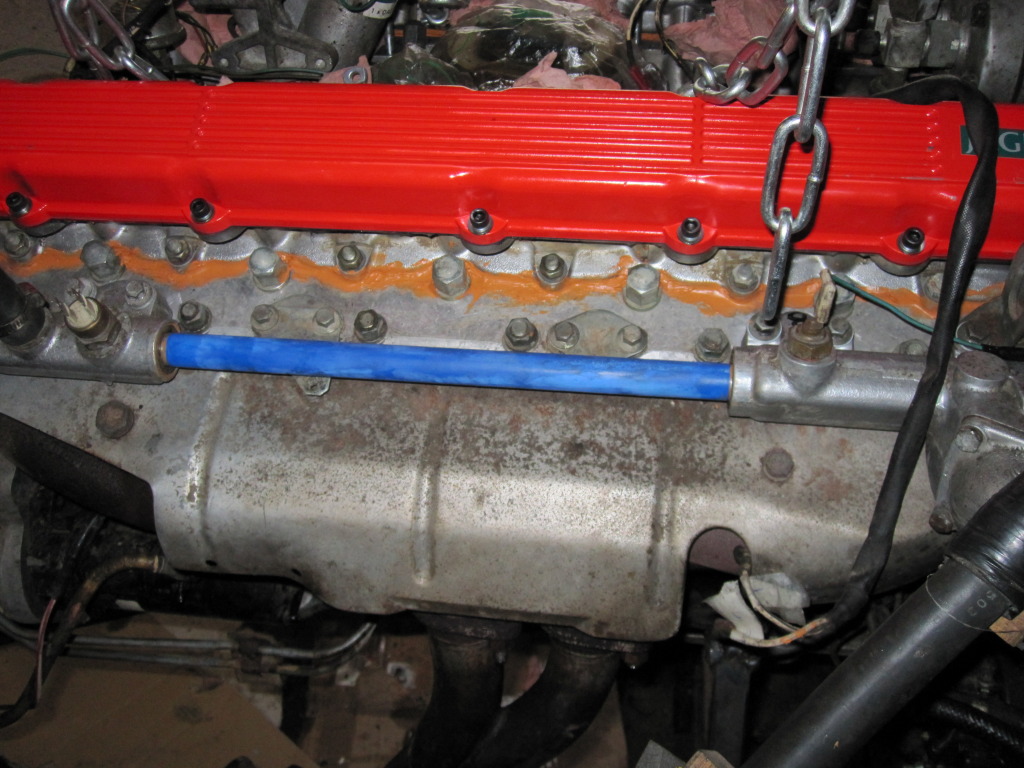
- cam cover gaskets and half moon seals (the seals will be hard-ish to get at engine in, as they are at the firewall end of the heads, but again quite doable with patience, here are some lovely aluminium ones I fitted, made by Ron Kelnhofer in the USA:
- renew water rail seals (see the blue pipe in the first photo, each end is sealed by a top hat seal into the water manifolds)
- renew all the injection hoses from the rail to the manifolds
- renew the flexible fuel feed lines from where they exit the firewall up to the regulators
- renew the small vac tubes
- check the advance/retard capsule on the dizzy (if you have a Lucas ignition car). If it has not been renewed recently it will be toasted almost surely
- new manifold/head gaskets
- new injector loom (stll available from Jaguar, or make your own). This is VERY important, as a short from toasted insulation holds the injectors open permanently and fills up the sump with fuel, and the car will not run
- check AAV, remove and ensure the plunger moves freely
- renew dizzy vent hoses (if you have a Lucas ignition car)
- while you have better access, it is a good idea to renew the water cross-rail hoses

Last edited by Greg in France; 10-28-2013 at 03:31 AM.
The following 3 users liked this post by Greg in France:
#3
10-28-2013, 06:13 AM

Greg has pretty much nailed it.
My only addition would be that you COUNT all the bits you have undone and removed, such as nuts, washers, clips etc. Count them AGAIN.
What I am getting at is that any stray items in the V and elsewhere close by will fall into the intake holes soooooo easily you will not notice until you put it back together and have a washer or something missing. The brain instantly goes into panic, "which cylinder did it fall into, and how do I get it out".
This has led to many engines being fully stripped to retrieve an errant item.
I always place the removed items on a table OUTSIDE the engine bay. Then look carefully for odd bits left behind from previous spanner persons, and once I am totally satisfied I lift the intake off.
The banjo bolts washers are a rare leaker, unless messed with. Longer banjo bolts are available for this application, as the factory bolts are toooo short and if messed with without real care will strip the threads in that alloy tappet block.
In all my years the half moon seals are 90% the issue here. Both on the V12 and 6 cylinder engines.
The following users liked this post:
azblindguy (10-28-2013)
#4
10-28-2013, 10:38 AM
Senior Member
Greg's post does a great job of illustrating the task, and the area to be repaired.
Be sure to replace the half moon seals at the back of the tappet block, as these are more likely the culprits of your leak, than are the gaskets. I've used two different permanent solutions to deal with this area on two different V12s. On the first motor, I had the heads off the car, and could put the tappet blocks on a level surface. This allowed me to clamp pieces of plastic on each side of the holes (a cut up credit card works well), then fill the half moon holes with JB WELD. After it cured I sanded the area level with the gasket mating surface. As I said, The tappet blocks were on a level surface, which is necessary for this technique.
The easiest solution for tackling this with the motor still in the car is, as Greg touched on, to purchase the aluminum half moon seals from Robert Kelnhofer. A link to the PDF file containing info on all his products for our V12s, as well as pricing and contact info for Ron can be found here: http://www.google.com/url?sa=t&rct=j...55123115,d.b2I
The seals are a VERY tight fit, and you will need to be very careful to get them pressed (beaten) down into their new home as much as possible before replacing your cam cover. One of our members cracked his cam cover because one of the seals was not completely seated before he tightened down his cam cover. The area is almost right up against the firewall, and it is difficult to get a straight shot at whacking the seal into place. I have used a section of wooden broom handle as a makeshift drift, which I hit with a dead-blow mallet in order to seat the seals, but, because wood tends to splinter after many blows, I recommend finding something more stable, yet softer than the aluminum seals (so as not to deform the gasket face). When I do this again on my 3rd motor, I plan to use, as my drift, something like the nylon or fiberglass handle from an old hammer or mallet.
While you're in that area, you should also replace the stock oil banjo bolts and copper washers with the improved versions Ron offers. I highly recommend getting as many of his useful products as you can afford.
Several years ago, Bernard Embden posted a VERY useful tutorial on doing this job. That tutorial can be found here: V-12 Valve Cover and Half-moon Seal replacement
I would suggest that everyone bookmark Bernie's website, as he has written great tutorials for fixing nearly every common malady encountered with our V12 XJSs. This is especially useful for those who own PRE-HE cars.
Last edited by JagZilla; 10-28-2013 at 11:03 AM.
The following 3 users liked this post by JagZilla:
#5
10-28-2013, 11:10 AM
#6
10-28-2013, 03:43 PM

#7
10-28-2013, 04:32 PM

Veteran Member
Trending Topics
#8
10-29-2013, 06:36 AM
Veteran Member
#9
11-22-2013, 11:16 PM
#10
11-24-2013, 09:47 AM
I’ve had the common problems,window motors not working, fuel sending unit not working, and groundingproblems.
Let me know if you need help with the gaskets...Regards,
#11
11-24-2013, 03:05 PM

Veteran Member
I recently did the shims on the followers. and didn't remove the hood as storage would be a problem. we padded the cars roof (fhc) with carpet and simply lifted the intakes and rested them on the roof until we closed the hood and carried them to the w/bench.
Last edited by rgp; 11-25-2013 at 02:34 AM.
#12
11-25-2013, 01:43 AM
Veteran Member
Greg
#13
11-25-2013, 02:27 AM
Veteran Member
having only done it 2 years ago, when I changed the heads, set them at 0015" following a book which advised that 15 may improve fuel consumption, it didn't and made a racket,
check the gaps
only can do one side at a time although you can check them all at the same time just cant remove both cams and keep the job uncomplicated
fit cam timing tool remove sprocket
remove cam
check existing shims
mine were new so I could still see the part # on them, old ones will need measuring
purchse 0003" thicker or whatever
wait for jags to deliver 2 weeks both sides
refit cam
check gaps
very straight forward when the intakes are off
now I no longer have the cowling fitted to the rad and
while I could get it at top dead centre r.h. with the cam timing plate, I checked the lower timing scale for accuracy set it at 10 degrees static (84 UK car) and marked the bottom pulley and corresponding position on timing cover so that I can check from above if I need to remove the dizzy at ant time in the future
Last edited by rgp; 11-25-2013 at 03:06 AM.
#14
11-25-2013, 07:20 AM
Veteran Member
Thanks, but excuse my ignorance, some supplementaries:
- Exactly HOW do you check the gap? Is it by turning the engine until the cam lobe in question is nose upwards and slipping in a feeler gauge? ?
- Then (say, for example, the gap is 10 thou and should be 15 thou for that valve) having removed the camshaft, do you reduce the shim thickness for that valve by (in this above example) 5 thou?
- I believe the shims go inside the bucket followers, correct?
- Can you make the correct thickness of shim by building up the shims, or must it be ONE shim of the correct thickness?
- Can the heads, valve train and shims be set up off car, then the engine turned to TDC for that side, and then the cam gauge used to ensure the cam is at the correct rotation point, and then the heads fitted?
Greg
#15
11-25-2013, 08:05 AM
Veteran Member
RGP
Thanks, but excuse my ignorance, some supplementaries:
Greg
Thanks, but excuse my ignorance, some supplementaries:
- Exactly HOW do you check the gap? Is it by turning the engine until the cam lobe in question is nose upwards and slipping in a feeler gauge? ?
- Then (say, for example, the gap is 10 thou and should be 15 thou for that valve) having removed the camshaft, do you reduce the shim thickness for that valve by (in this above example) 5 thou?
- I believe the shims go inside the bucket followers, correct?
- Can you make the correct thickness of shim by building up the shims, or must it be ONE shim of the correct thickness?
- Can the heads, valve train and shims be set up off car, then the engine turned to TDC for that side, and then the cam gauge used to ensure the cam is at the correct rotation point, and then the heads fitted?
Greg
2. yes
3. yup
4. I guess you can but if jags don't make the required shim. there are
bigger problems than adjustment, there is 2 thou tolerance to play
with
5. a. yes. much easier imo just hard to get the head off
b. no take the head off with the engine set at tdc and don't turn it then its easier to refit simply put the timing tool back on the cam and bolt back the sprocket. imo
its not complicated, its just that there is so much stuff to remember.
its the same as the 4.2 e type I once owned except that was twin cam
shims available still
http://www.jaguarclassicparts.com/uk...shim-5-3-litre
Last edited by rgp; 11-25-2013 at 08:11 AM.
The following users liked this post:
Greg in France (11-26-2013)
#16
11-26-2013, 02:19 AM
Veteran Member
Thanks RGP for this post, and for the link to the JCP site and the shims.
One last question:
Assuming you have measured the gap and calculated what the shim thickness difference that you need is, do you then remove the cam, find out by measurement the previously installed shim thickness, then calculate the new total thickness required for that valve, then order that shim thickness from JCP?
Apologies for my ignorance!
Greg
#17
11-26-2013, 03:32 AM
Veteran Member
yes, remove the cam at tdc, there are letters or part no on the shims but they may well be rubbed off so you'll need to measure them, write everything down, measured size, valve no. and shim size, and you may well find that you can use some of the shims on different valves, usually the gaps on an untouched engine will be tight rather than loose as the valves get comfy in the seat.
when you get round to the job, if you get stuck, get in touch
when you get round to the job, if you get stuck, get in touch
#18
11-26-2013, 05:35 AM
Veteran Member
#19
11-26-2013, 07:51 AM
Veteran Member
simple ones aren't hard to make and easy sellers when you finish with them.
if you have a decent bench drill and a supply of studding, really you only need two but this side was a bit more stubborn so I had to make another one
for the centre, it does damage the cam bearing studs but they are available from jcp but only listed under the 6lt parts. use the head dome nuts drilled through to guide the studs of the tool for the 1st 1/2"
p.s I have seen a plan in a book called experience in a book, I think, if you can find it
#20
03-11-2014, 07:00 PM
Hello,now that the holidays are over,going to try again on replacing the cam cover gaskets and half moons. I've worked on Fords,Chevy's and Nissan, but a little lost on the jag.Affaid going to end up with a trunk full of engine parts.