Rescue's Official Build Thread - 88 XJS V12 Oct 12 2019
#901
Resue
Well done, great stuff! Full service on the dizzy before toy put the manifolds back, When you do the injector hoses, also renew the "two lfexible, one steel" composite hose from the B bank fuel regulator to the fuel cooler. This is a sod to wriggle out, manifolds on the car. Just carefully cut the ferrules and replace the rubber parts with clips instead. They are barbed fittings under the ferrules.
If I were you I would renew the twin coils as well, these are not expensive. Remember to get only OEM ones, they have a far lower resistance than seemingly identical non-V12 ones, post here if you are not sure. the resistance must be about 0.7 ohms. A high resistance will screw the amp - which if cash is available you should also renew - and put the old one in the boot as a spare. .
#902
#903
#904
Resue
Well done, great stuff! Full service on the dizzy before toy put the manifolds back, When you do the injector hoses, also renew the "two lfexible, one steel" composite hose from the B bank fuel regulator to the fuel cooler. This is a sod to wriggle out, manifolds on the car. Just carefully cut the ferrules and replace the rubber parts with clips instead. They are barbed fittings under the ferrules.
If I were you I would renew the twin coils as well, these are not expensive. Remember to get only OEM ones, they have a far lower resistance than seemingly identical non-V12 ones, post here if you are not sure. the resistance must be about 0.7 ohms. A high resistance will screw the amp - which if cash is available you should also renew - and put the old one in the boot as a spare. .
Well done, great stuff! Full service on the dizzy before toy put the manifolds back, When you do the injector hoses, also renew the "two lfexible, one steel" composite hose from the B bank fuel regulator to the fuel cooler. This is a sod to wriggle out, manifolds on the car. Just carefully cut the ferrules and replace the rubber parts with clips instead. They are barbed fittings under the ferrules.
If I were you I would renew the twin coils as well, these are not expensive. Remember to get only OEM ones, they have a far lower resistance than seemingly identical non-V12 ones, post here if you are not sure. the resistance must be about 0.7 ohms. A high resistance will screw the amp - which if cash is available you should also renew - and put the old one in the boot as a spare. .
Didnt think about renewing the coils.
Also which is the correct gaskets for the tb. Search seems there is 2 styles.
Th

Should I take off the ends of the manifolds and replace the gaskets there? The deceleration valve areas. What do they do exactly?

finally thing. So the intake gaskets I have one piece wheres as the factory ones I received are all individuals. I've read people cutting the one piece up. Is it just because it's harder to install the one piece?
I leave today so I'll have all week to figure out my next order of parts.
#905
You need the top TB gasket in your post for the joint between the TB and the actual manifold casting. I think the next is for the joint between the air cleaner box and the TB, number 3 in this diagram:
https://parts.jaguarlandroverclassic.../brand/jaguar/
The two ringed in blue are for the overrun valves body (at one end of the manifold) and the spigot/balance pipe body, at the other. Neither of these do not need to touch at all. You do not need to undo anything bolted onto the ends of manifold body.
Last edited by Greg in France; 03-21-2021 at 08:21 AM.
The following users liked this post:
Doug (03-21-2021)
#906
#907
Join Date: Mar 2008
Location: Pacific Northwest USA
Posts: 24,866
Received 10,920 Likes
on
7,174 Posts
The following users liked this post:
Greg in France (03-21-2021)
#908
#909
Join Date: Mar 2008
Location: Pacific Northwest USA
Posts: 24,866
Received 10,920 Likes
on
7,174 Posts

Your engine bay will have lots of wiring in this condition which need to be clipped off and replaced. Often you can go back into the looms and find some softer, non-baked, non-crispy sections of wire to work with. Now get out your soldering iron......

My harness is so full of these repaired sections it's the equivalent of a quilt. I'm really becoming tempted to pull all the looms, lay 'em on the bench, and start from scratch.
Cheers
DD
#910
What you're hearing is the insulation breaking apart, leaving the wire strands exposed. It's a bit cringe inducing, isn't it? 
Your engine bay will have lots of wiring in this condition which need to be clipped off and replaced. Often you can go back into the looms and find some softer, non-baked, non-crispy sections of wire to work with. Now get out your soldering iron......
My harness is so full of these repaired sections it's the equivalent of a quilt. I'm really becoming tempted to pull all the looms, lay 'em on the bench, and start from scratch.
Cheers
DD

Your engine bay will have lots of wiring in this condition which need to be clipped off and replaced. Often you can go back into the looms and find some softer, non-baked, non-crispy sections of wire to work with. Now get out your soldering iron......

My harness is so full of these repaired sections it's the equivalent of a quilt. I'm really becoming tempted to pull all the looms, lay 'em on the bench, and start from scratch.
Cheers
DD
at least I'm good at soldering from my RC experience lol
#911
Join Date: Mar 2008
Location: Pacific Northwest USA
Posts: 24,866
Received 10,920 Likes
on
7,174 Posts
Cheers
DD
#912
Last edited by Rescue119; 03-21-2021 at 08:52 PM.
#913
#914
Back from work. 3 weeks before I'm gone for another 3.
So bought some cleaning stuff so gonna work.on cleaning up the V area before remove the spark plugs.
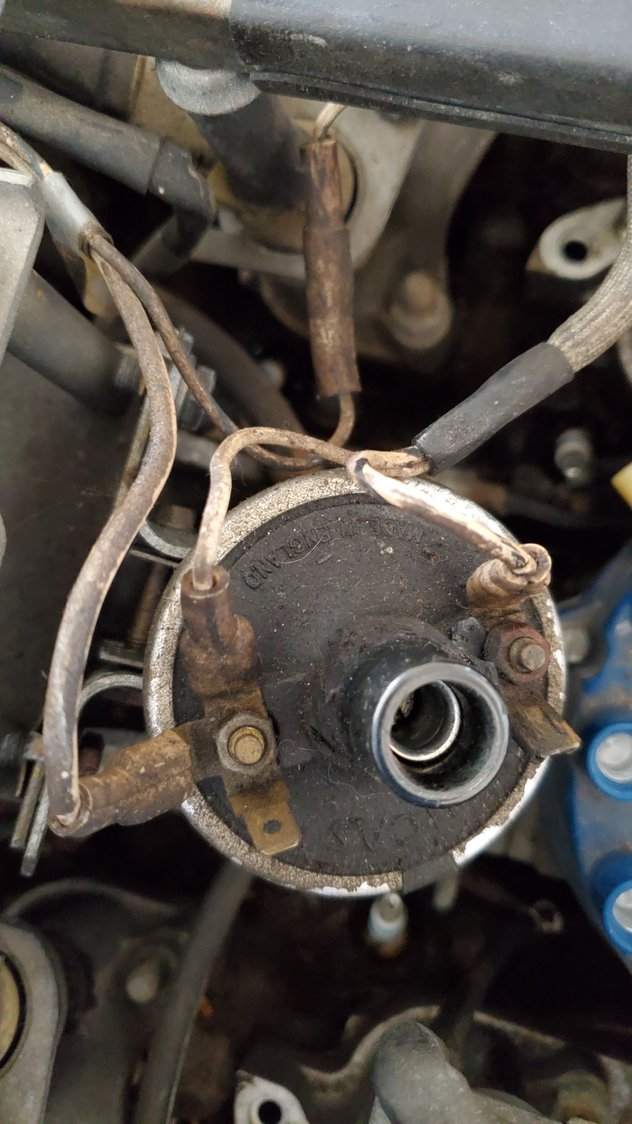
Question about the coil.
I thought I had the dual cool system but I can't find the smaller square 2nd one. unless it's hidden somewhere else I'm sure I just have the one coil then.
Anyone confirm or know the exact location of the 2nd one. I thought front of engine but nothing
#915
#916
Ok well good thing I removed all that. Just looked and don't see anything so single coil for me.
#917
Rescue
If you have the single coil setup, it should be the square one only, fixed to the throttle tower. If you have just a round coil there, and no second one, then it needs to be replaced by the square type. A single round coil cannot regenerate the spark fast enough to fire reliably over 3,500 rpm. Similarly, the square replacement must be the Jaguar one, or compatible one, not just any one that looks the same.
If you have the single coil setup, it should be the square one only, fixed to the throttle tower. If you have just a round coil there, and no second one, then it needs to be replaced by the square type. A single round coil cannot regenerate the spark fast enough to fire reliably over 3,500 rpm. Similarly, the square replacement must be the Jaguar one, or compatible one, not just any one that looks the same.
#918
Rescue
If you have the single coil setup, it should be the square one only, fixed to the throttle tower. If you have just a round coil there, and no second one, then it needs to be replaced by the square type. A single round coil cannot regenerate the spark fast enough to fire reliably over 3,500 rpm. Similarly, the square replacement must be the Jaguar one, or compatible one, not just any one that looks the same.
If you have the single coil setup, it should be the square one only, fixed to the throttle tower. If you have just a round coil there, and no second one, then it needs to be replaced by the square type. A single round coil cannot regenerate the spark fast enough to fire reliably over 3,500 rpm. Similarly, the square replacement must be the Jaguar one, or compatible one, not just any one that looks the same.
See why I'm confused. I have a single system. The round one

It's a March 1988 build date. Still Lucas.
#920


