When you click on links to various merchants on this site and make a purchase, this can result in this site earning a commission. Affiliate programs and affiliations include, but are not limited to, the eBay Partner Network.
A long time ago I did some checking on the importance of having a full 5.0 volts at WOT.
The consensus from various sources, including Bywater, and including a variety of different cars, is that it is not essential. Anything over 4.5 or so is considered acceptable.
A long time ago I did some checking on the importance of having a full 5.0 volts at WOT.
The consensus from various sources, including Bywater, and including a variety of different cars, is that it is not essential. Anything over 4.5 or so is considered acceptable.
Cheers
DD
The onther stlyes ive seen would suggest this info is correct as i see ones listed between .5v and 4.5v
Spec has been agreed, will fit with no set up necessary as all pre-set, 0.32v to 4.9v, 90�, clockwise action, Hall-effect action (no physical wiper to wear), female D fitting so should be OK for OEM Bournes-type spindle (maybe with a little fettling to OEM spindle if spindle D slightly different size), no minimum order. Quote on its way next week. When it arrives will post again with detailed spec. Essentially a "programable-to-spec-required" off the shelf item used in motorsport, very good heat and vibration reistance, etc etc.
My intention is to buy one and fit and test it. If it works properly and fits easily, it will be a really vital option for all who want a reliable, better than OEM spec TPS that fits straight on the OEM capstan setup.
For "red TPS" cars the item is also available with a blade-type male spindle that should be workable with the OEM adapor fitted to those cars, although just removing all the adoptor stuff would return your car to Bournes spec anyway! See attached.
Last edited by Greg in France; 10-14-2022 at 10:23 AM.
Spec has been agreed, will fit with no set up necessary as all pre-set, 0.32v to 4.9v, 90�, clockwise action, Hall-effect action (no physical wiper to wear), female D fitting so should be OK for OEM Bournes-type spindle (maybe with a little fettling to OEM spindle if spindle D slightly different size), no minimum order. Quote on its way next week. When it arrives will post again with detailed spec. Essentially a "programable-to-spec-required" off the shelf item used in motorsport, very good heat and vibration reistance, etc etc.
My intention is to buy one and fit and test it. If it works properly and fits easily, it will be a really vital option for all who want a reliable, better than OEM spec TPS that fits straight on the OEM capstan setup.
For "red TPS" cars the item is also available with a blade-type male spindle that should be workable with the OEM adapor fitted to those cars, although just removing all the adoptor stuff would return your car to Bournes spec anyway! See attached.
Great work!
I ordered some aluminum rod as I want to make a better shaft connector then the butchered one i have made up from the original TPS. After your testing etc. I would gladly pay for a more robust one. especially as we know heat is the enemy for anything under that hood
The rods i ordered showed up today. Ill start playing with it this week. the rods came in 300mm length and i only need 12.5mm lol so plenty of space to mess up.
Been awhile. Work was busy and winter set in early.
Now I'm on Xmas break for 2 weeks I'm going to jump into removing the front sub frame. I picked up a engine support bar from princess auto today. Rated at 1100lbs.
Going to finish that little connector for the ford tps and get that back together tomorrow morning.
Any tips for removing the front sub frame.
I've been watching camp chaos chronicles youtube videos on it and seems pretty striaght forward along with Bernard's website and his removal method.
Also I traded in my 07 Honda vfr800 for a 2023 klr650 adventure model to get into adv riding. Can't wait for spring.
Shot a nice 5x4 buck this hunting season to and got the head euro mounted
Rescue
What are you intending to do to the subframe/suspension etc? based on that I might have a few suggestions. TPS on order but late; should arrive before end of Jan.
Rescue
What are you intending to do to the subframe/suspension etc? based on that I might have a few suggestions. TPS on order but late; should arrive before end of Jan.
Same as yhe rear end... replace everything i can, all bushings (suggestions for poly or orginal style? ), rebuild power steering rack, clean and respray.
Anything else I should look at? Replace motor mounts?
I'd like to have it all back and reinstalled by april/may so I can start on body work as that should be the end of the mechanical stuff.
I very excited to see if that part works out for the tps.
Rescue
Once you have the beam across the motor, and the wheels off, and assuming the car is off the ground enough, then first thing to do is to remove the road springs whilst the subframe is still in the chassis. Then, you need a short 9/16ths spanner (wrench in US Speak) to undo the top nut on the motor mounts, remove the air cleaner covers as this helps get the spanner into place, and a ratchet spanner is a GREAT aide too.
Undo the brake flexibles at the caliper and block them off somehow (eg poly tube, blanked off fitting etc etc). Undo shocks at the hub, or wing top. Also undo the rack lines from the rack. At this stage I recommend removing the hubs from the stub axles, which requires the calipers to be removed first. Also separate the track-rod ball joints from the steering arm each side. Basically everything that needs to be undone is FAR easier done with the subframe still in the chassis. NOTE the caliper bolts are metric fine, but the bolt heads are (from memory) 5/8ths.
I would also recommend removing the lower ball joint from the bottom of the upright/lower wishbone at this point. There are four bolts holding it, but releasing it from the taper in the upright is a bear. A ball joint separater is a good tool for this job. Also undo the drop link from the sway bar where it fixes to the lower wishbone outer assembly.
Loosen but do not remove the huge six shot bolts at the front of the subrame.
Then using a workshop table about 6 inches under the subframe and a jack to one side of it against some part or other of the subframe (if no garage lift) just take the weight on the jack and undo the two rear subframe mounts fixing nuts, also 9/16ths. Once they are off, release the jack gradually so the rear of the subframe pivots down onto the table.
Now you need to drive out the bottom wishbone inner fulcrum pins, these may come out OK, or may be 3 hours with a FBH. These pins cannot be removed until the S/F is swung down as they foul the sump! I had to cut mine off! Either way, by the time you get this far the S/F will be minus everything except the top wishbones, rack and upright, and is quite easily lifted by hand. Support it (as it is still hanging down from the front mounts, and knock out the huge bolts, CAREFULLY noting where the huge spacers went and NOT losing the sleeve inside the six shot mount itself!
As to new bushes, I recommend metalastic throughout; but on the bottom wishbone they are a MUST. Anything else last weeks not months! Jack Weston at David Manners seems to be the only place that still has them. If the six shot bushes are not deformed, re-use them. Ditto rear subframe V mounts. If they are sot, buy metalastic ONLY from Jack at Manners. Poly are OK on the top wishbone inner fulcrum bushes, but no better than OEM Slipflex. Rack bushes: poly or neoprene are fine here but you MUST have the heat shields properly in place. The absolite BEST are Jaguarsport bushes, you need 2 plus one ordinary one, but they are idiotically expensive at about 100 USD each. While the S/F is out, check the swaybar rubbers where the bar is fixed to the chassis.
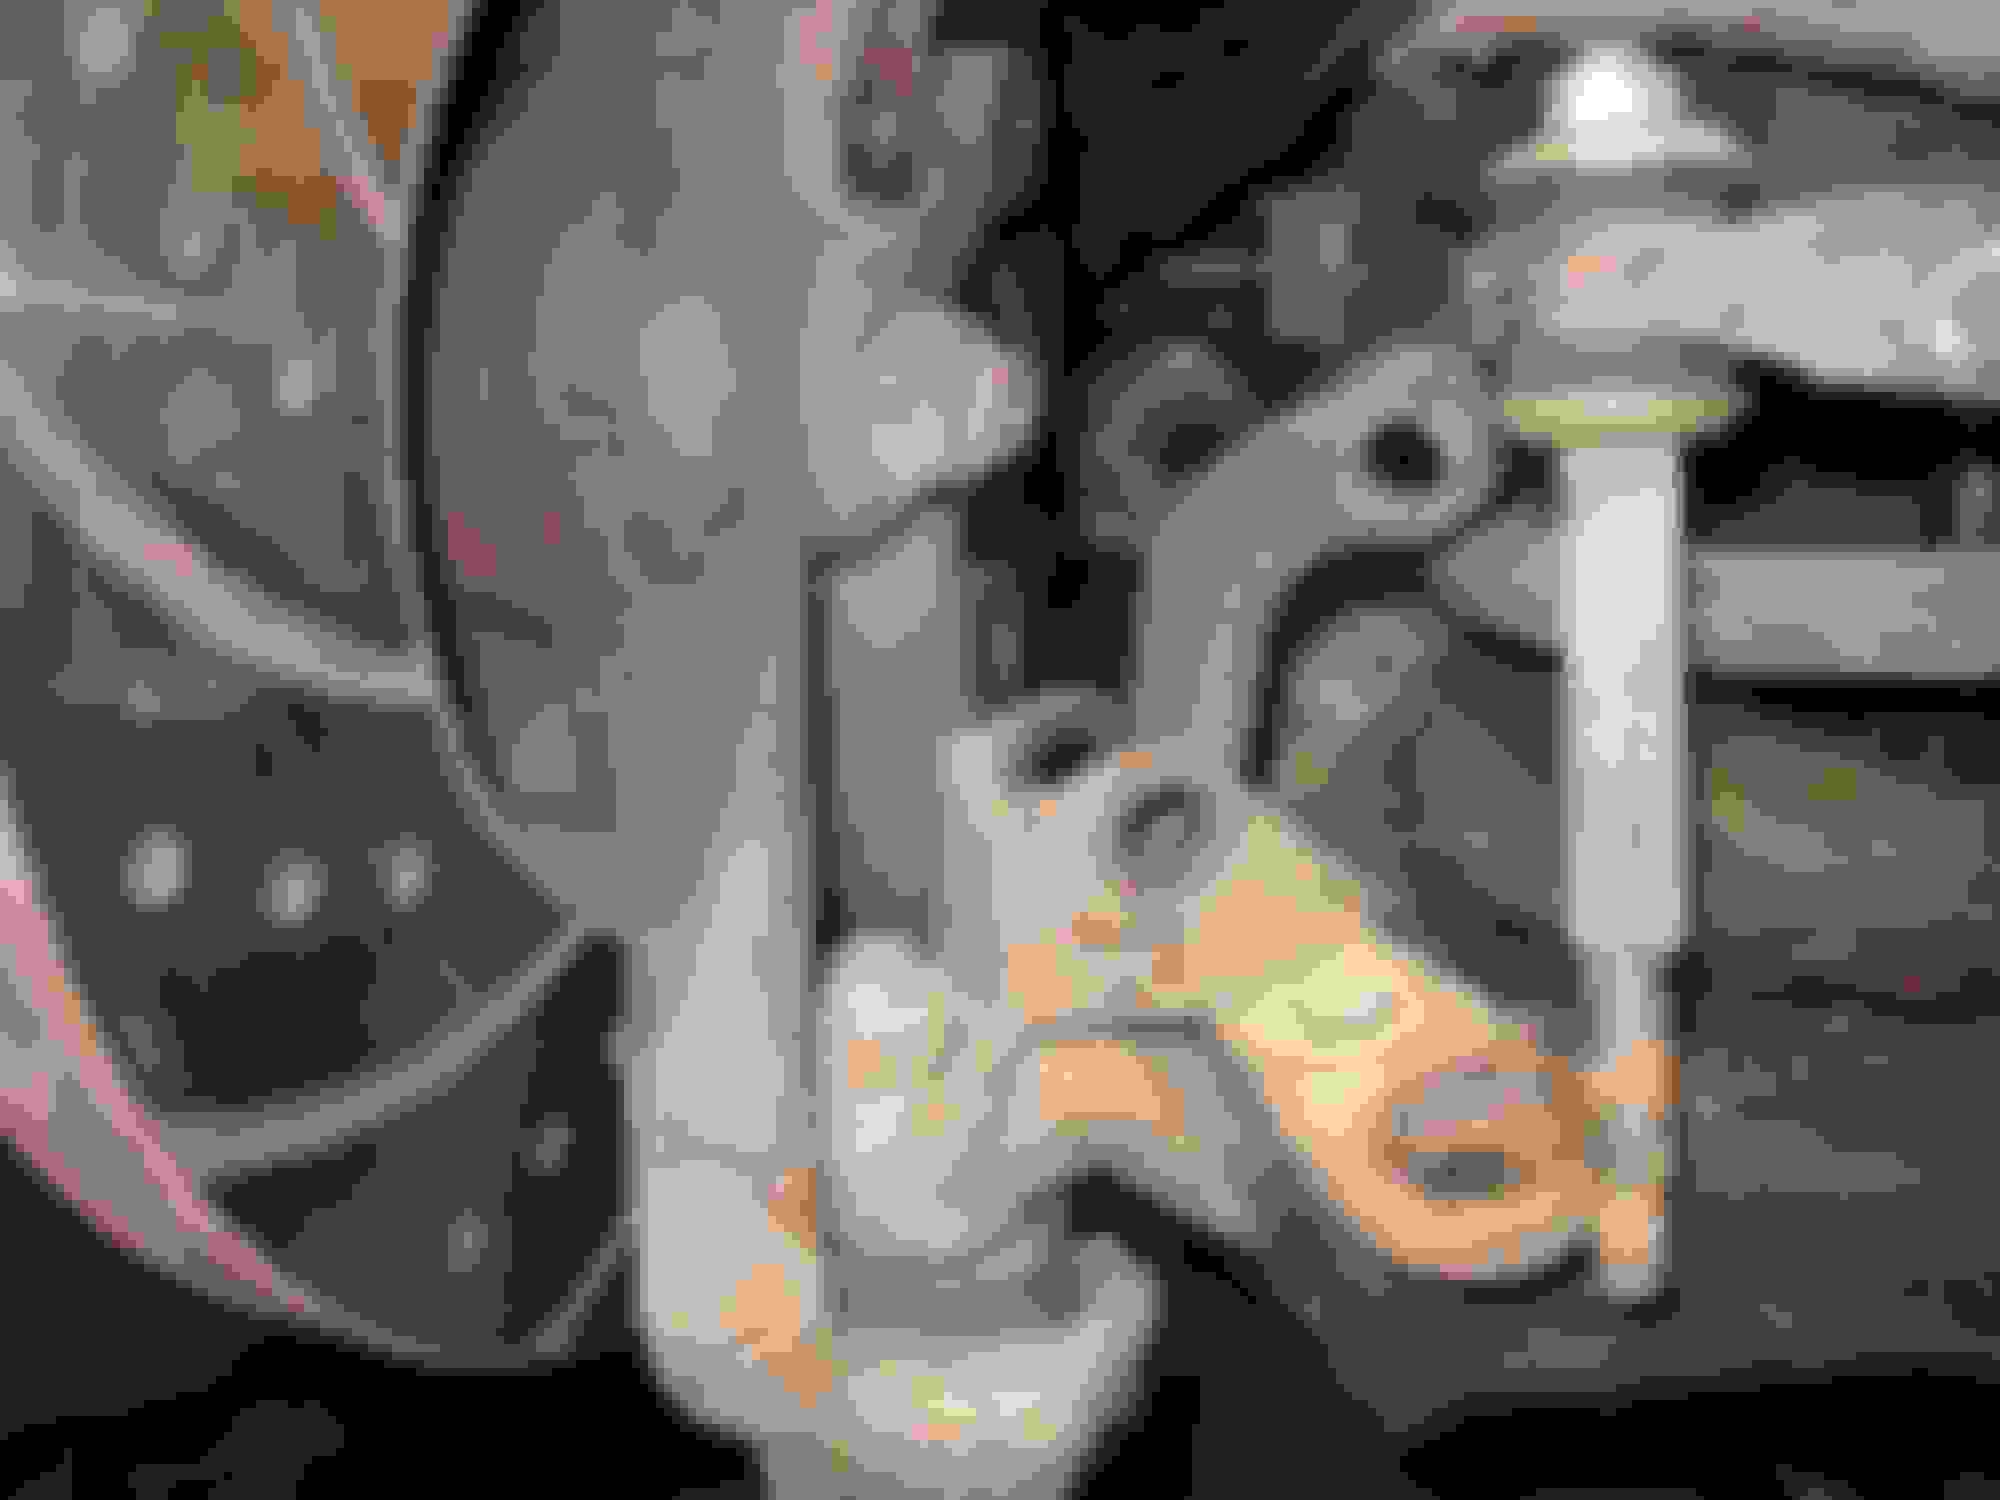
Close up of the lower ball joint here:
Last edited by Greg in France; 12-23-2022 at 11:23 AM.
Six shot bolts: the long bolts that hold the front subrame arms to the chassis, the large rubber bushes have 6 holes in them like a revolver magazine. See 10 in the diagram: https://parts.jaguarlandroverclassic.../brand/jaguar/
My view is that it is easier to remove the springs with the subframe firmly held in the car! The threaded rod method is fine, but it is easier without the subframe sliding about on a table! Even moreso when reassembling. Also when reassembling, it is far easier to get the subframe onto its rear V mount studs when it is as light as possible.
Ah ok I though there was like 6 bolts I needed to remove lol.
Got the ford tps installed. I ended up using the plastic piece I cut off the orginal as the aluminum I was going to use was a pain and just couldn't get it right.
I'm showing .32v at idle but only 4.1v at the stop. I know that's common issues and I know how to fix it but i need to get moving on my front craddle so at least i ca move it now
Forgot to add my idle is still high. Started at 2k and went down to 1400 after a few minutes. So im thinking the avv is stuck. Need to try cherryblossoms trick with the hair dryer but im suer its in need of a rebuild/replacement.
Rescue
Once you have the beam across the motor, and the wheels off, and assuming the car is off the ground enough, then first thing to do is to remove the road springs whilst the subframe is still in the chassis. Then, you need a short 9/16ths spanner (wrench in US Speak) to undo the top nut on the motor mounts, remove the air cleaner covers as this helps get the spanner into place, and a ratchet spanner is a GREAT aide too.
Undo the brake flexibles at the caliper and block them off somehow (eg poly tube, blanked off fitting etc etc). Undo shocks at the hub, or wing top. Also undo the rack lines from the rack. At this stage I recommend removing the hubs from the stub axles, which requires the calipers to be removed first. Also separate the track-rod ball joints from the steering arm each side. Basically everything that needs to be undone is FAR easier done with the subframe still in the chassis. NOTE the caliper bolts are metric fine, but the bolt heads are (from memory) 5/8ths.
I would also recommend removing the lower ball joint from the bottom of the upright/lower wishbone at this point. There are four bolts holding it, but releasing it from the taper in the upright is a bear. A ball joint separater is a good tool for this job. Also undo the drop link from the sway bar where it fixes to the lower wishbone outer assembly.
Loosen but do not remove the huge six shot bolts at the front of the subrame.
Then using a workshop table about 6 inches under the subframe and a jack to one side of it against some part or other of the subframe (if no garage lift) just take the weight on the jack and undo the two rear subframe mounts fixing nuts, also 9/16ths. Once they are off, release the jack gradually so the rear of the subframe pivots down onto the table.
Now you need to drive out the bottom wishbone inner fulcrum pins, these may come out OK, or may be 3 hours with a FBH. These pins cannot be removed until the S/F is swung down as they foul the sump! I had to cut mine off! Either way, by the time you get this far the S/F will be minus everything except the top wishbones, rack and upright, and is quite easily lifted by hand. Support it (as it is still hanging down from the front mounts, and knock out the huge bolts, CAREFULLY noting where the huge spacers went and NOT losing the sleeve inside the six shot mount itself!
As to new bushes, I recommend metalastic throughout; but on the bottom wishbone they are a MUST. Anything else last weeks not months! Jack Weston at David Manners seems to be the only place that still has them. If the six shot bushes are not deformed, re-use them. Ditto rear subframe V mounts. If they are sot, buy metalastic ONLY from Jack at Manners. Poly are OK on the top wishbone inner fulcrum bushes, but no better than OEM Slipflex. Rack bushes: poly or neoprene are fine here but you MUST have the heat shields properly in place. The absolite BEST are Jaguarsport bushes, you need 2 plus one ordinary one, but they are idiotically expensive at about 100 USD each. While the S/F is out, check the swaybar rubbers where the bar is fixed to the chassis.
Close up of the lower ball joint here:
You don't mention undoing the steering joint from the steer wheel shaft?
Bottom joint on the steering shaft is a combination pinch bolt - it actually sits in a groove in the shaft so the bolt must be removed completely. Depending on yuour plans make sure the wheels are in the straight ahead position but it isn't the end of the world if you don't.
The bolt is a bit of a beer festival to undo and remove, leave it a tad loose and try to open up the pinch area a little will help quite a bit, once it is all loosey goosey take the bolt out fully, you should be able to wriggle the shaft off, put the pinch bolt back in that's the safest place for it.
Picked up some 18 inch rims a week ago used. The fit perfectly due to a +18 offset. They came off a bmw.
The need to be refinished but that's ok. I'm gonna paint them gloss black.
Also wrapping them in yokohama advan sport a/s+ tires (30% off sale) 245/45r18 100W. Not the ones I really wanted but at 30% I couldn't pass them up and they are still a great tire.
I'm heading on vacation this weekend so no time to work on anything as getting the family packed up is time consuming lol
Did get some more bits and bobs disconnected from the front sub frame. Main reason I'm taking out the front sub frame is to repair a small hole in the rhs coil pot. Hopefully once I get it out and cleaned I don't find more damage as sourcing a front sub frame is gonna be very tricky at my current location.

 10-12-2022, 06:43 PM