
Rusted suspension components
#21
 08-06-2015, 05:44 PM


Just picked one up from SNG with bushings for $128 shipped. A pretty good deal if you ask me. That's few bucks cheaper than Berkshire and it's in the states so I'll get it quicker and cheaper. It's not OEM but that doesn't matter to me, I just want a fresh arm on there.
I've reviewed the tips and tricks, is it best to have the car on the ground when doing this (at ride height) or should I jack the car up first? From what I could see on the jaguar specialties site he had the car on the ground (the wheels are on blocks in increase height, but you understand what I mean) when replacing the arm?
I've reviewed the tips and tricks, is it best to have the car on the ground when doing this (at ride height) or should I jack the car up first? From what I could see on the jaguar specialties site he had the car on the ground (the wheels are on blocks in increase height, but you understand what I mean) when replacing the arm?
After fitting new one do not fully tighten rear fixing bolt until the weight of the car is back on suspension.
#22
08-12-2015, 08:45 AM

I dove into this last night. I managed to get the arm off, but it took a little longer than I expected, as usual.

I am pleased with the replacement: the bushings are nice and tight in there and the part looks great, very similar to the original.
The front came off within the first few minutes, it was the rear fixing bolt that took time. the bolt was actually frozen to the bushing race and I ended up having to cut it off.
I couldn't break the bolt loose, so I cut the arm off so that I could attempt to get at the race that way. The problem was that the bolt would loosen but it would take the race with it, putting pressure on the bracket the bolt goes through.
I ended up cutting the head of the bolt off, cutting the bushing (with the bolt in it) also in half in order to give me room to take the rest of the bolt out. The bolt came out by hand once I had enough space to take it out.
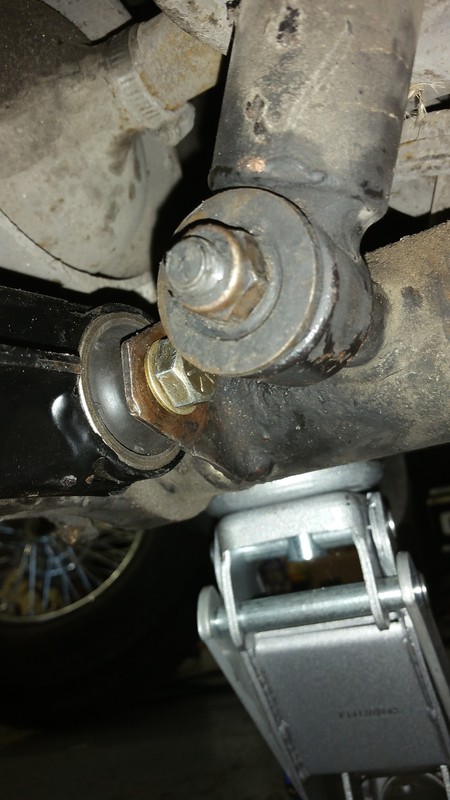
I didn't notice until I was down there that it actually appears to be a hex head bolt with two of the sides ground flat. Is this true? I'm assuming that this is so that it will clear the coilover mount for installation or something of the sort.

From the inside of the car looking out:

Since no one has said anything regarding that bolt being particularly difficult to install I'm hoping that it will be easier than I think it is, but it sure looks like I won't be able to get that bolt in without a lot of work. I don't see how it would have come out otherwise being as long as it is.
Can anyone lend some insight as to how that bolt installs? Was it relatively easy? It's a 1/2-20 bolt, nothing special save for the odd head, and I can turn one side down easy enough. I'll grab one at the hardware store and see what it looks like to install.

I am pleased with the replacement: the bushings are nice and tight in there and the part looks great, very similar to the original.
The front came off within the first few minutes, it was the rear fixing bolt that took time. the bolt was actually frozen to the bushing race and I ended up having to cut it off.
I couldn't break the bolt loose, so I cut the arm off so that I could attempt to get at the race that way. The problem was that the bolt would loosen but it would take the race with it, putting pressure on the bracket the bolt goes through.
I ended up cutting the head of the bolt off, cutting the bushing (with the bolt in it) also in half in order to give me room to take the rest of the bolt out. The bolt came out by hand once I had enough space to take it out.
I didn't notice until I was down there that it actually appears to be a hex head bolt with two of the sides ground flat. Is this true? I'm assuming that this is so that it will clear the coilover mount for installation or something of the sort.

From the inside of the car looking out:

Since no one has said anything regarding that bolt being particularly difficult to install I'm hoping that it will be easier than I think it is, but it sure looks like I won't be able to get that bolt in without a lot of work. I don't see how it would have come out otherwise being as long as it is.
Can anyone lend some insight as to how that bolt installs? Was it relatively easy? It's a 1/2-20 bolt, nothing special save for the odd head, and I can turn one side down easy enough. I'll grab one at the hardware store and see what it looks like to install.
#23
08-12-2015, 12:06 PM

Senior Member
the bolt head has a special shape to pass the rear shock mount, if you look at the rear shock mount you will see a bolt , then the shock bush , then a shim of about half an inch
this needs to come off to allow the radius arm bolt to easily be installed, with the lower swing arm at its lowest, the spring/damper assembly should come out without it extending or putting force on the lower bolt holding it, the damper will then move out of the way slightly
the special bolt for the radius arm will need a spanner to install avoiding the special shaped side
its a PITA but well worth the effort
i have to do a pair of these radius arms for my local XJS owning buddy in the UK
BB
The following users liked this post:
xjsman89 (08-12-2015)
#24
08-12-2015, 12:39 PM

Veteran Member
#25
08-12-2015, 03:35 PM
Thanks for the tips, BB. I hope to give it a try tonight or tomorrow. So the damper/shock/spring assembly should come off of that bolt without needing any kind of compressor or anything to put it back on once the bolt for the radius arm is installed?
I would go ahead and do that, Paul, but since I'm only doing the one side right now I'll probably leave it how it is so that it keeps a similar ride on both sides. I'll keep it in mind, though, when I go to replace the other one which I'm sure I'll have to do eventually.
I would go ahead and do that, Paul, but since I'm only doing the one side right now I'll probably leave it how it is so that it keeps a similar ride on both sides. I'll keep it in mind, though, when I go to replace the other one which I'm sure I'll have to do eventually.
#26
08-19-2015, 08:37 AM
I like to keep in the habit of finishing my threads for those interested and in case someone who was in the position that I was a couple weeks ago and stumbles upon this thread.
I got the arm on, it went on a lot quicker and easier than I thought it would.
I ordered the special bolt with the flat with SNG but when I got to thinking about it, I didn't want to wait that long for it and it's just a bolt with a flat on it, right? So I made my own. I got a 2.75" long 1/2-20 Grade 8 bolt and sanded two of the flats off on a belt sander. (Grade 8 is what we had at work, I would have gotten a Grade 5 if I were purchasing it on my own because they have a little better shear strength, but beggars can't be choosers.)
Just like everyone here said, I moved the jack from the lower suspension arm to let the assembly come to rest. It still has to be jacked up of course, though, so I put a jack stand under the diff cover (where it says to jack from in the manual if you want both wheels off the ground) and put a jack stand on the side for stability and my own piece of mind. I was then able to undo the shock tower nut and washer that were in the way, and I actually just slid the shock mount and spacer over a bit and was able to get the bolt in. I didn't have to actually remove them at all. My assembly was dirty enough that by just looking at it I couldn't tell that there was a spacer there at all.


Bolt installed:
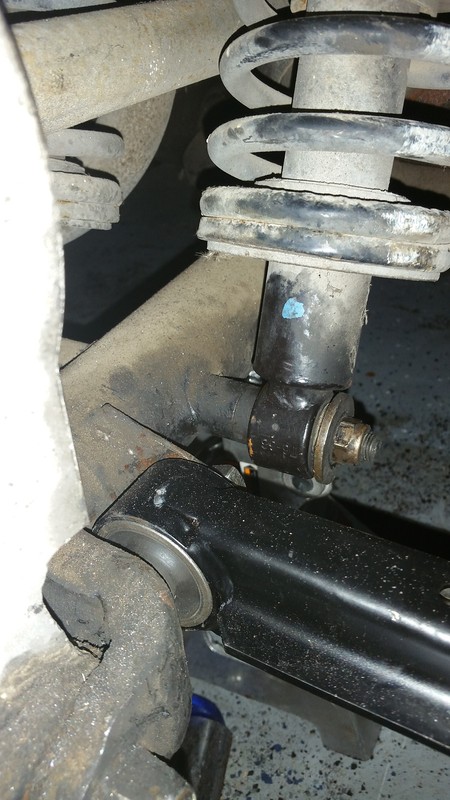
There was exactly zero clearance to get that bolt in. I see now when installing it (had to cut the bolt head and the bushing in pieces to remove it) that it actually rubs the shock tower mount, I had to tap it in with a hammer. It went in easy though and threaded right in. I got it snug, moved the jack back to the arm to bring the assembly back up to ride height (ish) and tightened the bolt (and metal bracket) on the front of the arm. Then I lowered the car back down and removed the jack entirely, tightened up the 1/2-20 bolt, and took her for a test drive. Everything works great now, and it's nice to have that old, rusted out radius arm off of the car.
Thanks everyone for all of their help, this forum is fantastic!
I got the arm on, it went on a lot quicker and easier than I thought it would.
I ordered the special bolt with the flat with SNG but when I got to thinking about it, I didn't want to wait that long for it and it's just a bolt with a flat on it, right? So I made my own. I got a 2.75" long 1/2-20 Grade 8 bolt and sanded two of the flats off on a belt sander. (Grade 8 is what we had at work, I would have gotten a Grade 5 if I were purchasing it on my own because they have a little better shear strength, but beggars can't be choosers.)
Just like everyone here said, I moved the jack from the lower suspension arm to let the assembly come to rest. It still has to be jacked up of course, though, so I put a jack stand under the diff cover (where it says to jack from in the manual if you want both wheels off the ground) and put a jack stand on the side for stability and my own piece of mind. I was then able to undo the shock tower nut and washer that were in the way, and I actually just slid the shock mount and spacer over a bit and was able to get the bolt in. I didn't have to actually remove them at all. My assembly was dirty enough that by just looking at it I couldn't tell that there was a spacer there at all.


Bolt installed:


There was exactly zero clearance to get that bolt in. I see now when installing it (had to cut the bolt head and the bushing in pieces to remove it) that it actually rubs the shock tower mount, I had to tap it in with a hammer. It went in easy though and threaded right in. I got it snug, moved the jack back to the arm to bring the assembly back up to ride height (ish) and tightened the bolt (and metal bracket) on the front of the arm. Then I lowered the car back down and removed the jack entirely, tightened up the 1/2-20 bolt, and took her for a test drive. Everything works great now, and it's nice to have that old, rusted out radius arm off of the car.
Thanks everyone for all of their help, this forum is fantastic!
Last edited by xjsman89; 08-19-2015 at 08:41 AM.
#27
08-19-2015, 09:03 AM
Veteran Member
#28
08-22-2015, 05:38 AM
Senior Member
well done and good pictures to during a difficult job ,
i did my friends last weekend, and had to get medieval on the one small bolt , i ended up drilling it out from the back of the lower wishbone !!
i don't know if you experienced this, but with the small bush end located the large cup doesn't quite reach the body mount, you can either use a second jack to help it fit , or with the wheel back on the car lower to the sound and the radius arm large bush will easily pop over the body mount with zero effort , pop in the bolts of the safety strap and tighten on the car,
should transform the feel of the car at the back
BB
these jobs are well worth doing
#29
08-22-2015, 08:37 AM

Senior Member
"IN MY "OWN" OPTION" looking @ these pictures, what does the rest of the car look like underneath ? How could that side look so bad & the rest of the car not? Someone better know how to WELD, with access to top of the line Migs, Tigs, Torches & of course a lift to start with. Along with a LOT of time & knowledge of what there doing. Did I mention a MONEY ? I would suggest reading some back issues (and I did in depth) JWM on these projects before taking one on.
Lawrence
Lawrence
#30
08-22-2015, 10:04 AM

Veteran Member
Join Date: Jul 2012
Location: Walnut Creek, California
Posts: 6,796
Received 2,399 Likes
on
1,880 Posts
A tad of a conundrum. In my former career, most insurors urged the use of good used parts in collision repairs. But, only tin. for suspension, it had to be new. After market stuff not as popular then as it is now.
A lot of the after market is just fine, as good or even better than original. and others, not nearly so much. Tin included.
In this case, those radius are suspension. So, that old rule would apply. But, it was broad based, not individualized. Big difference.
1. I'd choose a good used over a lessor after market.
2. I'd chose new, if the price was not that far off. Seems here, it is.
As this car lives in a wet clime, I'd choose a good paint for the arms, new or used before installation. There are specialized paints for this.
And, we must remember, that areas that use salt to control ice are tougher than mere water. Extra care needed.
Carl

Thread
Thread Starter
Forum
Replies
Last Post
driver safz
XJ XJ6 / XJ8 / XJR ( X350 & X358 )
1
09-26-2015 06:01 AM
Currently Active Users Viewing This Thread: 1 (0 members and 1 guests)