
Tank Removal and Repair
#1
 07-03-2015, 07:25 AM

Greetings
Thought I would share this experience and invite comments and advice
Having removed the tank from my 84 XJS to get to the bottom of the fuel smells I discovered……
Bottom of the tank is very rusty and pitted……surprise surprise….!
The infamous rivet is not there….looks like it has rusted away and fallen out…..!...does not look like the tank has been out before..?
Otherwise there is only very minor surface rust or none at all anywhere else in the tank area….pleasing…..
Gave the bottom of the tank an initial descale and clean down then did the air and soapy water thing and found the pin hole leaks in the rear, bottom middle of the tank.
At this stage the plan is to blast the bottom external of the tank and bronze / braze weld the leaking sections and any others that the pitting looks like it needs it. From what I can see there are only 2 or 3 areas that will need this. The blasting may change this…!
Intend to use the Wattle 3 coat Kill Rust system to paint the tank externals when the welding and repairs are done.
1. While the tank is out I will look at the Rochester valve….any advice on what to look for and how to check this please…..if it is stuffed what to replace it with…OEM or…..?
2. Same with the Gizmo the vent lines run to stuck up in the right hand buttress…..what to check and if it is stuffed…..OEM or?
3. I will need to turf the mat the tank was sitting on and replace it, any comments on products members have had success here with would be appreciated, was thinking of heading to Clark Rubber here in Oz and see what they could offer?
4. How the water makes it way to the underside of the tank….from what I understand it leaks in through the rear window….how to prevent this happening in future….?
Thank you to all in this Forum for the great information, it has made pulling the tank and knowing what to look for very straight forward.
All good
Darren
#2
07-03-2015, 08:11 AM

Senior Member
congrats at removing the tank and finding the source of the fuel leak
I have just done this myself, and installed the later revised tank , as jaguar did recall ALL xjs's to have this done when issues were found with the original olive coloured tanks , lots slipped through the net though ,
the rust repair and external treatment of the tank should work there is also a product called ' POR 15 ' designed to put inside the tank to seal and treat rust issues inside , maybe worth considering
as for the ' tank mat ' I ended up using a dense foam mat , this was sold as a camping roll mat for under your sleeping bag , when tested it did not react with petrol or solvent, and didn't soak up the liquid either, and is extremely cheap to buy , I just cut to shape with a sharp blade , and glued to the tank back and the base ,
if you search you will find my recent posting on the subject
here it is
https://www.jaguarforums.com/forum/x...cement-142961/
I may also congratulate you on having the correct colour XJS , lol
BB
Last edited by Brake buster; 07-03-2015 at 08:13 AM.
The following users liked this post:
darrhel (07-05-2015)
#3
07-03-2015, 10:02 AM


Veteran Member
At this stage the plan is to blast the bottom external of the tank and bronze / braze weld the leaking sections and any others that the pitting looks like it needs it. From what I can see there are only 2 or 3 areas that will need this. The blasting may change this…!
Intend to use the Wattle 3 coat Kill Rust system to paint the tank externals when the welding and repairs are done. I got the local rad shop to cover the entire bottom of my tank with a layer of radiator solder. Then painted it etc as you suggest. Top repair and I strongly recommend. Pic here:
1. While the tank is out I will look at the Rochester valve….any advice on what to look for and how to check this please…..if it is stuffed what to replace it with…OEM or…..?
The valve should open when pressure applied outwards from the tank, and open to let air in when a slight suck is applied to the topmost of the two inlet spigots. Frankly, if not working replace it with an aftermarket one that does this either way using just one line each side. Cheap and reliable. Mae sure that thin pipe that runs from the valve behind the tank to the outside is not blocked.
2. Same with the Gizmo the vent lines run to stuck up in the right hand buttress…..what to check and if it is stuffed…..OEM or? This is just a condensing chamber, no moving parts, just check that the pipes to it are in good shape
3. I will need to turf the mat the tank was sitting on and replace it, any comments on products members have had success here with would be appreciated, was thinking of heading to Clark Rubber here in Oz and see what they could offer? I used a sheet of neoprene, works just fine. Only 1/4" thick though as top space to the bodywork gets tight if ny thicker
4. How the water makes it way to the underside of the tank….from what I understand it leaks in through the rear window….how to prevent this happening in future….? seal the window outer ruibber with bitumastic gunk, get the nozzle under the rubber and squeeze it in running round the perimeter. Then wipe excess off with a white spirit and a rag. This works 100%, same for front windscreen too. Finally, while you have access to the butress insides and wheelarch insides, buy a cheap pressure sprayer and using a flexible probe send it up into the arch and squirt anti rust stuff in there, and down into the outside of the exhayst tunnel into the bottom of the wing/tunnel seam.
Intend to use the Wattle 3 coat Kill Rust system to paint the tank externals when the welding and repairs are done. I got the local rad shop to cover the entire bottom of my tank with a layer of radiator solder. Then painted it etc as you suggest. Top repair and I strongly recommend. Pic here:

1. While the tank is out I will look at the Rochester valve….any advice on what to look for and how to check this please…..if it is stuffed what to replace it with…OEM or…..?
The valve should open when pressure applied outwards from the tank, and open to let air in when a slight suck is applied to the topmost of the two inlet spigots. Frankly, if not working replace it with an aftermarket one that does this either way using just one line each side. Cheap and reliable. Mae sure that thin pipe that runs from the valve behind the tank to the outside is not blocked.
2. Same with the Gizmo the vent lines run to stuck up in the right hand buttress…..what to check and if it is stuffed…..OEM or? This is just a condensing chamber, no moving parts, just check that the pipes to it are in good shape
3. I will need to turf the mat the tank was sitting on and replace it, any comments on products members have had success here with would be appreciated, was thinking of heading to Clark Rubber here in Oz and see what they could offer? I used a sheet of neoprene, works just fine. Only 1/4" thick though as top space to the bodywork gets tight if ny thicker
4. How the water makes it way to the underside of the tank….from what I understand it leaks in through the rear window….how to prevent this happening in future….? seal the window outer ruibber with bitumastic gunk, get the nozzle under the rubber and squeeze it in running round the perimeter. Then wipe excess off with a white spirit and a rag. This works 100%, same for front windscreen too. Finally, while you have access to the butress insides and wheelarch insides, buy a cheap pressure sprayer and using a flexible probe send it up into the arch and squirt anti rust stuff in there, and down into the outside of the exhayst tunnel into the bottom of the wing/tunnel seam.
The following users liked this post:
darrhel (07-05-2015)

#7
07-05-2015, 02:47 AM
Veteran Member
Trending Topics
#8
07-05-2015, 08:54 PM

I feel I am qualified to comment about this topic.
Having a serious XJS project going on and a parts car, both of the tanks had the exact same problems with the rust in the lower tank.
I've had a lot of experience with old motorcycles, leaky fuel tanks and serious rust in the past as well. Motorcycle tanks are the worst case for metal tanks- huge temperature extremes, vented directly to atmosphere, rained upon etc.
I've used a product on motorcycle fuel tanks to reseal them on the inside, it is a phenol novalac epoxy resin. This is the stuff I use, one pack will line the inside of an XJS tank and about half a pack will laminate the bottom of the tank as described below: Gas Tank Sealer - Caswell Inc
All this is leading me to the repair of the XJS fuel tank I performed. Unfortunately I don't have too many in progress photos, but here are as many as I have.
I started with an original tank, with factory graffiti. I was upset about having to remove and paint over the graffiti, it';s cool little things like this that make older cars fun:

Anyway, the first step is to strip the tank. If you are only doing a bottom repair, no need to go as crazy as me, but I am a bit obsessed with this car, so it was a full strip for me. I did the surge tank whilst I was at it:

Once I had removed ALL paint from the bottom I had the usual deep pitting and a couple of pinholes. My observation is that all of the corrosion was from the outside in.
Now, the thing with the epoxy is that it needs a CLEAN surface. That means cleaning the inside and outside of the tank with lots of solvent. The epoxy does not mind surface corrosion and pitting, but you must remove any scaling rust. I had a few pinholes, I'm hopeless at brazing, so I used an epoxy filler on the pinholes. It is important that if you use an epoxy filler, that the filler is bulked up with microspheres or Q cells, not industrial talc as industrial talc is porous. Just use a quality pre made marine epoxy filler and you'll be fine. If you can braze, go for it.
I then sanded the entire bottom of the fuel tank then used a knotted wire wheel on a grinder to get the rust down to hard metal.
Once that was done, I marked out the area to work on and taped up the borders with masking tape to prevent any runaway resin. Then I cut out a few pieces of 6oz woven rovings for the bad areas and a piece for the whole bottom of the rusted area of the tank. You must use woven rovings, chopped strand mat has a binding material in it that only dissolves in polyester resin. Using it with epoxy will result in failure.
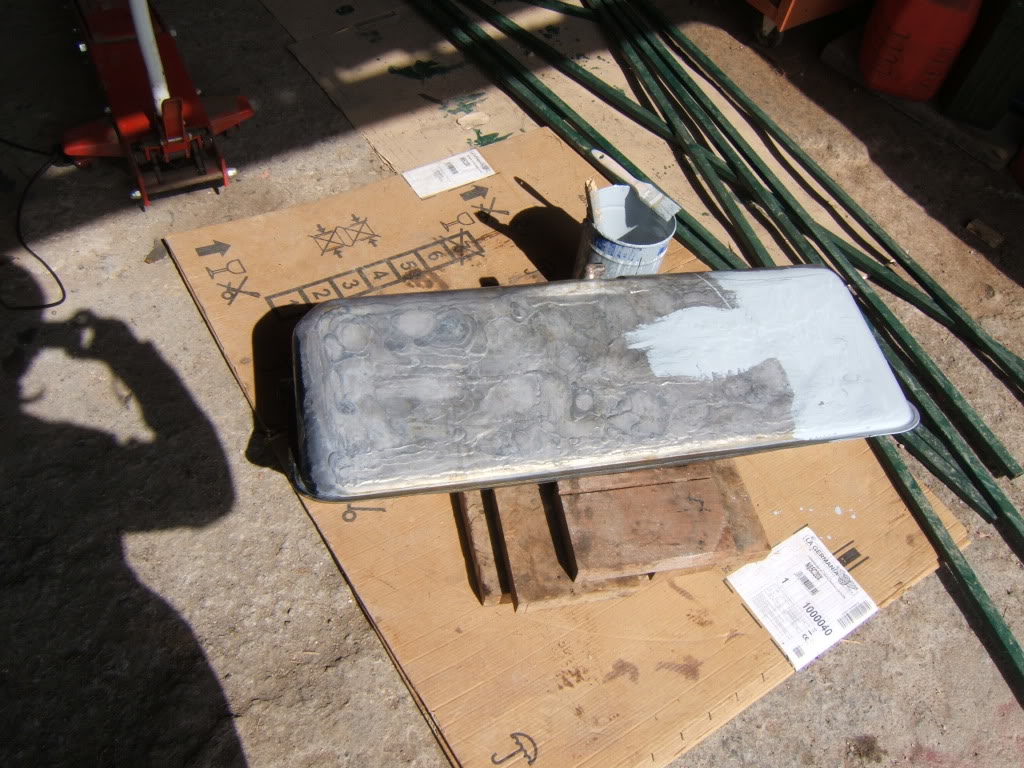
Then I proceeded to laminate it all to the bottom of the tank with the epoxy.
This is the finished product. The white blotches are teh epoxy filler under the lamination:

Once the outside was done, I proceeded to line the inside of the tank with the epoxy as per the instructions.
One thing that really surprised me about this job was that when completed, the oil canning and softness of the original tank around the rust thinned areas disappeared and the epoxy and rovings made the bottom of the tank extremely strong.
And the finished tank, coated with a 2 pack epoxy etch primer:

Do not be afraid of the epoxy. If you can follow instructions to the letter (for cleaning) and have mixed araldite before, you can use this product.
Hope this helps someone!
Having a serious XJS project going on and a parts car, both of the tanks had the exact same problems with the rust in the lower tank.
I've had a lot of experience with old motorcycles, leaky fuel tanks and serious rust in the past as well. Motorcycle tanks are the worst case for metal tanks- huge temperature extremes, vented directly to atmosphere, rained upon etc.
I've used a product on motorcycle fuel tanks to reseal them on the inside, it is a phenol novalac epoxy resin. This is the stuff I use, one pack will line the inside of an XJS tank and about half a pack will laminate the bottom of the tank as described below: Gas Tank Sealer - Caswell Inc
All this is leading me to the repair of the XJS fuel tank I performed. Unfortunately I don't have too many in progress photos, but here are as many as I have.
I started with an original tank, with factory graffiti. I was upset about having to remove and paint over the graffiti, it';s cool little things like this that make older cars fun:
Anyway, the first step is to strip the tank. If you are only doing a bottom repair, no need to go as crazy as me, but I am a bit obsessed with this car, so it was a full strip for me. I did the surge tank whilst I was at it:
Once I had removed ALL paint from the bottom I had the usual deep pitting and a couple of pinholes. My observation is that all of the corrosion was from the outside in.
Now, the thing with the epoxy is that it needs a CLEAN surface. That means cleaning the inside and outside of the tank with lots of solvent. The epoxy does not mind surface corrosion and pitting, but you must remove any scaling rust. I had a few pinholes, I'm hopeless at brazing, so I used an epoxy filler on the pinholes. It is important that if you use an epoxy filler, that the filler is bulked up with microspheres or Q cells, not industrial talc as industrial talc is porous. Just use a quality pre made marine epoxy filler and you'll be fine. If you can braze, go for it.
I then sanded the entire bottom of the fuel tank then used a knotted wire wheel on a grinder to get the rust down to hard metal.
Once that was done, I marked out the area to work on and taped up the borders with masking tape to prevent any runaway resin. Then I cut out a few pieces of 6oz woven rovings for the bad areas and a piece for the whole bottom of the rusted area of the tank. You must use woven rovings, chopped strand mat has a binding material in it that only dissolves in polyester resin. Using it with epoxy will result in failure.
Then I proceeded to laminate it all to the bottom of the tank with the epoxy.
This is the finished product. The white blotches are teh epoxy filler under the lamination:
Once the outside was done, I proceeded to line the inside of the tank with the epoxy as per the instructions.
One thing that really surprised me about this job was that when completed, the oil canning and softness of the original tank around the rust thinned areas disappeared and the epoxy and rovings made the bottom of the tank extremely strong.
And the finished tank, coated with a 2 pack epoxy etch primer:
Do not be afraid of the epoxy. If you can follow instructions to the letter (for cleaning) and have mixed araldite before, you can use this product.
Hope this helps someone!
The following 2 users liked this post by Typhoon:
darrhel (07-06-2015),
Greg in France (07-06-2015)
#10
07-12-2015, 10:51 PM
Greetings again....
well i had the bottom of the tank brazed up after finding more pin holes after it was cleaned and blasted.
While i was reasonably happy with the repair and am confident it will last after the welding and epoxy coating the bottom outside of the tank. The tank is back in and no smells of fuel in the boot....wonderful.....!
What i am seriously considering replacing the tank eventually with an aluminium tank. I will have to get one made, i took detailed dimensions of the tank while it was out....
Is there any suppliers / fabricators Forum members would recommend...?
Thanks
Darren

Thread
Thread Starter
Forum
Replies
Last Post
KarimPA
New Member Area - Intro a MUST
8
09-03-2015 07:32 PM
Currently Active Users Viewing This Thread: 1 (0 members and 1 guests)