
Thanks for the V12 suddenly not starting
#41
 11-06-2020, 07:23 AM


The following users liked this post:
Greg in France (11-06-2020)
#42
11-06-2020, 07:42 AM

Thanks Again Grant!! I figured I would have to receive the full baptism by fire since 1st serious issues with this vehicle after 34 years. So I'll start with taking pics for memory, removing cruise control, then compressor, then distributor in that order to expose V unless you advise otherwise. I'm sure I need to be rather careful in there.
#43
11-06-2020, 08:42 AM

Veteran Member
Thanks Again Grant!! I figured I would have to receive the full baptism by fire since 1st serious issues with this vehicle after 34 years. So I'll start with taking pics for memory, removing cruise control, then compressor, then distributor in that order to expose V unless you advise otherwise. I'm sure I need to be rather careful in there.
The following users liked this post:
Grant Francis (11-06-2020)
#44
11-06-2020, 08:59 AM


Since he has an 87, and should have a Lucas distributor, he may have to pull it to get to the advance mechanism to free it up as well as the vacuum advance unit if it is bad. Plus, the o-ring seal on the distributor base is a common leak point. If he marks where to rotor is pointing as well as the three bolts holding it down, he shouldn't have a hard time getting it back in place. He will need to do a timing light check of the advance though.
#45
11-06-2020, 10:12 AM
Wow I was afraid it was only going to get better lol. Well I'm a newby but up for any challenge cause this car is worth it to me. I'll hold off on distrbutor removal until I remove cruise and compressor. Glad I purchased the ROM but certain I'll be asking dumb questions soon.
#46
11-06-2020, 10:45 AM
Veteran Member
Since he has an 87, and should have a Lucas distributor, he may have to pull it to get to the advance mechanism to free it up as well as the vacuum advance unit if it is bad. Plus, the o-ring seal on the distributor base is a common leak point. If he marks where to rotor is pointing as well as the three bolts holding it down, he shouldn't have a hard time getting it back in place. He will need to do a timing light check of the advance though.
The following users liked this post:
Grant Francis (11-06-2020)
#47
11-06-2020, 12:43 PM
#48
11-06-2020, 07:57 PM
The following users liked this post:
Greg in France (11-07-2020)
#49
11-06-2020, 09:16 PM
Thanks for the distributor downloads! I like the "when push comes to shove" philosophy on the dizzy after a first read. Already unbolted/unconnected cruise control so I can now figure out bolts to remove as well as removing belt off AC compressor so it can be moved/propped up in front I assume.
The following 2 users liked this post by DT T:
Grant Francis (11-07-2020),
Greg in France (11-07-2020)
#50
11-11-2020, 02:23 PM
Well I removed the cruise control out of the way and began finding clamps down in the V to remove the injector harness. Had to snip it off a lot to get it all out. As I was in the V a small blue plug attached to another blue plug near the bottom of the distributor was chewed completely through. Just two small rubbery wires between the two blue plugs I think all connecting to the Lucas (Bosch) EFI bolted on top. I am assuming I need to order an entire EFI kit at this point. I already have a new injector harness to clamp onto the fuel rails but clearly I found the true no start culprit thankfully. Any help as to ordering those weird blue plugs on the end of EFI loom would be great help.
#51
11-11-2020, 03:55 PM


#52
11-11-2020, 08:53 PM
#53
11-11-2020, 09:40 PM
That Black Box with the Lucas sticker is the Ignition Amp, nothing to do with the EFI system at all.
The "Whitish" wire, going into that Black covering, is the lead for the dreaded shielded wire, I THINK, its been a while.
There is a small loom, 2 wires, that goes "Distributor to that Amp". Some are shielded, some are not. That is the section that generally gets chewed, and then there has been reports, mine was one, where those 2 wires actually broke inside the rubber bung of the distributor casing, took weeks to find.
I made my own as needed.
The following users liked this post:
Greg in France (11-12-2020)
#54
11-12-2020, 12:09 AM
Veteran Member
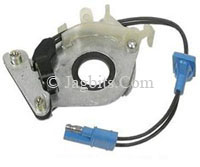
The distributor has a bit inside it called the pickup or base plate. This is the part:
https://www.britishparts.co.uk/class...ase-plate-p363
the blue rubber plug you see on the end of the loom exits the dizzy at the bottom and is the plug that joins the similar plug coming down from the amplifier. As Grant said, you can repair the plug/loom with any suitable plug, and no need to change the pickup as long as the wires exiting the bottom of the dizzy are OK.
The distributor base plate (in conjunction with the 12 point star wheel affixed to the distributor spindle) provides the signal to the amplifier to trigger the coil and produce a spark.
The thin white wire in your photo joining the loom via that black connector is indeed, as Grant said, the wire that goes to the ECU in the boot and tells the ECU (I think) that the engine is running so to keep the injectors going. If it is disconnected or broken the engine will not run.
Last edited by Greg in France; 11-12-2020 at 12:19 AM.
The following users liked this post:
Grant Francis (11-12-2020)
#55
11-12-2020, 04:34 AM
That's really helpful learning the wiring down there (and the correct part names). Wires from dizzy looked ok at first glance chewed between two small blue plugs. I haven't done an electrical wiring repair in SO long but if you have any steps, materials to order, advice, how to sites etc I would like to avoid a $200 bill for DAC 3247. Plus wiring seems to be a necessary skill as these beauties age regardless. That small wire to ECU looks good, just a weird configuration to me that's stronger than it looks. Ill fix the 2 chewed thru "rubbery" wires and detail V before I install new harness. I am planning on plugging new harness in first and check 12v on every connector before snapping them on injectors if that isn't overly cautious. I plan on using a Simple Green/Eco all purpose cleaner to carefully clean grime/grease down there and throughout the engine to detail. Any other suggestions/care products always welcome. Thanks again!
#56
11-12-2020, 09:14 AM
Veteran Member
To repair the dizzy to amp wires, i would used these:
You bare the wires ends, slide a tube down one, then slip a solid cover on. Then twist the wires together, slide the solder tube up to the join so the solder circle is over the twisted together-ends, then blast it with a heat gun until you see the solder run a bit. Then slide the solid cover over that inner tube and heat again to shrink on the cover. Job done.
The new harness will be fine, no need to worry!
Clean the V and anything else on the engine with white spirit, or 100% alcohol. Something that will evaporate and NEVER anything water based!
The following users liked this post:
Grant Francis (11-13-2020)
#57
11-12-2020, 11:49 AM
The following users liked this post:
Grant Francis (11-13-2020)
#58
11-19-2020, 06:38 PM
Don't think I'll be able to repair two wires as one of the two protruding wires from 1st blue plug coming from under distributor is eaten clean to the plug and other wire has maybe 1/4 inch left so not much to work with. I found the distributor base plate or partsgeek calling it base pickup coil for $145 if that sounds reasonable. The site from Greg doesn't ship to US which seems odd. Possibly online issues? Any chance there's a way to replace part without full dizzy removal? I have read the need to recondition every 15 years anyway so I'm due...but SO new to repairs but certainly not overwhelmed anymore thanks to you guys!
#59
11-19-2020, 11:25 PM
Sounds reasonable to me, BUT, I have never purchased one.
I ran 2 new wires to the pick up coil, soldered CAREFULLY, out through the base hole, leaving some slack inside the unit, and ran them direct to the Amp, which on my car is out the front of the radiator, no intermediate plug etc.
Filled the base hole with RTV, a SMALL amount at a time, let it dry, apply some more, lost the beer count, never mind.
It would be possible insitu, fiddly for sure, but certainly doable.
#60
11-20-2020, 12:11 AM

Veteran Member
Join Date: Mar 2008
Location: Pacific Northwest USA
Posts: 24,920
Received 10,979 Likes
on
7,211 Posts
After removing the dizzy cap, off comes the rotor, and then a plastic shield. You'll then see the pick-up.
The reluctor wheel has to come off before the pick can be removed. I seem to recall a roll pin that needs to be drifted out. That's where my memory is fuzzy. In any case I think it'll all be self-evident when you take a good look.
Oh....one more thing. If the ignition rotor does not come off easily do NOT yank upwards with any force....which will damage the innards residing out of sight below the base plate. Use Dremel tool or something to slice the rotor. Might wanna order a new rotor at the same time to place it safe
Cheers
DD