
v12 5spd on a budget w/ pics
#1
 01-23-2020, 11:54 AM


I am building a ferrari 275 replica using an xjs 5.3 that I pulled from a 1985 car. Since this forum has been a great resource for me I thought I'd pass along some info to anyone interested in converting their xjs to manual who may not want to use one of the costly pre made kits or who may not like to deal with certain companies. While this doesn't cover the full swap into an xjs chassis, it should give detailed information how to bolt up a trans to the engine, ready to operate. The rest is simple for you to sort out with off the shelf parts and a tiny bit of fabrication. The shifter location is approximately 25 3/4" off of the back of the engine, which should be correct for the factory XJS trans tunnel. Modification to the shifter rod could be made to accommodate for slight forward or backward adjustment as needed. If you are handy you could be driving your 5speed xjs for under $3000.
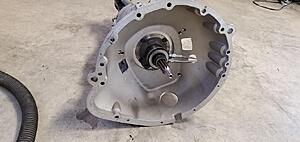
$575 5speeds bellhousing
$318 Fidanza v12 jaguar Flywheel from LMperformance
$69 23 tooth v8 t5 input shaft up to ’93 mustang with 9 �” length, 10 spline 1 1/16" diameter
$60 machine work to turn down input shaft to a slip fit with Jaguar pilot bearing
$40 small parts kit for t5. When you remove the input shaft you will want to replace the needle bearings and thrust washer that ride on the rest of the gearset. It's very simple and there are youtube videos how to install the input shaft with these new components and shim as necessary. I will not go over that here.
$40 chevy s10 T5 3.6” length bearing retainer with seal 1.375 diameter. Ford bearing retainer will not work!!! This also needs to be modified with with 5/8" cut off of length so it does not hit the hub on the clutch disk. Removing 5/8" from the length will give about 3/16-1/4" of necessary clearance.
$4 jaguar pilot bushing from terry's jag. Get a few extras... just in case. They are cheap.
$204 Hydraulic T5 throw out bearing RAM 78125HD
$13 3an female/female Teflon hose 14” to extend clutch feed line out of bellhousing
$112 clutch max clutch kit buick/gm/chevy 10.5”. We are only using the pressure plate, nothing else, because it has 11 5/8” bolt holes that mount to the fidanza flywheel. A mustang v8 10.5" pressure plate has the WRONG bolt pattern for the fidanza flywheel and will not work.
$59 ACT SS street clutch disk for mustang, 10.5” 10 spline 1 1/16” (new old stock). You can use another brand as long as it's for a v8 mustang with those specs.
$13 7/16-20 0.9” bolts (10) Dorman Flywheel Fasteners 678-154 from Summit (bolts the flywheel to the crank). Put the factory xjs flex plate washer between the bolts and the flywheel. Do not use the thicker "washer" that was on the flex plate though. Torque bolts to 80 ft/lbs with loctite.
$13 ARP 3/8-16 x 1.00 bolts clutch cover (bolts the pressure plate to flywheel) torque to 50 ft/lbs with loctite
$16 flanged 9/16 head Bellhousing bolts. 3/8-16x2” (x6) 3/8-16x3” (x2) I had to chuck these in a drill and put them on a belt sander to remove some of the flange on the bolt to a smaller diameter. easy. You could also use hex key bolts and lock washers instead. torque to 25 ft/lbs
$1789 TOTAL
For xjs manual conversion
trans mount ($free-200)
driveshaft ($3-500)
pedal assembly w/ master $475
interior trim?
speedometer wiring- dakota digital box?
aj6 ECU mod (? Necessary?)
stock trans, unmodified


new 9 1/4" input shaft, with end turned down, compare to 10" below it

bearing is a slip fit with just a few thousandths clearance


this is not necessary, but not a bad idea. I made a silicone mold of the newly machined input shaft and cast an alignment tool for future use when the clutch needs to be changed. It is simple to remove the input shaft from the trans and use the bare shaft to align the clutch to the flywheel on the engine, but the tool removes that step.

if you do not make an alignment tool, this is all you need to do to align the clutch on the flywheel.

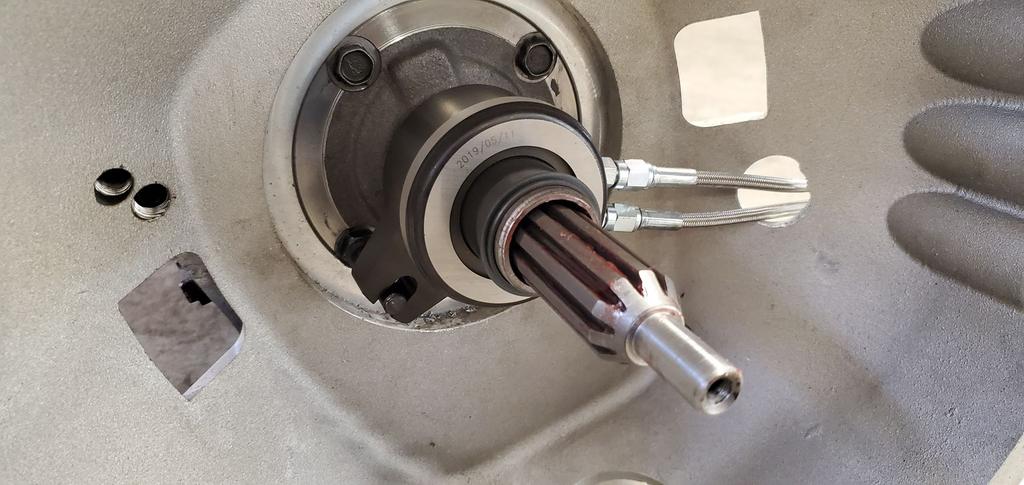
input shaft depth in the crank

now with the pilot bearing pressed in. Note that it is NOT bottomed out on the crank, there is clearance. The input shaft was not installed in the trans in this picture, so it actually sits further back when fully installed.

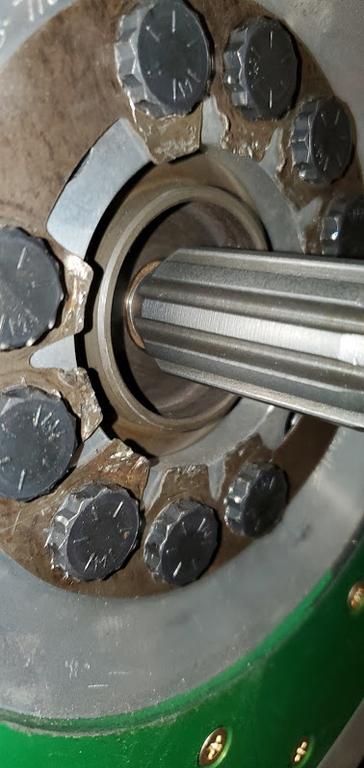
bearing retainer, remove this with an angle grinder or similar. it does not have to be perfect.

hydraulic throw out bearing. Since my trans needed an m8x1.25 stud for the bearing to slide on, and the kit only supplies two sized standard studs, you will need to take the larger diameter stud, turn it down, and re thread to m8x1.25. I was able to just chuck it up in a power drill and grind the threads off (aka a poor man's lathe), then check the diameter with calipers before cutting new threads with a dye tool. Really simple. The kit supplies a bunch of shims to properly shim the contact face of the bearing off of the clutch fingers when depressed. It calls for .1-.2" of free play. Using about 6 of the supplied shims I was able to shim it to 3/16" of free play (.1875"). Make sure you use pipe thread tape on the 1/8" NPT fittings that go into the bearing, but NOT on the -3an side of the fittings.

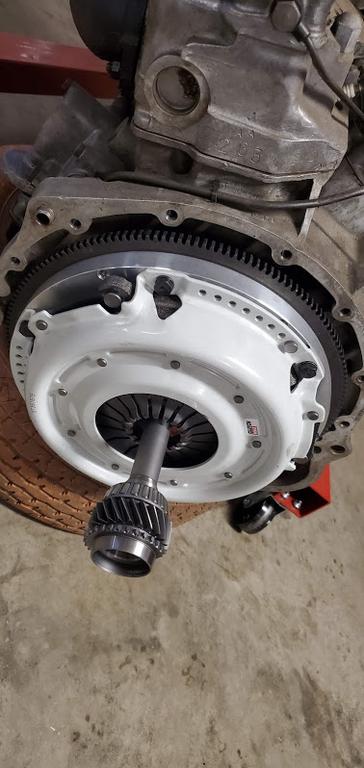
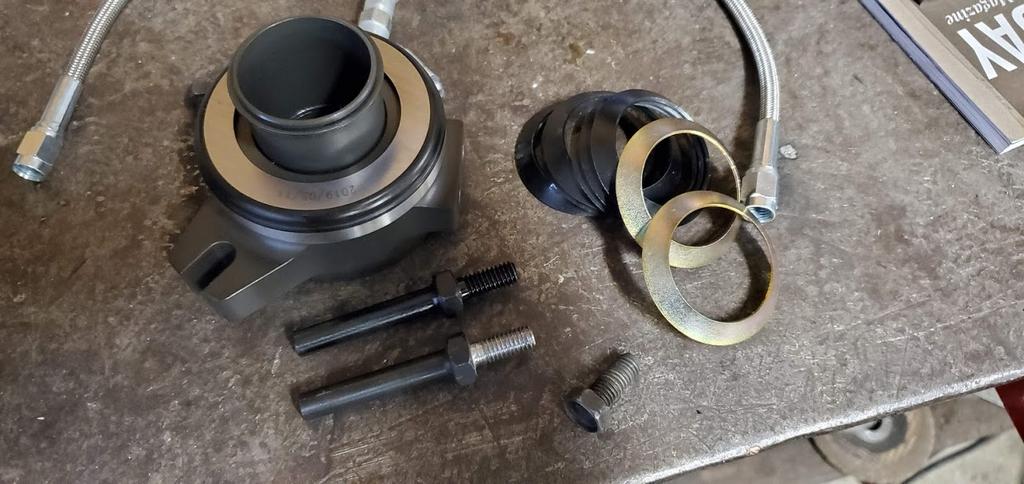
assembled on the trans. The bellhousing will need to be modified and a small hole cut below the side window. I used a 1 1/4 hole saw to make a small hole so the feed and bleed hoses exit the transmission cleanly.


voila

Here's what I needed and what I spent total.
$250 Ford mustang t5 trans, mine sourced form a 2001 v6 (has a 10" input shaft and electronic speed sensor)$575 5speeds bellhousing
$318 Fidanza v12 jaguar Flywheel from LMperformance
$69 23 tooth v8 t5 input shaft up to ’93 mustang with 9 �” length, 10 spline 1 1/16" diameter
$60 machine work to turn down input shaft to a slip fit with Jaguar pilot bearing
$40 small parts kit for t5. When you remove the input shaft you will want to replace the needle bearings and thrust washer that ride on the rest of the gearset. It's very simple and there are youtube videos how to install the input shaft with these new components and shim as necessary. I will not go over that here.
$40 chevy s10 T5 3.6” length bearing retainer with seal 1.375 diameter. Ford bearing retainer will not work!!! This also needs to be modified with with 5/8" cut off of length so it does not hit the hub on the clutch disk. Removing 5/8" from the length will give about 3/16-1/4" of necessary clearance.
$4 jaguar pilot bushing from terry's jag. Get a few extras... just in case. They are cheap.
$204 Hydraulic T5 throw out bearing RAM 78125HD
$13 3an female/female Teflon hose 14” to extend clutch feed line out of bellhousing
$112 clutch max clutch kit buick/gm/chevy 10.5”. We are only using the pressure plate, nothing else, because it has 11 5/8” bolt holes that mount to the fidanza flywheel. A mustang v8 10.5" pressure plate has the WRONG bolt pattern for the fidanza flywheel and will not work.
$59 ACT SS street clutch disk for mustang, 10.5” 10 spline 1 1/16” (new old stock). You can use another brand as long as it's for a v8 mustang with those specs.
$13 7/16-20 0.9” bolts (10) Dorman Flywheel Fasteners 678-154 from Summit (bolts the flywheel to the crank). Put the factory xjs flex plate washer between the bolts and the flywheel. Do not use the thicker "washer" that was on the flex plate though. Torque bolts to 80 ft/lbs with loctite.
$13 ARP 3/8-16 x 1.00 bolts clutch cover (bolts the pressure plate to flywheel) torque to 50 ft/lbs with loctite
$16 flanged 9/16 head Bellhousing bolts. 3/8-16x2” (x6) 3/8-16x3” (x2) I had to chuck these in a drill and put them on a belt sander to remove some of the flange on the bolt to a smaller diameter. easy. You could also use hex key bolts and lock washers instead. torque to 25 ft/lbs
$1789 TOTAL
For xjs manual conversion
trans mount ($free-200)
driveshaft ($3-500)
pedal assembly w/ master $475
interior trim?
speedometer wiring- dakota digital box?
aj6 ECU mod (? Necessary?)
pictures

stock trans, unmodified
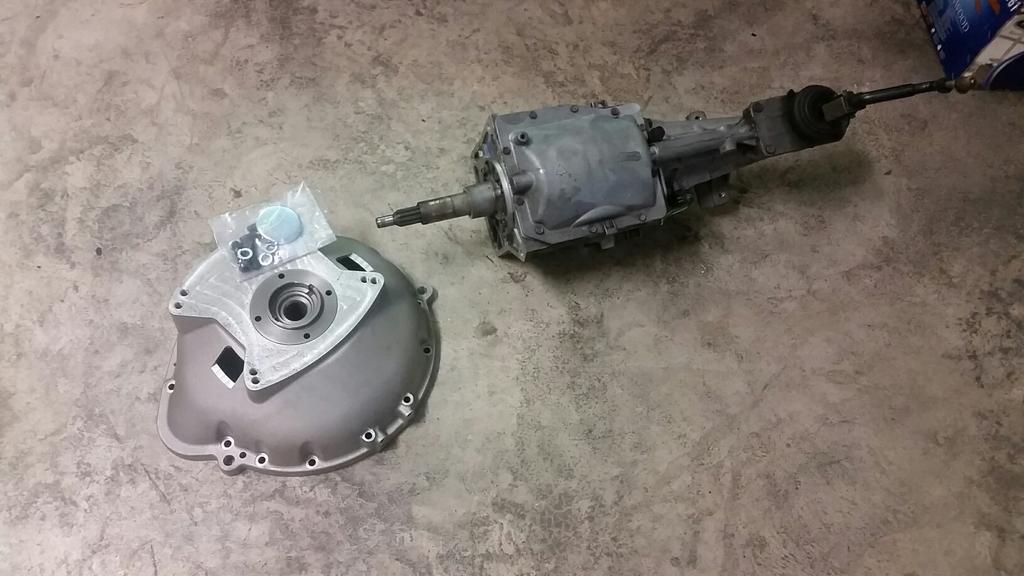

new 9 1/4" input shaft, with end turned down, compare to 10" below it

bearing is a slip fit with just a few thousandths clearance


this is not necessary, but not a bad idea. I made a silicone mold of the newly machined input shaft and cast an alignment tool for future use when the clutch needs to be changed. It is simple to remove the input shaft from the trans and use the bare shaft to align the clutch to the flywheel on the engine, but the tool removes that step.
if you do not make an alignment tool, this is all you need to do to align the clutch on the flywheel.

input shaft depth in the crank
now with the pilot bearing pressed in. Note that it is NOT bottomed out on the crank, there is clearance. The input shaft was not installed in the trans in this picture, so it actually sits further back when fully installed.

bearing retainer, remove this with an angle grinder or similar. it does not have to be perfect.
hydraulic throw out bearing. Since my trans needed an m8x1.25 stud for the bearing to slide on, and the kit only supplies two sized standard studs, you will need to take the larger diameter stud, turn it down, and re thread to m8x1.25. I was able to just chuck it up in a power drill and grind the threads off (aka a poor man's lathe), then check the diameter with calipers before cutting new threads with a dye tool. Really simple. The kit supplies a bunch of shims to properly shim the contact face of the bearing off of the clutch fingers when depressed. It calls for .1-.2" of free play. Using about 6 of the supplied shims I was able to shim it to 3/16" of free play (.1875"). Make sure you use pipe thread tape on the 1/8" NPT fittings that go into the bearing, but NOT on the -3an side of the fittings.
assembled on the trans. The bellhousing will need to be modified and a small hole cut below the side window. I used a 1 1/4 hole saw to make a small hole so the feed and bleed hoses exit the transmission cleanly.


voila

Last edited by 275nart; 01-23-2020 at 12:19 PM.
The following 13 users liked this post by 275nart:
anyoldiron (01-23-2020),
Bez74 (01-23-2020),
Chop (01-24-2020),
Daim (01-24-2020),
Doug (01-23-2020),
and 8 others liked this post.
#2
01-23-2020, 04:16 PM

Looks good,
What are you doing for a clutch pedal box? I have a deposit on a facelift aluminum clutch pedalbox that is brand new. Im actually thinking of finding a sand casting outfit to duplicate it as they are so hard to find. Not all pedal boxes have the boss on them for a clutch master.
What are you doing for a clutch pedal box? I have a deposit on a facelift aluminum clutch pedalbox that is brand new. Im actually thinking of finding a sand casting outfit to duplicate it as they are so hard to find. Not all pedal boxes have the boss on them for a clutch master.
#3
01-23-2020, 06:05 PM

Banned
The following users liked this post:
Greg in France (01-24-2020)
#4
01-24-2020, 11:30 AM

Doing it this way saved me about $500 when I figure what the plate of Aluminum cost. Plus I�m not sure they offer a kit for the early blocks.
#5
01-24-2020, 11:36 AM
I am building a ferrari 275 replica using an xjs 5.3 that I pulled from a 1985 car. Since this forum has been a great resource for me I thought I'd pass along some info to anyone interested in converting their xjs to manual who may not want to use one of the costly pre made kits or who may not like to deal with certain companies. While this doesn't cover the full swap into an xjs chassis, it should give detailed information how to bolt up a trans to the engine, ready to operate. The rest is simple for you to sort out with off the shelf parts and a tiny bit of fabrication. The shifter location is approximately 25 3/4" off of the back of the engine, which should be correct for the factory XJS trans tunnel. Modification to the shifter rod could be made to accommodate for slight forward or backward adjustment as needed. If you are handy you could be driving your 5speed xjs for under $3000.
$575 5speeds bellhousing
$318 Fidanza v12 jaguar Flywheel from LMperformance
$69 23 tooth v8 t5 input shaft up to �93 mustang with 9 �� length, 10 spline 1 1/16" diameter
$60 machine work to turn down input shaft to a slip fit with Jaguar pilot bearing
$40 small parts kit for t5. When you remove the input shaft you will want to replace the needle bearings and thrust washer that ride on the rest of the gearset. It's very simple and there are youtube videos how to install the input shaft with these new components and shim as necessary. I will not go over that here.
$40 chevy s10 T5 3.6� length bearing retainer with seal 1.375 diameter. Ford bearing retainer will not work!!! This also needs to be modified with with 5/8" cut off of length so it does not hit the hub on the clutch disk. Removing 5/8" from the length will give about 3/16-1/4" of necessary clearance.
$4 jaguar pilot bushing from terry's jag. Get a few extras... just in case. They are cheap.
$204 Hydraulic T5 throw out bearing RAM 78125HD
$13 3an female/female Teflon hose 14� to extend clutch feed line out of bellhousing
$112 clutch max clutch kit buick/gm/chevy 10.5�. We are only using the pressure plate, nothing else, because it has 11 5/8� bolt holes that mount to the fidanza flywheel. A mustang v8 10.5" pressure plate has the WRONG bolt pattern for the fidanza flywheel and will not work.
$59 ACT SS street clutch disk for mustang, 10.5� 10 spline 1 1/16� (new old stock). You can use another brand as long as it's for a v8 mustang with those specs.
$13 7/16-20 0.9� bolts (10) Dorman Flywheel Fasteners 678-154 from Summit (bolts the flywheel to the crank). Put the factory xjs flex plate washer between the bolts and the flywheel. Do not use the thicker "washer" that was on the flex plate though. Torque bolts to 80 ft/lbs with loctite.
$13 ARP 3/8-16 x 1.00 bolts clutch cover (bolts the pressure plate to flywheel) torque to 50 ft/lbs with loctite
$16 flanged 9/16 head Bellhousing bolts. 3/8-16x2� (x6) 3/8-16x3� (x2) I had to chuck these in a drill and put them on a belt sander to remove some of the flange on the bolt to a smaller diameter. easy. You could also use hex key bolts and lock washers instead. torque to 25 ft/lbs
$1789 TOTAL
For xjs manual conversion
trans mount ($free-200)
driveshaft ($3-500)
pedal assembly w/ master $475
interior trim?
speedometer wiring- dakota digital box?
aj6 ECU mod (? Necessary?)
stock trans, unmodified


new 9 1/4" input shaft, with end turned down, compare to 10" below it

bearing is a slip fit with just a few thousandths clearance


this is not necessary, but not a bad idea. I made a silicone mold of the newly machined input shaft and cast an alignment tool for future use when the clutch needs to be changed. It is simple to remove the input shaft from the trans and use the bare shaft to align the clutch to the flywheel on the engine, but the tool removes that step.

if you do not make an alignment tool, this is all you need to do to align the clutch on the flywheel.

input shaft depth in the crank

now with the pilot bearing pressed in. Note that it is NOT bottomed out on the crank, there is clearance. The input shaft was not installed in the trans in this picture, so it actually sits further back when fully installed.

bearing retainer, remove this with an angle grinder or similar. it does not have to be perfect.

hydraulic throw out bearing. Since my trans needed an m8x1.25 stud for the bearing to slide on, and the kit only supplies two sized standard studs, you will need to take the larger diameter stud, turn it down, and re thread to m8x1.25. I was able to just chuck it up in a power drill and grind the threads off (aka a poor man's lathe), then check the diameter with calipers before cutting new threads with a dye tool. Really simple. The kit supplies a bunch of shims to properly shim the contact face of the bearing off of the clutch fingers when depressed. It calls for .1-.2" of free play. Using about 6 of the supplied shims I was able to shim it to 3/16" of free play (.1875"). Make sure you use pipe thread tape on the 1/8" NPT fittings that go into the bearing, but NOT on the -3an side of the fittings.

assembled on the trans. The bellhousing will need to be modified and a small hole cut below the side window. I used a 1 1/4 hole saw to make a small hole so the feed and bleed hoses exit the transmission cleanly.


voila

Here's what I needed and what I spent total.
$250 Ford mustang t5 trans, mine sourced form a 2001 v6 (has a 10" input shaft and electronic speed sensor)$575 5speeds bellhousing
$318 Fidanza v12 jaguar Flywheel from LMperformance
$69 23 tooth v8 t5 input shaft up to �93 mustang with 9 �� length, 10 spline 1 1/16" diameter
$60 machine work to turn down input shaft to a slip fit with Jaguar pilot bearing
$40 small parts kit for t5. When you remove the input shaft you will want to replace the needle bearings and thrust washer that ride on the rest of the gearset. It's very simple and there are youtube videos how to install the input shaft with these new components and shim as necessary. I will not go over that here.
$40 chevy s10 T5 3.6� length bearing retainer with seal 1.375 diameter. Ford bearing retainer will not work!!! This also needs to be modified with with 5/8" cut off of length so it does not hit the hub on the clutch disk. Removing 5/8" from the length will give about 3/16-1/4" of necessary clearance.
$4 jaguar pilot bushing from terry's jag. Get a few extras... just in case. They are cheap.
$204 Hydraulic T5 throw out bearing RAM 78125HD
$13 3an female/female Teflon hose 14� to extend clutch feed line out of bellhousing
$112 clutch max clutch kit buick/gm/chevy 10.5�. We are only using the pressure plate, nothing else, because it has 11 5/8� bolt holes that mount to the fidanza flywheel. A mustang v8 10.5" pressure plate has the WRONG bolt pattern for the fidanza flywheel and will not work.
$59 ACT SS street clutch disk for mustang, 10.5� 10 spline 1 1/16� (new old stock). You can use another brand as long as it's for a v8 mustang with those specs.
$13 7/16-20 0.9� bolts (10) Dorman Flywheel Fasteners 678-154 from Summit (bolts the flywheel to the crank). Put the factory xjs flex plate washer between the bolts and the flywheel. Do not use the thicker "washer" that was on the flex plate though. Torque bolts to 80 ft/lbs with loctite.
$13 ARP 3/8-16 x 1.00 bolts clutch cover (bolts the pressure plate to flywheel) torque to 50 ft/lbs with loctite
$16 flanged 9/16 head Bellhousing bolts. 3/8-16x2� (x6) 3/8-16x3� (x2) I had to chuck these in a drill and put them on a belt sander to remove some of the flange on the bolt to a smaller diameter. easy. You could also use hex key bolts and lock washers instead. torque to 25 ft/lbs
$1789 TOTAL
For xjs manual conversion
trans mount ($free-200)
driveshaft ($3-500)
pedal assembly w/ master $475
interior trim?
speedometer wiring- dakota digital box?
aj6 ECU mod (? Necessary?)
pictures
stock trans, unmodified
new 9 1/4" input shaft, with end turned down, compare to 10" below it
bearing is a slip fit with just a few thousandths clearance
this is not necessary, but not a bad idea. I made a silicone mold of the newly machined input shaft and cast an alignment tool for future use when the clutch needs to be changed. It is simple to remove the input shaft from the trans and use the bare shaft to align the clutch to the flywheel on the engine, but the tool removes that step.
if you do not make an alignment tool, this is all you need to do to align the clutch on the flywheel.
input shaft depth in the crank
now with the pilot bearing pressed in. Note that it is NOT bottomed out on the crank, there is clearance. The input shaft was not installed in the trans in this picture, so it actually sits further back when fully installed.
bearing retainer, remove this with an angle grinder or similar. it does not have to be perfect.
hydraulic throw out bearing. Since my trans needed an m8x1.25 stud for the bearing to slide on, and the kit only supplies two sized standard studs, you will need to take the larger diameter stud, turn it down, and re thread to m8x1.25. I was able to just chuck it up in a power drill and grind the threads off (aka a poor man's lathe), then check the diameter with calipers before cutting new threads with a dye tool. Really simple. The kit supplies a bunch of shims to properly shim the contact face of the bearing off of the clutch fingers when depressed. It calls for .1-.2" of free play. Using about 6 of the supplied shims I was able to shim it to 3/16" of free play (.1875"). Make sure you use pipe thread tape on the 1/8" NPT fittings that go into the bearing, but NOT on the -3an side of the fittings.
assembled on the trans. The bellhousing will need to be modified and a small hole cut below the side window. I used a 1 1/4 hole saw to make a small hole so the feed and bleed hoses exit the transmission cleanly.
voila
What happens is it shoves the crankshaft hard forward which quickly ruins thrust bearings and then chews up the crankshaft and engine block.
#6
01-24-2020, 03:26 PM
#7
01-24-2020, 04:37 PM
I think it depends on the machine work on the bell housing too. An extra pass or two to clean up a casting might be the cause.
That and with so many variants of the T5 being used it wouldn�t be too hard to have a pilot shaft project an extra .250 or so which could be the cause.
All I know is that when the T5 kits came out I sold several engines to replace ruined ones.
That and with so many variants of the T5 being used it wouldn�t be too hard to have a pilot shaft project an extra .250 or so which could be the cause.
All I know is that when the T5 kits came out I sold several engines to replace ruined ones.
Trending Topics
#8
06-13-2022, 03:33 PM

Does anyone have any information on how this compares fore-and-aft with the correct positioning of the shift knob in our XJSs? The OP was making a Ferari replica, so presumably didn't have to deal with that little detail the way we would. I'm intrigued by this solution, but can't go down this route if it's going to put the shift knob in the stowage box between the seats (or in the trip computer) rather than where the original TH400 mechanism sat.....
#9
10-11-2022, 09:22 PM
275nart,
I think I know the answer, but I don't want to assume....
The pilot bushing should be a press fit into the end of the crankshaft, right?
You state that the input shaft is machined down to have a slip fit of "a few thousandths"....are we talking .003 or .005? How critical is this? I'm ready to take my input shaft and bushing to the machine shop, and I need to have "a number" to give them....I just don't know what the standard/normal clearance for this is!!
Brad


Thread
Thread Starter
Forum
Replies
Last Post
bullittandy
XJS ( X27 )
13
04-14-2017 10:33 AM
Currently Active Users Viewing This Thread: 1 (0 members and 1 guests)