V12 water rails
#1
 07-29-2014, 08:17 AM

Hey there,
well, I'm moving on with my XJ-S and have discovered leaking water rails... Yes, those "darn" pipes... It is leaking from the area where the pipe is pushed into the rubber bush. I assume the pipe has corroded and the rubber is brittle.
Oddly, it didn't leak there before (at least not that I could tell) I filled the system with new coolant. Looking at the "slurry" I got out before flushing it, I think it was run without antifreeze...
Anyhow, I've read that these pipes are "wear and tear" parts which seem to require regular maintance. Has anyone got a recommendation for some good replacement pipes? Stainless steel or copper? Maybe even brass? Being only a short pipe should require rocket engineering
As far as I have seen, I need to remove the entire water rails - from front to rear. 4 little gaskets per side (bodies to engine) and 4 rubber bushs.
Is there anything else I should consider changing at the same time? Thermostats: done. Hoses: done. The extra air valve is a brand new part (original Lucas) so that doesn't need to be replaced...
I was thinking about doing all the sensors at the same time... Other suggestions?
Cheers
Damien
#2
07-29-2014, 08:32 AM

Veteran Member
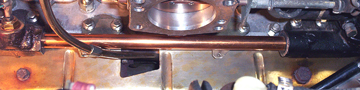
Stainless water rails a good idea. The existing rails may be Ok but equally may be rusted a bit. All the gaskets and top hat water rail/manifold seals still available from Jaguar. There is a theory that the water at the back of the engine gets less well circulated and that the water 'short circuits' round the front of the engine. This can be ameliorated by reducing the size of the holes in the front manifolds as shown here:

The hole nearest the front is about 4mm and the next one about 12mm. This is standard practice apparently by the racers. Careful how you undo the water manifold bolts as they can snap, though mine were no problem.
Greg

The hole nearest the front is about 4mm and the next one about 12mm. This is standard practice apparently by the racers. Careful how you undo the water manifold bolts as they can snap, though mine were no problem.
Greg
The following 3 users liked this post by Greg in France:


#4
07-29-2014, 09:06 AM
#5
07-29-2014, 10:17 AM
Veteran Member
The following users liked this post:
rgp (07-29-2014)

#7
07-29-2014, 12:16 PM
I purchased a 3ft section of stainless tubing from McMaster-Carr for ~$30. I then cut it to length. The pipe is technically considered tubing due to its thin sidewall. I then cut it to size and installed new rubber rings. I also used rtv sealant just to be extra safe. I will post later this evening when I get home with part numbers.
Trending Topics
#8
07-29-2014, 12:26 PM
I purchased a 3ft section of stainless tubing from McMaster-Carr for ~$30. I then cut it to length. The pipe is technically considered tubing due to its thin sidewall. I then cut it to size and installed new rubber rings. I also used rtv sealant just to be extra safe. I will post later this evening when I get home with part numbers.
#9
07-29-2014, 01:24 PM
Senior Member
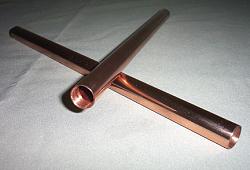
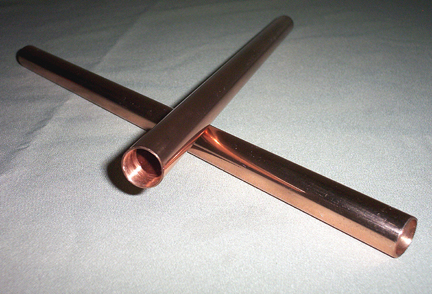
I like the look of copper for the coolant rails. I think the look pays homage to grand motorcars of the 20s & 30s.
I've polished and clear-coated at least a dozen pair of copper pipes without adding an additional ring at each end, and have installed them on two of my own engines. I never had any complaints of leaks from customers I sold the pipes to, nor, have I ever had leaks on my engines after installing. The rubber top hat seals heat up and bond to the pipes and housings very well without additional sealant.
I've polished and clear-coated at least a dozen pair of copper pipes without adding an additional ring at each end, and have installed them on two of my own engines. I never had any complaints of leaks from customers I sold the pipes to, nor, have I ever had leaks on my engines after installing. The rubber top hat seals heat up and bond to the pipes and housings very well without additional sealant.
The following users liked this post:
darrhel (06-14-2020)
#10
07-29-2014, 02:07 PM
I like the look of copper for the coolant rails. I think the look pays homage to grand motorcars of the 20s & 30s.
I've polished and clear-coated at least a dozen pair of copper pipes without adding an additional ring at each end, and have installed them on two of my own engines. I never had any complaints of leaks from customers I sold the pipes to, nor, have I ever had leaks on my engines after installing. The rubber top hat seals heat up and bond to the pipes and housings very well without additional sealant.
Attachment 91820 Attachment 91821

And cheers about the housing bond bush things... Sounds perfect!
#11
07-29-2014, 04:53 PM
Senior Member

The following 2 users liked this post by JagZilla:
darrhel (06-14-2020),
Poppa doing it (11-20-2020)
#12
07-30-2014, 07:25 AM

JagZilla, that is really sharp looking!
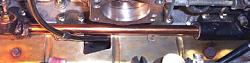
While doing the rails on mine recently, I also went with copper. I bought 2, two foot lengths of Type "K" hard copper tubing from a company called Zoro. Did not use any additional "shoulders" and it seems to be working just fine.
Here is one side while work was still in progress.
While doing the rails on mine recently, I also went with copper. I bought 2, two foot lengths of Type "K" hard copper tubing from a company called Zoro. Did not use any additional "shoulders" and it seems to be working just fine.
Here is one side while work was still in progress.
#13
07-30-2014, 07:44 AM
Senior Member
JagZilla, that is really sharp looking!
While doing the rails on mine recently, I also went with copper. I bought 2, two foot lengths of Type "K" hard copper tubing from a company called Zoro. Did not use any additional "shoulders" and it seems to be working just fine.
Here is one side while work was still in progress.
While doing the rails on mine recently, I also went with copper. I bought 2, two foot lengths of Type "K" hard copper tubing from a company called Zoro. Did not use any additional "shoulders" and it seems to be working just fine.
Here is one side while work was still in progress.
Good point. You won't find this size copper at Home Depot or Lowes. I had to buy it in a 20' length from a heating & A/C supply company.
Another important point if someone is planning to clear-coat their coolant pipes, be they copper, stainless, or whatever, is to tape off the ends of the pipe before they clear-coat them. You want bare metal bonding to the top hat seals, not clear-coat.
The following users liked this post:
Bill C (07-30-2014)
#14
07-30-2014, 08:34 AM
#16
07-30-2014, 10:07 AM
The gasket is luckily not leaking. The AAV is as it looks really new (or recently replaced) so the gasket would have been done at the same time. I asked as the screws/bolts seem awkward to access behind!? I intend on having the rail "bodies" blasted (probably glass blast as it should look tidier).
#17
07-30-2014, 01:00 PM
As said, I want to replace the sensors and have stumbled upon this one (the brass one!):

What does it do? If it is important: how can you check if it works right? This may sound "cheap skate like" but I am repalcing all the sensors - just this one seems like the only one to cost an "arm and leg". Basically the price of all other sensors together. I have one spare (from my scrapped XJ-S) and don't fancy fitting a new one for the sake of it...
Is there a way to check if it is working right? Anyone have some suggestions?
#18
07-30-2014, 03:07 PM
Veteran Member
If the bit you mean is the thing with the two wires to it, and it is on the A bank rear water manifold, then it is the 15 minute timer water temp switch. It keeps the mixture rich for 15 mins after start up, for no real purpose, and disconnecting the wires disables this part of the warmup procedure. The Great Palm's book explains this in detail.
Greg
Greg
#19
07-31-2014, 05:27 AM
If the bit you mean is the thing with the two wires to it, and it is on the A bank rear water manifold, then it is the 15 minute timer water temp switch. It keeps the mixture rich for 15 mins after start up, for no real purpose, and disconnecting the wires disables this part of the warmup procedure. The Great Palm's book explains this in detail.
Greg
Greg

#20
07-31-2014, 06:19 AM