
Windshield 86 Coupe
#1
 11-11-2013, 11:29 AM

So I started my Veterans day attacking this windscreen job.
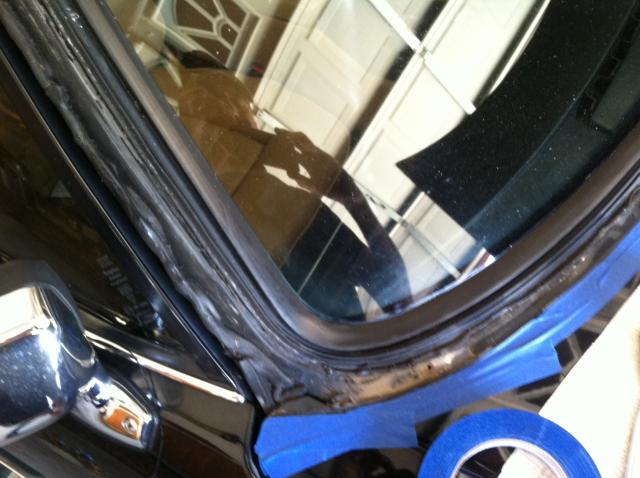
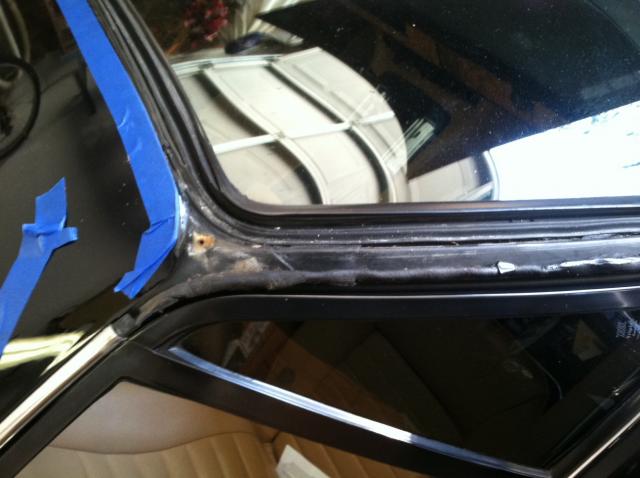
1. Took 1 hour to remove all trim and windscreen. trim came up easy enough with no "jarring" of it. I used a plastic pry/spatula and wiggled it free as I went. (noted groove under top piece that seems to demand a "strip" but there was sealant from this to the body, I'll need to see a parts breakdown)
2. I'd never have a company remove/replace now that I see the opening...when I did my 87 XJ6 I had them pull it then come back in two weeks to install after I prepped the hole. There is too much mastic stuck on the body opening and too much "pulled" up to not spend time smoothing and finishing the opening properly.
3. no rust noted, just minor surface at screw holes.
4. New gasket/seal DRY fitted (from URO) fit fine, very little bunching and didn't seem "too big" as reported by some at all. A GOOD FIT IS GOING TO DEPEND ON A CLEAN, SMOOTH OPENING, I CAN'T STRESS THIS ENOUGH. glass companies are going to do the job in 2 hours and area not going to prep that are right, they will most likely cover it with spread out mastic and won't have to contend with it in 6 years when it all goes south.
5.Going to leave the gasket dry in place to allow it to find it's new "home" then I'll remove clean, prep the opening and install....more to report as it goes along.
Trim removed driver side...
trim removed pass side
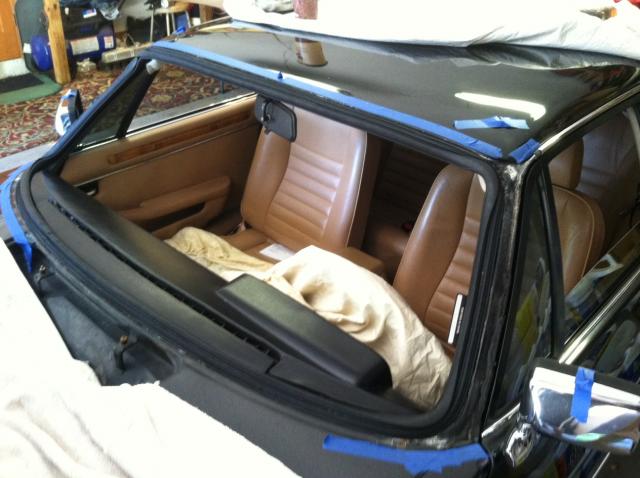
Winshield out, old seal still in (just cut the outter seal part away from glass edge, windshield pops right out quite easy)

New seal just dry fit over rougly smoothed opening, further cleaning/prep needed, checking fit and allowing it to seat for a little
Pass side, new seal

This simple tool is a MUST

1. Took 1 hour to remove all trim and windscreen. trim came up easy enough with no "jarring" of it. I used a plastic pry/spatula and wiggled it free as I went. (noted groove under top piece that seems to demand a "strip" but there was sealant from this to the body, I'll need to see a parts breakdown)
2. I'd never have a company remove/replace now that I see the opening...when I did my 87 XJ6 I had them pull it then come back in two weeks to install after I prepped the hole. There is too much mastic stuck on the body opening and too much "pulled" up to not spend time smoothing and finishing the opening properly.
3. no rust noted, just minor surface at screw holes.
4. New gasket/seal DRY fitted (from URO) fit fine, very little bunching and didn't seem "too big" as reported by some at all. A GOOD FIT IS GOING TO DEPEND ON A CLEAN, SMOOTH OPENING, I CAN'T STRESS THIS ENOUGH. glass companies are going to do the job in 2 hours and area not going to prep that are right, they will most likely cover it with spread out mastic and won't have to contend with it in 6 years when it all goes south.
5.Going to leave the gasket dry in place to allow it to find it's new "home" then I'll remove clean, prep the opening and install....more to report as it goes along.
Trim removed driver side...

trim removed pass side

Winshield out, old seal still in (just cut the outter seal part away from glass edge, windshield pops right out quite easy)

New seal just dry fit over rougly smoothed opening, further cleaning/prep needed, checking fit and allowing it to seat for a little

Pass side, new seal

This simple tool is a MUST

Last edited by JTsmks; 11-11-2013 at 12:52 PM.
The following users liked this post:
katar83 (11-27-2019)
#2
11-11-2013, 11:55 AM
Senior Member
Looks good. I'm encouraged by what I'm seeing in your post. Maybe I'll tackle my windshield replacement when I get time to do so.
I'm spending my Veterans Day weekend wiring my Electromotive TEC1 (fuel and ignition control) ECU into JagZilla. I've been putting this part of the project off for about a year and a half, because I suck at electrical projects.
I'm spending my Veterans Day weekend wiring my Electromotive TEC1 (fuel and ignition control) ECU into JagZilla. I've been putting this part of the project off for about a year and a half, because I suck at electrical projects.
#3
11-11-2013, 12:05 PM
It's funny how I've got the day dedicated to "me" and I choose to work on my car....funny how much I enjoy automotive work when I'm not struggleing to get It running to drive it to work, I did enough for now so I'm throwig the cover over it and taking the TR-6 out to get some mastic.....76 F here and severe clear!
#4
11-12-2013, 02:19 PM
Day 2: Bought scotchbrite wheel, zinc primer, acetone, metal prep and ordered windshield sealant. On way home to start prep work and the power steering pump went out in the LS, YaY!!!! so I have to wait a day for that to come in and then I cracked the pully (which doesn't come with the pump) YaY!!!! So now my DD and my XJS b/u are out of commission...isn't car ownership fun!!!!!!! Hope it doesn't rain tomorrow cause the TR-6 is going to work! That'll be next to break! 
#5
11-19-2013, 04:18 PM
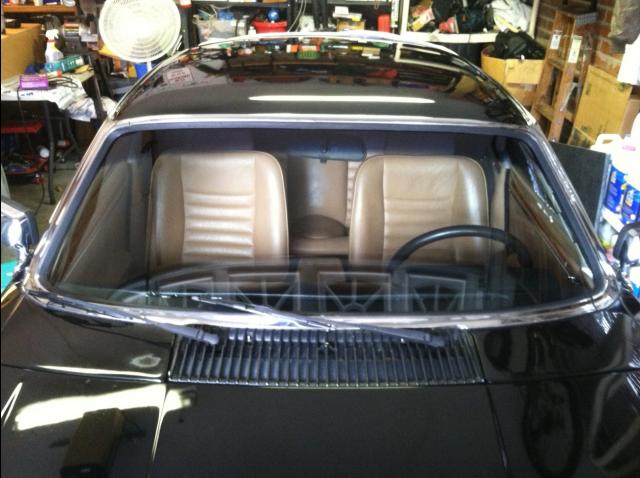
FINALLY got around to the windshield today....eassseeee, peeeezzzeeee. Took dry fit seal out, smoothed opening with a scotchbrite wheel, zinc primed and painted opening where there was bare metal from leveling, smoothed out a bead of sealant in the recess groove and a small bead on the outer edge, fit the seal to the body and dry fit the glass in starting with the bottom then used the plastic scraper to go up each side then the top seal was folded under the top glass so I got inside and just "pushed" it up and over with the plastic scraper and VIOLA she popped in place! About an hour to get out an hour to prep and about 20 mins to install seal and glass. Clean up has proven to be the long part! Installed the locking strip in minuets took the scraper and pulled the rubber to glass seal up and applied a bead of sealant all around and tidy'd up the outer sealant and smoothed it out with a wet finger. Waiting for it to set-up over night before tackling the trim install.
Love the look of the windshield with the "tint" band at the top too!
I would strongly recommend not installing the seal to the glass and trying to "rope" it in, install the seal to the car and then the glass to the seal, URO seal fit fine without altering and it simply goes on with "connecting" point visible at center bottom.
#6
11-20-2013, 02:10 PM


#7
11-21-2013, 01:03 PM
Job done! I will tell you this the stainless trim is by far the hardest most frustrating part. As Doug stated before that he couldn't get a piece to fit quite right and I found the same with a couple of pieces, I tried to slightly torque one and kinked it. I'll be getting a new piece eventually for that side but for now I'm just going to enjoy a clear windscreen. I also sealed in the top gutter flow through as mine were clogged with leaves behind the stainless trim down each side. Not super difficult but not something I would like to do again!


Last edited by JTsmks; 11-21-2013 at 02:56 PM.
Trending Topics
#8
11-21-2013, 01:18 PM
Veteran Member
Job done! I will tell you this the stainless trim is by far the hardest most frustrating part. As Doug stated before that he couldn't get a piece to fit quite right and I found the same with a couple of pieces, I tried to slightly torque one and kinked it. I'll be getting a new piece eventually for that side but for now I'm just going to enjoy a clear windscreen.
Once the trim is straight again I filed it flat then wet sand until smooth and polish with a buff.
Or you can have it repaired professionally by someone that does chroming.
Good job BTW and I see you filled the lower corners of the screen this will prevent water pooling and eventual rust.
#9
11-21-2013, 01:36 PM
Anyone interested in pricing:
Windscreen, with tint band: Rock Auto.....$159 (a steal) $70 to ship canada warehouse to Florida total time 4 days from order to delivery
URO windshield seal: Rock Auto....$35 (again a steal, most charge $70 for exact same seal)
Lockstrip: RockAuto....$3.97 (wow, now thats CHEAP)
I could only find one windscreen originally through Pilkington Classic direct from England, $350 plus $150 frieght. I called RockAuto when I saw their price + the Pilkington does'nt come with the tint band, RA assured me it would fit and for less then used glass on E-Bay I've a new screen. At last count they had 2 left in the warehouse. Only local company that would tackle the job wanted to charge me $800 with pilkington clear screen. I got away with about $325 dollars for screen, seal and sealant, tape, spirts, gloves etc. (thats less then the screen cost alone through PC)

Thread
Thread Starter
Forum
Replies
Last Post
Currently Active Users Viewing This Thread: 1 (0 members and 1 guests)