When you click on links to various merchants on this site and make a purchase, this can result in this site earning a commission. Affiliate programs and affiliations include, but are not limited to, the eBay Partner Network.
First off, I am new to the forum. Just got '86 xjs, my (most likely) (very) long term project car. Before I get to working on the engine, I need to replace the radiator.
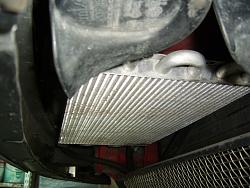
Here is what I did so far:
- removed the front grill
- removed the lower grill
- removed the bonnet
This got me here:
I can see the radiator clearly now. But what do I do with the top black covering on top of it? Also, there is some metal tubing running across. What are those and what do I need to do with them in order to get to the radiator and pull it out?
(BTW, I did search previous threads. There were only couple on radiators. If I missed some, I apologize. Also, I have Haynes repair manual and read the section on radiators, but it is confusing. At least for now. So, looking for some kind souls to help me with next steps...)
Firstly welcome to teh Forum, Please do an Intro in the New Members Area when time permits.
Nearly there.
Undo the banjo bolt on the RH side (as seen sitting in the car and facing the front). DO NOT drop the spacer and copper washers. Release whatever clips secure that pipe to the top panel, and the 2 small hoses on the LH side.
Remove the required smaller bolts/screws that hold the radiator shrouds to that top panel. This bit I dont remember so well, as I ditched the engine fan and all that junk for Efans back in 1994.
Now remove the 4 bolts holding that Black panel to the car, wobble it aroung CAREFULLY, so the rubber bushing release from the pins of the radiator. Place that panel to one side, again CAREFULLY, so as not to damage any electrical items attached to it.
Remove the 2 top radiatoir hoses, and the LARGE bottom hose, NAD the small heater return hose in that same area.
Grab hold of the radiator and simply lift it out. The bottom mounts are the same as the top, rubber grommets, and pins, NO bolts at all.
You will need on hand:
Bandaids for the ensueing blood letting.
Language extension.
Sense of humour, the more warped the better.
Ability to consume alcohol in large quantities, to keep the head on track.
Tools, lots of tools, to restock the toolbox due to the ones you have launched across the shed.
TIME, rush this thing and that car will FIGHT you 100%, so sometimes, sit back, drink, think, and look at the angle of the dangle for another way.
Last edited by Grant Francis; 12-26-2016 at 01:54 AM.
Further detail to add to Grant's points about the panel above the radiator that has the pipes and the wiring loom going through it:
The loom piece goes to the secondary coil in front of the rad (clearly shown in your photo). This coil is an important part of the ignition system at high revs. Undo the loom from its terminals and MARK THEM carefully for which terminal they attach to. Then, when the top panel is loose, you can pull it back and place it carefully on top of the engine without straining the loom.
There is also loom and relays fixed to the engine side of the panel. The relays can be carefully pulled off their fixings and the P clips holding the loom undone. This frees up the top panel once the four bolts (two each side) fixing the panel to the body have been undone. There are important earth wires (grounds) under these bolts each side, note how many each side and be careful to ensure they go back. Clean up the area to bare metal when re-attaching to ensure a good earth. The loom on the back of the panel can be eased carefully back towards the engine to give enough clearance to remove the radiator.
BUT: you will also find that there are bolts or nuts holding the fan shroud to the top panel. These must also be undone to get the panel out of the way. These fixings sit in small rubber "cotton reels" for insulation. The shroud can also be eased, at the top, carefully back towards the engine just enough to get the radiator out. There are equivalent shroud fixings at the bottom, but with luck you should not have to move these.
Then you will find two small pipes going into the RHS of the rad, these are gearbox oil cooler pipes, in your care they may be threaded fixings or just worm drive ones. In either case remove VERY carefully, if worm drive, even after the clip is undone, the pipe may not come off and forcing it will fracture the radiator spigot. In this case, cut the pipe off as close as possible to the spigot end, and then cut along the length of the spigot with a sharp knife and get the pipe rubber off that way. There should be enough rubber pipe left to re-attach, but if not renew it with top notch flexible pipe.
Then you just have the two top rad hoses to undo and the bottom one and a small one which also goes to the rad bottom attaching to a small upright spigot, which is the heater return pipe. It is a very good plan to renew all these coolant flexible pipes, so if you do so, cutting them if you have to is not problem. Hose kits are available from the normal Jaguar suppliers (eg SNG Barratt, David Manners, Coventry West). New stainless worm drive clips also a good idea. The bottom hose is especially vulnerable and renewing it is important, as is carefully siting it so nothing on the engine is rubbing against it when it goes back in.
Then with for preference a mate to assist, the rad can be lifted vertically upwards, but be sure its rubber pads go back where they should be if for some reason they come out with the rad. Clean out all the rubbish blocking the fins of the coolers in front of the rad that remain in the car as much as you possibly can.
This job is a rite of passage for the XJS owner, we have all been there the first time, so just take it steadily and make careful notes of what goes where and all will be well. Good luck
Greg
Last edited by Greg in France; 12-26-2016 at 03:03 AM.
I forgot the trans hoses, I dont have them in the radiator.
I knew those shroud top mounts would test the patience, now i know why I ditched all that stuff.
Thanks to you, neither do I have all that either! But mine was removed not too long ago so I can (just) remember the pain! Plus, (/boast on/) I have done away with the radtop bleed pipe too (/boast off/).
Greg
Mine is out the front behind the rubber bumper blade, and mounted Horizontally, and angled ever so slightly so air flowing under the bumper blade passes over it. This "angling was more hit and miss, but it has been there since 1996.
The power steer cooler is also AWOL, more room on the LH side without it, and less hose joints to leak.
Also remember I run Synthetic trans fluid in the TH400 and the steer system, and again, NO issues since 1996.
Thank you Grant and Greg! Extremely helpful! With these explanations and tips, the job looks only half as daunting as it looked only 24hrs ago
And, yes, I do see that second small rad at the bottom (for the transmission oil cooling).
Question: are these two radiators (engine and tranny) "connected" (i.e., share the same coolant) or do they operate independently? (I did find the cap through which the coolant is added on LHS. Is there another one for the transmission radiator?)
And, yes, I do see that second small rad at the bottom (for the transmission oil cooling).
No you do not, that is for the engine oil cooling. The gearbox cooling is a coil inside the RHS of the radiator, which is surrounded by but not connected to, the coolant.
Originally Posted by v1rok
Question: are these two radiators (engine and tranny) "connected" (i.e., share the same coolant) or do they operate independently? (I did find the cap through which the coolant is added on LHS. Is there another one for the transmission radiator?)
The water radiator is entirely separate from everything else. There are two coolers in front of the water rad. The top one is the aircon condenser (that round thick tube in front of the radtop panel is the aircon dryer). Do not undo any of the pipe connections on these two items! The dryer fixings to the radtop panel that fix it to the metal chassis tube will have to be loosened or undone to remove the panel.
The engine oil radiator is below the condenser and may be a hedgehog looking tube, or a proper looking radiator. Again do not touch the pipes going in or out of this either. each of the three items is entirely separate from the others.
You will find when you pull out the rad a deal of horrible oily foam rubber round the rad edges stuffed between it and the bodywork. This can be dispensed with when replacing the rad. Just leaves a gap which helps reduce engine bay temps, which as you will learn, is a subject of great discussion and importance in keeping our cars and their engine bay wiring reliable.
Greg
Last edited by Greg in France; 12-26-2016 at 12:44 PM.
Interesting place Grant! Thanks for showing. How did you run the hoses? Are then along the chassis rails instead of along the engine?
My setup is like Grants and copied from him. My pipes go from the OEM steel pipes downwards a bit and then through the gap between the RHS of the rad and the body. On that type of tranny cooler both the cooler in and return are at that end, which is handy.
Greg
Any recommendations on what replacement radiator I should get? I tried to scan online and prices appear to vary from $200s to as high as $6xx.
I don't want to go crazy immediately and get a super high end stuff and then discover it does not fit exactly or, worse yet, break it during installation process. Just needs something that is solid and is known to work reasonably well, but at the same time be budget friendly
Any recommendations?
If you can find a radiator repair place, just get the one you have re-cored. This keeps the original side-tanks and fits a new actual matrix, and should be your cheapest decent quality option. I also expect if you ask Coventry West, David MAnners, SNG Barratt etc they will be able to supply one.
The very best aluminium ones are Wizard brand (Texas I think) and they are really good but 700 USD or some such. A cheapie from Ebay is not a good idea, IMO.
Greg
Ok. The radiator is out... Drying on the garage floor, Took me about 4 hours... And a pint of blood. Or maybe two
What a job! Is it the worse radiator replacement job of any cars ever made or what???
This morning, I re-read the responses from Grant and Greg and dove in. Initially, I was cruising. Got the banjo bolt out, then the metal pipe, then the top black panel. I was like: wow, it is not that bad.
Then I started unplugging the hoses. Top ones came out fine. The metal ones on RHS (tranny oil hoses) I had to struggle with a bit, as the room is very tight. But those two were also undone after maybe 30 min.
And then I was left with just two bottom hoses...
How on Earth is one supposed to remove the bottom two hoses???? There is absolutely no f* room whatsoever to even get remotely close to them. It is just f* impossible!!!
After thinking, and looking, and thinking, and looking again,... I decided to try to pull the small plastic fan on LHS out. Together with the housing, the wiring, etc.
I struggled with it for more than an hour. At the very end, I discovered that one of the bolts holding the covering was fried. So, I had to drill through it. What a f* nightmare...
Only after I pulled the small plastic fan out, I was able to somehow get a grip (barely) on the bottom hoses (even then it was not easy!), and pulled them out
How did you guys do it for the bottom hoses??? Is there a trick???
Anyway, will drive the rad to a radiator shop tomorrow to see if they can recore it. Keeping my fingers crossed
Last edited by v1rok; 12-28-2016 at 08:03 PM.
Reason: picture
You are now part of an elite group of Jaguar owners.
I went thru that ONCE only, and I simply cut the bottom hose length ways, it was being replaced anyway.
Then I went Efans, seperate trans cooler, etc, and access is sooooooo easy. I realise that scenario is NOT for everyone.
You now know that there was never ever any logical reason for what was stuffed in there, as the cars were NEVER thought to still be in service more than 10 years down the track.
I would have probably tried to cut the bottom hoses, but there was absolutely no room for me to get anywhere close to them... With or without a knife...
How are they doing it at dealerships when somebody brings a car for a leaking radiator service? Take the whole engine out just to replace a radiator??? Anyway, just venting
Now it is out, and very well done you, do not forget to clean out the fins of the front two coolers. When replacing the rad, be very careful with the orientation of the worm drive clips, placing them so the screw tighteners are accessible when you so back in there is important next time.
Greg
I would have probably tried to cut the bottom hoses, but there was absolutely no room for me to get anywhere close to them... With or without a knife...
How are they doing it at dealerships when somebody brings a car for a leaking radiator service? Take the whole engine out just to replace a radiator??? Anyway, just venting
What is Efans, by the way?
Yep,
Engine out, do it ALL, do it PROPERLY, repeat in 25 years, HAHA, honestly, that is MY way of a newly aquired V12, no second thoughts ever.
I doubt there would be an actual Delaer anywhere in the world that would have employees that remember a V12 of any kind, and an XJ-S even thinner on the ground, as has been mentioned.
Down here there are a few Independents that will work on them, but again, the age of the spanner (wrencing))) poerson is ypounger than the car be a heap.
Efans = twin thermo fans. I use Aussie Ford fans that basically slide straight in, a few bits of wire here and there, all done.
A snap of my fan set up for what its worth, 4 screws, 2 loom plugs, and the fans lift out, and the ROOM available is HUGE.
Ok. The radiator is out... Drying on the garage floor, Took me about 4 hours... And a pint of blood. Or maybe two
What a job! Is it the worse radiator replacement job of any cars ever made or what???
This morning, I re-read the responses from Grant and Greg and dove in. Initially, I was cruising. Got the banjo bolt out, then the metal pipe, then the top black panel. I was like: wow, it is not that bad.
Then I started unplugging the hoses. Top ones came out fine. The metal ones on RHS (tranny oil hoses) I had to struggle with a bit, as the room is very tight. But those two were also undone after maybe 30 min.
And then I was left with just two bottom hoses...
How on Earth is one supposed to remove the bottom two hoses???? There is absolutely no f* room whatsoever to even get remotely close to them. It is just f* impossible!!!
After thinking, and looking, and thinking, and looking again,... I decided to try to pull the small plastic fan on LHS out. Together with the housing, the wiring, etc.
I struggled with it for more than an hour. At the very end, I discovered that one of the bolts holding the covering was fried. So, I had to drill through it. What a f* nightmare...
Only after I pulled the small plastic fan out, I was able to somehow get a grip (barely) on the bottom hoses (even then it was not easy!), and pulled them out
How did you guys do it for the bottom hoses??? Is there a trick???
Anyway, will drive the rad to a radiator shop tomorrow to see if they can recore it. Keeping my fingers crossed
Hi V1roc
You are only on the nursery slopes, so think yourself very lucky as when I took the Rad out I wound up spending the day in A&E
 12-25-2016, 11:16 PM