
A/C water drainage in passenger footwell fixed! RESOLVED "How To"
#1
 03-31-2014 | 10:30 PM

Thread Starter
|
Member
Joined: Nov 2012
Posts: 66
Likes: 69
First of all I want to thank Hawaii for this ingenious idea. I take NO credit! This will save you lots of money and is a great inexpensive solution to the problem. I did the repair in about an hour and thought a few pictures would make it easier for some folks. Again thanks to Hawaii!!
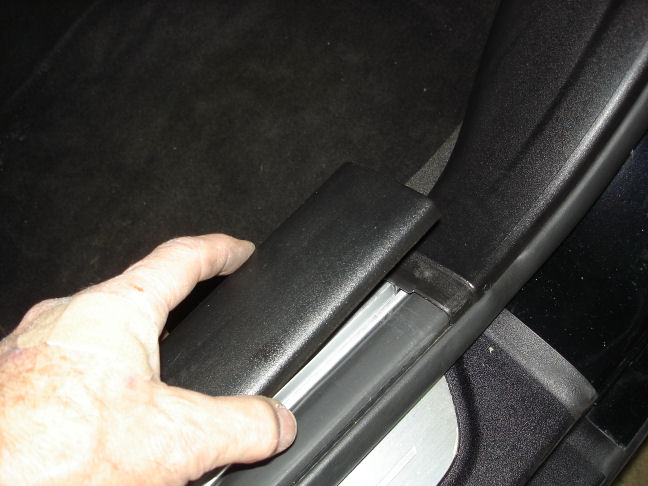
Start by pulling the door sill panel up with your hand. Then the side panel in the passenger footwell pulls back toward the rear of the car to remove.

then pull the carpet back to get access to things. It takes some effort as the carpet is stiff.

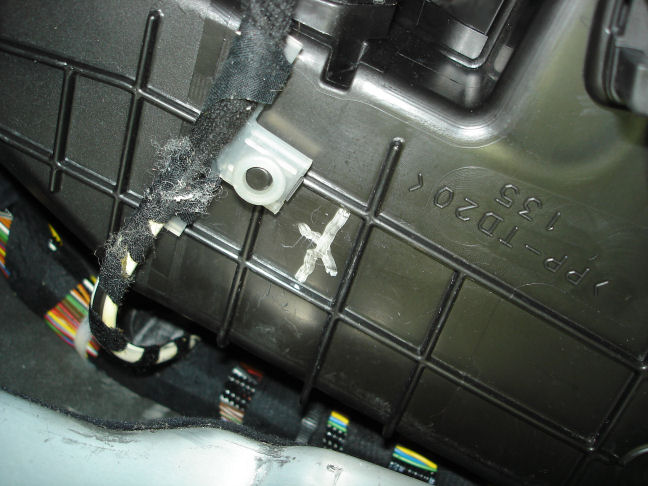
this is the view looking up at the plastic box which contains the condenser unit inside. It is slightly lower at the front of the unit, but its hard to drill a perpendicular hole in this area, so I targeted one with an X a little to the rear
A right angle drill gives you more room to drill. You can see if I chose a site closer to the front, my drill would have to be angled preventing a perpendicular drilling approach. I drilled carefully as Hawaii recommended but after I broke through in this location there was nothing inside to damage.


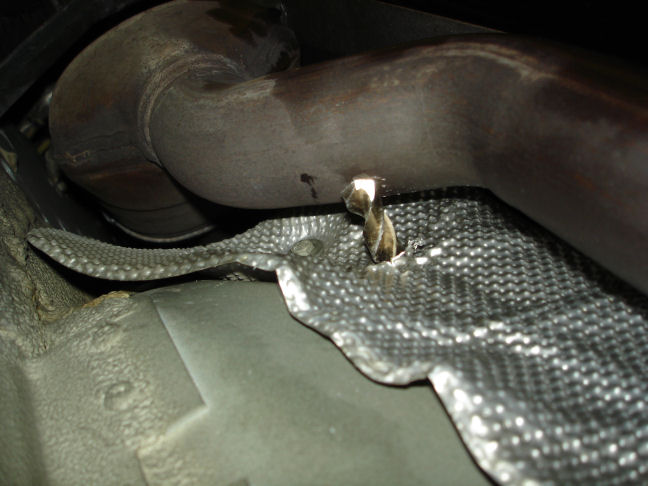
This is the site I chose to drill through the floor. It worked out fine but you may want to go a little closer to the outside of the car (away from the transmission tunnel) The picture below shows where I exited beneath the car.
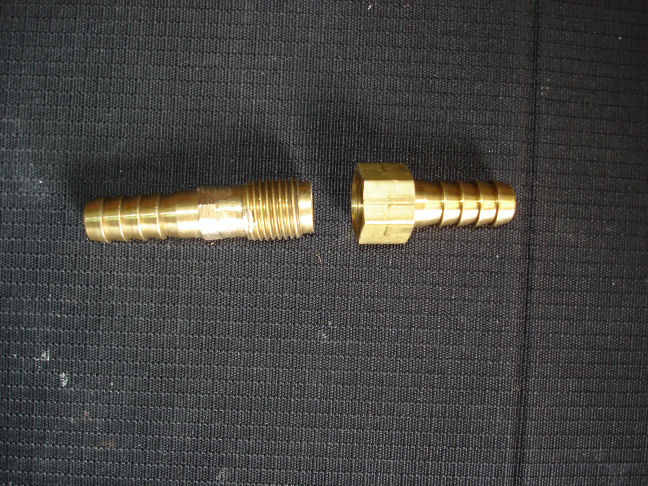
Because of the proximity to the exhaust pipe I decided to use a brass fitting. I was concerned the plastic tubing would melt and seal itself. I found some brass fittings in my "junk" drawer that worked out.
I assembled these parts and put the long end through the flow secured by some JB Weld


I put some JB Weld on the threads of another fitting I had and threaded it into the condenser box.
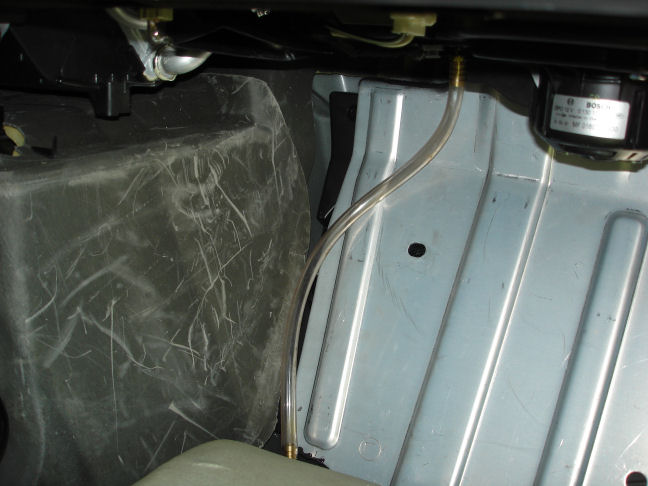
from there I just routed a plastic tube between the two brass fittings.

I tucked the carpet back in place and replaced the panels. Looks good!
My thanks again to Hawaii for this tip. PM me if you have any questions!

Start by pulling the door sill panel up with your hand. Then the side panel in the passenger footwell pulls back toward the rear of the car to remove.

then pull the carpet back to get access to things. It takes some effort as the carpet is stiff.

this is the view looking up at the plastic box which contains the condenser unit inside. It is slightly lower at the front of the unit, but its hard to drill a perpendicular hole in this area, so I targeted one with an X a little to the rear

A right angle drill gives you more room to drill. You can see if I chose a site closer to the front, my drill would have to be angled preventing a perpendicular drilling approach. I drilled carefully as Hawaii recommended but after I broke through in this location there was nothing inside to damage.


This is the site I chose to drill through the floor. It worked out fine but you may want to go a little closer to the outside of the car (away from the transmission tunnel) The picture below shows where I exited beneath the car.

Because of the proximity to the exhaust pipe I decided to use a brass fitting. I was concerned the plastic tubing would melt and seal itself. I found some brass fittings in my "junk" drawer that worked out.

I assembled these parts and put the long end through the flow secured by some JB Weld


I put some JB Weld on the threads of another fitting I had and threaded it into the condenser box.

from there I just routed a plastic tube between the two brass fittings.

I tucked the carpet back in place and replaced the panels. Looks good!
My thanks again to Hawaii for this tip. PM me if you have any questions!
The following 29 users liked this post by DenverDDS:
1 of 19 (07-22-2016),
amcdonal86 (04-01-2014),
axr6 (03-31-2014),
bobdr1 (04-02-2014),
CaptHank (05-26-2016),
and 24 others liked this post.
#2
03-31-2014 | 10:48 PM

Veteran Member
Joined: Aug 2010
Posts: 2,367
Likes: 594
From: California
#3
04-01-2014 | 12:18 AM
Veteran Member
Joined: May 2013
Posts: 3,425
Likes: 1,127
From: London, UK
Mods: I think this needs to be added to the sticky how-to list.
The following users liked this post:
DGL (04-19-2014)
#4
04-01-2014 | 05:03 AM
Veteran Member
Joined: Dec 2007
Posts: 1,466
Likes: 262
From: Atlanta
I had the problem in my '10 XKR...they pulled the dash and repaired under warranty.

#7
04-01-2014 | 09:30 AM
Trending Topics

#10
04-01-2014 | 01:36 PM

Senior Member
Joined: Oct 2012
Posts: 474
Likes: 98
From: Maui
Excellent Photos and narrative Denver! Nice work. I'm glad it worked out for you. I drilled the main evaporator box as low as I could and left some hose dangling out of the bottom so I could blow air up it occasionally to keep it clear. Where you drilled the hole was a lot safer because there's no evaporator behind it, but it might fill up with water more before it gets to the fitting. Nice to have two choices where to drill. Cheers

Last edited by hawaii; 04-01-2014 at 01:41 PM.
#11
04-01-2014 | 02:23 PM

excellent photos and narrative denver! Nice work. I'm glad it worked out for you. I drilled the main evaporator box as low as i could and left some hose dangling out of the bottom so i could blow air up it occasionally to keep it clear. Where you drilled the hole was a lot safer because there's no evaporator behind it, but it might fill up with water more before it gets to the fitting. Nice to have two choices where to drill. Cheers
Last edited by Brutal; 04-01-2014 at 03:04 PM.
#12
04-01-2014 | 02:28 PM
Veteran Member
Joined: May 2013
Posts: 3,292
Likes: 1,236
Since you are the Jaguar expert here and a Jaguar certified tech...."Where is the best place on the box to drill, for maxium drainage".
Hopefully you might be able to provide that info.
Although you commented on the DIY repair/fix, you did not provide the Jaguar owners here on the forum any other info to correct/fix what might be implied in your personal comments.
#13
04-01-2014 | 02:33 PM
Veteran Member
Joined: May 2013
Posts: 3,425
Likes: 1,127
From: London, UK
Maybe use a flex drill extension to get closer to the bulkhead - only problem may be that the chuck may not take the right size of drill and there's no space inside so you can't ream it.
On the other hand, maybe it's not a big deal if the hole is drilled at a slight angle - you're going to seal it all anyway.
On the other hand, maybe it's not a big deal if the hole is drilled at a slight angle - you're going to seal it all anyway.
#14
04-01-2014 | 03:07 PM
Brutal:
Since you are the Jaguar expert here and a Jaguar certified tech...."Where is the best place on the box to drill, for maxium drainage".
Hopefully you might be able to provide that info.
Although you commented on the DIY repair/fix, you did not provide the Jaguar owners here on the forum any other info to correct/fix what might be implied in your personal comments.

Last edited by Brutal; 04-01-2014 at 03:12 PM.
#15
04-01-2014 | 07:22 PM
Thread Starter
|
Member
Joined: Nov 2012
Posts: 66
Likes: 69
Thanks for all the nice comments. To address a few suggestions: I used a level on the base of the evaporator box and found mine to be level side to side. It is lower toward the front of the car but as I stated I couldnt drill that close to the firewall. So I think I will still get good drainage. Time will tell.
As for Brutal 's comments, I dont consider the 1100.00 quote I got from my local dealer to be " a few bucks". Anyone with good basic tool skills can prevent the bit from pulling through. I also mentioned the area I chose has nothing above the hole. It depends on how careful you are " breaking uo some concrete" I didn't damage anything and my passengers feet are no where near the install, unless they are doing leg presses! Worst case senareo I plug up the barbed fitting...no harm done.
As for Brutal 's comments, I dont consider the 1100.00 quote I got from my local dealer to be " a few bucks". Anyone with good basic tool skills can prevent the bit from pulling through. I also mentioned the area I chose has nothing above the hole. It depends on how careful you are " breaking uo some concrete" I didn't damage anything and my passengers feet are no where near the install, unless they are doing leg presses! Worst case senareo I plug up the barbed fitting...no harm done.
#16
04-01-2014 | 09:33 PM
Veteran Member
Joined: May 2013
Posts: 3,292
Likes: 1,236
Thanks for all the nice comments. To address a few suggestions: I used a level on the base of the evaporator box and found mine to be level side to side. It is lower toward the front of the car but as I stated I couldnt drill that close to the firewall. So I think I will still get good drainage. Time will tell.
As for Brutal 's comments, I dont consider the 1100.00 quote I got from my local dealer to be " a few bucks". Anyone with good basic tool skills can prevent the bit from pulling through. I also mentioned the area I chose has nothing above the hole. It depends on how careful you are " breaking uo some concrete" I didn't damage anything and my passengers feet are no where near the install, unless they are doing leg presses! Worst case senareo I plug up the barbed fitting...no harm done.
As for Brutal 's comments, I dont consider the 1100.00 quote I got from my local dealer to be " a few bucks". Anyone with good basic tool skills can prevent the bit from pulling through. I also mentioned the area I chose has nothing above the hole. It depends on how careful you are " breaking uo some concrete" I didn't damage anything and my passengers feet are no where near the install, unless they are doing leg presses! Worst case senareo I plug up the barbed fitting...no harm done.
For now I don't have to worry about the drainage line, but I did print out Denver's post and will keep it in my file, just in case any passengers feet get wet.
The following users liked this post:
sherbercars (04-01-2014)
#17
04-01-2014 | 09:42 PM

Thanks for all the nice comments. To address a few suggestions: I used a level on the base of the evaporator box and found mine to be level side to side. It is lower toward the front of the car but as I stated I couldnt drill that close to the firewall. So I think I will still get good drainage. Time will tell.
As for Brutal 's comments, I dont consider the 1100.00 quote I got from my local dealer to be " a few bucks". Anyone with good basic tool skills can prevent the bit from pulling through. I also mentioned the area I chose has nothing above the hole. It depends on how careful you are " breaking uo some concrete" I didn't damage anything and my passengers feet are no where near the install, unless they are doing leg presses! Worst case senareo I plug up the barbed fitting...no harm done.
As for Brutal 's comments, I dont consider the 1100.00 quote I got from my local dealer to be " a few bucks". Anyone with good basic tool skills can prevent the bit from pulling through. I also mentioned the area I chose has nothing above the hole. It depends on how careful you are " breaking uo some concrete" I didn't damage anything and my passengers feet are no where near the install, unless they are doing leg presses! Worst case senareo I plug up the barbed fitting...no harm done.
#18
04-01-2014 | 11:37 PM

Joined: Oct 2007
Posts: 117,913
Likes: 6,377
From: PHX some of the time
The following users liked this post:
JimC64 (04-02-2014)
#19
04-02-2014 | 08:02 AM
I guess ill just keep my thoughts to myself then thanks, and was reffering to hawaiis drilling into the case at the evap as he mentioned. Not you drilling into the duct next to the blower. And i think about the "WHAT IFS" and the skills and thoughts of the 1000's that read threads that may not have the skills of a skilled dental surgeon. You know the What if a owner drills too far trying to save $1100 and it costs them $2500 to replace a evap, or What if someone pushes the hose loose and its not noticed and drains into the car. I cnat think about just fixing a car, I also have to think alot about the what if and longevity of a repair. But thats just me and I was asked if I recall
Last edited by Brutal; 04-02-2014 at 08:11 AM.
The following 7 users liked this post by Brutal:
jjackerson (11-23-2014),
Norri (04-02-2014),
richzak (04-02-2014),
rosstool (11-09-2014),
sherbercars (04-02-2014),
and 2 others liked this post.
#20
04-02-2014 | 08:29 AM
Joined: Oct 2007
Posts: 117,913
Likes: 6,377
From: PHX some of the time
If you hold all those thoughts back will there be room for new ones? 
Your point of view as a dealer tech is very different to an owner trying to find a simple fix, I might not be best pleased if I put my car into the dealer to resolve the problem and it came back with a hole punched in the case and a plastic hose JB welded in.
However if I was wanting to solve the problem myself it could seem to be a cheap and simple solution.
DenverDDS, perhaps you should edit the post with a warning in big red letters for anyone attempting this to take care not to drill into the evaporator?
The following 3 users liked this post by Norri: