Back up light


#4
 11-15-2017, 01:40 PM
Veteran Member
Join Date: Jan 2015
Location: Naperville, Illinois USA
Posts: 4,676
Received 2,012 Likes
on
1,345 Posts

#6
11-16-2017, 10:23 AM
#7
11-16-2017, 11:52 AM

Join Date: Jan 2012
Location: Newport Beach, California
Posts: 5,650
Received 2,646 Likes
on
1,822 Posts
Trending Topics
#8
11-16-2017, 12:07 PM

Veteran Member
#9
11-16-2017, 12:34 PM
#11
11-21-2017, 02:21 PM

The updated lights do look good though...
Word of warning about the installation, the wiring changes, resistors and relays is very time consuming, and not exactly as the instructions say.
The basic installation is about 4-5hrs, and I ended up having to try four different resistor units until I found a combination that worked, this took several weeks while I waited for the different resistors to be delivered.
And paying top dollar for a kit that keeps the incandescent bulbs in there as well as the LEDs, is not cool,
#12
11-21-2017, 02:52 PM
Veteran Member
Join Date: Jan 2015
Location: Naperville, Illinois USA
Posts: 4,676
Received 2,012 Likes
on
1,345 Posts
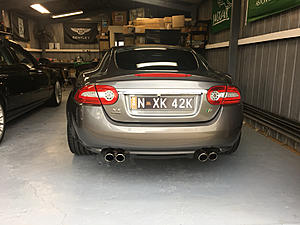
The updated lights do look good though...
Attachment 205977
Word of warning about the installation, the wiring changes, resistors and relays is very time consuming, and not exactly as the instructions say.
The basic installation is about 4-5hrs, and I ended up having to try four different resistor units until I found a combination that worked, this took several weeks while I waited for the different resistors to be delivered.
And paying top dollar for a kit that keeps the incandescent bulbs in there as well as the LEDs, is not cool,
#13
11-21-2017, 03:47 PM
Originally Posted by kj07xk
You should have looked at the step by step instructions in the PDF posted by George Kale. Just uses resistors, no bulbs. Had mine for 2 years now, no problems.
There were also some "kits" being sold that used the bulbs instead of resistors, not naming names...
#14
11-21-2017, 05:10 PM
Veteran Member
Join Date: Jan 2015
Location: Naperville, Illinois USA
Posts: 4,676
Received 2,012 Likes
on
1,345 Posts
Back the George's instructions... I used the exact resistor values he specified, and it works fine for me. The only issue I had with his instructions was the labeling of the pin-out differences between the LED units and the pre-LED units. I don't recall if he was wrong about one of them, or it was just confusing. Think I posted later in that thread a clarification to make it easier to make the wiring changes.
#15
11-21-2017, 05:30 PM
Yeah the pinout differences was explained in a very confusing way, I worked it out my own way using the wiring diagrams from both models, no biggie.
Maybe my car is a bit odd or something, but I had to do it differently with the resistors.
For the turn signals he says 2x 25ohm in paralell = 12.5ohm, which didn't work for me.
My left side would only put out the errors with 2x 6ohm in series, = 12ohm
My right side would only put out the warning with a single 6ohm, the errors remained with the 2x 6ohm series or 2x 25ohm paralell.
For the brake lights he said 1x 25ohm & 1x 10ohm in paralell = 7.14ohm on each side. Again this didn't work. I got some 8ohm ones (which actually measured ~8.2ohm) and that fixed it.
Was lots of fun to solve, not...
#16
11-21-2017, 06:44 PM
Veteran Member
#17
11-21-2017, 06:48 PM
But there are different rear lamps for RHD and LHD, one side being red, the other white, the colours are on different sides depending on which side the steering wheel is on.
In theory you could get a left side lamp from a RHD car and wire it in, then you would have two reversing lights, but no fog lights...
In theory you could get a left side lamp from a RHD car and wire it in, then you would have two reversing lights, but no fog lights...
#18
11-21-2017, 06:49 PM
Veteran Member
#19
11-21-2017, 06:58 PM
Well, it just so happens, I have a full set of RHD rear lights here that are gathering dust...
This one will probably go cheap https://www.ebay.co.uk/itm/jaguar-xk...e/263331828530
This one will probably go cheap https://www.ebay.co.uk/itm/jaguar-xk...e/263331828530
Last edited by Cambo; 11-21-2017 at 07:03 PM.
#20
11-22-2017, 05:56 PM
Veteran Member
Join Date: Jan 2015
Location: Naperville, Illinois USA
Posts: 4,676
Received 2,012 Likes
on
1,345 Posts
For the turn signals he says 2x 25ohm in paralell = 12.5ohm, which didn't work for me.
My left side would only put out the errors with 2x 6ohm in series, = 12ohm
My right side would only put out the warning with a single 6ohm, the errors remained with the 2x 6ohm series or 2x 25ohm paralell.
My left side would only put out the errors with 2x 6ohm in series, = 12ohm
My right side would only put out the warning with a single 6ohm, the errors remained with the 2x 6ohm series or 2x 25ohm paralell.
A small, but apparently significant, difference. Pretty fussy electronics in there.