
First Time Using CTEK Charger/Maintainer
#1
 01-18-2016, 08:00 PM


#2
01-18-2016, 11:19 PM
Veteran Member
You made a very wise decision with the CTEK MUS 4.3..8 Step Smart Charger. Give the CTEK a few hours to go green. Then you are charged and keep the CTEK on the car when not driving it.
Once green the CTEK will continue to charge the battery with a trickle charge. If you don't drive the Jag for 10 days, the #8 green light will now light up and take you into a pulse mode.
I own 4 of these CTEK models and have never had a dead or low battery.
I have mine set up for a simple plug and play. Takes only 5 secs to connect or disconnect without having to open the trunk lid.
Click the images below once to open, then click once again for full screen.
....
Last edited by richzak; 01-18-2016 at 11:23 PM.
The following users liked this post:
vnewtonXK07 (01-19-2016)
#5
01-19-2016, 10:53 AM
#6
01-19-2016, 11:41 AM
vnewtonXK07:
You made a very wise decision with the CTEK MUS 4.3..8 Step Smart Charger. Give the CTEK a few hours to go green. Then you are charged and keep the CTEK on the car when not driving it.
Once green the CTEK will continue to charge the battery with a trickle charge. If you don't drive the Jag for 10 days, the #8 green light will now light up and take you into a pulse mode.
I own 4 of these CTEK models and have never had a dead or low battery.
I have mine set up for a simple plug and play. Takes only 5 secs to connect or disconnect without having to open the trunk lid.
Click the images below once to open, then click once again for full screen.
....
#7
01-19-2016, 11:58 AM
Veteran Member
Trending Topics
#8
01-19-2016, 12:21 PM
Senior Member
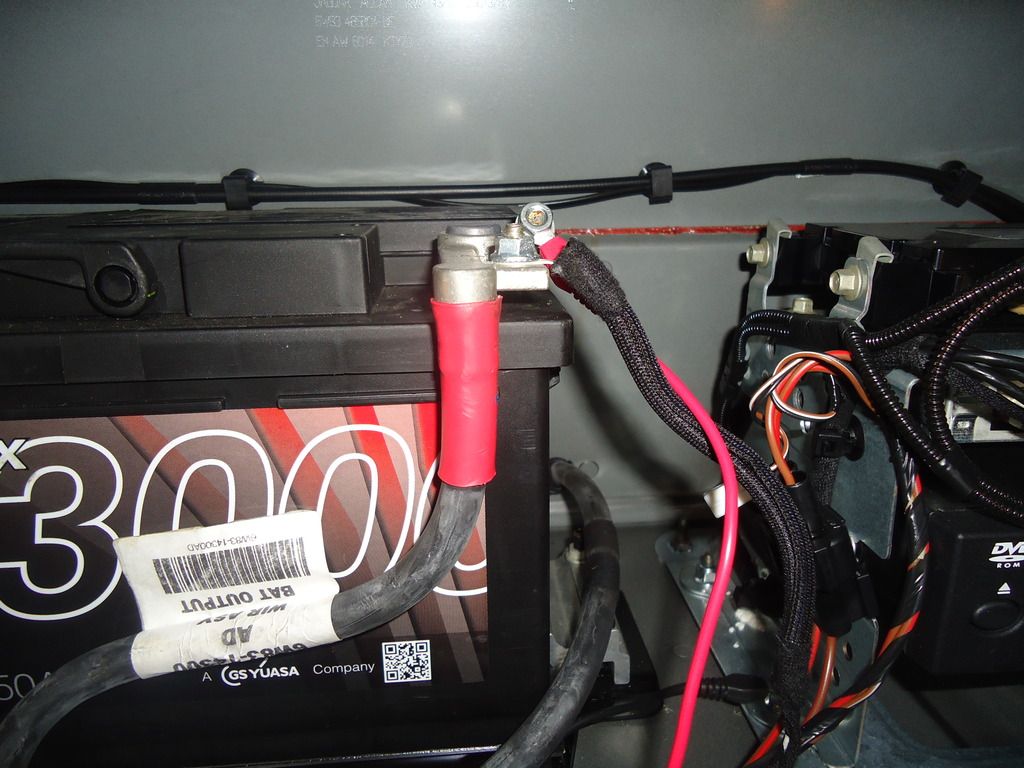
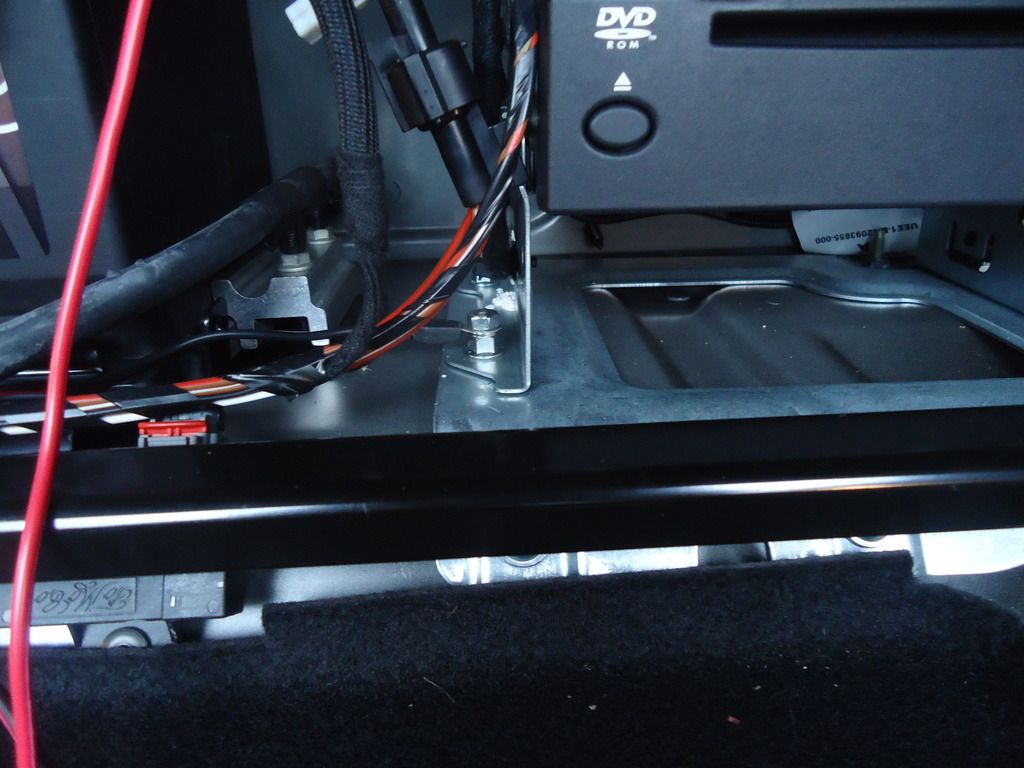
I took these photos of my installation. I assume the coupe would have a similar arrangement for the battery and satnav disc player.

In the photo below, the red cable with the eyelet passing behind the braided positive battery cable is the CTEK connector, secured to the stud with an M6 nut

The black cable in the photo below is the CTEK connector with eyelet, also secured with an M6 nut to the sat nav mounting point.

Hope this helps.
The following users liked this post:
Ozmag (01-23-2016)
#9
01-19-2016, 12:30 PM
M6 nuts on my XKR convertible. If yours is a 5.0 litre, you should not connect direct to the negative terminal as it confuses the Battery Monitoring System. I connected to one of the satnav cage mounting points.
I took these photos of my installation. I assume the coupe would have a similar arrangement for the battery and satnav disc player.

In the photo below, the red cable with the eyelet passing behind the braided positive battery cable is the CTEK connector, secured to the stud with an M6 nut
The black cable in the photo below is the CTEK connector with eyelet, also secured with an M6 nut to the sat nav mounting point.
Hope this helps.
I took these photos of my installation. I assume the coupe would have a similar arrangement for the battery and satnav disc player.
In the photo below, the red cable with the eyelet passing behind the braided positive battery cable is the CTEK connector, secured to the stud with an M6 nut
The black cable in the photo below is the CTEK connector with eyelet, also secured with an M6 nut to the sat nav mounting point.
Hope this helps.
#11
01-20-2016, 12:02 AM
Veteran Member
Although some Forum members with 4.2L XK/XKRs connect their battery maintainers directly to the (+) and (-) terminals on the battery itself, I prefer to connect mine to the remote battery terminals. There's a reason why the Jaguar engineers included those remote terminals - safety, particularly when jump starting.
Because the battery is in an enclosed space, there is a risk (albeit small) of an explosion. When a conventional lead-acid ("flooded") battery is being charged it produce hydrogen gas, which is colorless and odorless - and very powerful. You've heard of the H-bomb? Well, what's in your trunk is nowhere as powerful, but it can still do quite a bit of damage. Sure, the risk of an explosion is small, since there's a vent tube connected to the OEM battery to discharge the hydrogen gas to the outside - and that should work if it's connected and not plugged up. But I just don't want to take any chances; I've seen what can happen when a car battery explodes.
Here are pictures of how I connected to the remote battery terminals. Both remote terminals are in the trunk, with the (+) terminal behind a cover in the left fender and the (-) terminal under the cover in the well where the spare tire is stowed.
Cover for battery remote access +terminal in left fender:

Note the black quick connect wire running from under the luggage panel floor to the remote access panel.
-----------------------------------------------------------------------
Quick connect + lead alligator clip attached to the remote access +terminal:

-----------------------------------------------------------------------
The quick connect - lead alligator clip is attached to the -remote terminal in the spare wheel well:

-----------------------------------------------------------------------
Quick connect leads connected together in the trunk:

-----------------------------------------------------------------------
Trunk lid closes over the wire with no problems:

The charger is plugged into a wall socket; it is not in the car. Here's the link to the original thread if you're interested in more details and alternatives: https://www.jaguarforums.com/forum/x...lay-ups-73471/
I've had no problems using alligator clips on both my 4.2L XKR and 5.0L XJ. Here's the link to how I connected my CTEK to my 2013 XJ with the battery monitor and stop-start system. Positive lead to the (+) battery terminal, negative lead to a body ground, quick disconnect plug: https://www.jaguarforums.com/forum/x...lation-130801/ The charger is not in the car.
Stuart
Because the battery is in an enclosed space, there is a risk (albeit small) of an explosion. When a conventional lead-acid ("flooded") battery is being charged it produce hydrogen gas, which is colorless and odorless - and very powerful. You've heard of the H-bomb? Well, what's in your trunk is nowhere as powerful, but it can still do quite a bit of damage. Sure, the risk of an explosion is small, since there's a vent tube connected to the OEM battery to discharge the hydrogen gas to the outside - and that should work if it's connected and not plugged up. But I just don't want to take any chances; I've seen what can happen when a car battery explodes.
Here are pictures of how I connected to the remote battery terminals. Both remote terminals are in the trunk, with the (+) terminal behind a cover in the left fender and the (-) terminal under the cover in the well where the spare tire is stowed.
Cover for battery remote access +terminal in left fender:
Note the black quick connect wire running from under the luggage panel floor to the remote access panel.
-----------------------------------------------------------------------
Quick connect + lead alligator clip attached to the remote access +terminal:
-----------------------------------------------------------------------
The quick connect - lead alligator clip is attached to the -remote terminal in the spare wheel well:
-----------------------------------------------------------------------
Quick connect leads connected together in the trunk:
-----------------------------------------------------------------------
Trunk lid closes over the wire with no problems:
The charger is plugged into a wall socket; it is not in the car. Here's the link to the original thread if you're interested in more details and alternatives: https://www.jaguarforums.com/forum/x...lay-ups-73471/
I've had no problems using alligator clips on both my 4.2L XKR and 5.0L XJ. Here's the link to how I connected my CTEK to my 2013 XJ with the battery monitor and stop-start system. Positive lead to the (+) battery terminal, negative lead to a body ground, quick disconnect plug: https://www.jaguarforums.com/forum/x...lation-130801/ The charger is not in the car.
Stuart
#12
01-20-2016, 06:26 AM

Veteran Member
Join Date: Jan 2015
Location: Naperville, Illinois USA
Posts: 4,730
Received 2,048 Likes
on
1,372 Posts
Originally Posted by Stuart S;
Both remote terminals are in the trunk, with the (+) terminal behind a cover in the left fender and the (-) terminal under the cover in the well where the spare tire is stowed.
#13
01-20-2016, 08:14 AM
Veteran Member
On the Jaguar XK/XKR model years, 2007 to 2009 the CTEK Smart Chargers can be connected directly to the battery. CTEK units do not create sparks, and the batteries are vented batteries with a vent tube connected into the left side of the battery.
Here's my setup. I have not had any problems with this set over the last 3 years of ownership.
Click on the image to expand the view. Click again for full screen image.
.....
Here's my setup. I have not had any problems with this set over the last 3 years of ownership.
Click on the image to expand the view. Click again for full screen image.
.....
#14
01-20-2016, 08:39 AM
Veteran Member
It would be interesting to understand what changes were made between the 2007-2009 XK and the 2010-2015 XK electronics. The above is an example of difference in recommendations on how to hook up the battery charger . I don't suspect it is purely a safety issue buy not connecting the to the negative terminal on the 2010 but something to do with this control module. I also understand that the alternator for the 5.0 cars is different then the 4.2 cars and almost twice the cost so there must be a change in the charging system. Another question is there a recommended set of jumper cables that fit easily into the remote lug space or if you need a jump you can use a standard cable clamp.
#15
01-20-2016, 08:45 AM
Veteran Member
The difference is the later models have the battery monitoring system fitted which is connected on the negative post of the battery. Some people have reported problems when connecting a charger direct to the battery with this system.
Hence the reason for connecting a charger to the positive of the battery and a suitable ground post.
It is all in the manual.
Hence the reason for connecting a charger to the positive of the battery and a suitable ground post.
It is all in the manual.
#16
01-20-2016, 09:03 AM
Veteran Member
It would be interesting to understand what changes were made between the 2007-2009 XK and the 2010-2015 XK electronics. The above is an example of difference in recommendations on how to hook up the battery charger . I don't suspect it is purely a safety issue buy not connecting the to the negative terminal on the 2010 but something to do with this control module. I also understand that the alternator for the 5.0 cars is different then the 4.2 cars and almost twice the cost so there must be a change in the charging system. Another question is there a recommended set of jumper cables that fit easily into the remote lug space or if you need a jump you can use a standard cable clamp.
#17
01-20-2016, 03:16 PM
Veteran Member
#18
01-20-2016, 03:35 PM
Veteran Member
The battery monitoring system module is integral with the battery negative cable and is controlled by the ECM.
If a new battery is fitted to the vehicle, the battery monitoring system module will require re-calibrating using the Jaguar approved diagnostic system.
BATTERY MONITORING SYSTEM
Periodically the battery monitoring system module will instigate a self-calibration routine. To self calibrate, the battery monitoring system first charges the battery to its full condition.
• NOTE: If the vehicle is only driven for short periods the charging process could take a number of days to complete.
Once the battery is fully charged, the battery monitoring system will discharge the battery to approximately 75% of its full state of charge, but never lower than 12.2 V. The time taken to complete this part of the routine is dependent on the electrical load on the vehicle.
When the second part of the routine has been successfully completed, the battery monitoring system will return the battery to its optimum level of charge. The optimum level of charge will be between 12.6 V and 15 V, depending on battery condition, temperature and loading.
The battery monitoring system module also monitors the battery condition with the engine switched off. If a low voltage condition is detected the module can request the infotainment system is switched off to protect battery voltage. Once the infotainment system has been switched off, the vehicle must be run for at least 5 minutes to charge the battery before the infotainment system can be operated with the engine switched off.
Hope this explains things for you.
Last edited by jimbov8; 01-20-2016 at 03:37 PM.
#19
01-20-2016, 03:43 PM
Veteran Member
The battery monitoring system module measures battery current and voltage, which it communicates to the RJB over a LIN bus connection. The RJB transmits the battery information to the instrument cluster over the medium speed CAN (controller area network)bus. The instrument cluster acts as a gateway between the medium and high speed CAN bus networks, and transmits the battery condition information to the ECM over the high speed CAN bus. Based on the information received from the battery monitoring system module, the ECM will control the output from the generator and request the switching off of electrical loads if necessary.
CAUTION: Due to the self-calibration routine, it is recommended that all power supply diagnostic testing is carried out using the Jaguar approved diagnostic system rather than a digital multimeter
The battery monitoring system module is able to generate DTC's to help diagnose battery or generator power supply issues. These DTC's can be read using the Jaguar approved diagnostic system. The Jaguar approved diagnostic system can also be used to implement a battery and generator self test routine. For additional information, refer to the Diagnosis and Testing section of the workshop manual.
If a fault is detected, the ECM will override the battery monitoring system module. The battery monitoring system module DTC's can be used to help diagnose battery or generator power supply faults. The
DTC's are stored in both the RJB and the ECM. The Jaguar approved diagnostic system has a process for an automated power supply diagnostic procedure. The procedure provides a menu driven process to locate a fault in a logical sequence.
The procedure uses the capability of the battery monitoring system and generator LIN bus controlled functions to provide current flow information and will detect if the battery monitoring system or generator are functioning correctly.
Some more info.
#20
01-20-2016, 08:26 PM
Veteran Member