HKS Camp2 and GVIF install
#1
 03-12-2015, 11:56 AM

I installed these two units so I can have a coolant gauge. The GVIF install section will be handy for those installing a back up cam as well. Props to WhiteXKR for valuable tidbits of priceless information.
The hardest part of this install is finding an HKS Camp2. Long discontinued and difficult to find but they are out there. Just be prepared for the $$. The GVIF I used was this one.
GVIF car video interface for Lexus, Toyota, Land Rover, Cadillac, Jaguar
Let's begin.
You have to do a few things before you install the GVIF. The Y cable with the blue connectors has to be modified. This is the cable that connects to the GVIF IN/OUT. Very carefully with a safety pin remove and swap the two brown and purple wires. Out of the box the wires are brown/purple/black-brown/purple black.
You have to change them to purple/brown/black--purple/brown/black:

To set up the HKS, you have to change a wire on the OBD2 connector. Disconnect the pink wire out of the OBD2 plug and leave it open. Connect the power supply harness to the pink wire that goes into the OBD2 harness. I soldered an extension wire to run it all the way to the back of the car. Blue wire in all the pics.
Now it's time to dismantle your precious baby. Remove the driver side undertray by pulling these retainers.

Remove fuse panel cover by grabbing on the side and pull sharply to unsnap then lift slightly and out:

Remove the back seat and trim.
Pull:

Pull:

Lift seat bottoms out:

Remove these bolts to remove seat back and lift:

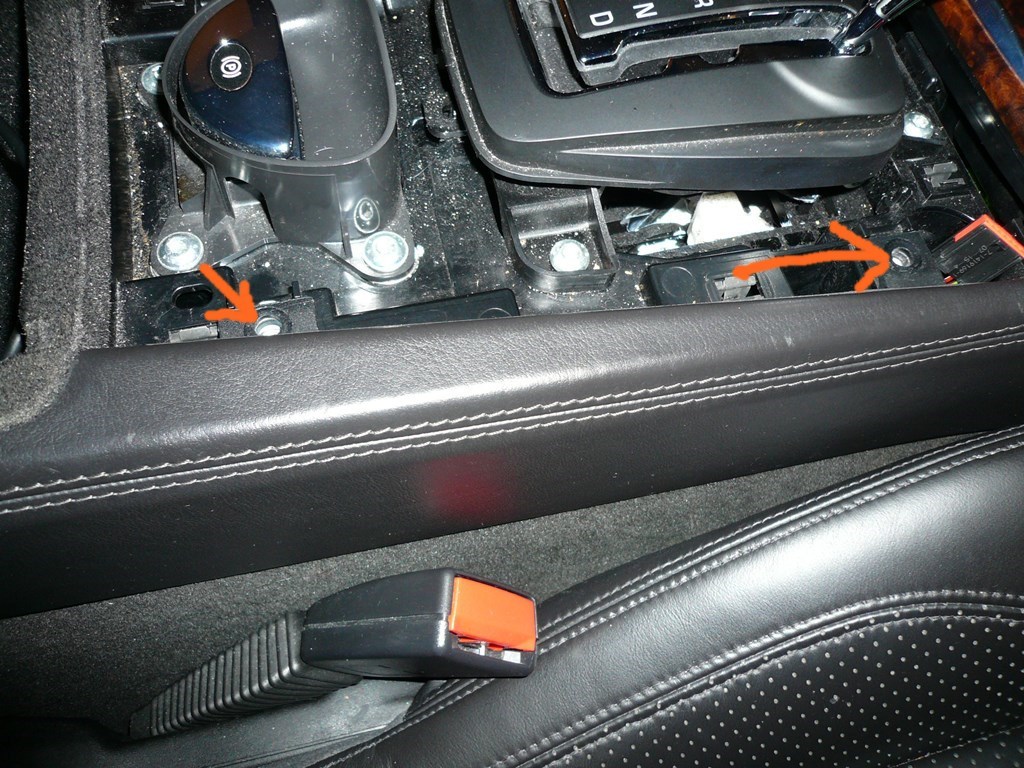
Remove the wood carefully around the shift select. I recommend plastic pry bars. Remove the little vertical black plastic trim just behind the ashtray. Remove the side leather covers on each side of the console removing these bolts:
Now remove all the panels you'd remove to take out the battery. Also remove the left (drivers side in the US) inside panel.
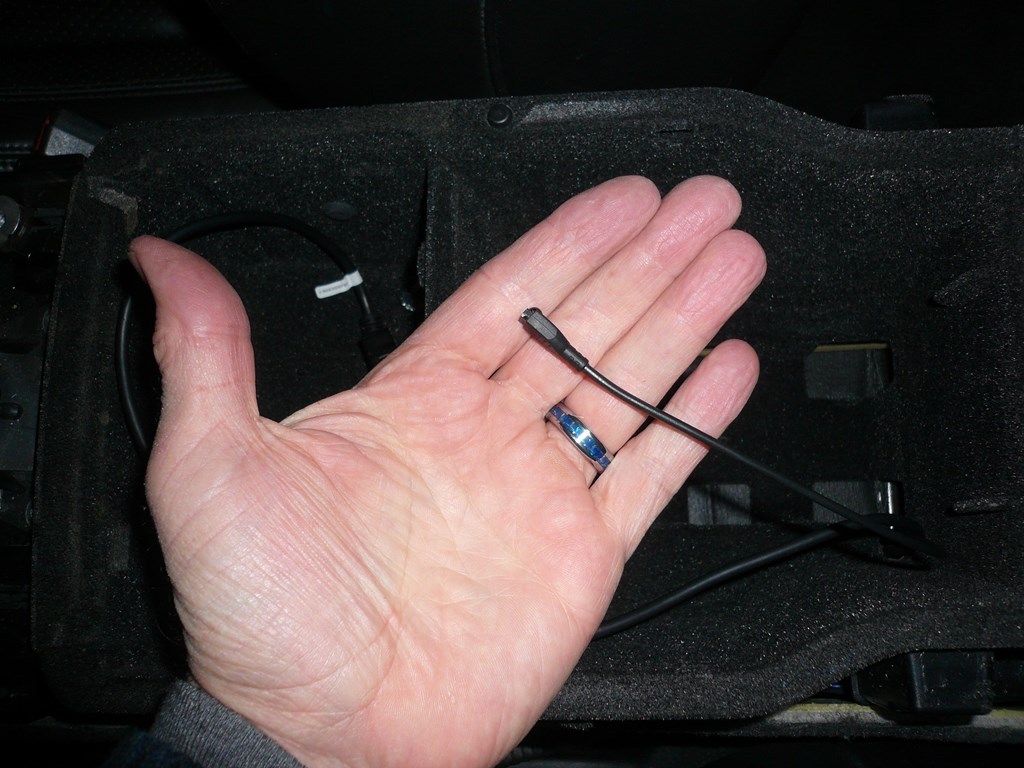
Now the fun begins. I installed the HKS camp2 behind the back seat using 2 sided foam tape and a zip tie:

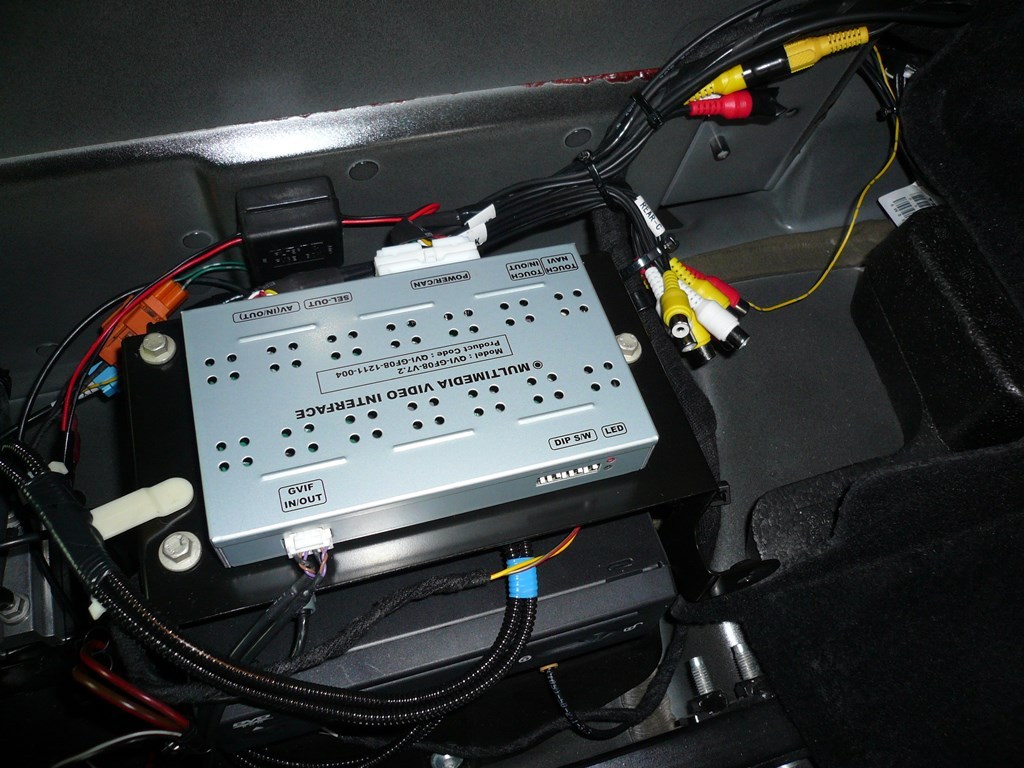
I installed the GVIF on top of the DVD stack with double sided foam tape:
Run the OBD2 harness behind the bar under the steering wheel:

Replace panel:

Run the harness back to the Camp2:

Connect an RCA type cable to the Camp 2 and run it back to the GVIF along with the power wire you ran from the OBD2 connector.
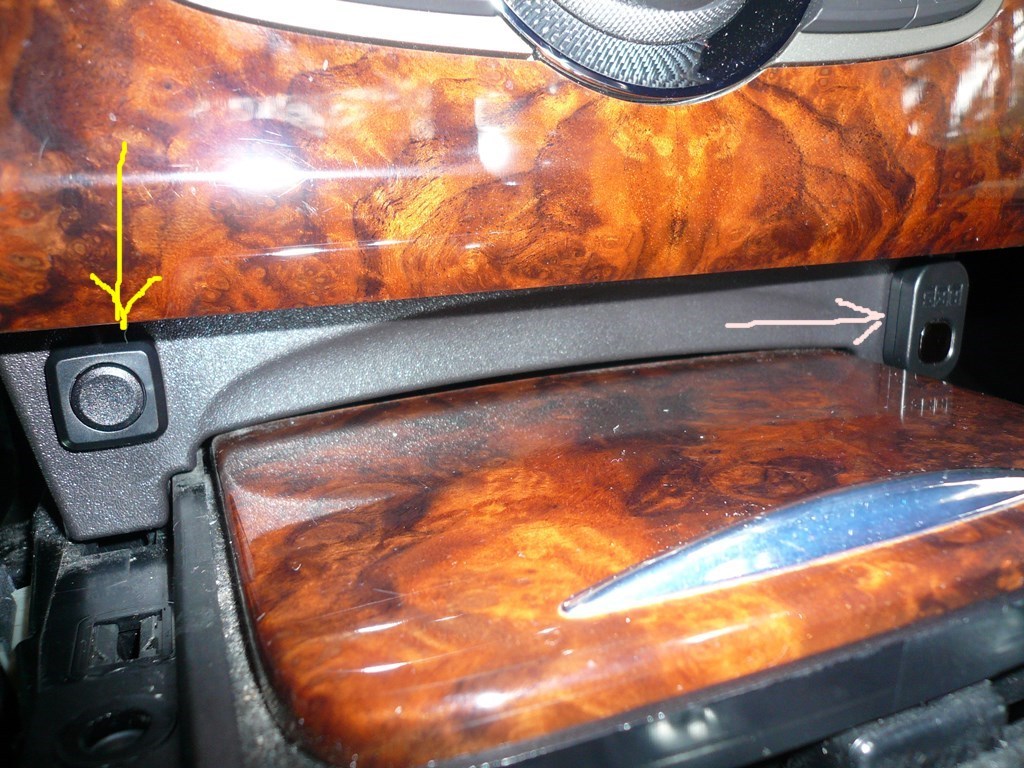
Now you have a few more wires to run. The screen switcher from the GVIF and the sensor for the HKS remote. This is where you use that little plastic trim piece behind the ashtray. Using a dremel make a couple of reliefs for wires on each side.

I mounted the switch on the driver side and the remote sensor on the other with foam tape. IMPORTANT: I later had to rotate the HKS sensor because it hit the shifter wood trim. Mount it horizontal!
Run the wires back to the respective box. One to the GVIF and the other to the HKS. Yellow arrow is the switch and the other is the wire. Same on both sides.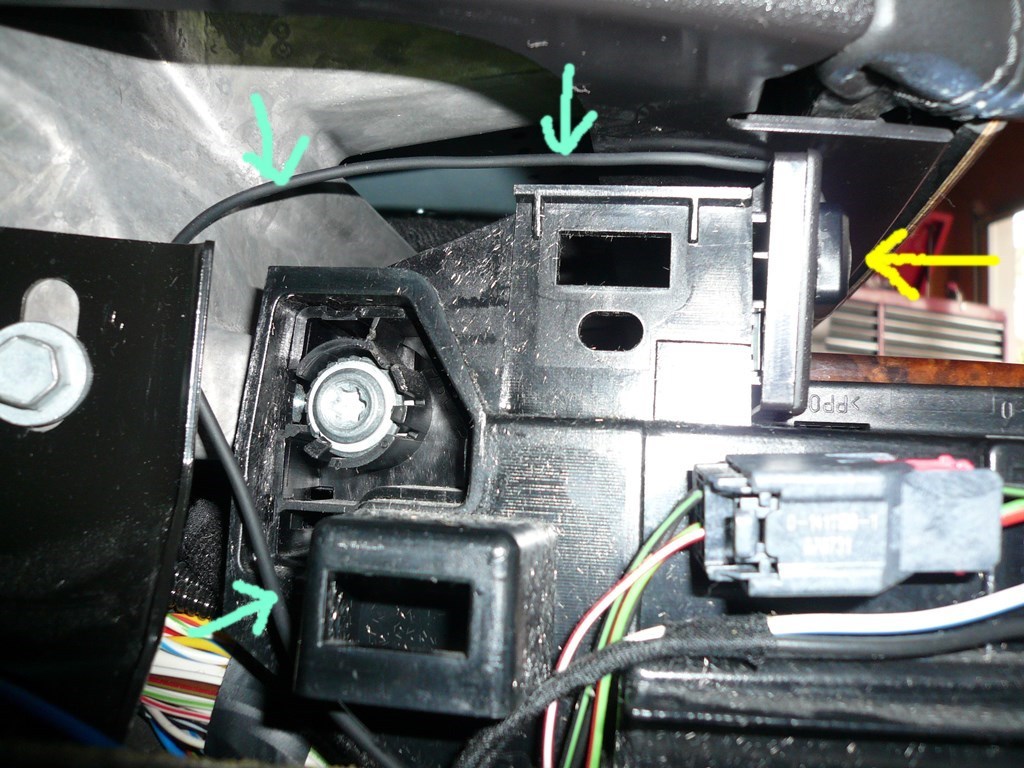
One more wire to run from the front is the remote sensor for the GVIF. I put it in the center console because once it's set up you're done with it.
The hardest part of this install is finding an HKS Camp2. Long discontinued and difficult to find but they are out there. Just be prepared for the $$. The GVIF I used was this one.
GVIF car video interface for Lexus, Toyota, Land Rover, Cadillac, Jaguar
Let's begin.
You have to do a few things before you install the GVIF. The Y cable with the blue connectors has to be modified. This is the cable that connects to the GVIF IN/OUT. Very carefully with a safety pin remove and swap the two brown and purple wires. Out of the box the wires are brown/purple/black-brown/purple black.
You have to change them to purple/brown/black--purple/brown/black:

To set up the HKS, you have to change a wire on the OBD2 connector. Disconnect the pink wire out of the OBD2 plug and leave it open. Connect the power supply harness to the pink wire that goes into the OBD2 harness. I soldered an extension wire to run it all the way to the back of the car. Blue wire in all the pics.
Now it's time to dismantle your precious baby. Remove the driver side undertray by pulling these retainers.

Remove fuse panel cover by grabbing on the side and pull sharply to unsnap then lift slightly and out:

Remove the back seat and trim.
Pull:

Pull:

Lift seat bottoms out:

Remove these bolts to remove seat back and lift:

Remove the wood carefully around the shift select. I recommend plastic pry bars. Remove the little vertical black plastic trim just behind the ashtray. Remove the side leather covers on each side of the console removing these bolts:

Now remove all the panels you'd remove to take out the battery. Also remove the left (drivers side in the US) inside panel.
Now the fun begins. I installed the HKS camp2 behind the back seat using 2 sided foam tape and a zip tie:

I installed the GVIF on top of the DVD stack with double sided foam tape:

Run the OBD2 harness behind the bar under the steering wheel:

Replace panel:

Run the harness back to the Camp2:

Connect an RCA type cable to the Camp 2 and run it back to the GVIF along with the power wire you ran from the OBD2 connector.
Now you have a few more wires to run. The screen switcher from the GVIF and the sensor for the HKS remote. This is where you use that little plastic trim piece behind the ashtray. Using a dremel make a couple of reliefs for wires on each side.

I mounted the switch on the driver side and the remote sensor on the other with foam tape. IMPORTANT: I later had to rotate the HKS sensor because it hit the shifter wood trim. Mount it horizontal!

Run the wires back to the respective box. One to the GVIF and the other to the HKS. Yellow arrow is the switch and the other is the wire. Same on both sides.

One more wire to run from the front is the remote sensor for the GVIF. I put it in the center console because once it's set up you're done with it.

Last edited by flyc2c; 03-12-2015 at 12:33 PM.
#2
03-12-2015, 11:57 AM
Connect the RCA cable, remote wire to the HKS, plug in the OBD2 harness and secure everything. Don't forget to split off the power wire (blue in this case) and run it to the back.
Also run the GVIF remote sensor wire to the back...

Now it's time to move to the trunk/hatch area. In the left side back corner you should find a dead end plug. This is an optional power accessory plug. This little jewel is switched power!!!
Again thanks to WhiteXKR, he told me about this!
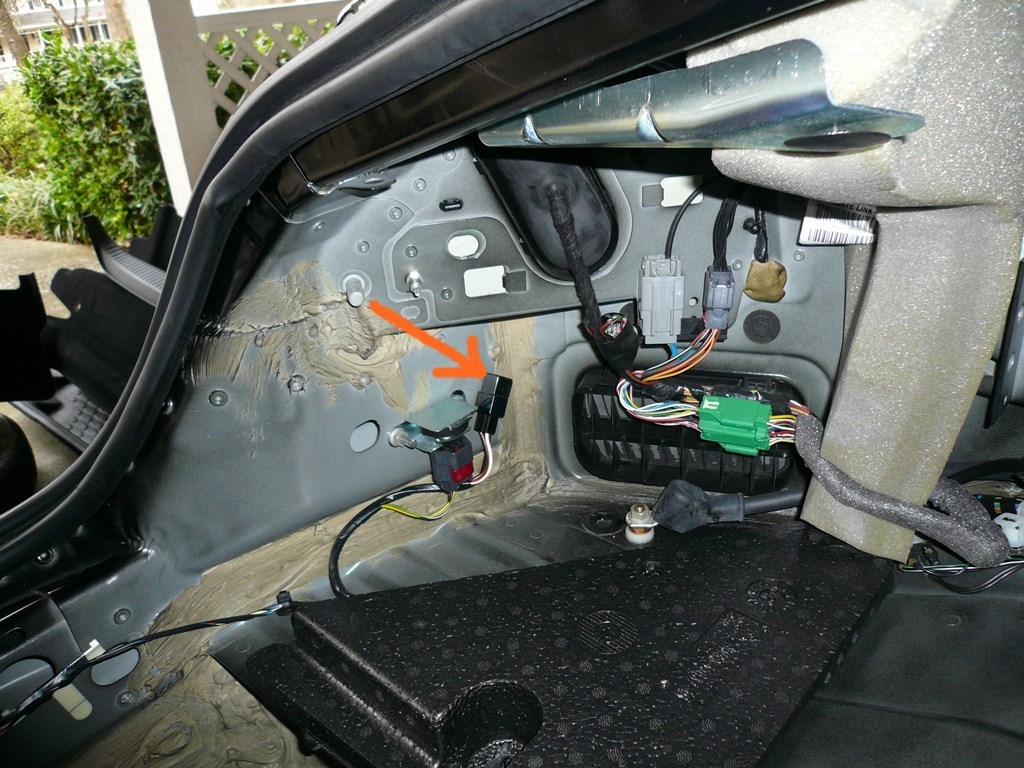
Remove the empty female plug.

Unshielded 1/4 inch female connectors fit perfectly! Now you have two options. You can install the connectors to go to a sub fuse panel of your liking. Use this option if you plan a backup camera or other accessories in the future. Switched power is scarce in this car. Or you can just connect +12v and ground wires and run it straight to the GVIF area which is what I did. Either way you get power.
Empty plug:

The white/red is hot and the black is ground so install the wires like so...
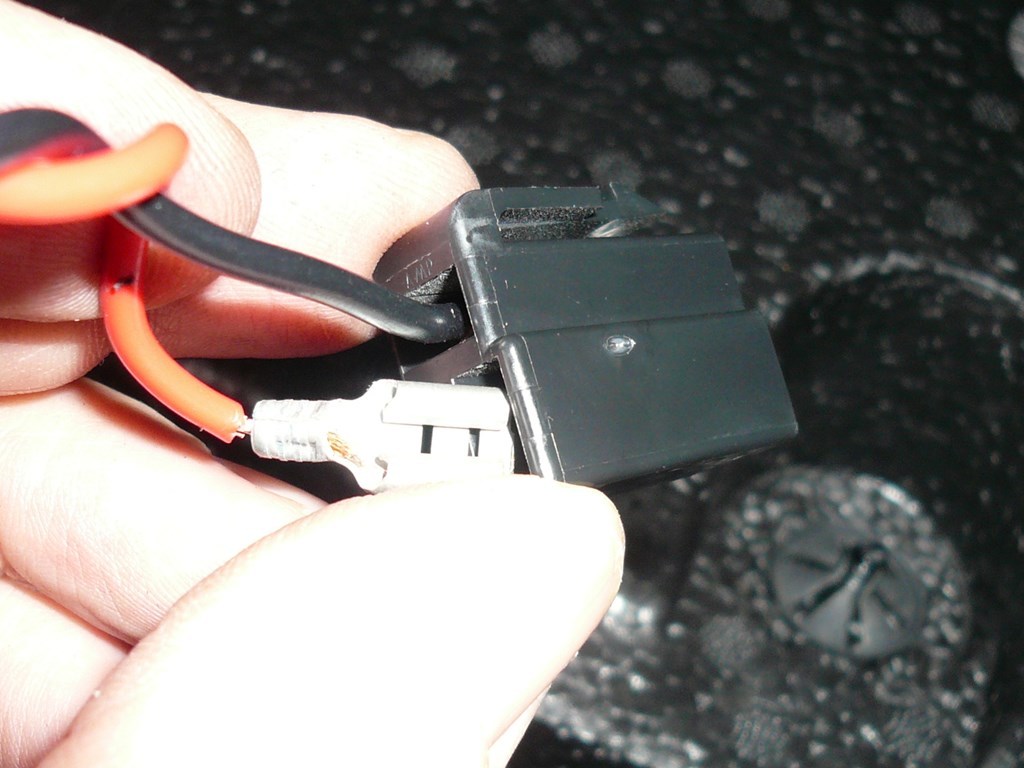
Orange arrow is ground, red is hot.

Plug in and run to the GVIF area:
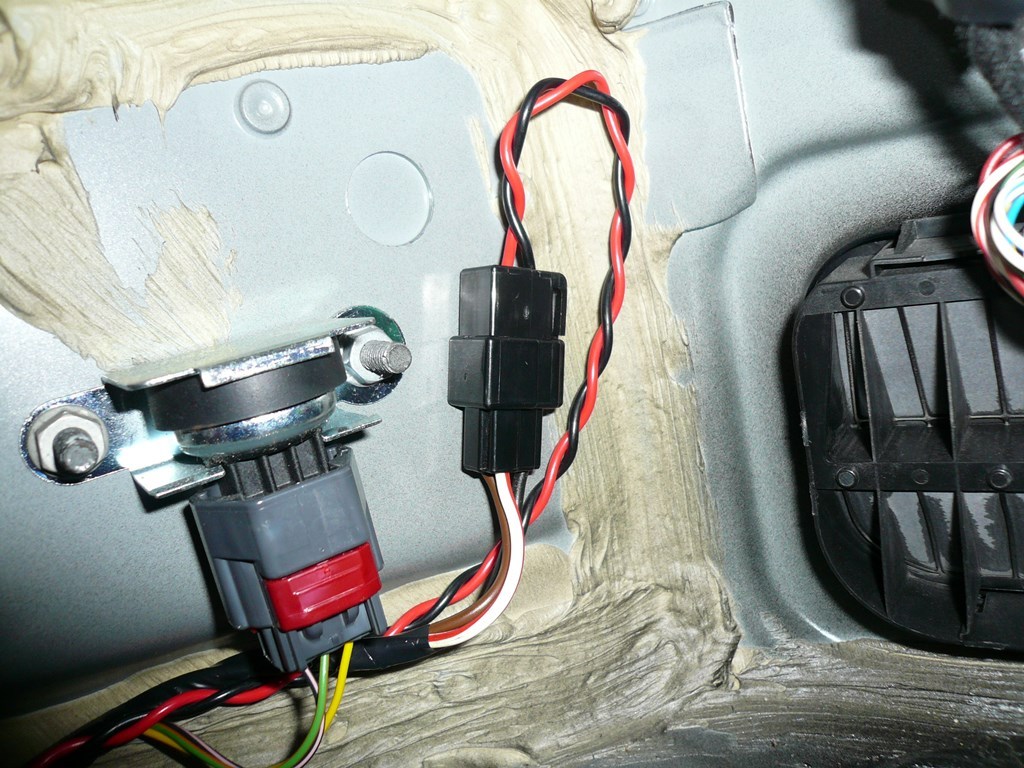
Red and black twisted wire is the supply...

I soldered a Toyota connector at the end for ease of removal. I ripped this out of a car at the boneyard:

Unplug the blue plug on the DVD and install your modified cable:


How you connect your power and ground to the HKS and the GVIF is up to you. I used simple push/pull connectors. Connect the remaining wires to the GVIF. Remote sensor, video in, GVIF and power/ground through the attached fuse box. Select the dip switches to ignore the other inputs as necessary. If you use, say, input 1 only have that one "on". I didn't use the audio portion of the Camp2. Do not touch the canbus!
IMPORTANT: Dip switches 5 and 6 need to be: 5-ON 6-OFF for the XKR.

Setup is self explanatory. Select the NAV on the touchscreen and then push the GVIF select button behind the ashtray. This button cycles through the GVIF inputs that you have "on" and then back to the NAV. Since I only have one input it just switches between NAV and the HKS. Use the GVIF setup remote as necessary. Then play around with the HKS!

Also run the GVIF remote sensor wire to the back...

Now it's time to move to the trunk/hatch area. In the left side back corner you should find a dead end plug. This is an optional power accessory plug. This little jewel is switched power!!!
Again thanks to WhiteXKR, he told me about this!

Remove the empty female plug.

Unshielded 1/4 inch female connectors fit perfectly! Now you have two options. You can install the connectors to go to a sub fuse panel of your liking. Use this option if you plan a backup camera or other accessories in the future. Switched power is scarce in this car. Or you can just connect +12v and ground wires and run it straight to the GVIF area which is what I did. Either way you get power.
Empty plug:

The white/red is hot and the black is ground so install the wires like so...

Orange arrow is ground, red is hot.

Plug in and run to the GVIF area:

Red and black twisted wire is the supply...

I soldered a Toyota connector at the end for ease of removal. I ripped this out of a car at the boneyard:

Unplug the blue plug on the DVD and install your modified cable:

How you connect your power and ground to the HKS and the GVIF is up to you. I used simple push/pull connectors. Connect the remaining wires to the GVIF. Remote sensor, video in, GVIF and power/ground through the attached fuse box. Select the dip switches to ignore the other inputs as necessary. If you use, say, input 1 only have that one "on". I didn't use the audio portion of the Camp2. Do not touch the canbus!
IMPORTANT: Dip switches 5 and 6 need to be: 5-ON 6-OFF for the XKR.
Setup is self explanatory. Select the NAV on the touchscreen and then push the GVIF select button behind the ashtray. This button cycles through the GVIF inputs that you have "on" and then back to the NAV. Since I only have one input it just switches between NAV and the HKS. Use the GVIF setup remote as necessary. Then play around with the HKS!

Last edited by flyc2c; 03-12-2015 at 12:56 PM.

#5
03-20-2015, 06:16 PM
I haven't explored all the parameters the Camp2 can read. For some odd reason it won't measure beyond around 5psi boost. I'll check the other readouts. You can read parameters in multiple ways but you can't record it. If this unit is installed with an HKS engine ECU you can. I bought it mainly for it's coolant temp and volts and for this it works great. I'll post when I get more info. (out of town)
The following users liked this post:
FrickenJag (03-23-2015)
#6
03-20-2015, 06:38 PM
Veteran Member
I haven't explored all the parameters the Camp2 can read. For some odd reason it won't measure beyond around 5psi boost. I'll check the other readouts. You can read parameters in multiple ways but you can't record it. If this unit is installed with an HKS engine ECU you can. I bought it mainly for it's coolant temp and volts and for this it works great. I'll post when I get more info. (out of town)
#7
03-20-2015, 08:13 PM
Veteran Member
Trending Topics
#8
03-22-2015, 11:56 AM
#9
08-17-2015, 02:27 PM

Veteran Member
Join Date: Jan 2015
Location: Naperville, Illinois USA
Posts: 4,649
Received 1,975 Likes
on
1,326 Posts
#10
08-17-2015, 03:54 PM
Veteran Member
#12
08-17-2015, 05:17 PM
Veteran Member
Join Date: Jan 2015
Location: Naperville, Illinois USA
Posts: 4,649
Received 1,975 Likes
on
1,326 Posts
Is this the same product, that's so elusive?
HKS - CAMP 2 - Nengun Performance
HKS - CAMP 2 - Nengun Performance
#14
08-17-2015, 09:33 PM
Veteran Member
Join Date: Jan 2015
Location: Naperville, Illinois USA
Posts: 4,649
Received 1,975 Likes
on
1,326 Posts
Seems to have been discontinued several years ago, so I'm guessing it's not likely to be resurrected, especially with all the cheaper Bluetooth OBD devices now available (i.e. the market for such a complete device is now much smaller).
#15
08-18-2015, 07:50 AM
Veteran Member
The jag tech & design teams should be following sites like these to earn what people on the streets are really wanting in their Jags.
#16
08-24-2015, 06:07 AM
Yeah, I find it easy to agree. I have a WiFi OBD ll that'll stream to my iPhone. You can get a lot of whacky tech data. However, pulling it up on your NAV screen is "priceless".
The jag tech & design teams should be following sites like these to earn what people on the streets are really wanting in their Jags.
The jag tech & design teams should be following sites like these to earn what people on the streets are really wanting in their Jags.

The following users liked this post:
elindo (10-08-2016)
#17
11-17-2015, 04:56 PM
Veteran Member
Join Date: Jan 2015
Location: Naperville, Illinois USA
Posts: 4,649
Received 1,975 Likes
on
1,326 Posts
flyc2c - Your write-up with photos is excellent! Been using it as a guide for the installation of a GVIF / Rear Camera / HKS Camp2.
Couple of things though... using your GVIF dip switch settings, I saw no interruption of the Nav screen. Consulting with WhiteXKR, he suggested changing switch 5 to 'off'. That worked for me, as I was then able to see alternate video on the Nav screen.
Another pointer from WhiteXKR, if using a back up camera on the 'Rear C' video input on the GVIF unit, be sure to also supply back up lamp power to the lead labeled 'Rear' (and you may need to do that via a relay triggered by the back up lights, to filter out the pulsing current supplied by the car to those lights).
I have a question for you on the HKS Camp 2 (just started playing with it).
What car 'type' did you select in the setup menu?
Thanks!
Edit: I was using 'BWM1' for the car 'Type', as WhiteXKR had in his write up for the X100, but I've now found that 'BWM2' seems to work better for me in the X150 with the HKS Camp 2 (now on to do the final installation).
Last edited by kj07xk; 11-17-2015 at 08:05 PM. Reason: Adding car 'type' that seems to work.
#18
11-19-2015, 12:03 PM
Maybe there are some minor differences between units? It's been a while but I think the dip switch position was for screen size. I think I'm using BMW2 as well. I'm out of town right now and can't verify. I don't have a backup cam and never really thought of installing one. Some of the cams look horrible on the back of the car or simply looked tacked on. I'd be glad to drill a hole for a nice OEM style unit. Like most, unless the screen automatically switches over to the backup cam I'll probably never install one. I've owned hatch backs most of my life and find the XKR (coupe) to have decent rear visibility.
I love the Camp2 but really haven't explored all it's capabilities. I'm using it as a really expensive temp gauge! I display volts and boost as well but the boost isn't accurate because of sensor location. It's just more money to add it and I just don't have the enthusiasm right now. I recently bought a Quaife torsen LSD and that is my next, and hopefully last, big mod. If I decide to get a smaller super charger pulley I may do the additional boost sensor.
I'm glad the write up helped! That's the great thing about forums. We're all here to help each other out. Keep us posted on your progress so that others may learn!
#19
11-19-2015, 12:31 PM
Veteran Member
Join Date: Jan 2015
Location: Naperville, Illinois USA
Posts: 4,649
Received 1,975 Likes
on
1,326 Posts
You're right, it is an expensive temp gauge, but it looks so cool...
I've also got volts and currently throttle position displayed (but its kind of boring). Since I don't have a SC, there's some things that won't concern me,
but maybe an optional oil pressure reading would be comforting.
When I took my back seats out last night, I realized a difference I'll have from your mounting position of the HKS unit, you've got a coupe, with lots of space there, I've got the vert, and a couple of 'rocket launchers' back there for the RPD's (rollover protection devices).
I'll have to see what options I have, given the cable length from the OBD-II port.
Keep us posted on your Quaife, DIY or having a shop do it?
#20
11-19-2015, 09:52 PM