LED failed in third brake light
#1
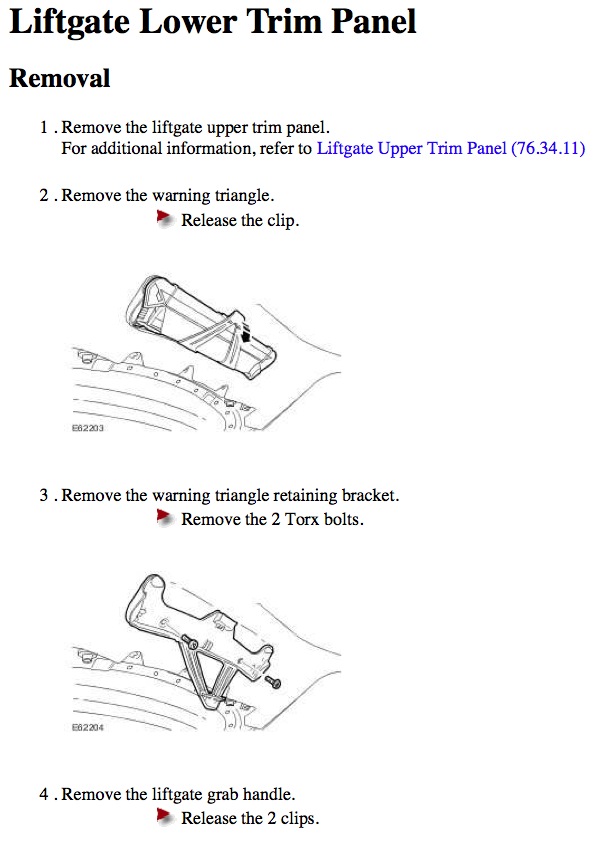
 01-26-2014, 10:28 AM


I have an April 2007 XKR, purchased from new and the other day while reversing towards a window I noticed one of the LED bulbs has failed in the 3rd brake light; the one on the spoiler.
My first thought was surprise as I thought these LED lights were designed not to fail i.e. there are no serviceable parts in them like "normal" light fittings. The more I thought about it the more annoyed I got as I realised, and this was confirmed by a phone call to my local dealers, that I would have to replace the whole unit, if I wanted it fixing.
Obviously, one LED bulb failure isn't a big deal - the car will still pass a UK MOT (as far as I'm aware), but every time I hit the brake light, I'm now thinking, the guy behind me will see a "sub-standard" high level brake light and wonder why I don't get it fixed!!!
My dealer wants to charge me around �130 to supply and fit a new unit. So, this is the equivalent of paying �130 for a new light bulb!!!! That doesn't sit well with me. I can see second hand units on eBay for around �35 and I'm tempted to purchase one and try to fit it myself. Admittedly, there's always the chance one of the LED's would fail in a second hand unit as it may be as old as mine, but surely, that would just be bad luck, or would it indicate these brake units are built using inferior parts that aren't meant to last?
Removing the 3rd brake light from the spoiler is easy, however removing the trim from under the tailgate lid is another matter, and I've no idea how to do this. Can anyone offer any advice/instructions about how the trim is removed so I can access the connector to remove the existing brake light?
I've found some online manuals for the XK150 2007 model, but the trim doesn't look anything like mine - they have "warning triangles" that need to be removed, and mine doesn't have this.
Any help would be appreciated.
#2
01-26-2014, 11:34 AM
Veteran Member
Removing the trim is pretty simple. I use a door panel tool to pop the plastic holders from the hatch.
The triangle is an add-on for country's that require them. I ordered one and installed it myself with supplied screws.
If I were to take the panel off, I would have to remove the triangle first.
BOL
Vince
The triangle is an add-on for country's that require them. I ordered one and installed it myself with supplied screws.
If I were to take the panel off, I would have to remove the triangle first.
BOL
Vince
#3
01-26-2014, 12:24 PM

I think it indicates that there is poor quality control on the production side. You get a light that was defective and it fails early. A broken part is a broken part. Replace it and hope the next one you get isn't as poorly built.
FWIW, I had to replace two LED light-fixtures that failed early on. They've been fine since.
FWIW, I had to replace two LED light-fixtures that failed early on. They've been fine since.
#4
01-26-2014, 03:05 PM
That looks like a useful tool, but how is it used? Where are the fixing points and how is the trim connected as I can't see anything on the outside.
I'm guessing the "handle" needs to be removed first, but how to pry this off without breaking the fixings.
I can lift the trim a little and see underneath and it looks like it is hooked onto the fixing so prying the trim away from the bodywork is likely to break something. I can't see how many fixings there are or where they are positioned!
If you could provide a little detail about how you used the tool to remove the trim, that would be helpful.
#5
01-26-2014, 07:08 PM
Veteran Member
LEDs do fail - they usually last a lot longer than conventional lamps, but small defects can lead to hotspots that burn out the (very small) semiconductor junction at the heart of the LED. If you can get at the individual LED units within the strip, then you might be able to remove the faulty one and replace it. It is possible that the electronics are moulded directly into one piece of plastic, which would make replacing an individual LED impossible.
However, if the LEDs are replaceable, you'd really need one from another strip to get the correct brightness to match the rest of the strip, so this is probably only something worth considering if an LED goes in the replacement strip. Assuming you've kept your current strip, you'll have both a source of replacement LEDs and a unit you can experiment with disassembling, without worrying about breaking it.
However, if the LEDs are replaceable, you'd really need one from another strip to get the correct brightness to match the rest of the strip, so this is probably only something worth considering if an LED goes in the replacement strip. Assuming you've kept your current strip, you'll have both a source of replacement LEDs and a unit you can experiment with disassembling, without worrying about breaking it.
#6
01-26-2014, 07:17 PM
Veteran Member


#7
01-26-2014, 09:12 PM

Senior Member
removing the upper panel is the easiest; just use a putty knife under the edges and pot out.
Main trim is tougher have to locate the clips by prying up the edges and use the tool as suggested by Clevername. Remove the hand hold first by just prying and pulling by hand (no tool reqd) . It's smart to buy some spare "arrow head" plastic fasteners for lower unit; they get damage if they are not aligned properly when putting back in!
Spoiler LED units are available from Hilo, Hawaii! spoilerlights.com . got a unit for my wife's XK8 $50 + shpg.
Hope this helps, Adrian
Trending Topics


#9
01-28-2014, 02:25 AM
Hi Ngarara, thanks for the pictures, however, I have already found the source manual for these instructions. Unfortunately "Release from the 12 clips" and "Release the 6 clips" doesn't really help me unless I understand how the clips are fitted as I don't want to end up braking them.
Is it possible to just force the trim away from the bodywork at the location of each clip. I tried doing this gently with the lower trim but it wasn't moving and I had the impression I was going to break something.
With all trims, once you've done one and you can see how the clips are fixed, it's easy, but I want to avoid breaking the clips, so I need to understand how the clips are fixed in place.
CleverName, I've ordered a similar tool, so that should help access the clip and britannia, it sounds like brute force is all that is required to "pop" out the clips of the upper trim, assuming I actually need to remove this. I only need access to the 3rd brake light connector.
I'm not convinced the clips in the lower trim will simply pop out and that maybe the trim needs to be "negotiated" out, possibly by pushing it up. This is based on my ability to see one of the clips through a small gap in the edge of the trim.
#10
01-28-2014, 03:06 AM

The Tailgate upper trim is held in place with 12 spring steel clips (item 3):

Each clip sits in a rectangular cutout in the Tailgate and is held in place with two 'teeth' on either side (arrowed in red). Take care when removing - the 'teeth' are sharp.
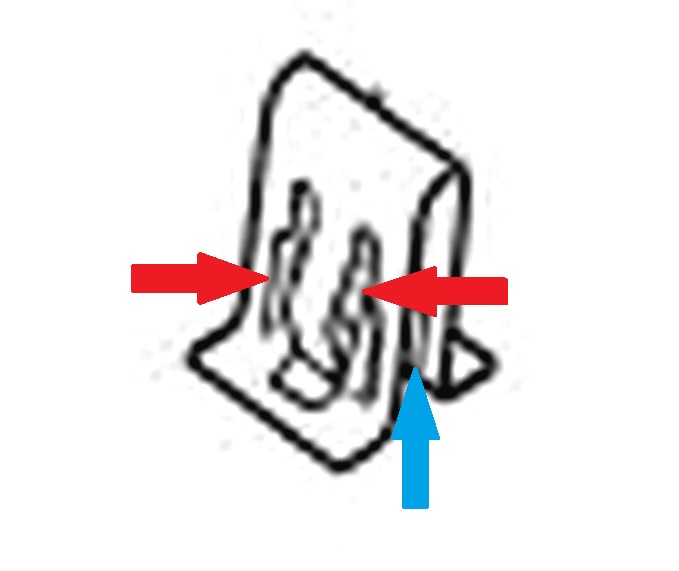
The trim has 12 moulded 'tongues' which push into the clips (arrowed in blue). It is released by inserting a flat tool such as a wooden or plastic spatula on the edge where the trim meets the metal and easing the trim away. This should be done gradually all round the perimeter releasing the trim from all 12 clips. Four hands are better than two!
The spring clips are supposed to be replaced but the same ones are used on the earlier XK8 dash veneer and seem to survive several removal/refitting cycles.
Graham
Last edited by GGG; 01-28-2014 at 03:09 AM.
The following users liked this post:
britannia (01-29-2014)
#11
01-28-2014, 03:17 PM
Hi Graham, thanks for that great information about the clips on the upper tailgate trim, that makes it much easier to understand how it can be removed and I feel more confident about doing it without breaking anything.
I'm guessing you haven't got access to similar detailed information about the clips used in the lower tailgate trim as that's the one I think I'm going to struggle with.
Thanks.
I'm guessing you haven't got access to similar detailed information about the clips used in the lower tailgate trim as that's the one I think I'm going to struggle with.
Thanks.
#12
01-28-2014, 05:08 PM
Senior Member
They will pop out if you use a forked upholstery tool but it takes an effort. They are round arrow shaped thingies. As I said before "get some spares" then you will know what they are like and you may need a couple anyway..................
Just bit the bullet.......................
Adrian
Just bit the bullet.......................
Adrian
#13
01-29-2014, 09:36 AM
Senior Member
Graham,
What's the source of that wonderful description of the upper (window) trim attachments.
My XK Jaguar DVD nor my Alldatadyi account has this kind of info!
When I removed the upper and lower trim panels to add my UK reverse light your pictures would have made it much quicker. I did it correctly but only after a lot of head scratching!
Curious, Adrian
#14
01-29-2014, 10:05 AM
Adrian,
I often find the diagrams in the Parts Catalogue make things much clearer than the ones in the Workshop Manual.
The Upper Trim is a perfect example. Anyone who has never come across these spring clips before would think something was going to break as the 'tongue' is released. The Parts Catalogue shows the design of the clips but the Workshop Manual doesn't.
Graham

Thread
Thread Starter
Forum
Replies
Last Post
rachelstr
S-Type / S type R Supercharged V8 ( X200 )
7
09-03-2015 12:59 PM
Currently Active Users Viewing This Thread: 1 (0 members and 1 guests)