New owner introduction...
#21
 07-14-2016, 08:16 PM


So where to start... 
I've got an eBay order in for a new hood sensor, but done a naughty and shorted it out for the few days until it arrives. At least I thought, that way I could lock the car!
Ive hidden a trickle charge connection in the car - which clever soul played where's Waldo with the battery? Took me a while and then an Internet search to find it! And managed to get my battery trickled to full. I have a quick charge system too, but always think they are less kind to the battery. Talking of which - it's blooming HUGE!!!
Once I was happy with the state of the battery, I managed to get to drive the car to work this week. Long story short, had a nasty noise coming from the front from around 30 through to 50mph.
Limped the car home thinking that a front wheel bearing was out - took it to my local friendly independent.
They kindly checked it out for me and to my relief, told me that the tire seemed to have cupped - looks like the previous owner wasn't quite so mechanically minded. They asked me if I knew about the state of the brakes...
No I said, I've only really just finished charging and messing with the car and taken it out for the first run. They said I really should look at them.
Pulled the front pad (which looked damned low eyeballing still on the car) and it was just under 3mm, the back was worse around 2mm. Darn. Just when I thought the car might have to have new springs on the front and back (the old ones are a little tired honey and the sports ones are the cheapest...) it looks like it's going to be the brakes that get the first attention.
I've also noted that a few of the rubber boots underneath are damaged here and there. Another little job for the future - brakes are first on the list!
What is the OEM brand for pads and discs? I'd like to make sure I don't cheap out on these as if I mess up the engine and can't get anywhere, it's one thing, but cheap poorly working brakes are a different box of monkeys all together!
Talk about new ownership feet first!
#22
07-14-2016, 10:09 PM
Veteran Member
Join Date: Jan 2015
Location: Naperville, Illinois USA
Posts: 4,676
Received 2,012 Likes
on
1,345 Posts
If you want to be happy, and not cleaning brake dust off your wheels every day, go with ceramic pads. Lovin' the Akebono's on my '07.
If you find a posting of mine somewhere on the forum that shows my signature, that has the pad part numbers in it (this post from my phone doesn't show the signature).
Found my signature, these are the Akebono part numbers that fit the 2007 XK:
front EUR1241
rear EUR1095
If you find a posting of mine somewhere on the forum that shows my signature, that has the pad part numbers in it (this post from my phone doesn't show the signature).
Found my signature, these are the Akebono part numbers that fit the 2007 XK:
front EUR1241
rear EUR1095
Last edited by kj07xk; 07-15-2016 at 12:18 PM. Reason: Added Akebono part numbers
The following users liked this post:
Munky (07-16-2016)
#23
07-15-2016, 07:50 AM

I had a similar experience buying my 2011 XK from Florida sight unseen. Service engine light on, low battery, making lots of noise from the rear. It also turned out the front brakes were worn out. I was lucky to still have a few months of warranty left so the brakes were covered. New tires made most of the road noise go away (Conti DWS 06). When you get the brakes done, change the fluid out as well. Enjoy the ride!
The following users liked this post:
Munky (07-16-2016)
#24
07-15-2016, 05:03 PM
Veteran Member
The following users liked this post:
Munky (07-16-2016)
#25
07-15-2016, 08:12 PM

Veteran Member
So where to start...
I've got an eBay order in for a new hood sensor, but done a naughty and shorted it out for the few days until it arrives. At least I thought, that way I could lock the car!
Ive hidden a trickle charge connection in the car - which clever soul played where's Waldo with the battery? Took me a while and then an Internet search to find it! And managed to get my battery trickled to full. I have a quick charge system too, but always think they are less kind to the battery. Talking of which - it's blooming HUGE!!!
Once I was happy with the state of the battery, I managed to get to drive the car to work this week. Long story short, had a nasty noise coming from the front from around 30 through to 50mph.
Limped the car home thinking that a front wheel bearing was out - took it to my local friendly independent.
They kindly checked it out for me and to my relief, told me that the tire seemed to have cupped - looks like the previous owner wasn't quite so mechanically minded. They asked me if I knew about the state of the brakes...
No I said, I've only really just finished charging and messing with the car and taken it out for the first run. They said I really should look at them.
Pulled the front pad (which looked damned low eyeballing still on the car) and it was just under 3mm, the back was worse around 2mm. Darn. Just when I thought the car might have to have new springs on the front and back (the old ones are a little tired honey and the sports ones are the cheapest...) it looks like it's going to be the brakes that get the first attention.
I've also noted that a few of the rubber boots underneath are damaged here and there. Another little job for the future - brakes are first on the list!
What is the OEM brand for pads and discs? I'd like to make sure I don't cheap out on these as if I mess up the engine and can't get anywhere, it's one thing, but cheap poorly working brakes are a different box of monkeys all together!
Talk about new ownership feet first!
These get good reviews, on this and other forums, and they've been on eBay for years. I went with this set and haven't installed them yet. No affiliation.
Front Rear Drilled Slotted Brake Rotors 8 Ceramic Pads Jaguar s Type XF XJ | eBay
The following users liked this post:
Munky (07-16-2016)
#26
07-16-2016, 10:07 AM
So this little puppy arrived on Friday in the post

Should be able to get that installed some time this evening and remove the gudgeon pin I've used to short the sensor connector.
It seemed like a good price from an eBay seller - however, slightly annoyed with myself now that I didn't take more time to look into the one on the car. Wouldn't have taken too much to have tried bending the spring on this or machining the switch out and putting another in. Oh well, I'm always learning I guess!
Just ordered some ceramic brakes - thanks kjo7xk and Sean W.
The guys at my local garage are pretty good to me and let me buy the odd part from them at their price.
As you said, they recommended ceramic brakes and could get me some Akebonos so they should be here some time today. I really need to get these swapped out as I don't want to drive the car and risk transferring the heat into the calipers themselves should I need to stop fast on the highway or something!
Looks like my Sunday is going to be covered... Still it should be worth it once I get them on. I've not bedded in ceramic brakes before - anything I should be wary of or do different to a normal pad and disc swap?
Sean W - those look like a good deal, but I need to be driving the car to work on Monday, so I can't really wait to order. Thanks for the link though. They seem to be a good price!
Quick pic of the car that's causing all the trouble...

Giving my mum a lift in the Scooby. Sad I couldn't take her out in the Jaguar!
#27
07-16-2016, 10:56 AM
Veteran Member
Unless you are replacing the rotors or having them turned there is no need to bed in the brakes. The bedding process is done when replacing the rotors. The reason for this is to transfer brake pad material onto the rotors to give you better breaking. New pads on old rotors aren't a problem as the rotors have brake material already on them. As for the statement on the brake pads transferring heat on the calipers I don't understand your concern. If you have any brake material on your old pads your brakes will work as designed. The only issue would be if you had no pads left and you were metal to metal on the rotors. There is also a lot of info on the web that tells you how to bed in new pads and rotors.
The following users liked this post:
Munky (07-16-2016)
#28
07-16-2016, 01:18 PM
#29
07-16-2016, 07:53 PM
This might help someone if they are trying to sort out a 'hood open' warning on their XK...
To find out which side is the issue, you should be able to tell (without the aid of an accomplice) by trying to set the alarm using the key fob.
With the car all closed up, try setting the alarm. It should go beep beep - warning that there is an issue with the alarm. Now push on the corner of the hood, nearest the drivers door and while pushing it down, try setting the alarm. If it sets, it's probably this side that's faulty.
If not repeat on the other passenger side. Be warned - when you manage to set the alarm, as soon as you take pressure off the hood, the alarm is going to go off. Don't do it at 10:00pm like I did. It doesn't make 'the guy who helps you fix your car' very popular...
Open the hood and you're ready to go! Mine was an issue on the drivers side, so that's what you see in the pics.
First a quick hack so you can get the alarm to work and wait for the part to come - there are four plastic screws to be able to remove the first of the plastic trim.
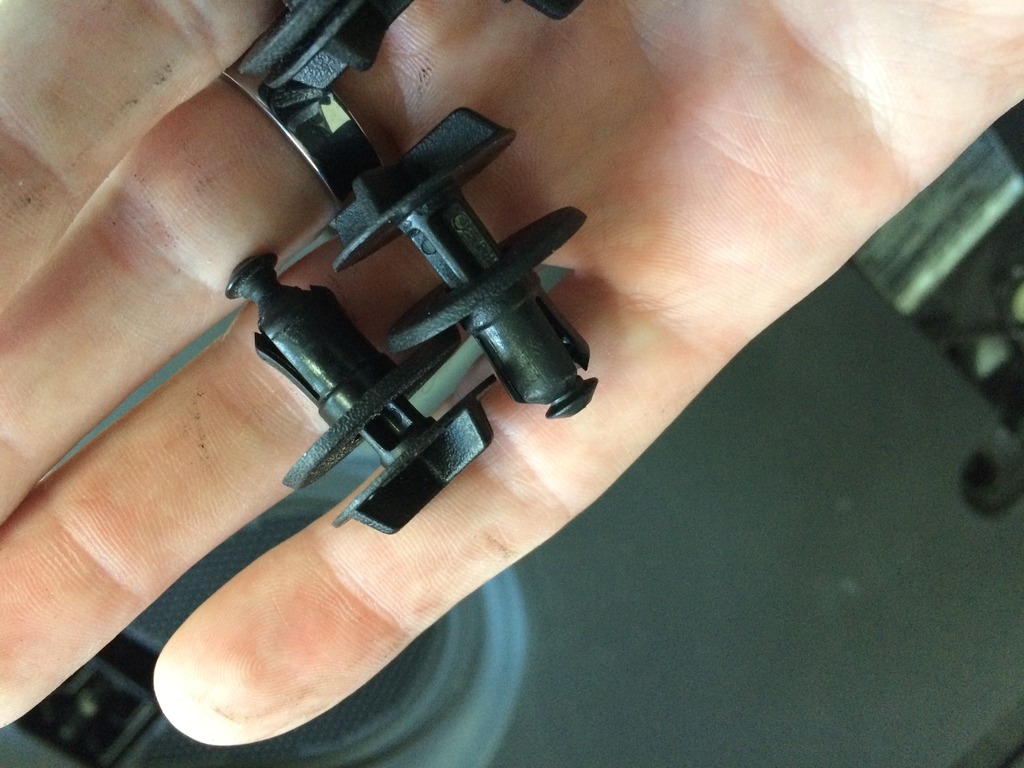
These are the typical unscrew and then pull out the expanded section. One of mine was broken. If anyone has the part number or spare, I would appreciate it! Thanks to kj. The part number is XR812941
Next remove the big slab of plastic by hinging it up towards the windshield.

I know, I know, I normally wear gloves. Leave no fingerprints as evidence
Next look at the hood catch and follow it down until you see the wires bundle going to it. Wiggle the connector out. Next find a short piece of wire and use it to short the connectors. I used a piece from a gudgeon pin.

Next you need to make sure you don't short it to anything else... So put some insulation tape over the top.
I then used some insulation tape to hold it to another part (so it didn't rattle). Closed the hood and checked for the warning light.
All good. Plastics back on and job hacked until the part arrived.
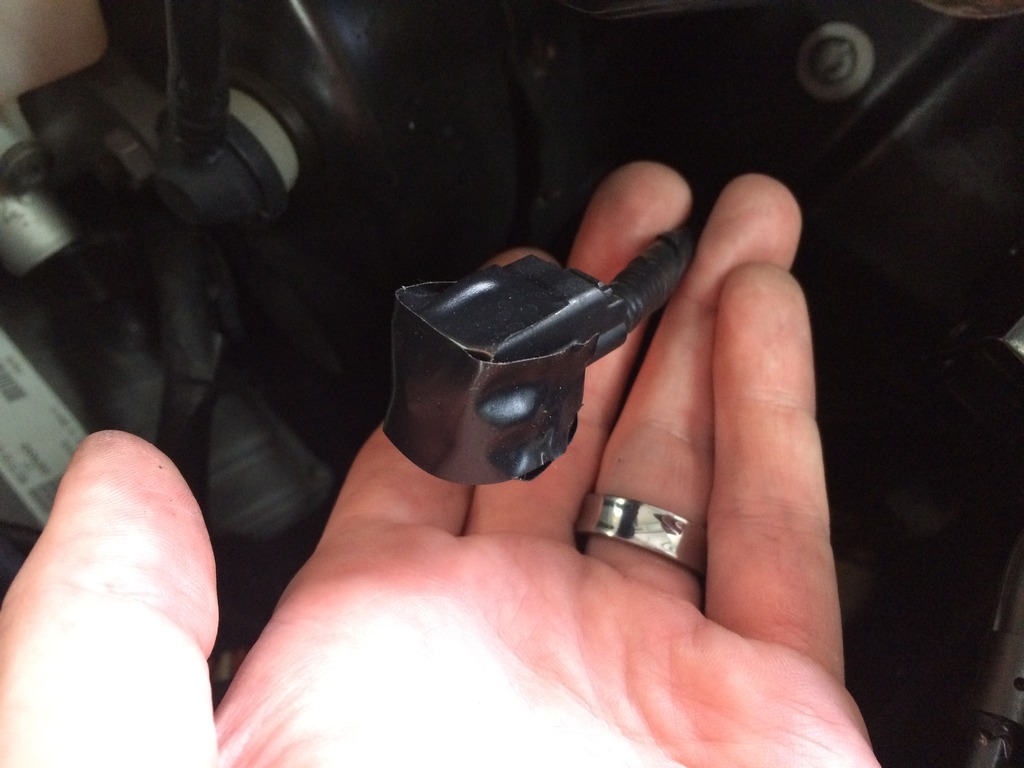
The part I ordered was C2D27159. It cost me around $20 shipped but saw them priced for up to $108 on the net. In this case, eBay was my friend!
So with the part in my grubby mit, the part is ready for a swap. As soon as the part arrived, I wished I had pulled the original part off to look to see what was wrong with it.
Mine would have been an easy fix but had too many things going on to be bothered with it.
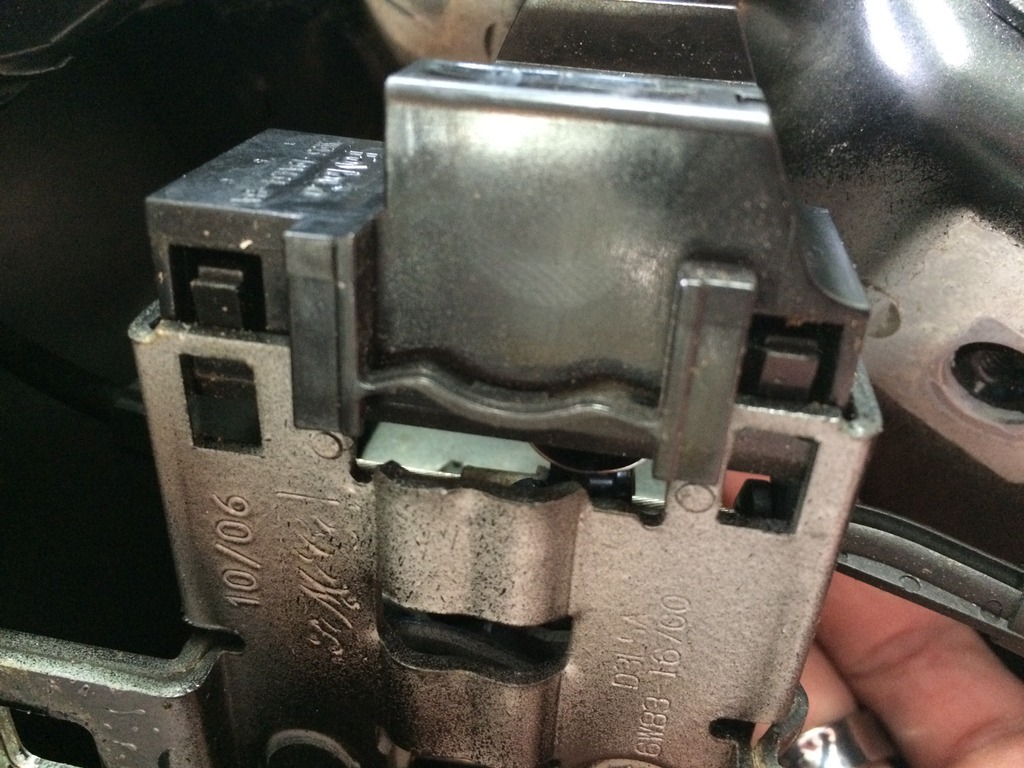
Anyway, plastics off again (try not to get annoyed by the partially broken screw) and ready to take the latch off. You need a 10mm wrench. The side nearest the windshield is tight for space so I used a ratcheting wrench but a normal one will also work - might just take an extra 30seconds.

I normally stuff a white shop towel underneath things I remove on cars with plastic under trays like the Jag. This gives me a fair chance of catching and seeing anything that clumsy four thumbs drops.
This time I went 'Onatural' (mainly as my usual towel for the job is in another engine bay).
Undo the two bolts and washers. With the bracket released but cables still attached

Turn it carefully over
And pop up the two barb hooks with a small screwdriver and ease the assembly out.
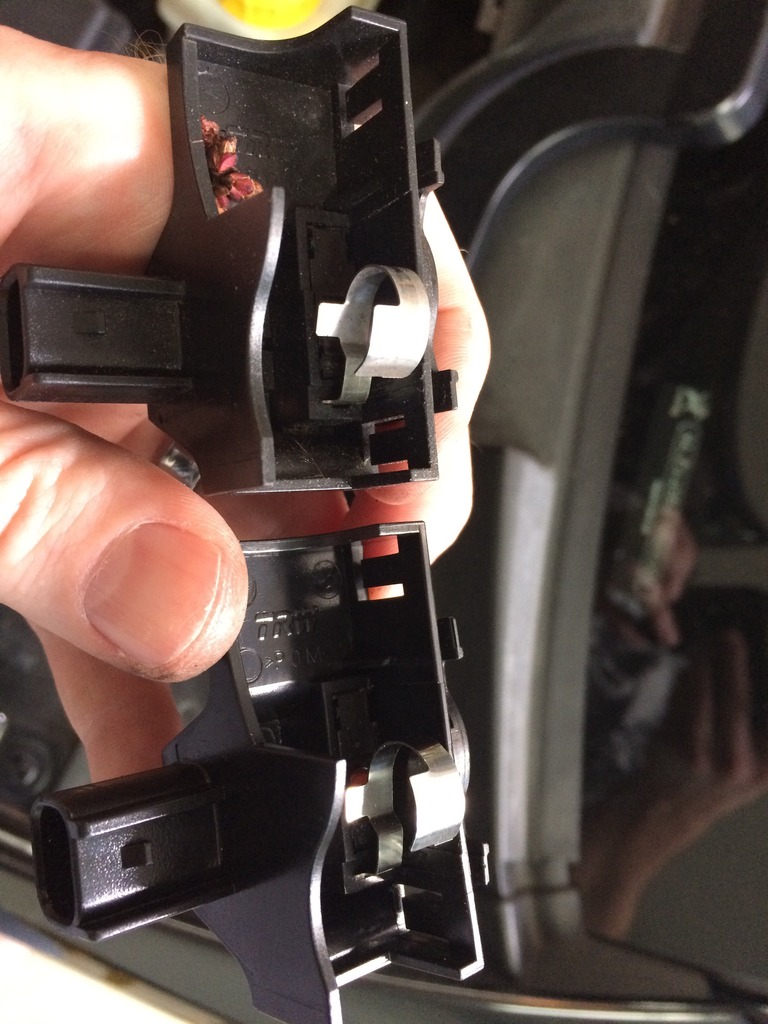
As you see comparing the old and new parts, old one upper, new one lower, I should have fiddled with mine.
The old one has a piece of vegetation in it (possible cause of the issue) and the spring seems a little more deformed than the new one.
Swap the old one out for the new. Slide everything back into place and you are done!
Tomorrow is ceramic pads and new rotors
Edit: mine was an issue with the spring or that pretty little flower. I tested the switch itself with my multimeter and the switch still worked - no surprise I guess. Still, I have a spare now
To find out which side is the issue, you should be able to tell (without the aid of an accomplice) by trying to set the alarm using the key fob.
With the car all closed up, try setting the alarm. It should go beep beep - warning that there is an issue with the alarm. Now push on the corner of the hood, nearest the drivers door and while pushing it down, try setting the alarm. If it sets, it's probably this side that's faulty.
If not repeat on the other passenger side. Be warned - when you manage to set the alarm, as soon as you take pressure off the hood, the alarm is going to go off. Don't do it at 10:00pm like I did. It doesn't make 'the guy who helps you fix your car' very popular...
Open the hood and you're ready to go! Mine was an issue on the drivers side, so that's what you see in the pics.
First a quick hack so you can get the alarm to work and wait for the part to come - there are four plastic screws to be able to remove the first of the plastic trim.

These are the typical unscrew and then pull out the expanded section. One of mine was broken. If anyone has the part number or spare, I would appreciate it! Thanks to kj. The part number is XR812941
Next remove the big slab of plastic by hinging it up towards the windshield.

I know, I know, I normally wear gloves. Leave no fingerprints as evidence
Next look at the hood catch and follow it down until you see the wires bundle going to it. Wiggle the connector out. Next find a short piece of wire and use it to short the connectors. I used a piece from a gudgeon pin.

Next you need to make sure you don't short it to anything else... So put some insulation tape over the top.

I then used some insulation tape to hold it to another part (so it didn't rattle). Closed the hood and checked for the warning light.
All good. Plastics back on and job hacked until the part arrived.
The part I ordered was C2D27159. It cost me around $20 shipped but saw them priced for up to $108 on the net. In this case, eBay was my friend!
So with the part in my grubby mit, the part is ready for a swap. As soon as the part arrived, I wished I had pulled the original part off to look to see what was wrong with it.
Mine would have been an easy fix but had too many things going on to be bothered with it.
Anyway, plastics off again (try not to get annoyed by the partially broken screw) and ready to take the latch off. You need a 10mm wrench. The side nearest the windshield is tight for space so I used a ratcheting wrench but a normal one will also work - might just take an extra 30seconds.

I normally stuff a white shop towel underneath things I remove on cars with plastic under trays like the Jag. This gives me a fair chance of catching and seeing anything that clumsy four thumbs drops.
This time I went 'Onatural' (mainly as my usual towel for the job is in another engine bay).
Undo the two bolts and washers. With the bracket released but cables still attached

Turn it carefully over

And pop up the two barb hooks with a small screwdriver and ease the assembly out.

As you see comparing the old and new parts, old one upper, new one lower, I should have fiddled with mine.
The old one has a piece of vegetation in it (possible cause of the issue) and the spring seems a little more deformed than the new one.
Swap the old one out for the new. Slide everything back into place and you are done!
Tomorrow is ceramic pads and new rotors
Edit: mine was an issue with the spring or that pretty little flower. I tested the switch itself with my multimeter and the switch still worked - no surprise I guess. Still, I have a spare now
Last edited by Munky; 07-17-2016 at 08:07 AM.
#30
07-16-2016, 11:56 PM
Veteran Member
Join Date: Jan 2015
Location: Naperville, Illinois USA
Posts: 4,676
Received 2,012 Likes
on
1,345 Posts
The following users liked this post:
Munky (07-17-2016)
#31
07-17-2016, 07:54 AM
Thanks kj. I'll see what I can find.
If I do find it, I'll stuff it in the post above.
Pads and discs today. A sure-fire way to get covered in grime...
Edit: found it - XR812941
Thanks kj.
http://www.ebay.com/itm/JAGUAR-S-TYP...hU-iLP&vxp=mtr
$10 for two??? I'm sure I can find these for less(!)
If I do find it, I'll stuff it in the post above.
Pads and discs today. A sure-fire way to get covered in grime...
Edit: found it - XR812941
Thanks kj.
http://www.ebay.com/itm/JAGUAR-S-TYP...hU-iLP&vxp=mtr
$10 for two??? I'm sure I can find these for less(!)
Last edited by Munky; 07-17-2016 at 08:05 AM.
#32
07-17-2016, 11:12 AM
Veteran Member
Join Date: Jan 2015
Location: Naperville, Illinois USA
Posts: 4,676
Received 2,012 Likes
on
1,345 Posts
Edit: found it - XR812941
Thanks kj.
Jaguar s Type Radiator Shield Retaining Clips XR812941010 Set of 2 XR812941 | eBay
$10 for two??? I'm sure I can find these for less(!)
Thanks kj.
Jaguar s Type Radiator Shield Retaining Clips XR812941010 Set of 2 XR812941 | eBay
$10 for two??? I'm sure I can find these for less(!)
Yeah, that eBay seller always has high prices on stuff.
The following users liked this post:
Munky (07-17-2016)
#33
07-17-2016, 12:11 PM
Veteran Member
#35
07-17-2016, 03:02 PM
Veteran Member
Join Date: Jan 2015
Location: Naperville, Illinois USA
Posts: 4,676
Received 2,012 Likes
on
1,345 Posts
The following users liked this post:
Munky (07-17-2016)
#36
07-17-2016, 09:09 PM
#37
07-18-2016, 11:12 AM
Veteran Member

The following users liked this post:
kj07xk (07-18-2016)
#38
07-18-2016, 11:33 AM
Veteran Member
Join Date: Jan 2015
Location: Naperville, Illinois USA
Posts: 4,676
Received 2,012 Likes
on
1,345 Posts
Yep, from a PC the link opens fine, I was reading from my phone, and didn't work, oh well. 
Yes, those are the ones I ordered, as had been posted in entry #9 in this thread:
https://www.jaguarforums.com/forum/x...solved-107977/
Yes, those are the ones I ordered, as had been posted in entry #9 in this thread:
https://www.jaguarforums.com/forum/x...solved-107977/
#39
08-02-2016, 07:39 PM
Well that has been a complete bust.
I was hoping to do a step by step change of discs and pads (not super difficult but I thought it might help someone out).
Instead of using my iPhone as usual, I used an old digital camera I've had knocking around and really don't care for. Not so bad when I drop it or cover it with copper grease)
And guess what - my damn camera won't let me download the pictures!
What's worse is, I work for a camera company and its one I had many years before that isn't one of theirs! So I can't even ask anyone at work to help me fix it!
Anyway, pads and discs done - next up is a low rev rattle or vibration.
The wheel bearings seem okay but there seems to be a buzz around the exhaust though it's hard to tell. It seems to only happen at low revs 1200RPM or so. I have new tires so it's not that.
Seems like I have some loose exhaust brackets or when some work has been done to the car, the brackets have been left off?
Could anyone send me a picture of the underside of their car please so I can see if there is anything missing. There doesn't seem to be any tell tale signs of anything missing, but the wheel bearing looks fine.
Problem is it only seems to happen under load so I'm struggling to pin it down. Could it be an engine mount? They all look fine.
Only a few last things to fix before the modding commences - but I HAVE to sort this as its starting to really bother me. Otherwise I just love this car!
