Rear Window regulator 2008 XKR X150 convt.
#21
My LR window regulator failed a few weeks ago. It turns out that the part (C2P24322) is out of stock and, according to my dealer, Jag has it backordered to their OEM. My dealer was unwilling to remove the regulator and send it out for rebuild. Fortunately, I called other Jag dealers and one located a new regulator at another dealer. I purchased it, about $900 with tax and shipping, and my dealer installed it.
I now have my old, defective regulator. If anyone else is dealing with this issue, I will provide my regulator at no cost, except shipping, which would allow you to get it rebuilt and just swap yours out without the extra week or so for rebuild time.
I now have my old, defective regulator. If anyone else is dealing with this issue, I will provide my regulator at no cost, except shipping, which would allow you to get it rebuilt and just swap yours out without the extra week or so for rebuild time.
#22
My LR regulator failed over the weekend. Combining the video by kysc with the service manual, dismantling was straightforward and took under two hours. For UK residents, I can recommend the service of Power Windows in Blackburn ( https://www.electriccarwindowrepair.co.uk/ ), who turned the job around in less than 24 hours for £165 including next day delivery. Reassembly was equally straightforward, although I doubled the workload by part dismantling the other side of the car to convince myself that I was putting all the trim overlaps in the right order.
One word of warning: Whilst it is possible to stop the rear cover in the partially raised position, it will only stay there for around ten minutes before the valves release the hydraulic pressure and allow it to close. Always start from the roof retracted position and only allow the roof to raise the bare minimum required for access. If you open the roof too far, it can get jammed under the rear cover when the pressure is released. After each operation, fully open the roof (ie re-close the rear cover) again, before re-opening the cover to tackle the next operation. That way, you will have the benefit of the full ten minutes for each stage of the job.
It is a daunting job, but actually just a great many simple steps.
#23
Hi Folks,
So, back seat trims; fuse box cover, center armrest, seat bottoms, seat backs - all snap out apart from the backs that are held with 2 screws.
Quarter trim and scuff panel, seat belt mechanism and guide, unplug some cables and remove speaker enclosure, remove inner and outer window seals and closing panel (2 screws easy, one needs to have the soft top partially extended for access) and finally the 3 nuts that hold the regulator.
Getting the regulator OUT took forever - am I missing something??? It seems that mine had a cable that had wrapped itself around the driven wheel, with the window jammed about halfway down - perhaps this was causing the regulator to be too "thick" and not able to be slid into the gap between the body inner and outer shell? I finally had to partially disassemble the unit inside the car to get the parts out - removed the glass and then the motor assembly.
I am sending it out to Window Motor World of Florida who advertise on eBay under the name uzd2bmine and have a 100% rating with 7000 reviews on rebuild/improvement... with a lifetime warranty! Cost is $180.
Phil
This one's a 2009 XKR convertible. A while ago, the left side went bad, and I repaired it. I managed to re-string the wire and get everything back the way it was, and it was working, but I was a little skeptical about it long term. Sure enough, she was leaving work a few weeks back, hit the top button (by mistake), the rear windows went down, and wouldn't come back up. This time it was BOTH sides. Crap. Guess I needed to find a better fix.
Jaguar wants about $1000 for a rear window mechanism. Each. If you can find ones in stock. I shudder to think what this might cost at a dealer. I looked around for used pieces, and there were a few, but you're taking the chance that those are old, too, and may not last that long, either. Then I found a place that claims to rebuild these mechanisms.
It's called Window Motor World and they're in Titusville, Florida. Wish I had seen this thread earlier, I would have known that, but it worked out ok anyway. Cost is now $225 per side. Price includes return shipping. You have to box up your parts and pay for the shipping to them. Once they get the parts, they inspect them to make sure they are repairable, you talk to them on the phone, give 'em a credit card number, and they do the work. Turns out Julie is still there, after what, 7 years? And I have to give a shout-out to her, she was extremely helpful. The USPS did something screwy with the parts I shipped, so that what should have been a 1 or 2 day trip from Boca to Titusville took over a week and somehow the parts got sent to Orlando and god-knows-where-else, but I called to see if maybe they were out of their office on the day the package was supposed to be delivered and Julie (without me asking) took my tracking number and terrorized USPS from her end until the parts were eventually delivered. Thank you, Julie!
Anyhoo, repairs were made, the return trip went without incident, and I thought I'd post some how-to pictures for anyone who might need to tackle this project on their car.
I won't go through every step required to remove the rear interior panels. If you've never done that, see my post here for a detailed description of how to get some of the tricky stuff apart: https://www.jaguarforums.com/forum/x...0/#post2619732
Start by hooking a battery charger up to the car. This job can drain a battery, since the top needs to be run, doors are open, interior lights are on... Next, put the convertible top down, but stop just before the tonneau cover starts to close, so it stays in the vertical position. It will stay put, it doesn't drop after a few minutes like the top does. Detach the string to the sliding flap:
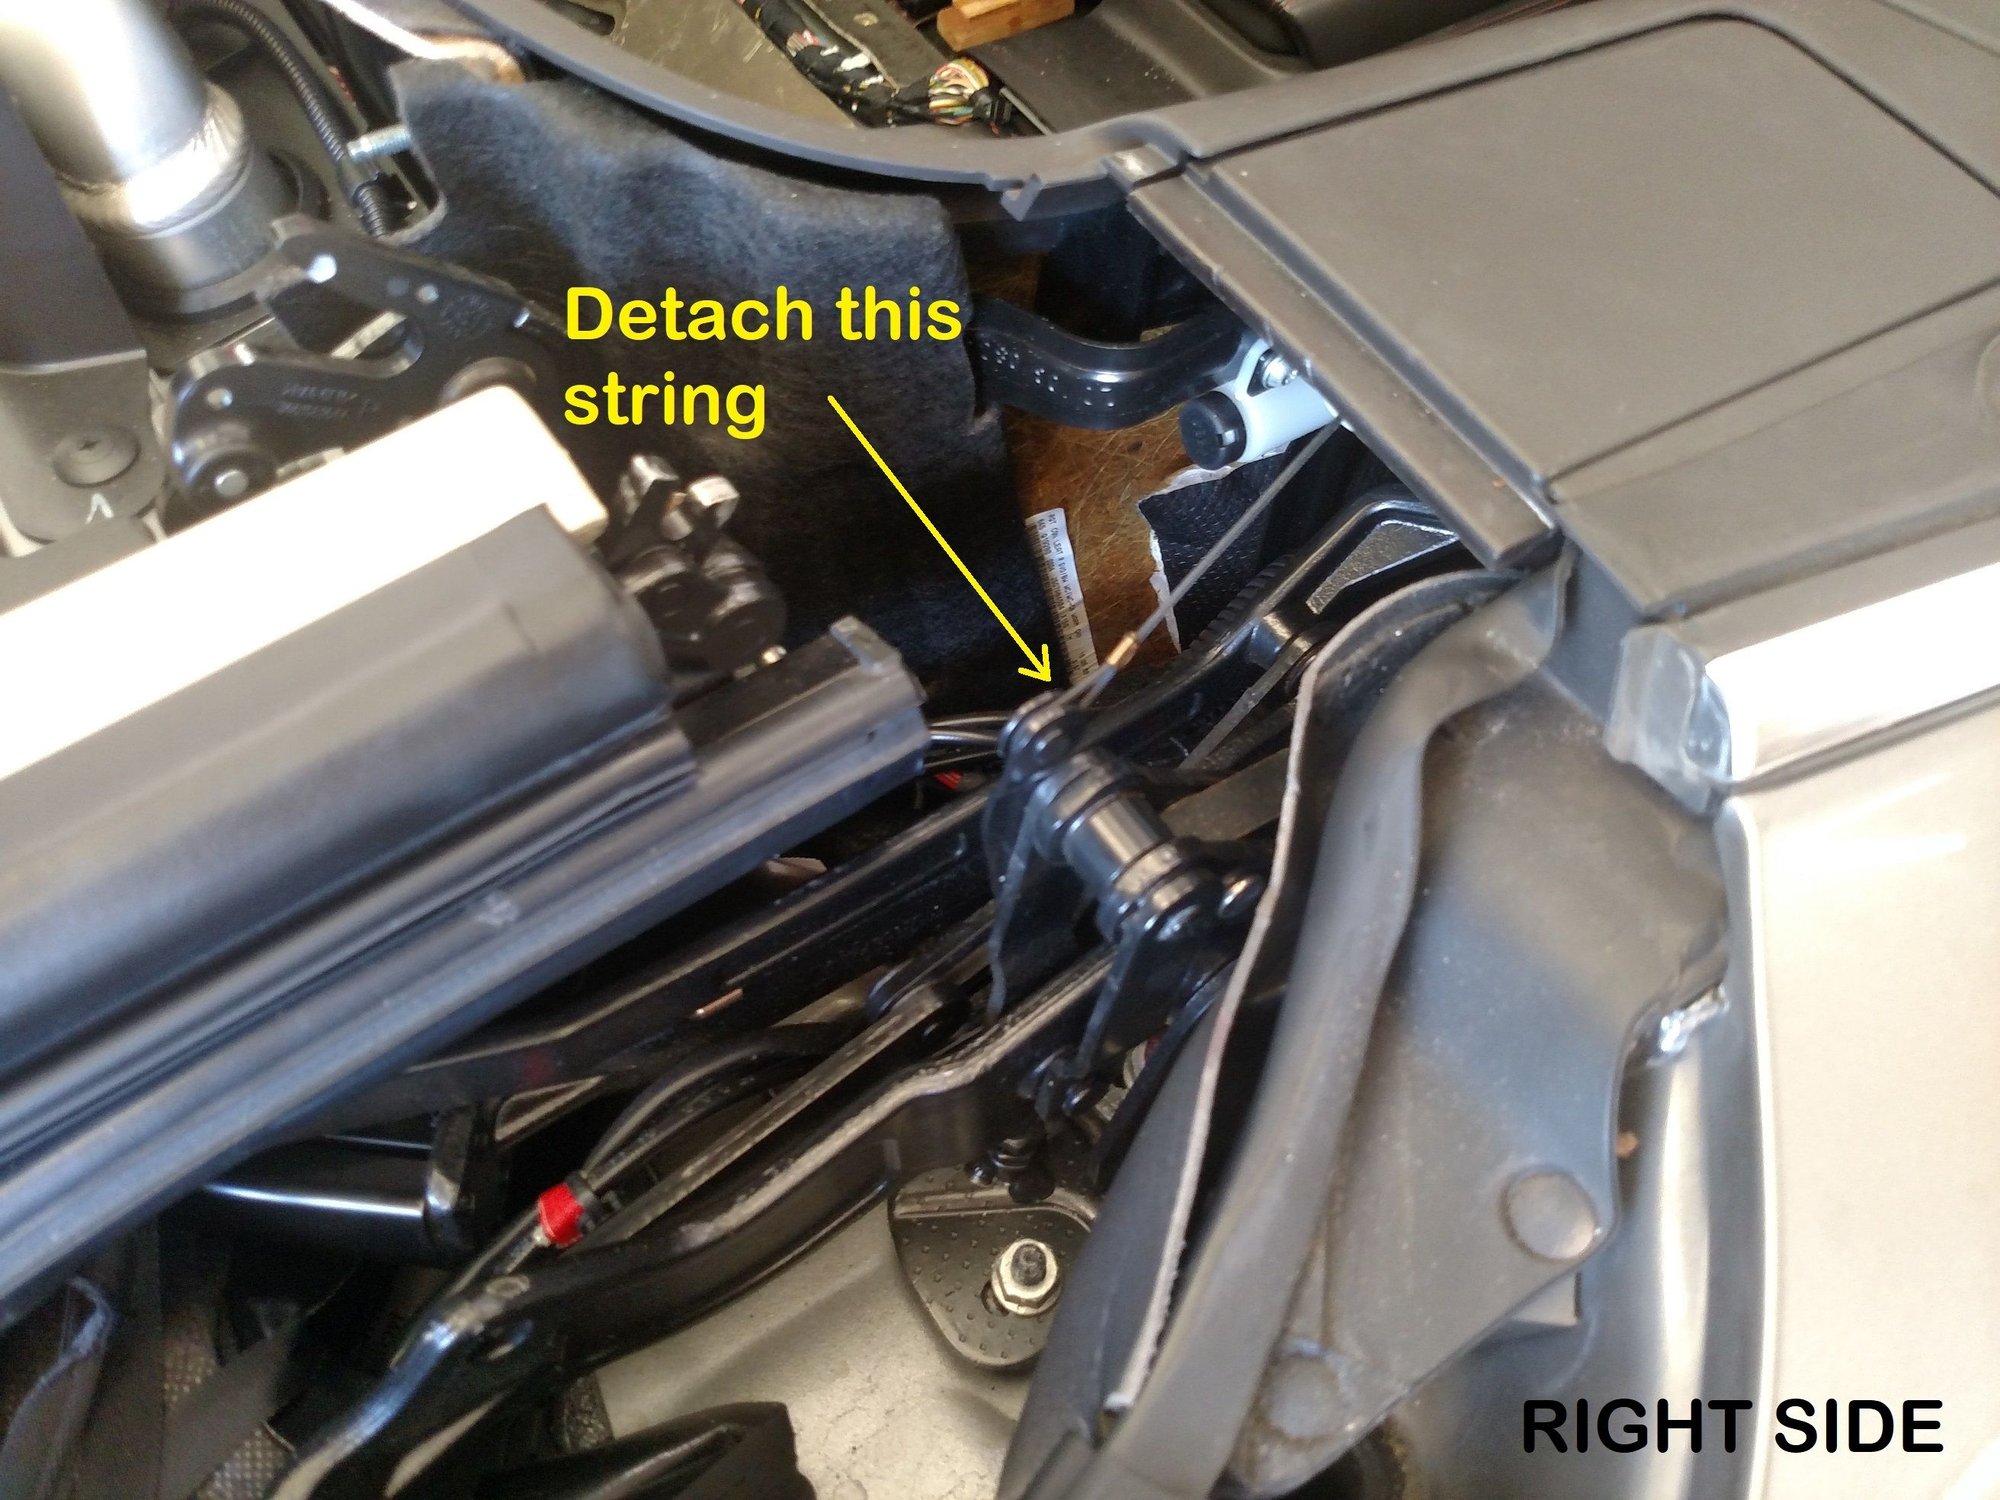
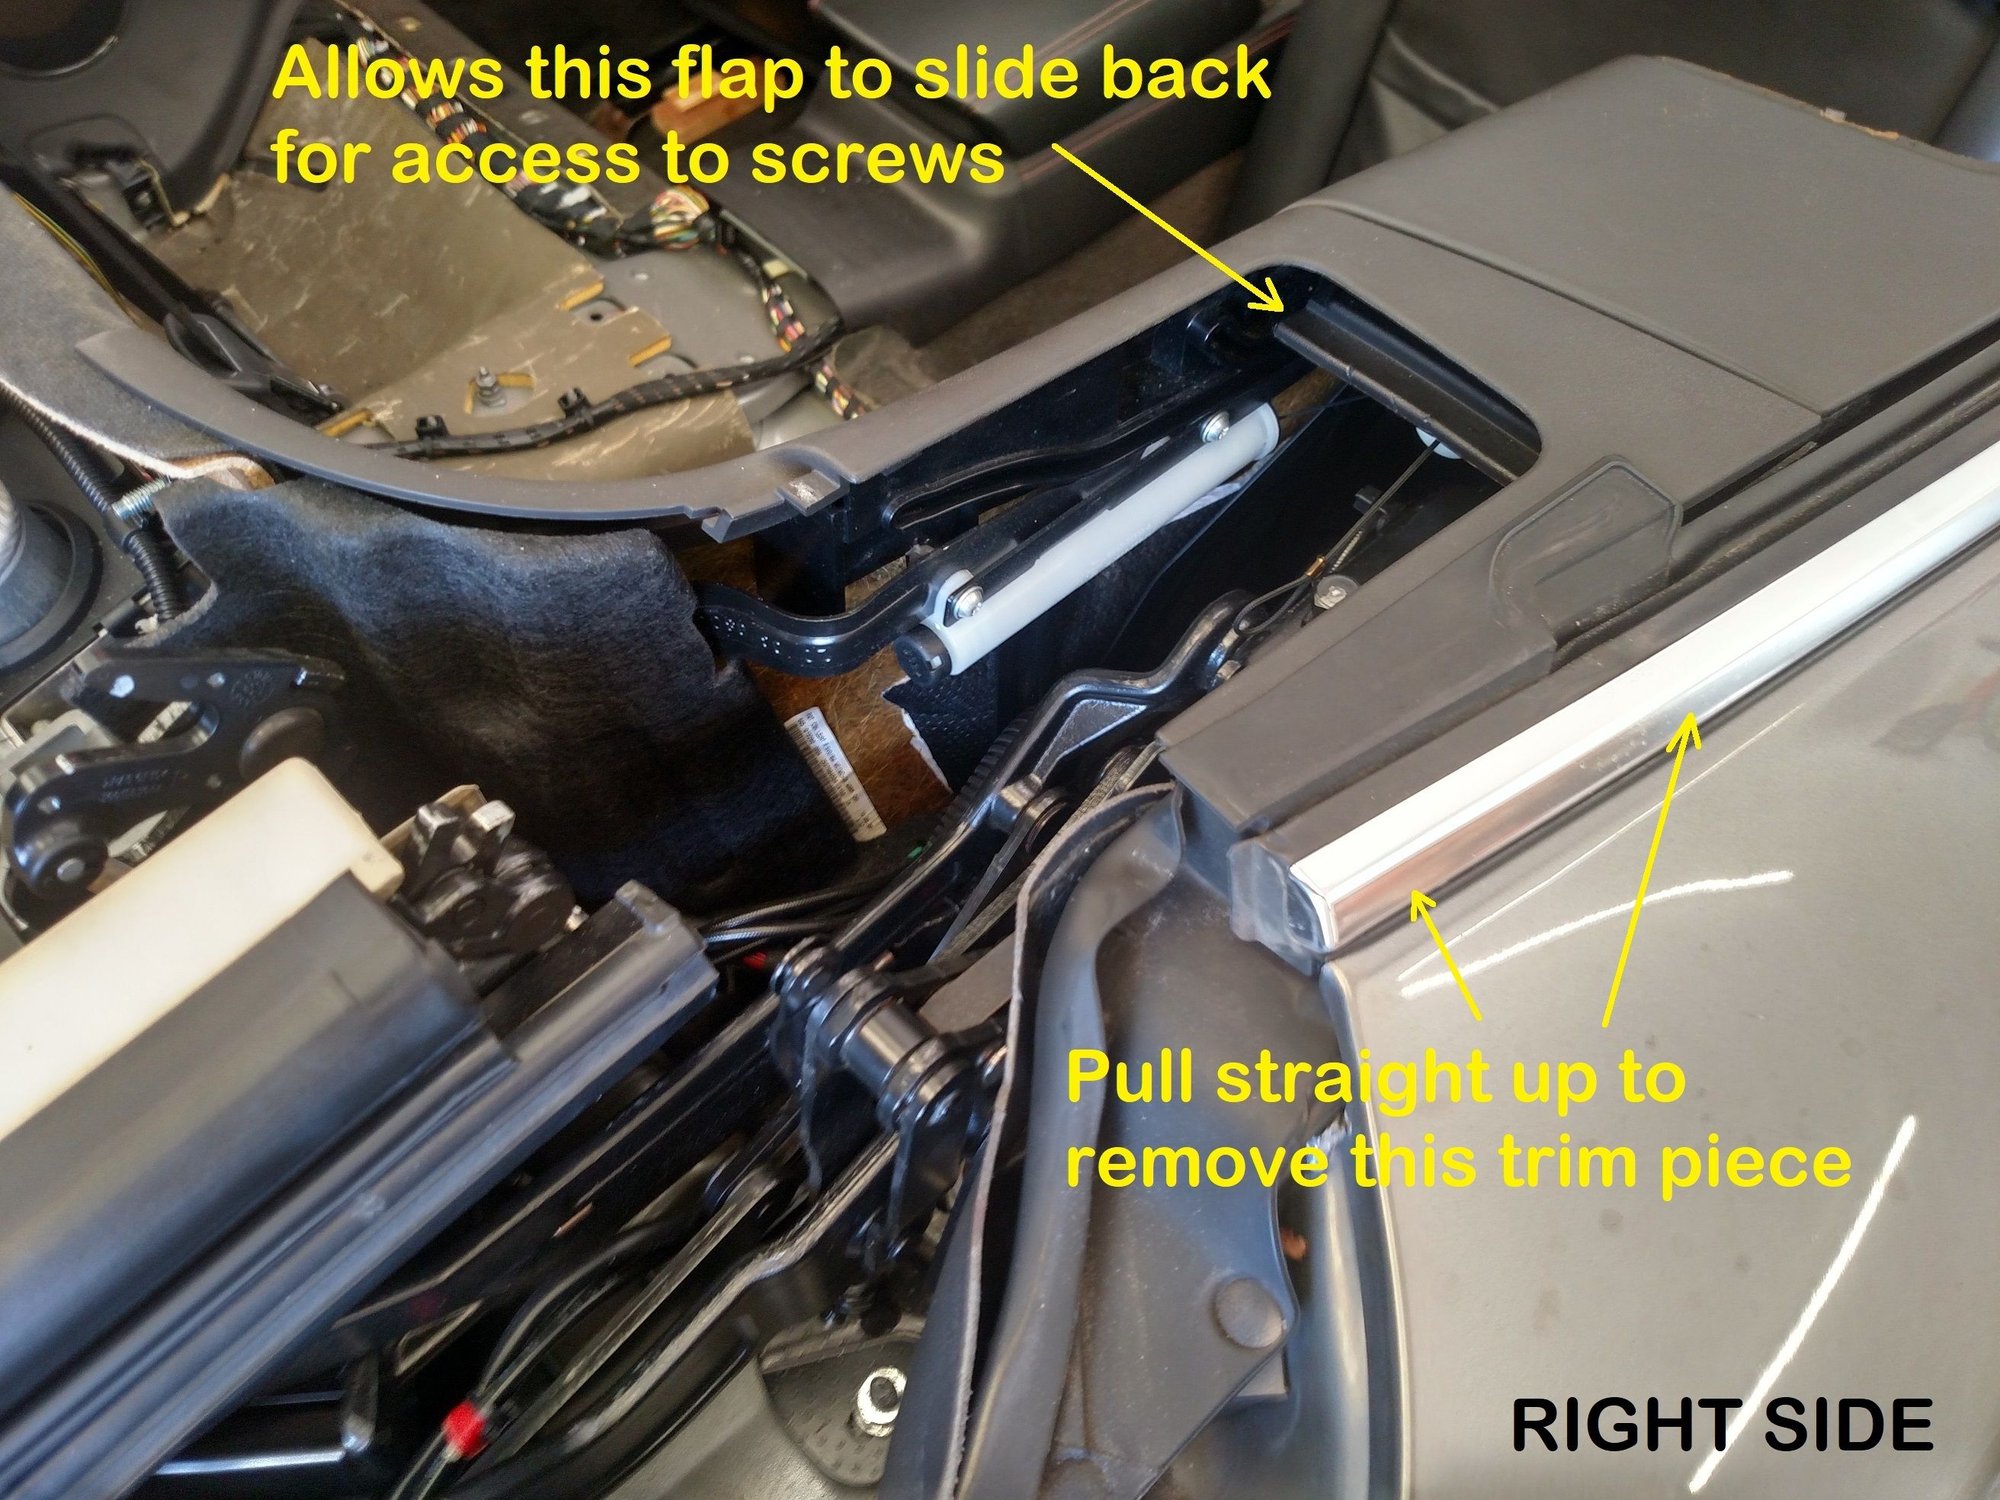
Pull this rubber gasket, too, to get it out of the way.
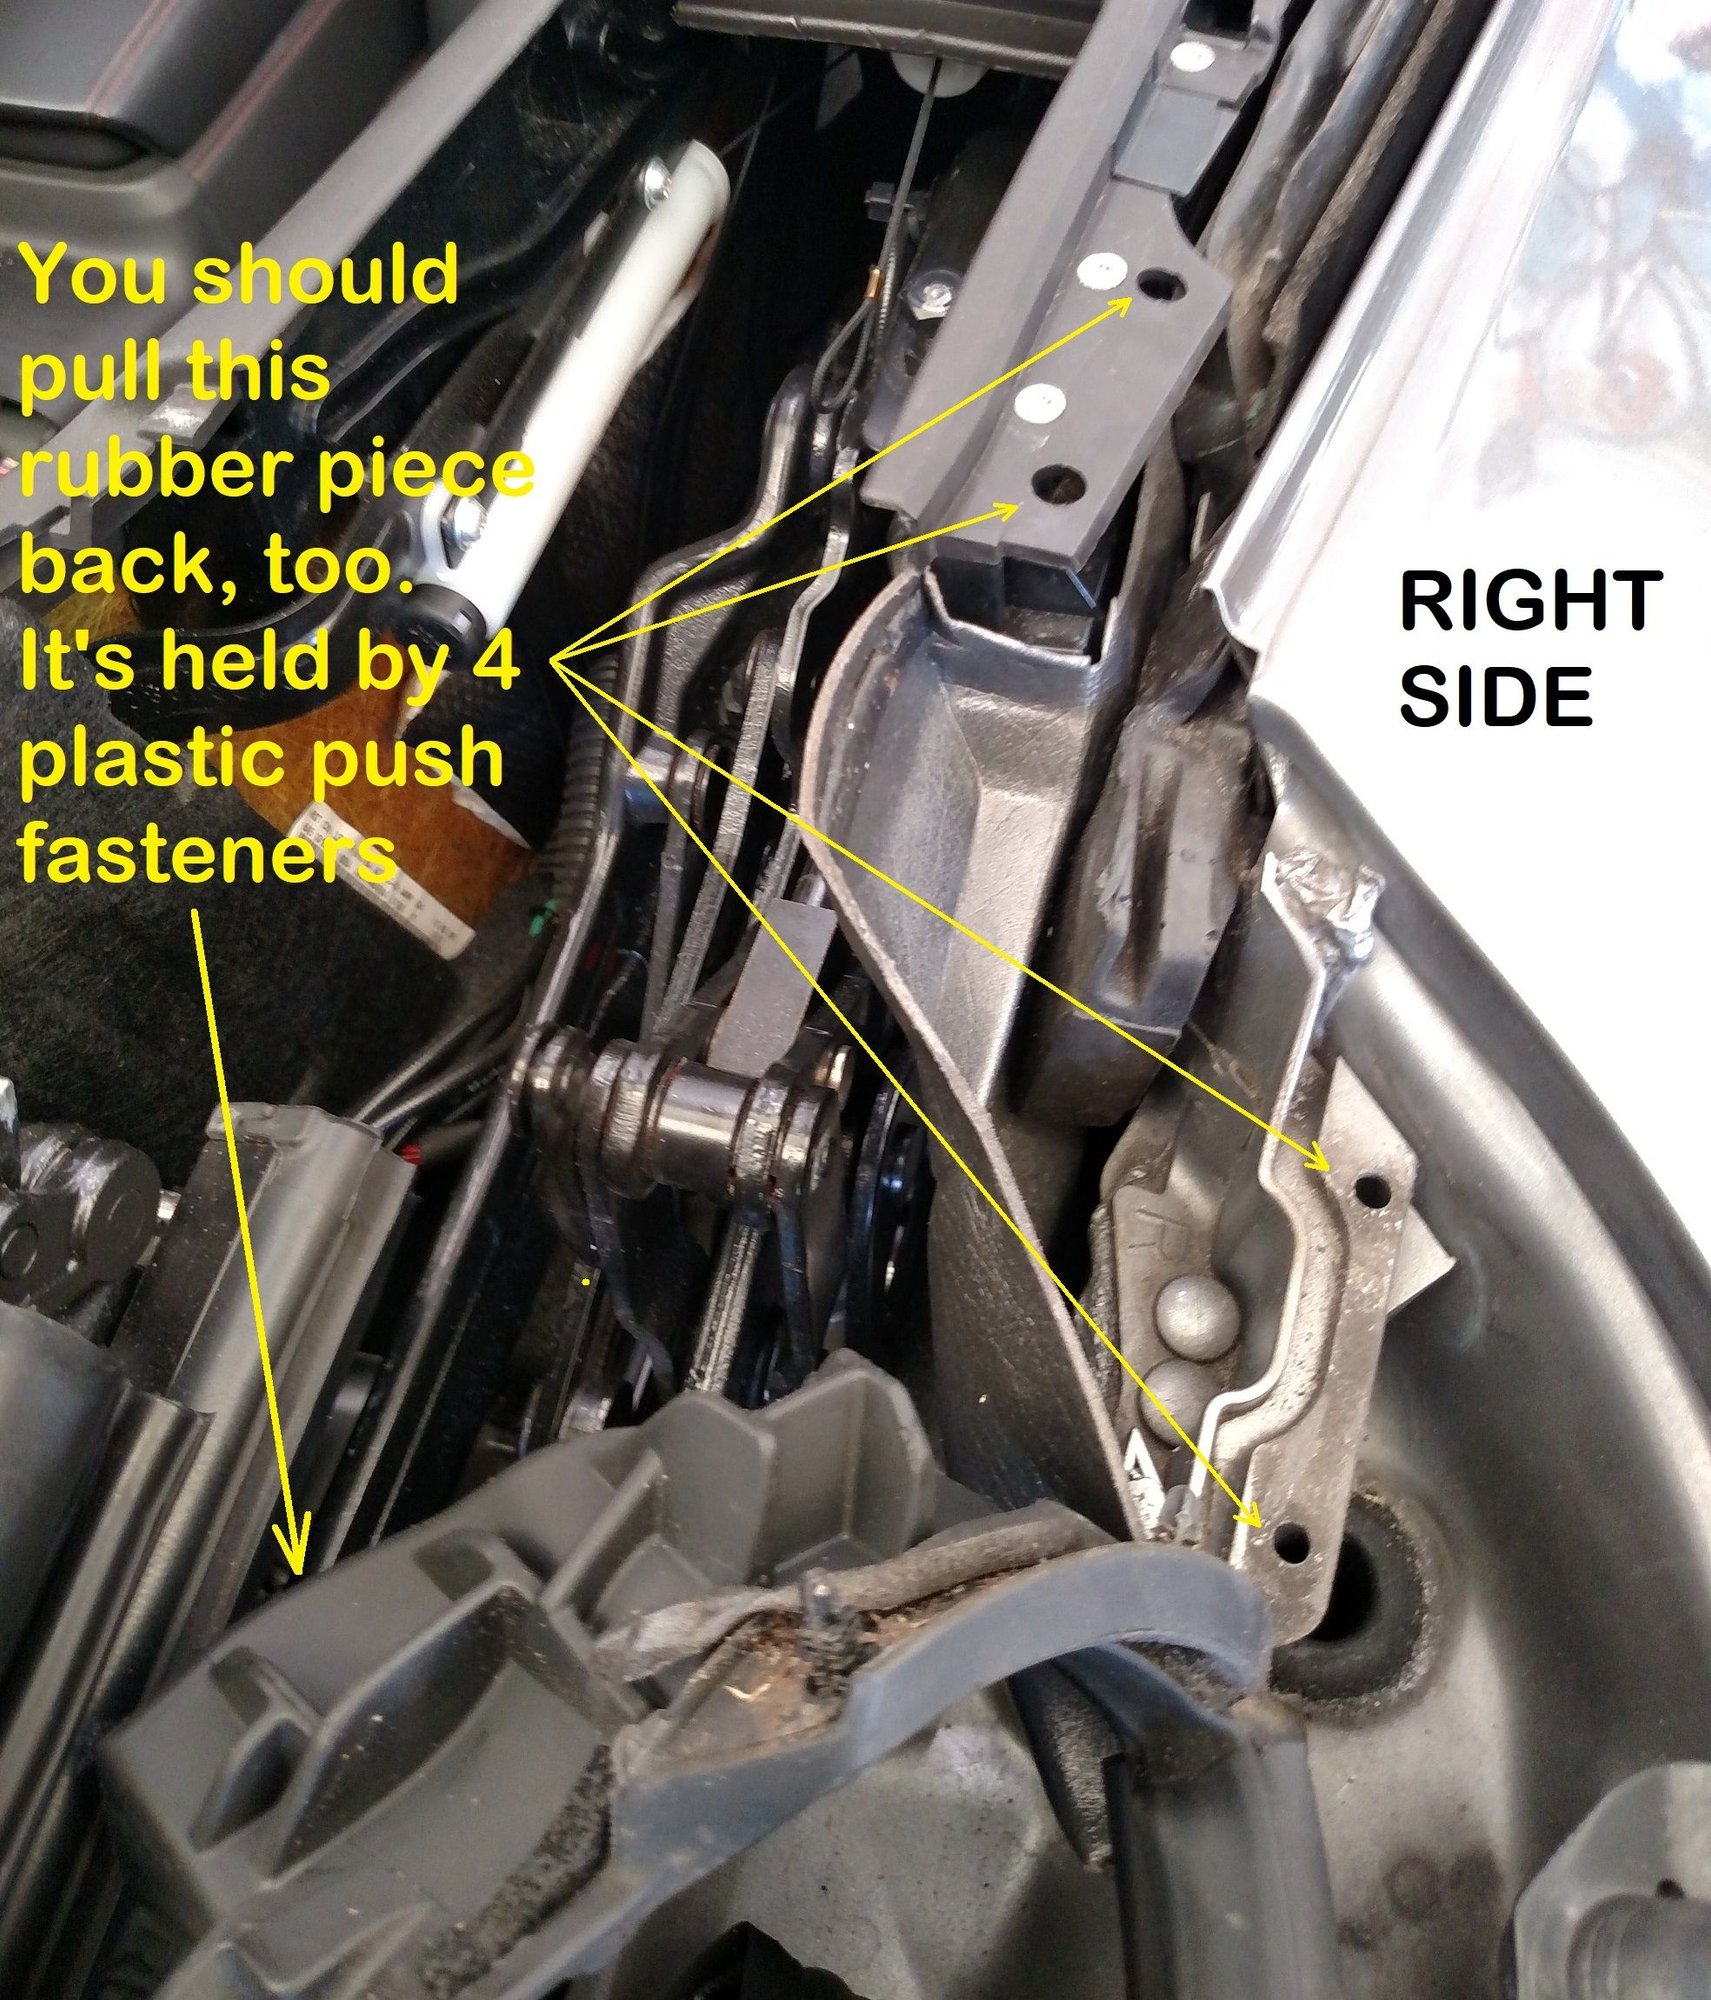
Undo the seat belts on the floor behind the front seats. (See the above referenced post for details.) Next, remove the rear seat belt latches:
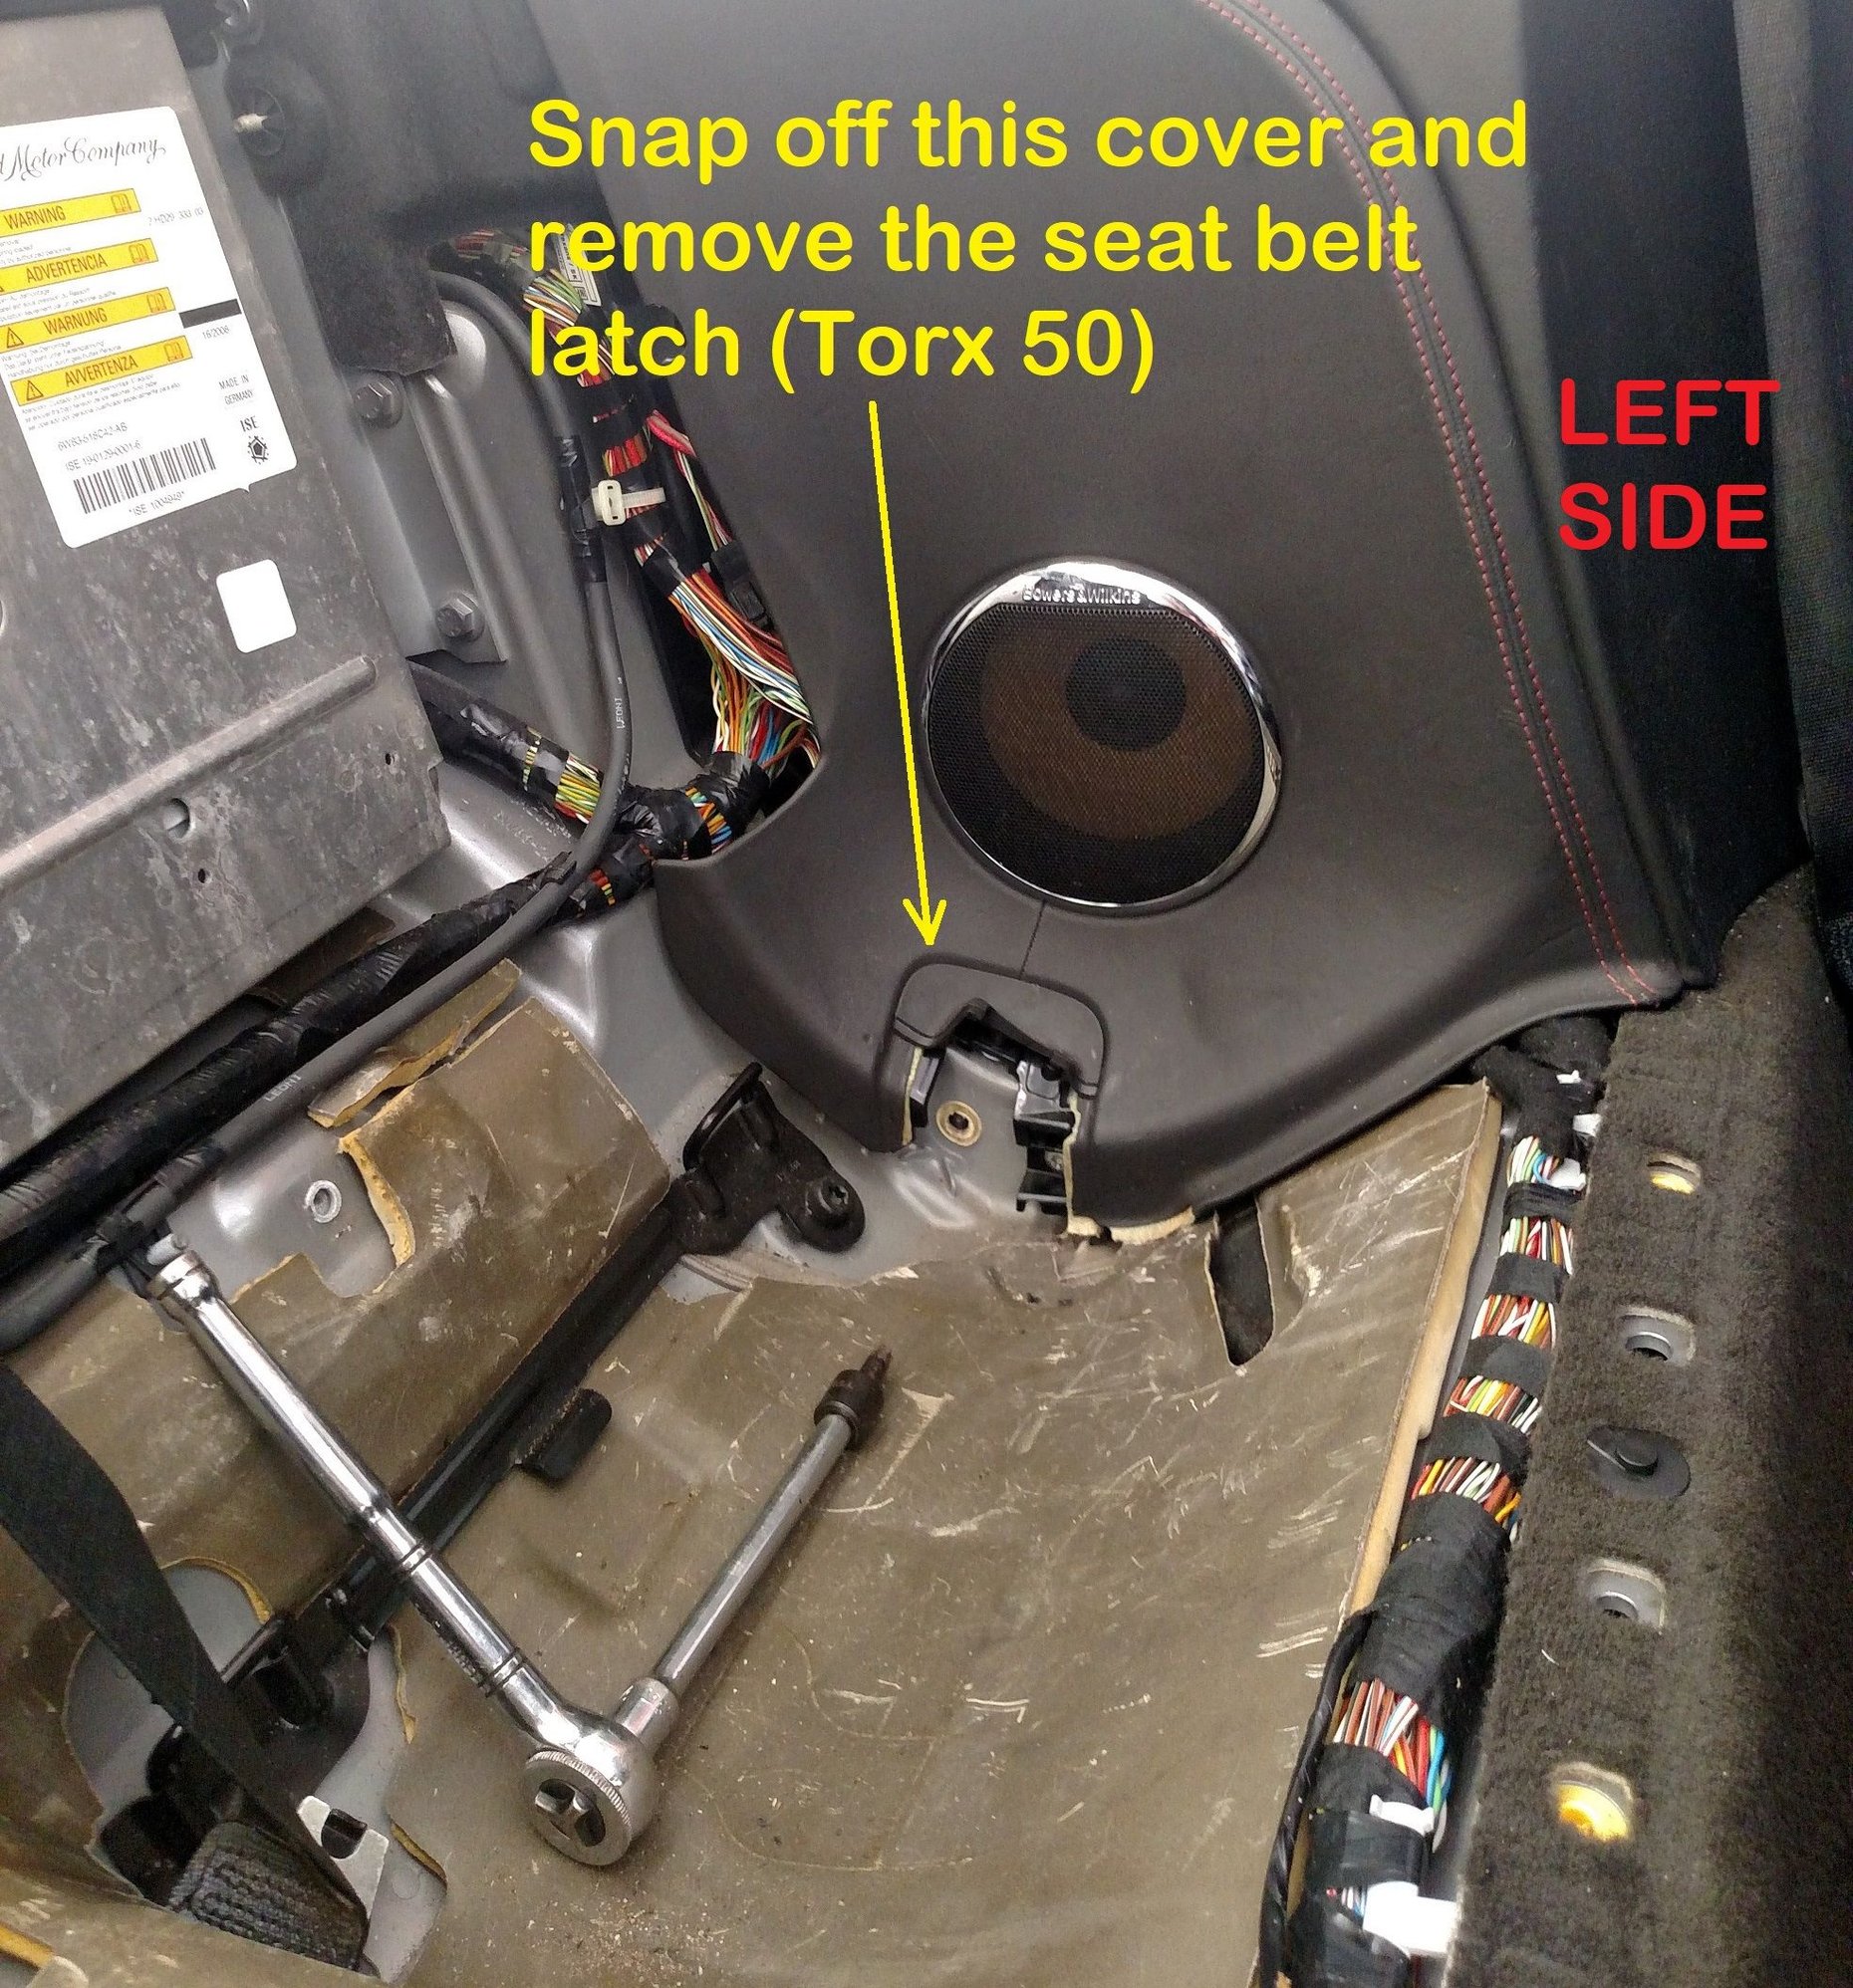
Remove the 5 screws holding the rear side interior panels.
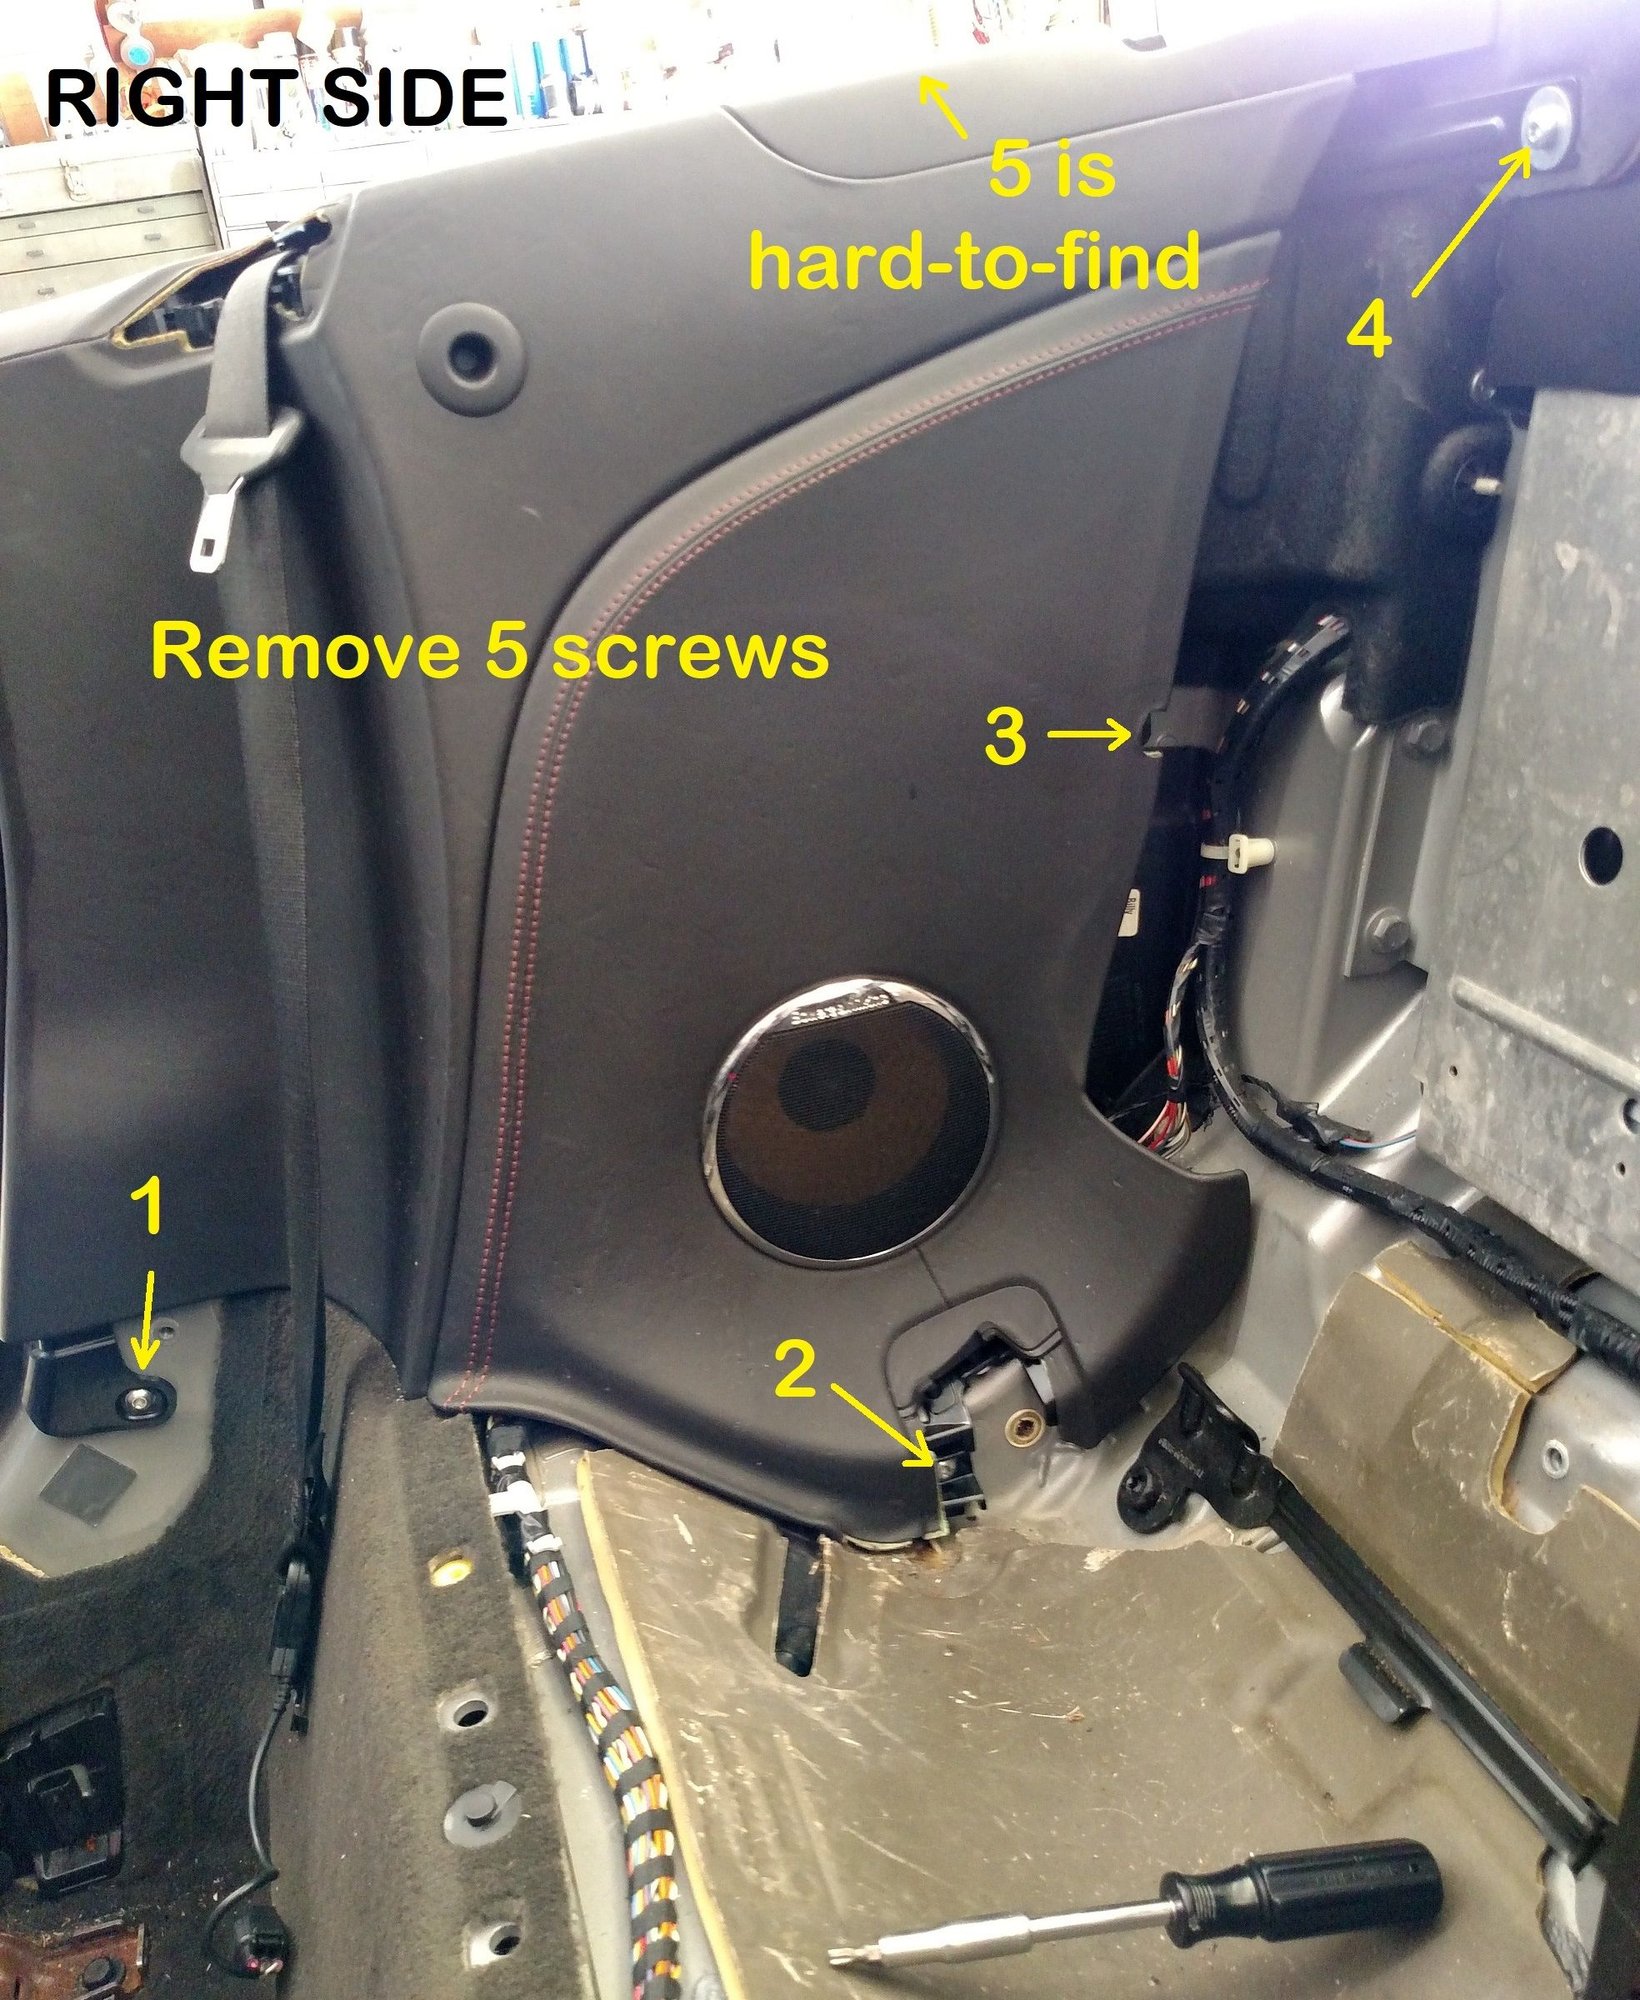
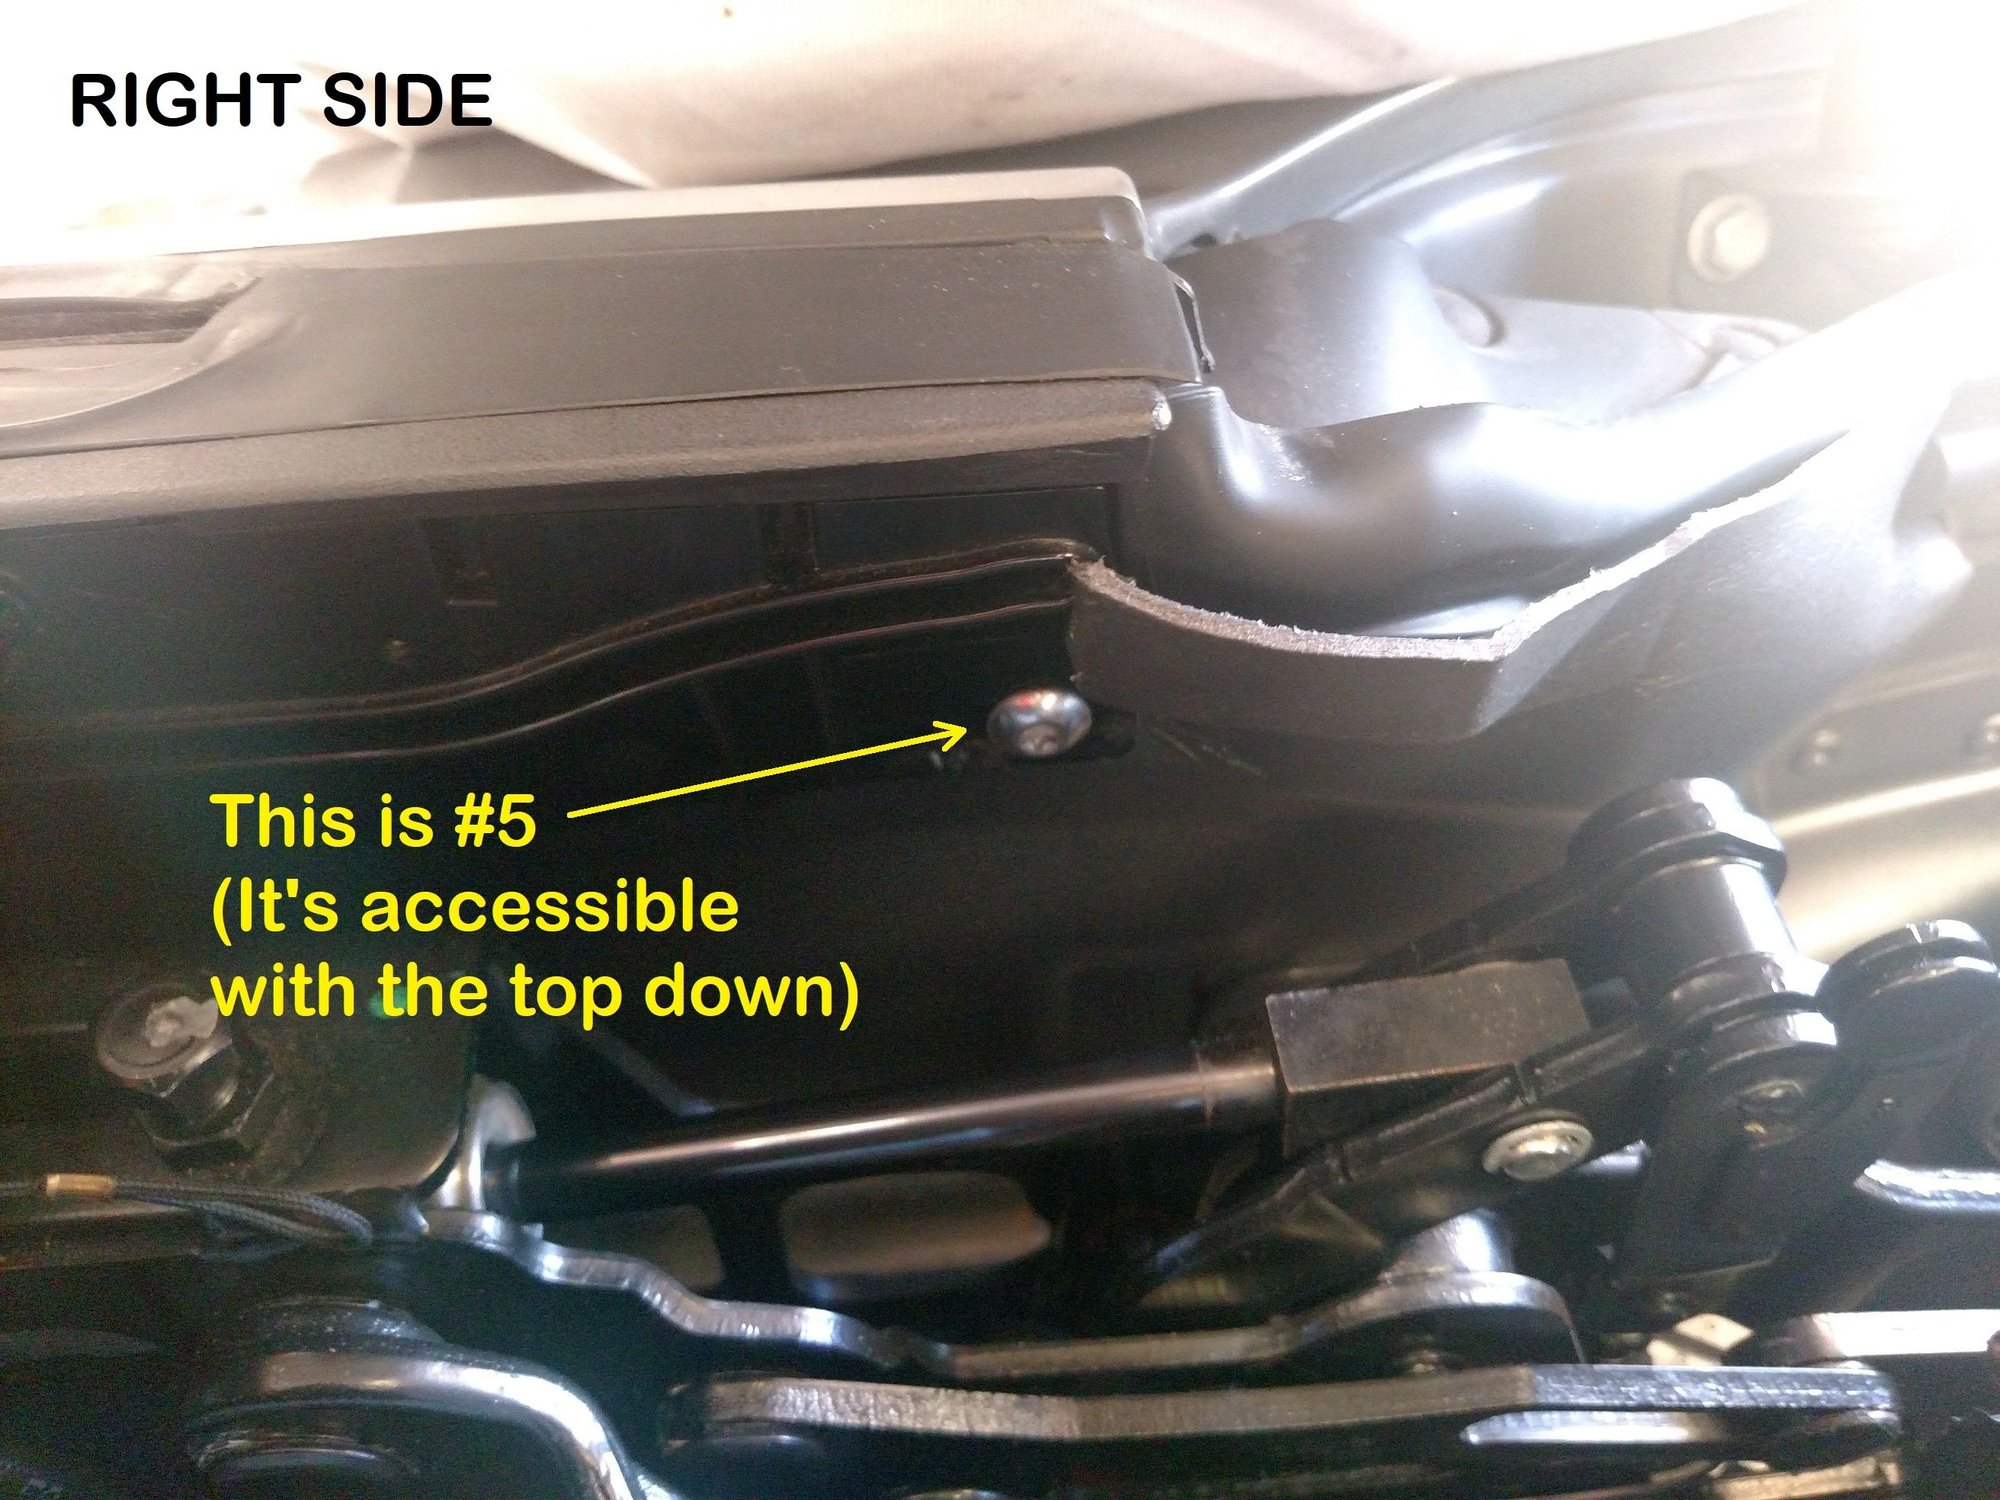
Next, you have to remove the upper seat belt guide. First is left side, then right with bolts removed:
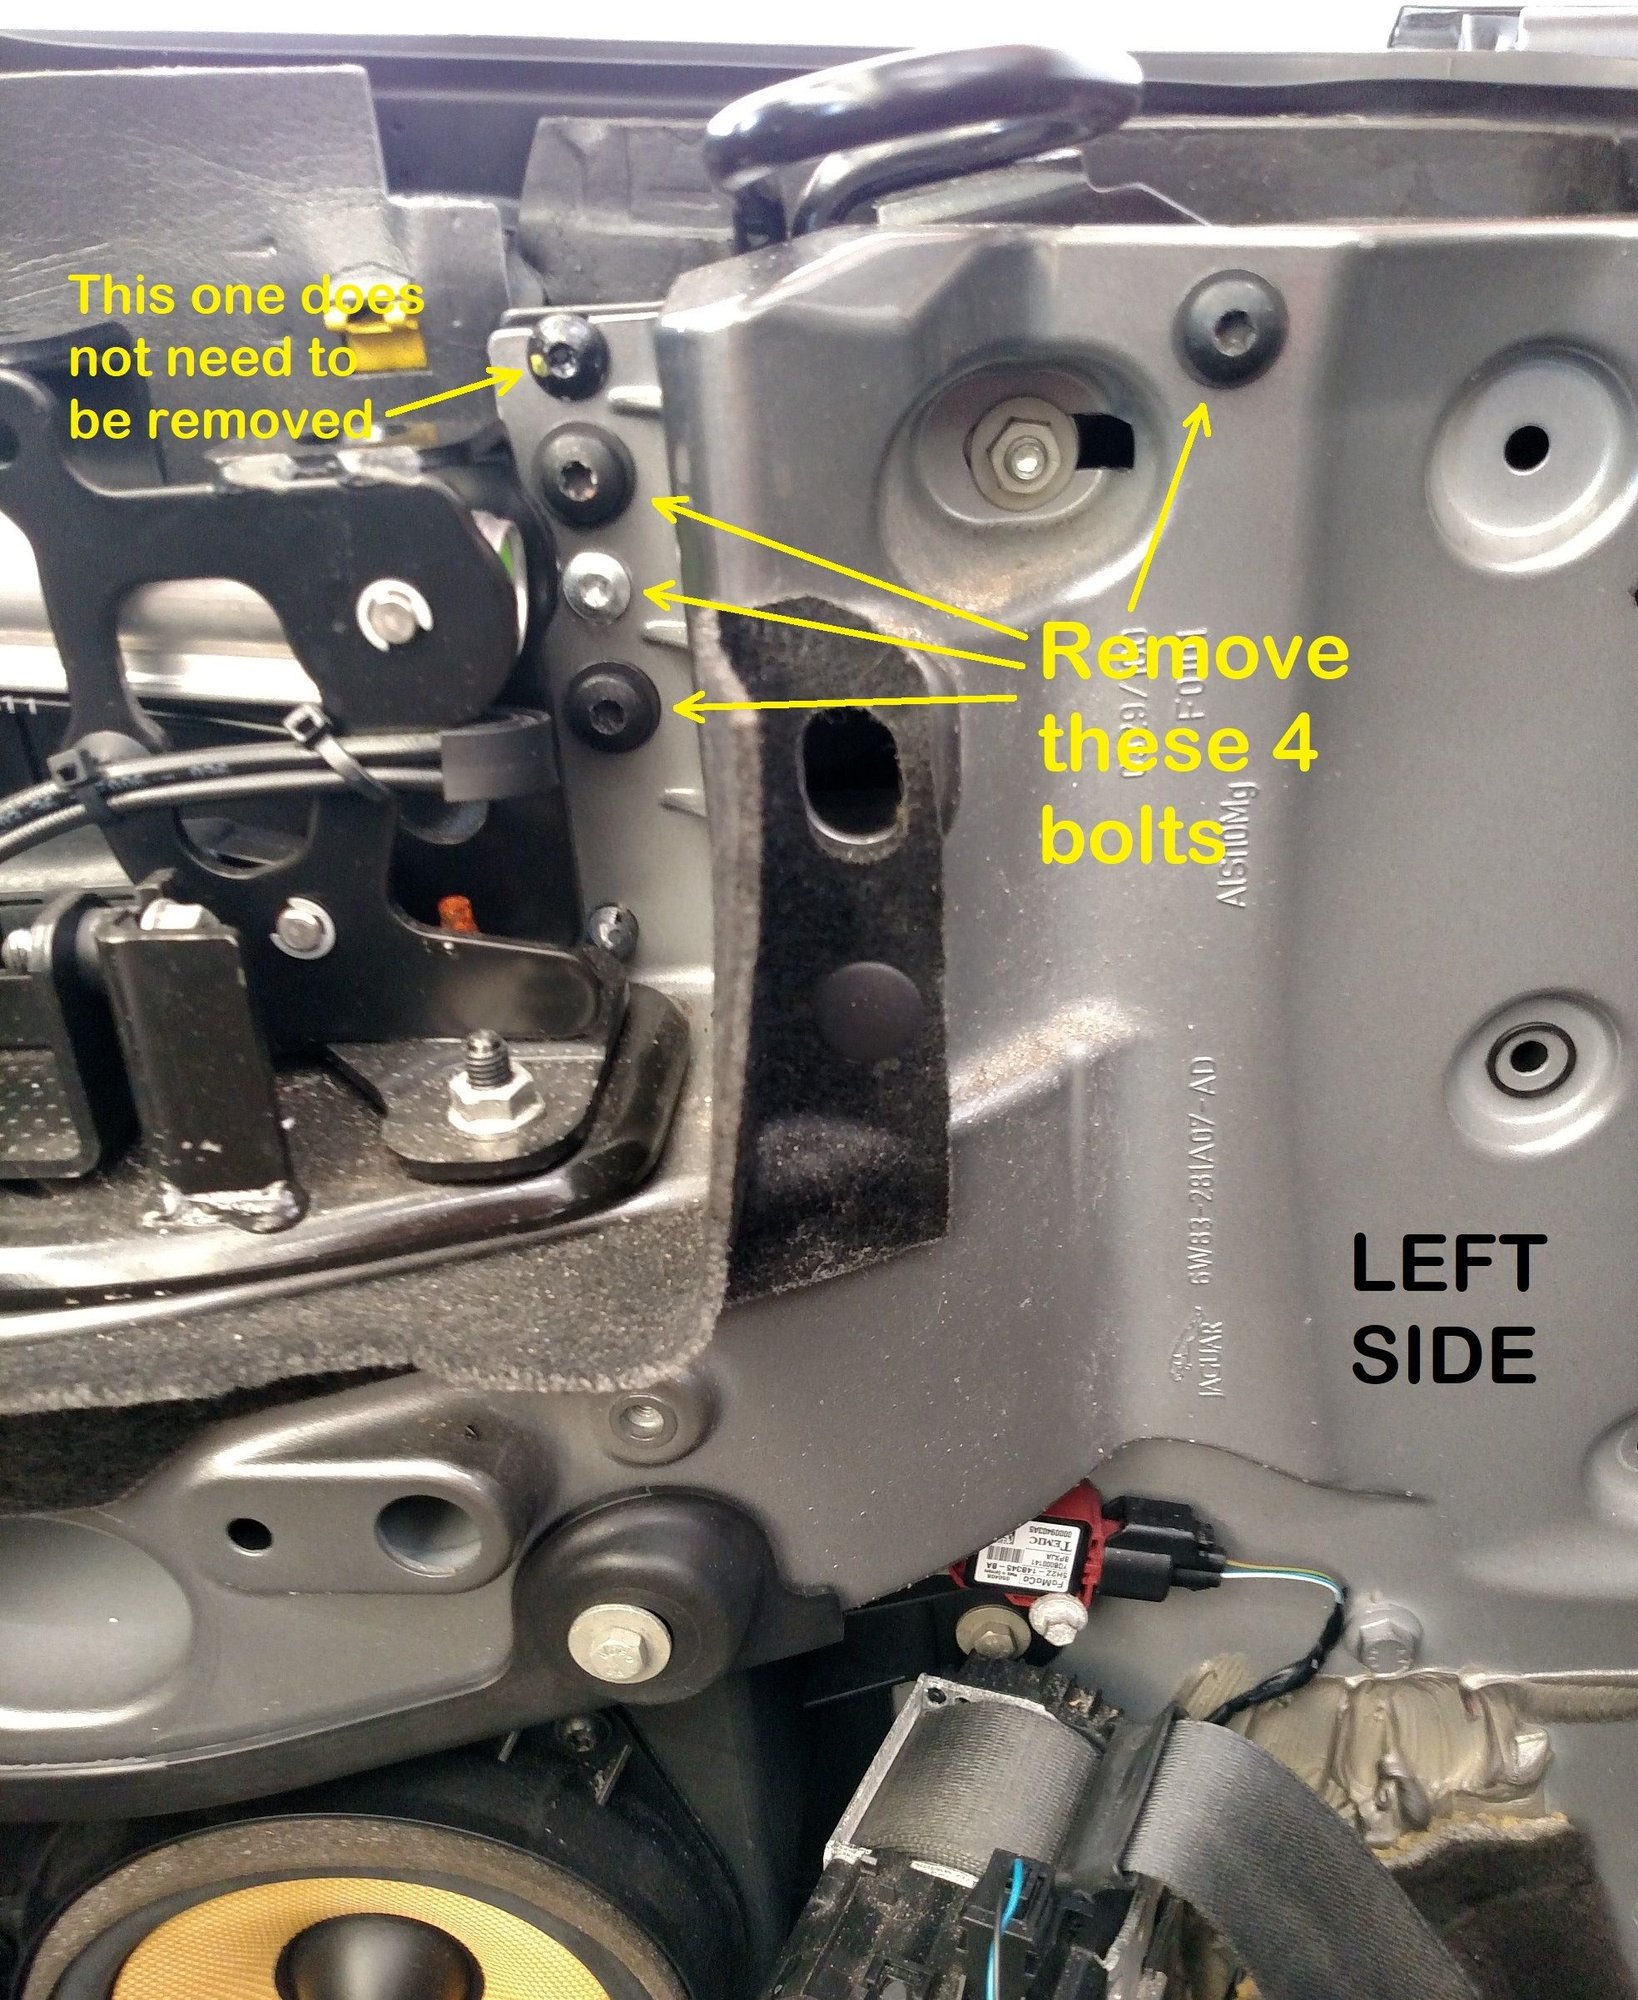
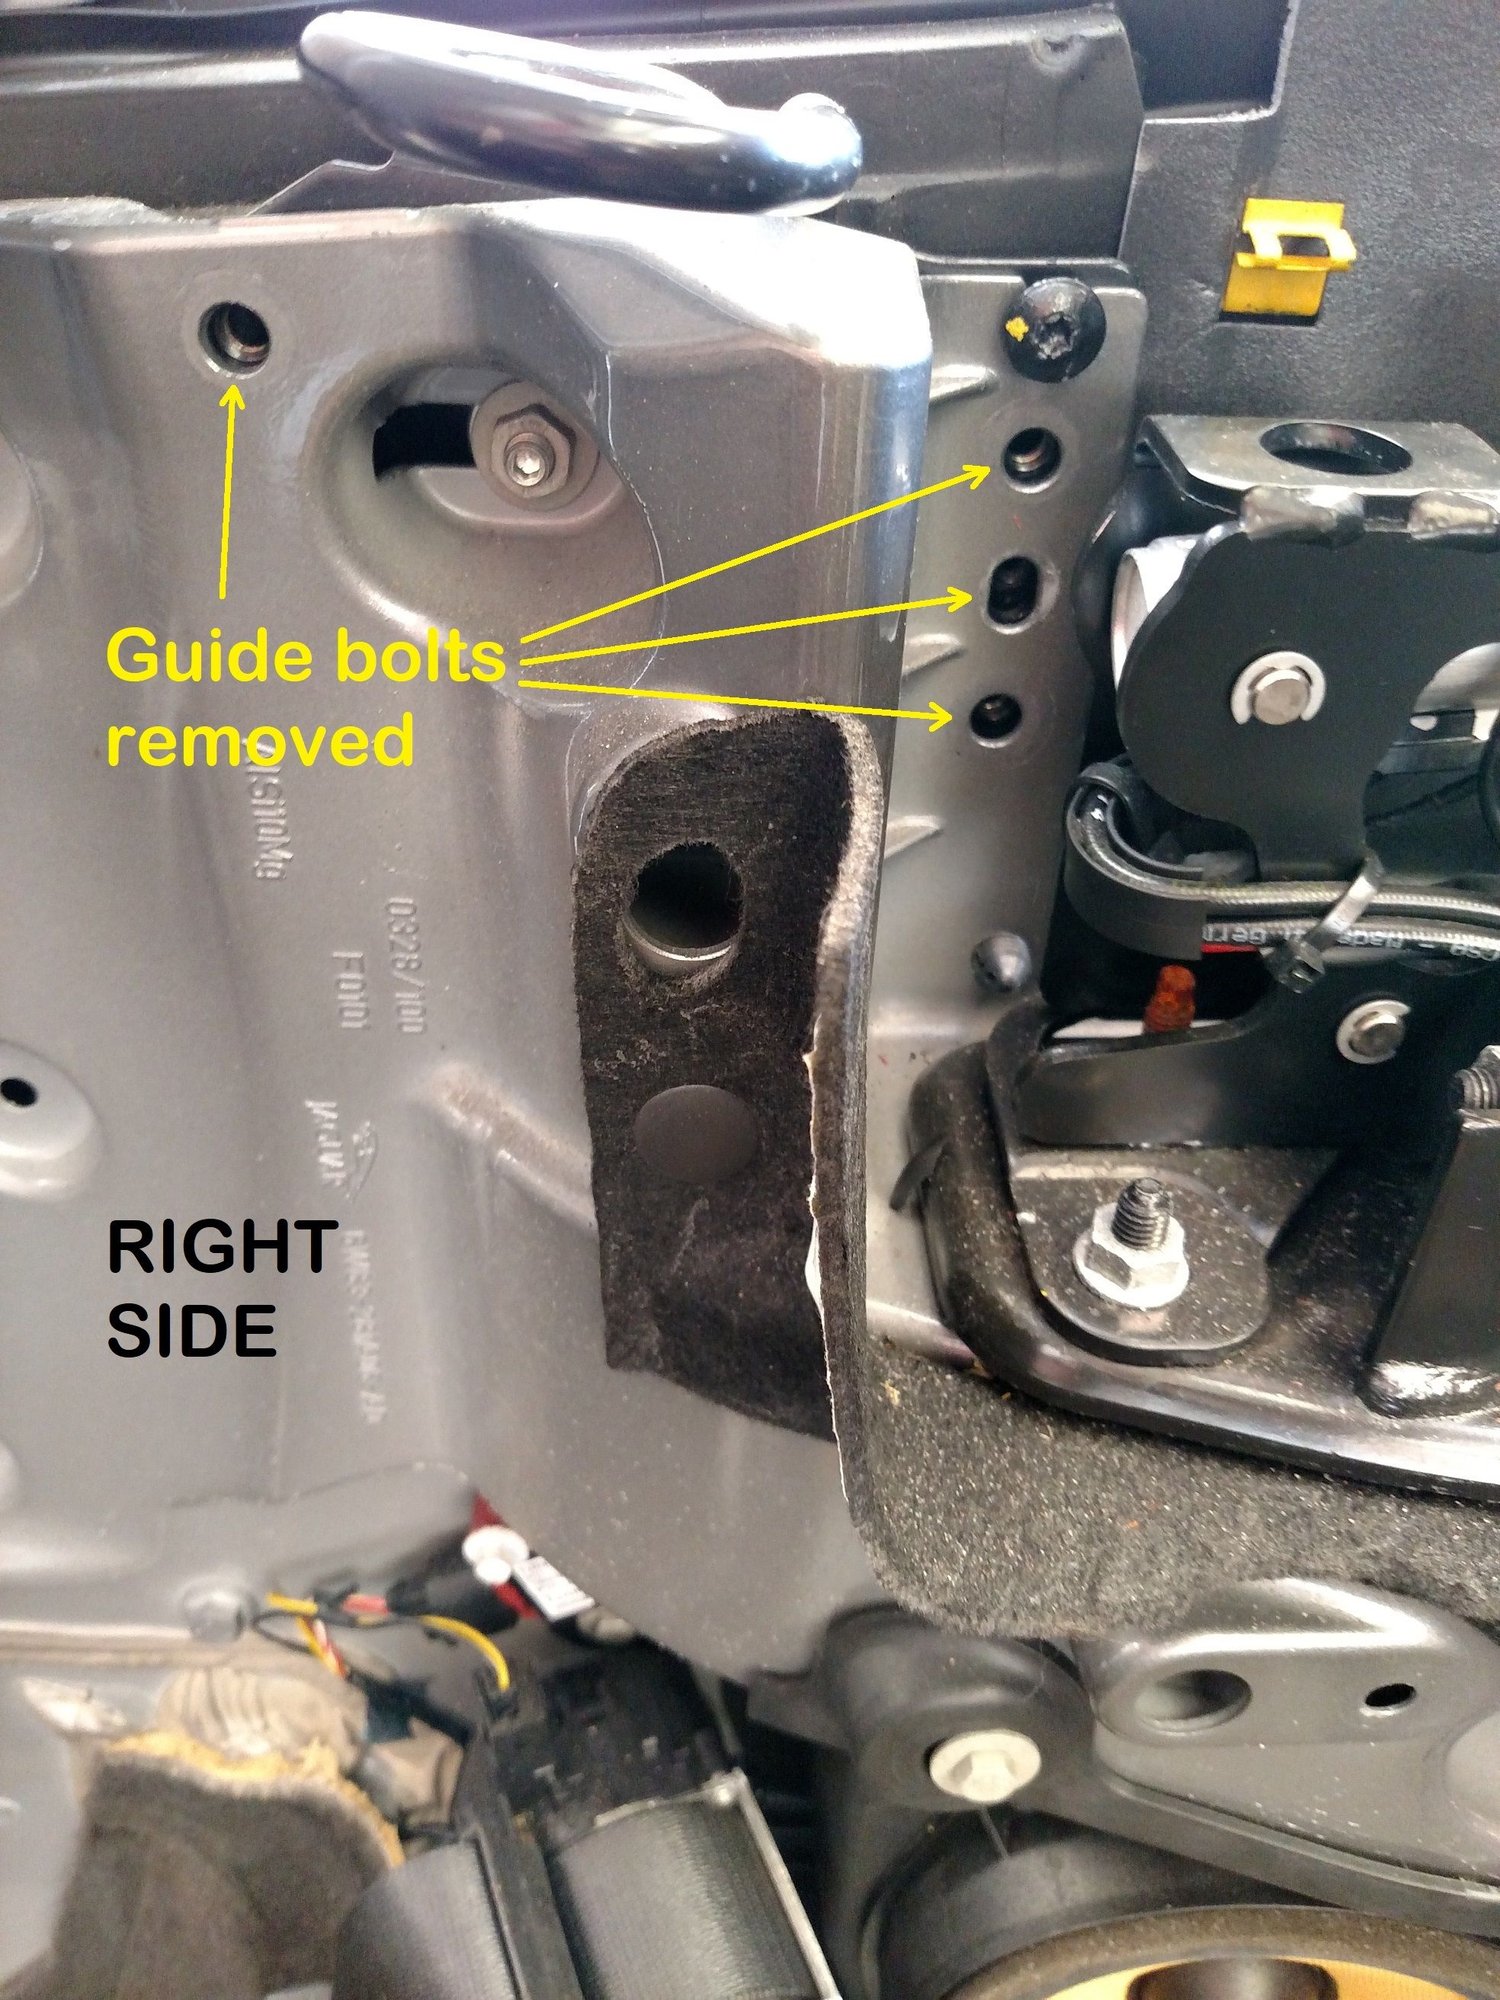
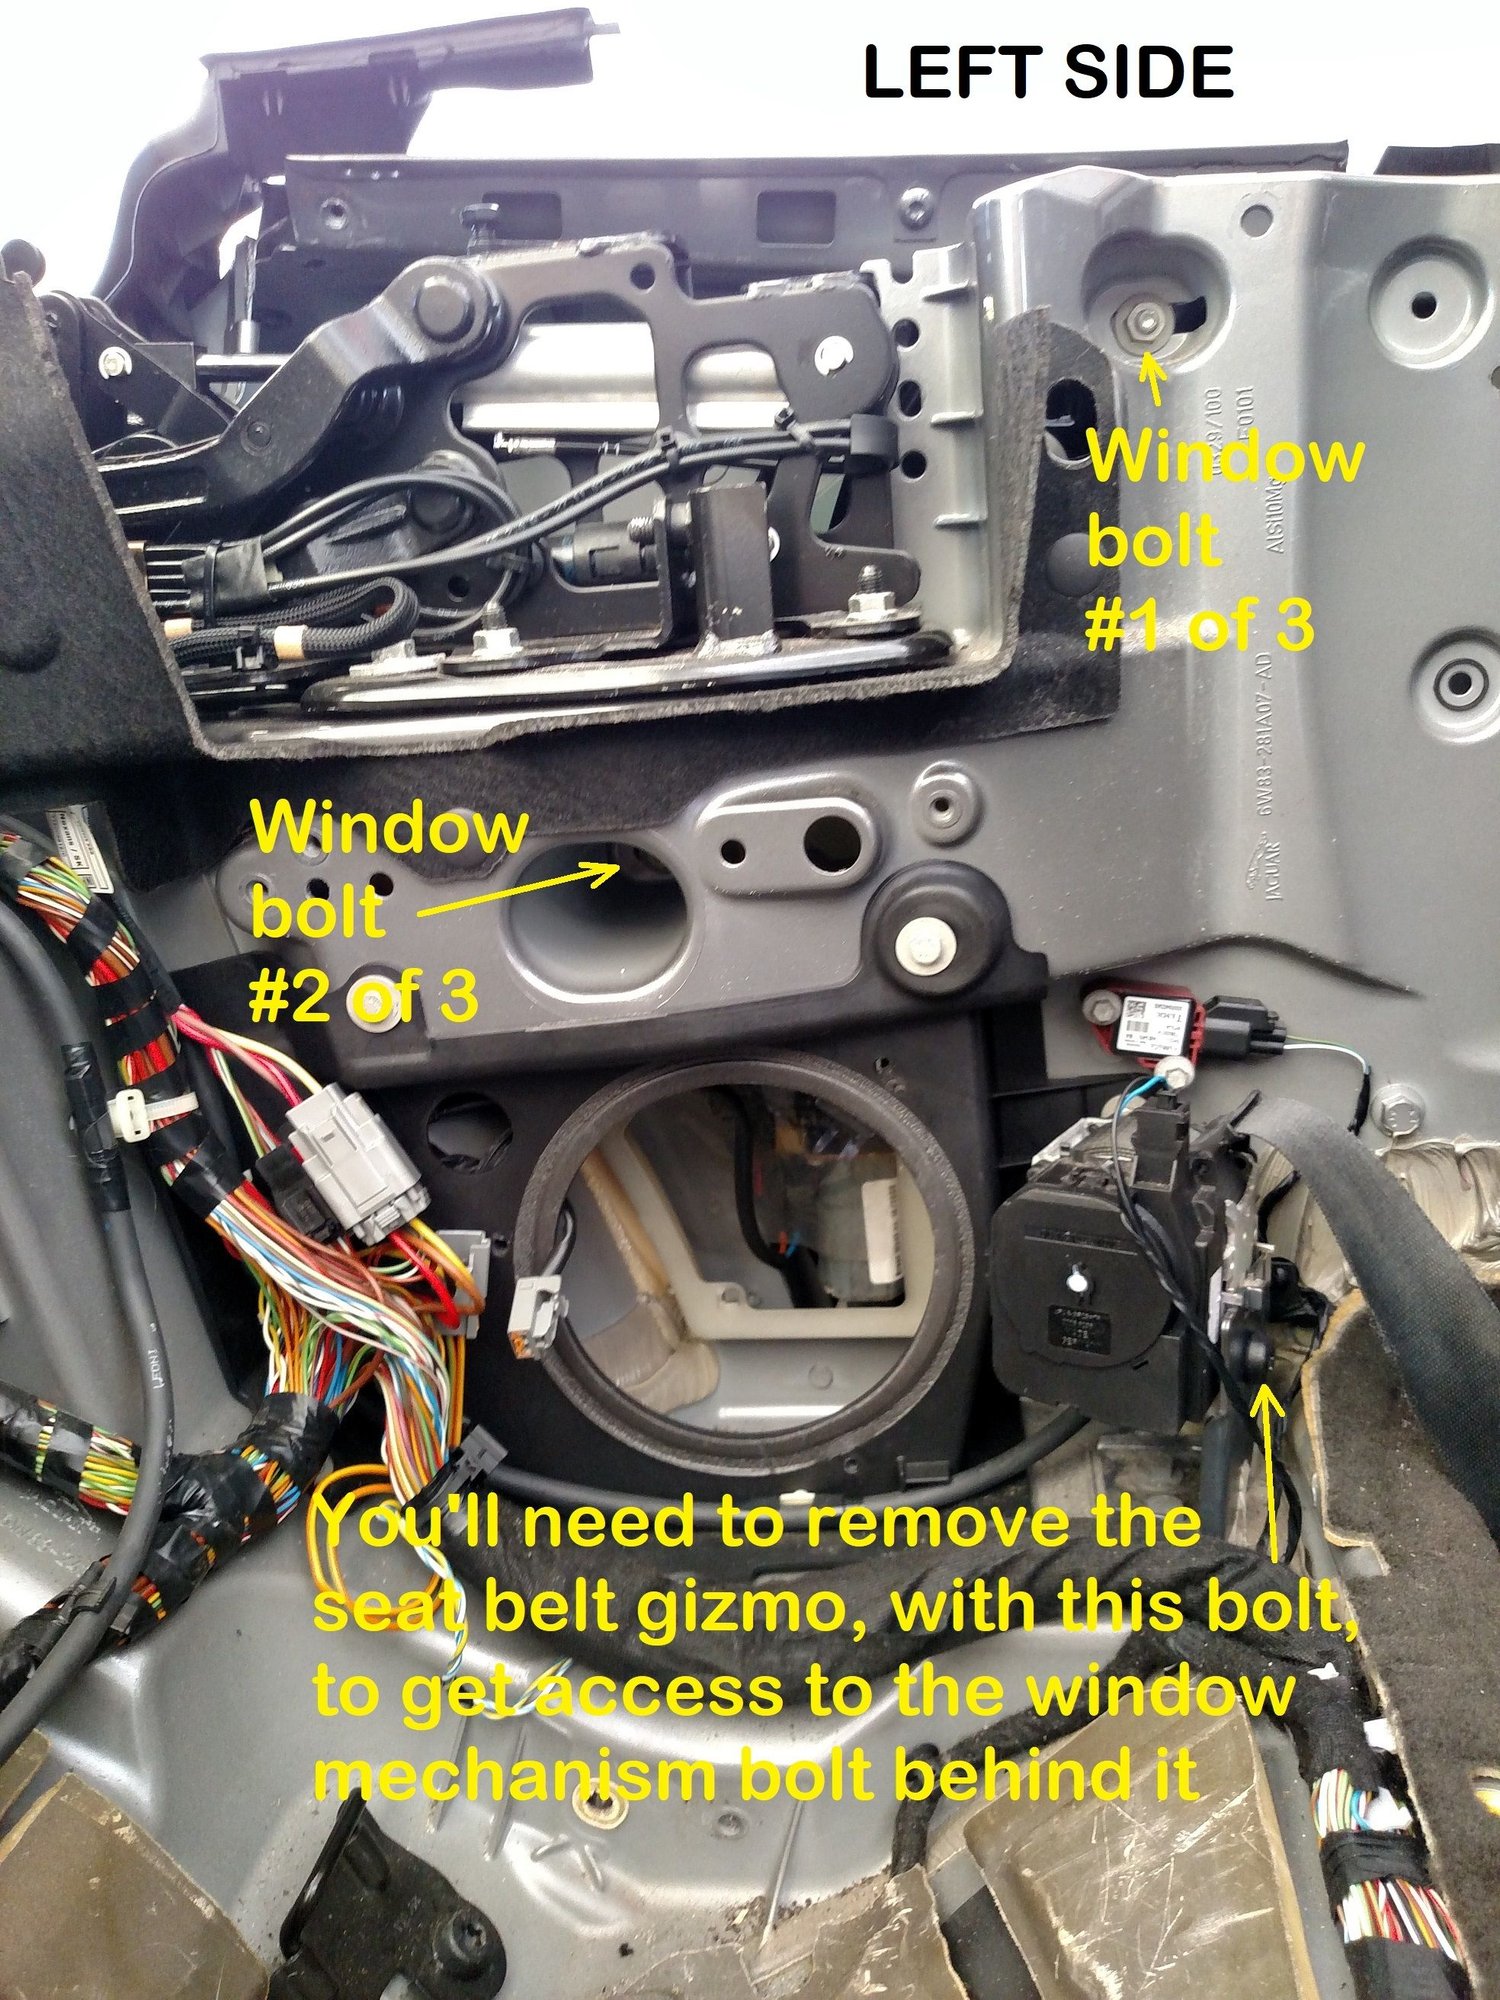
Next, there's 2 bolts that hold the inner window guide. One's kind of hidden:
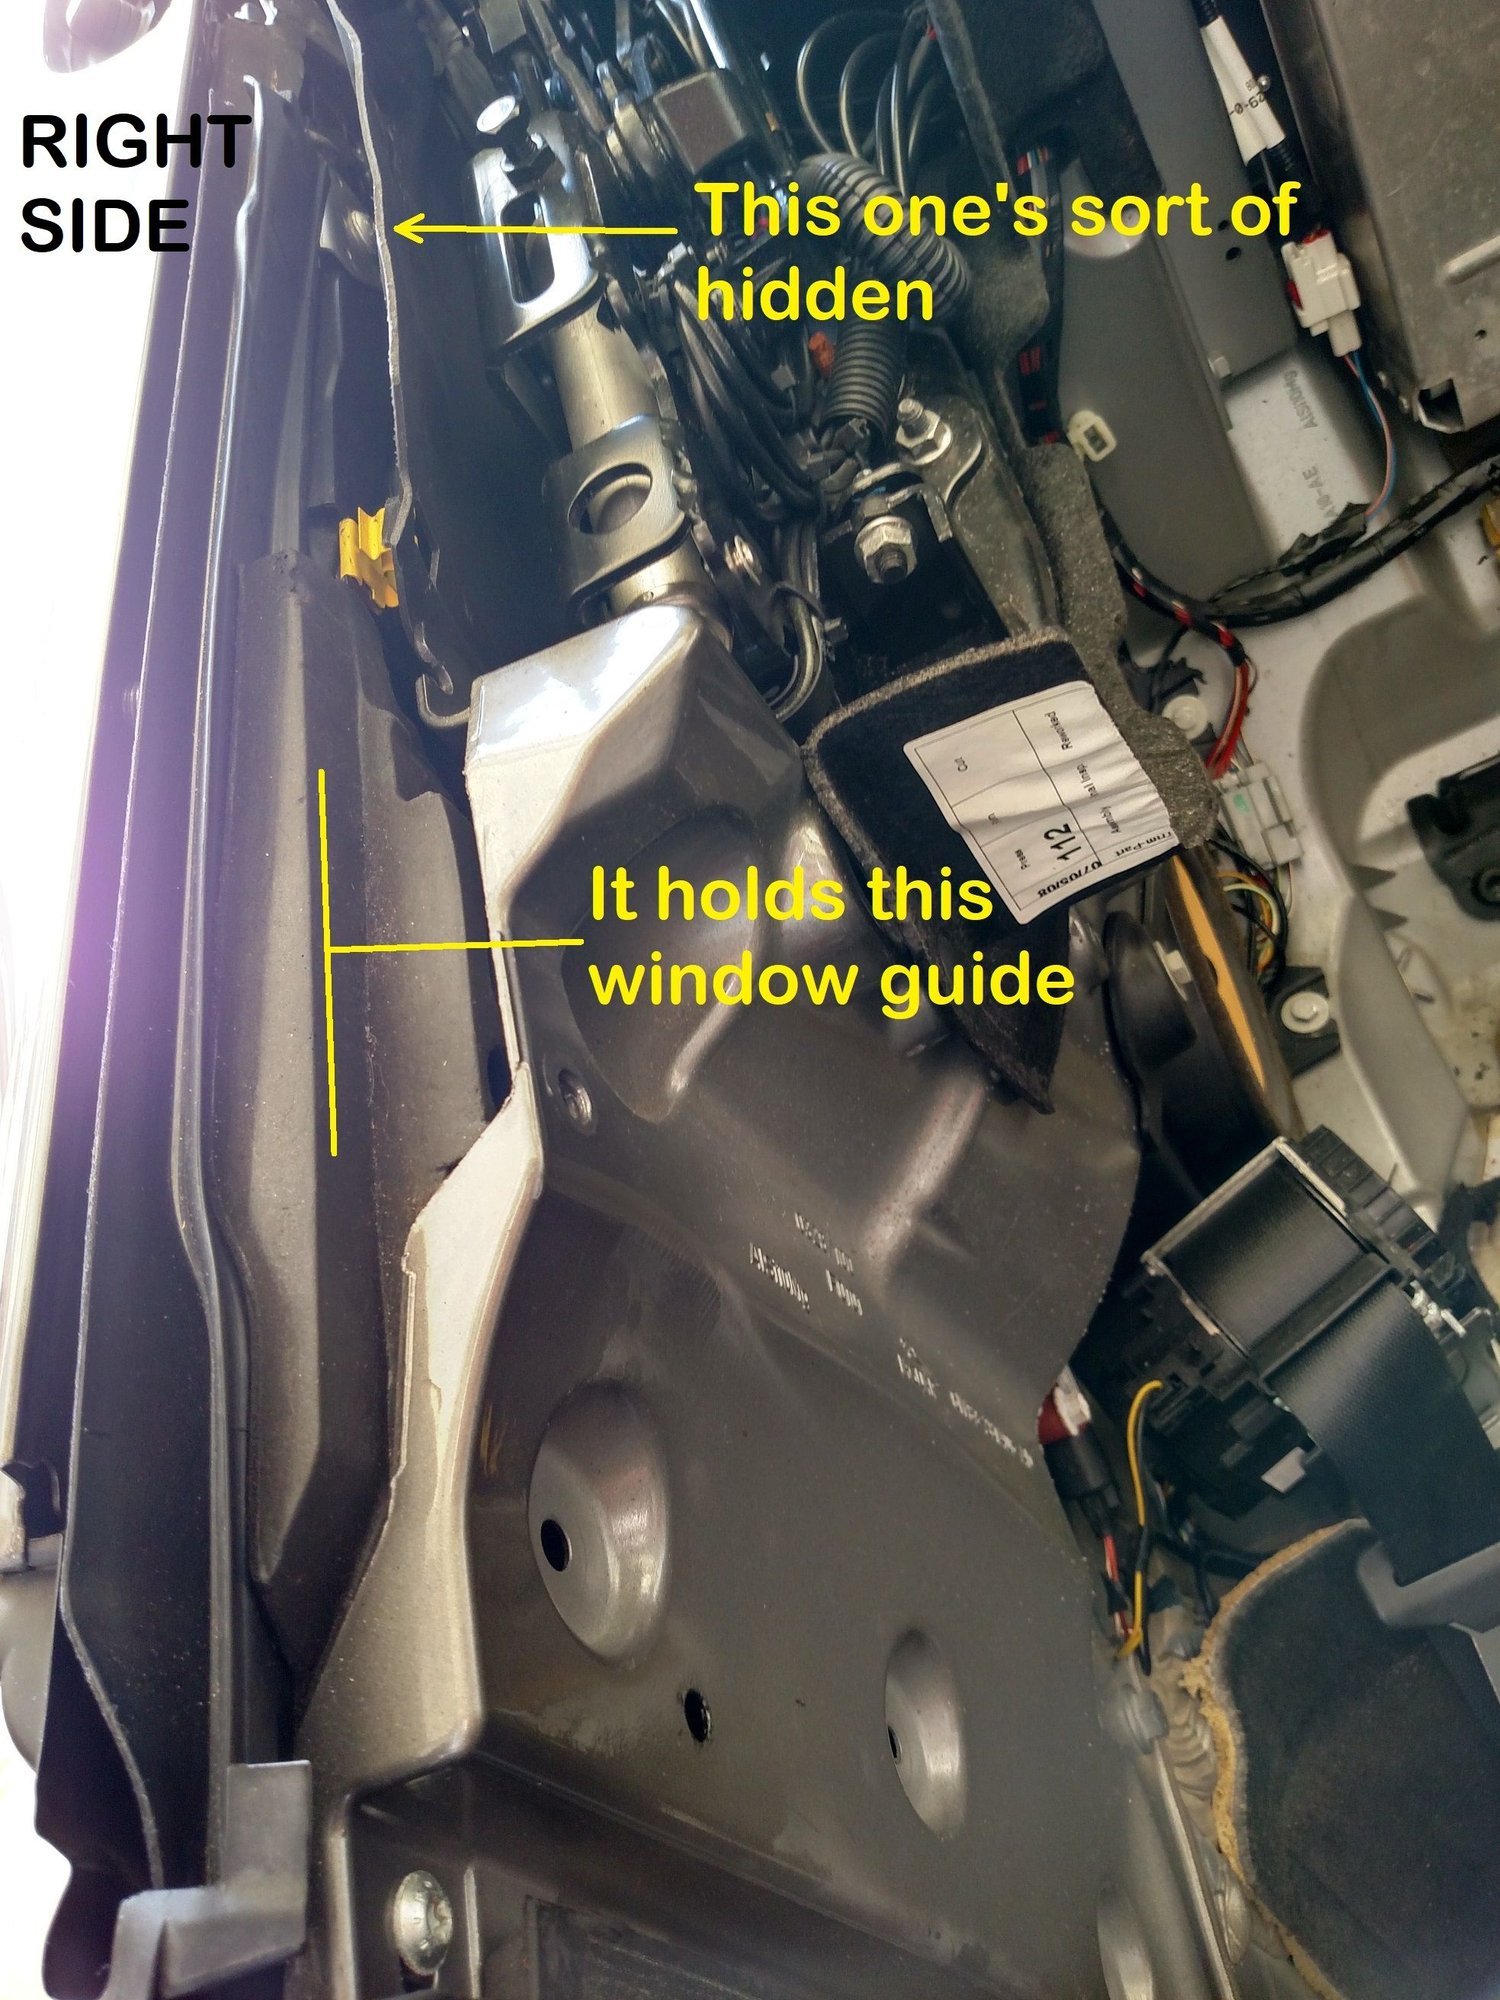
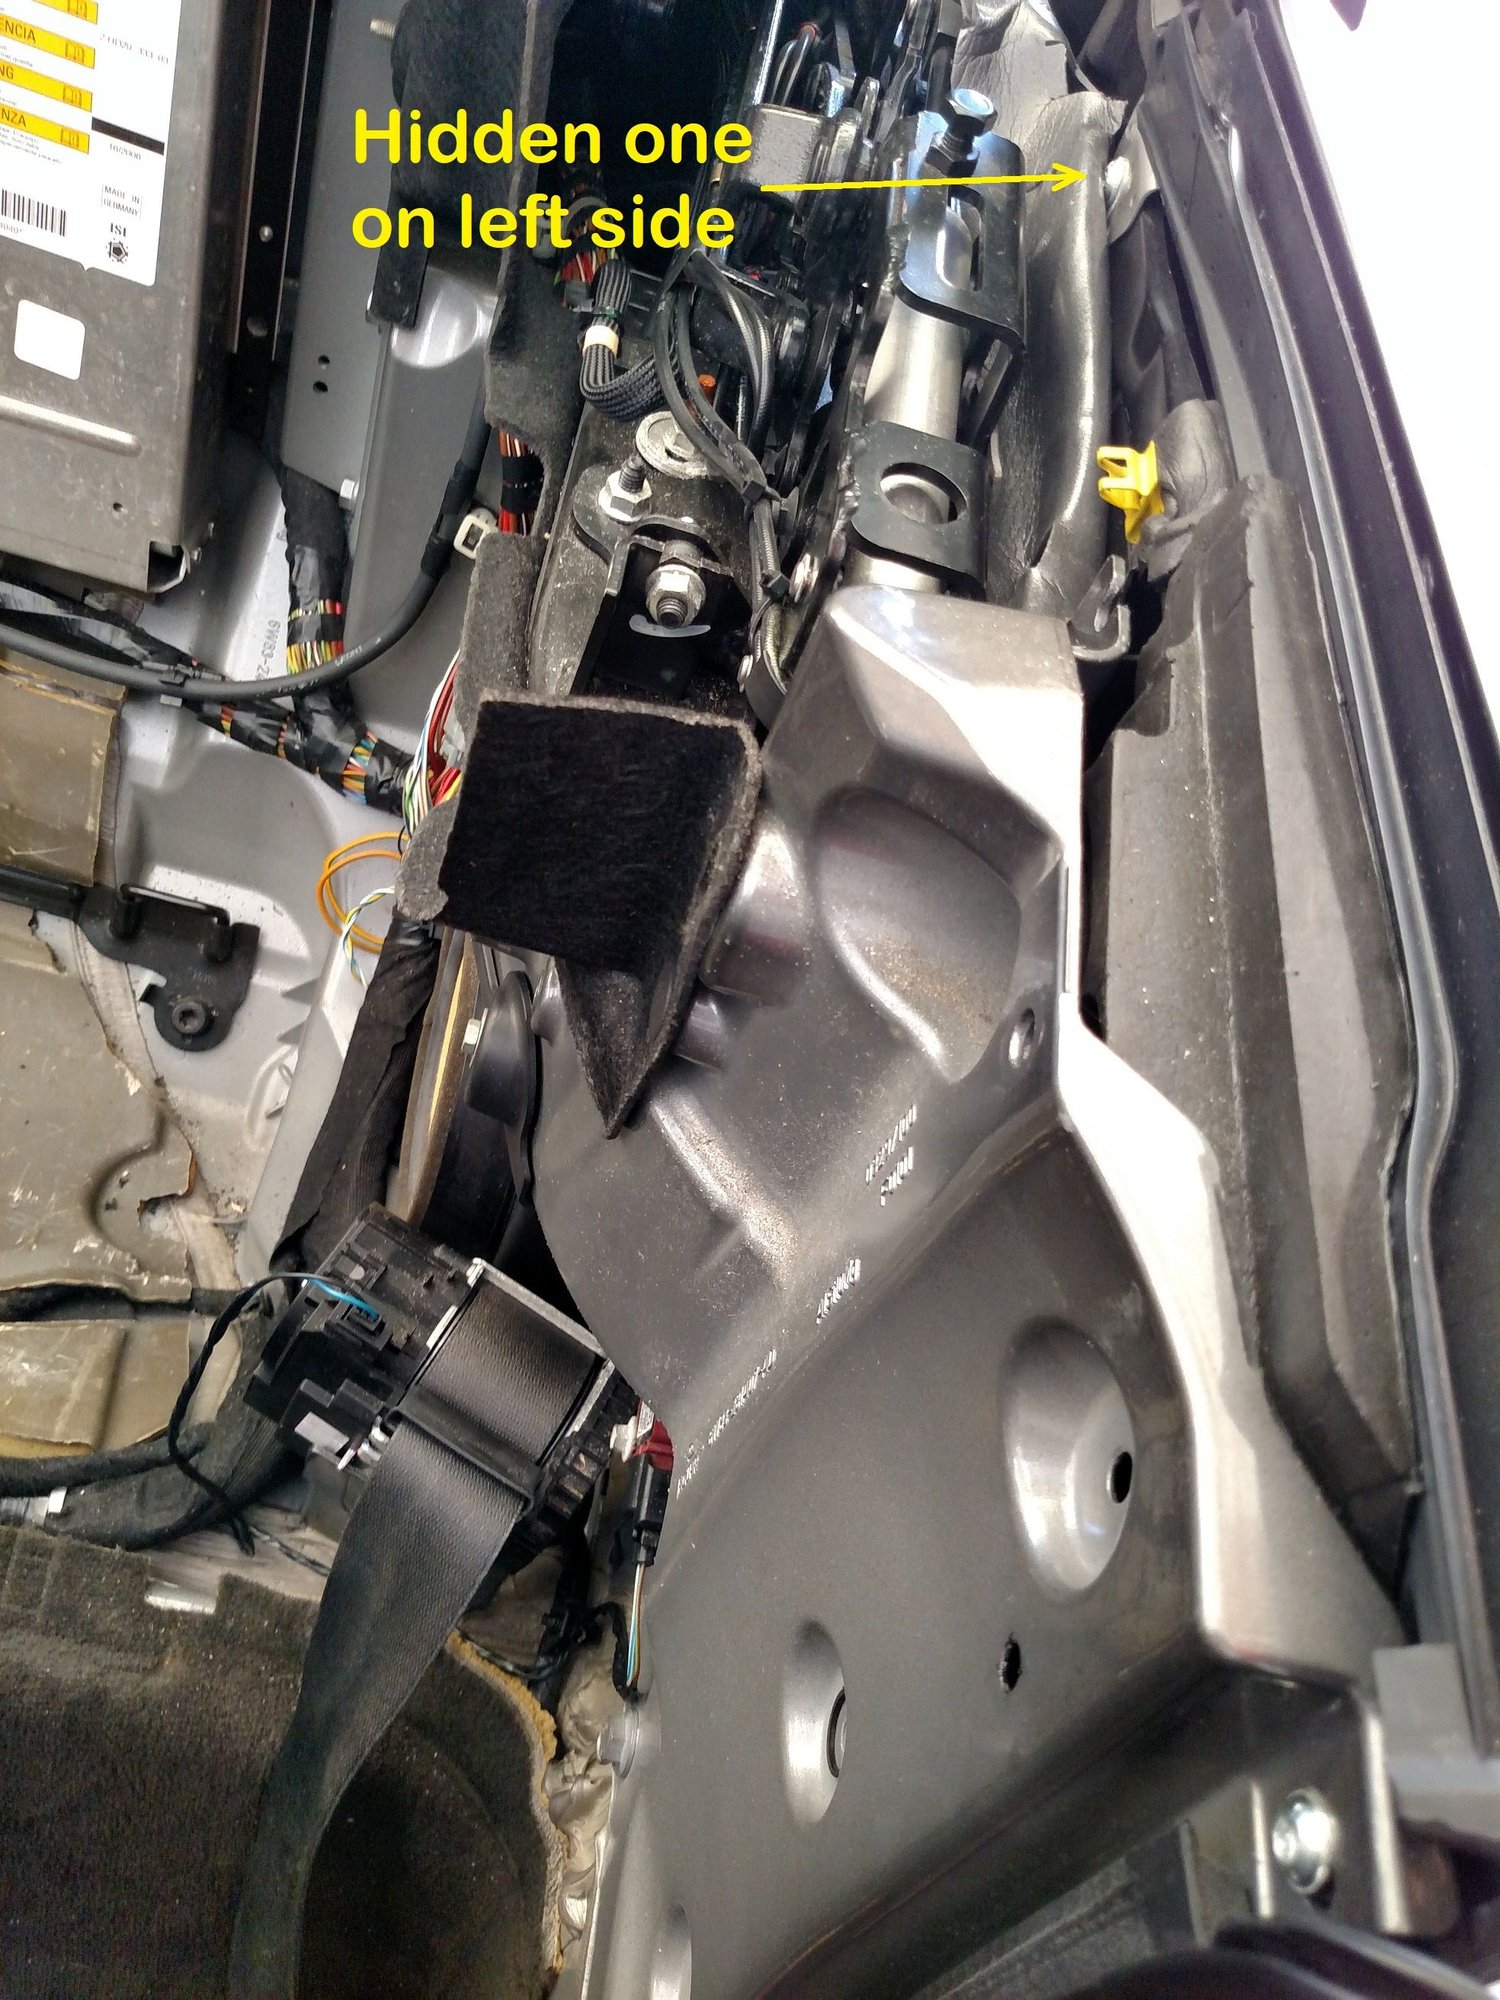
There's another, outer window guide, that has 3 bolts:
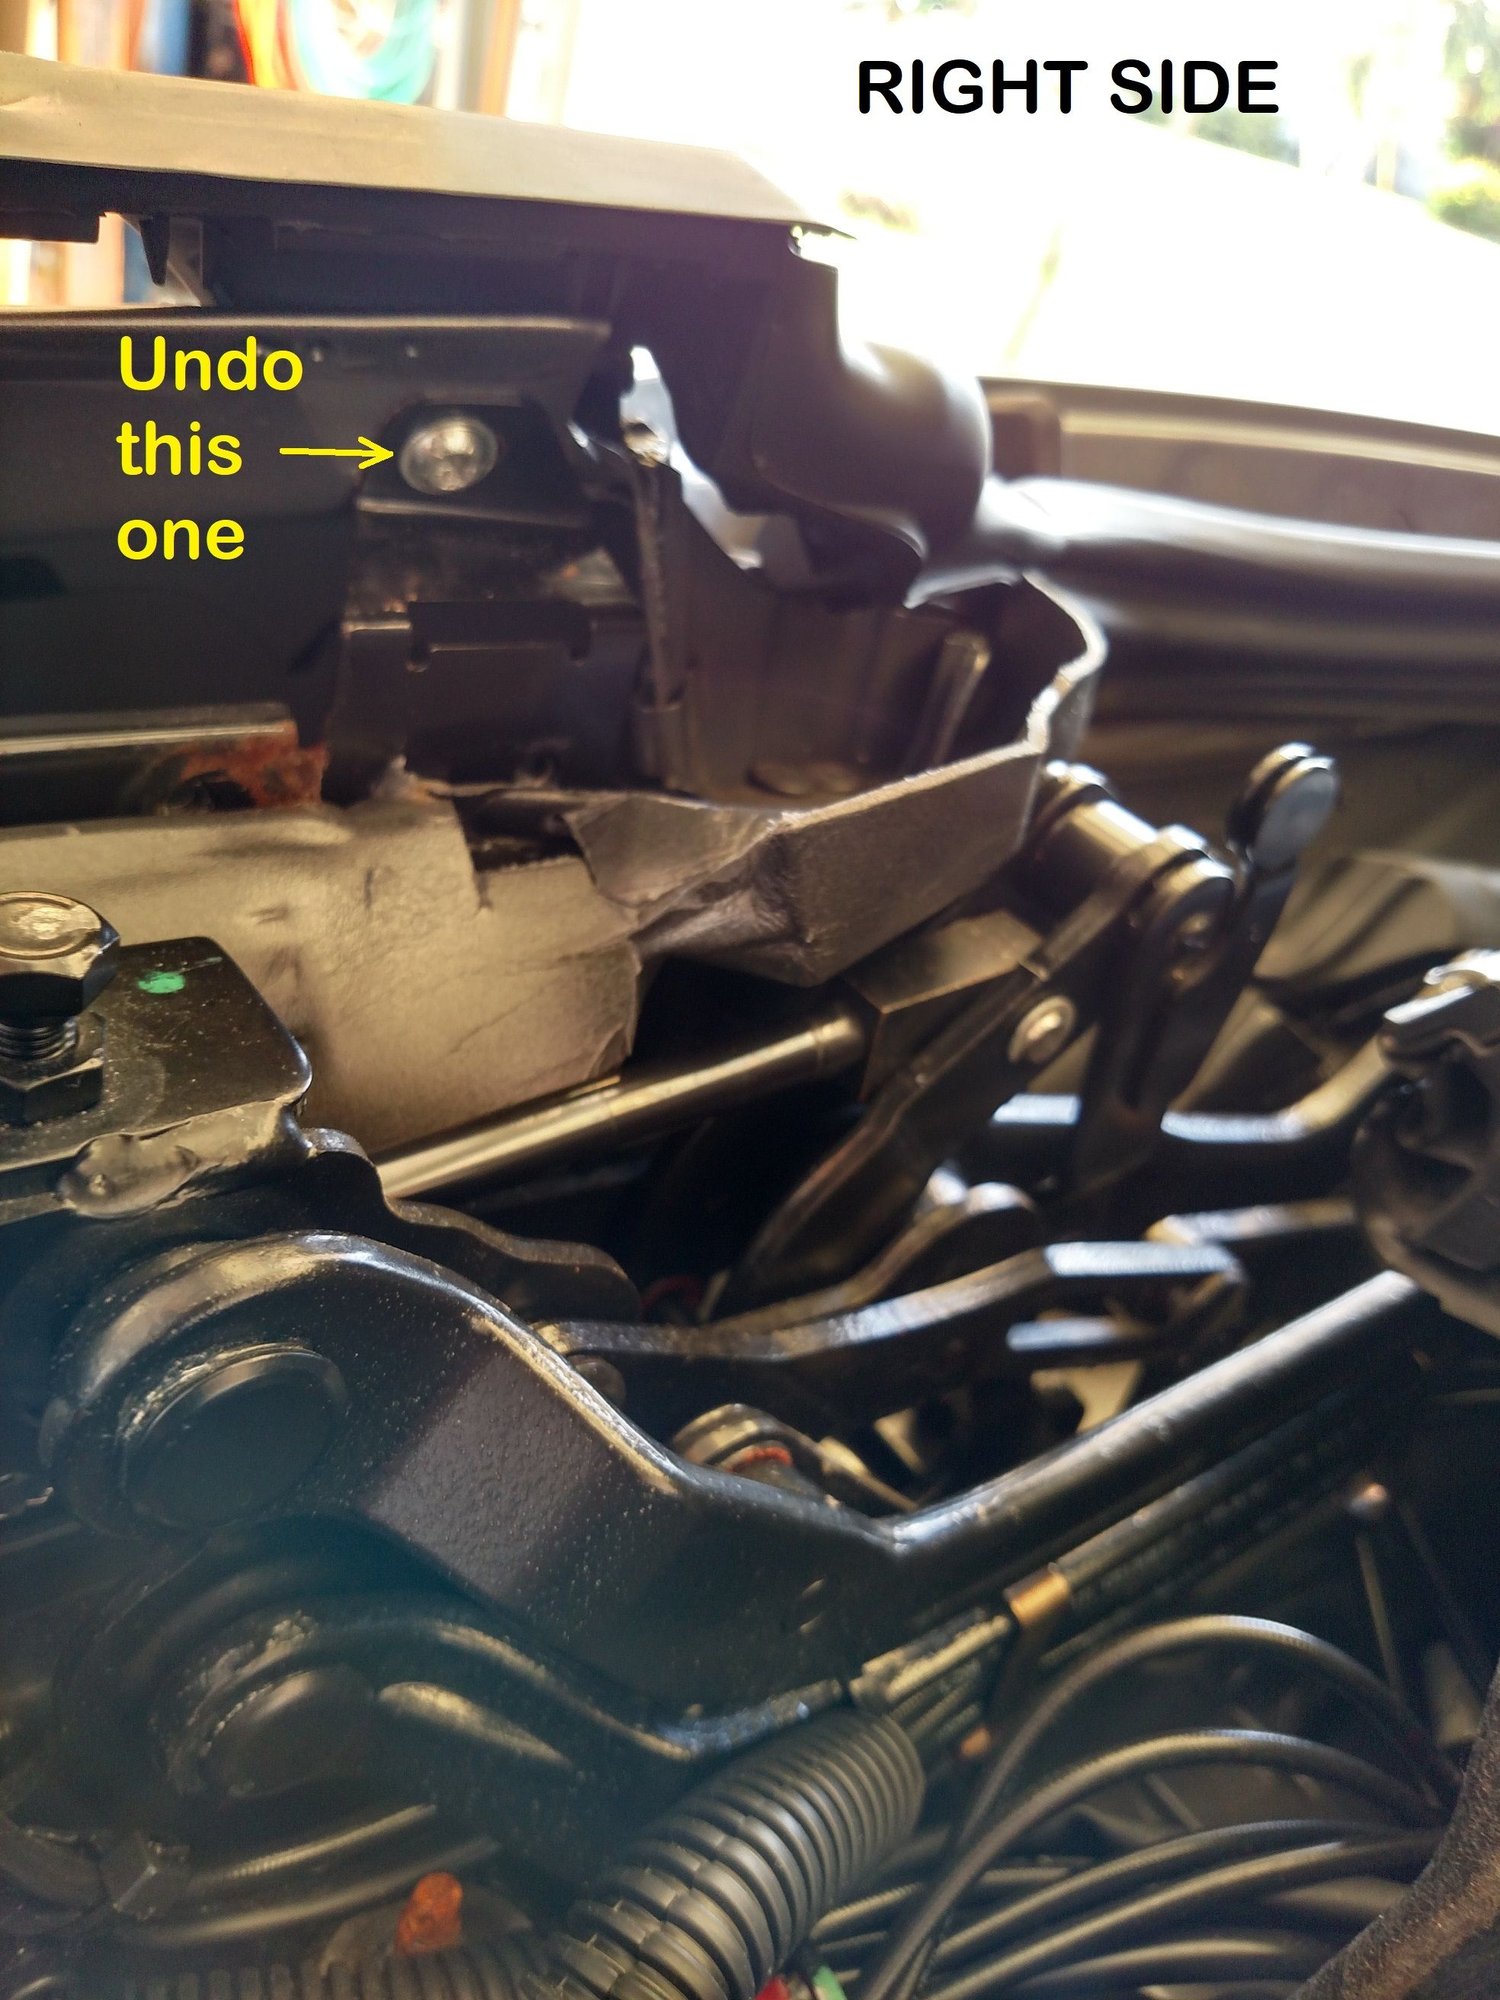
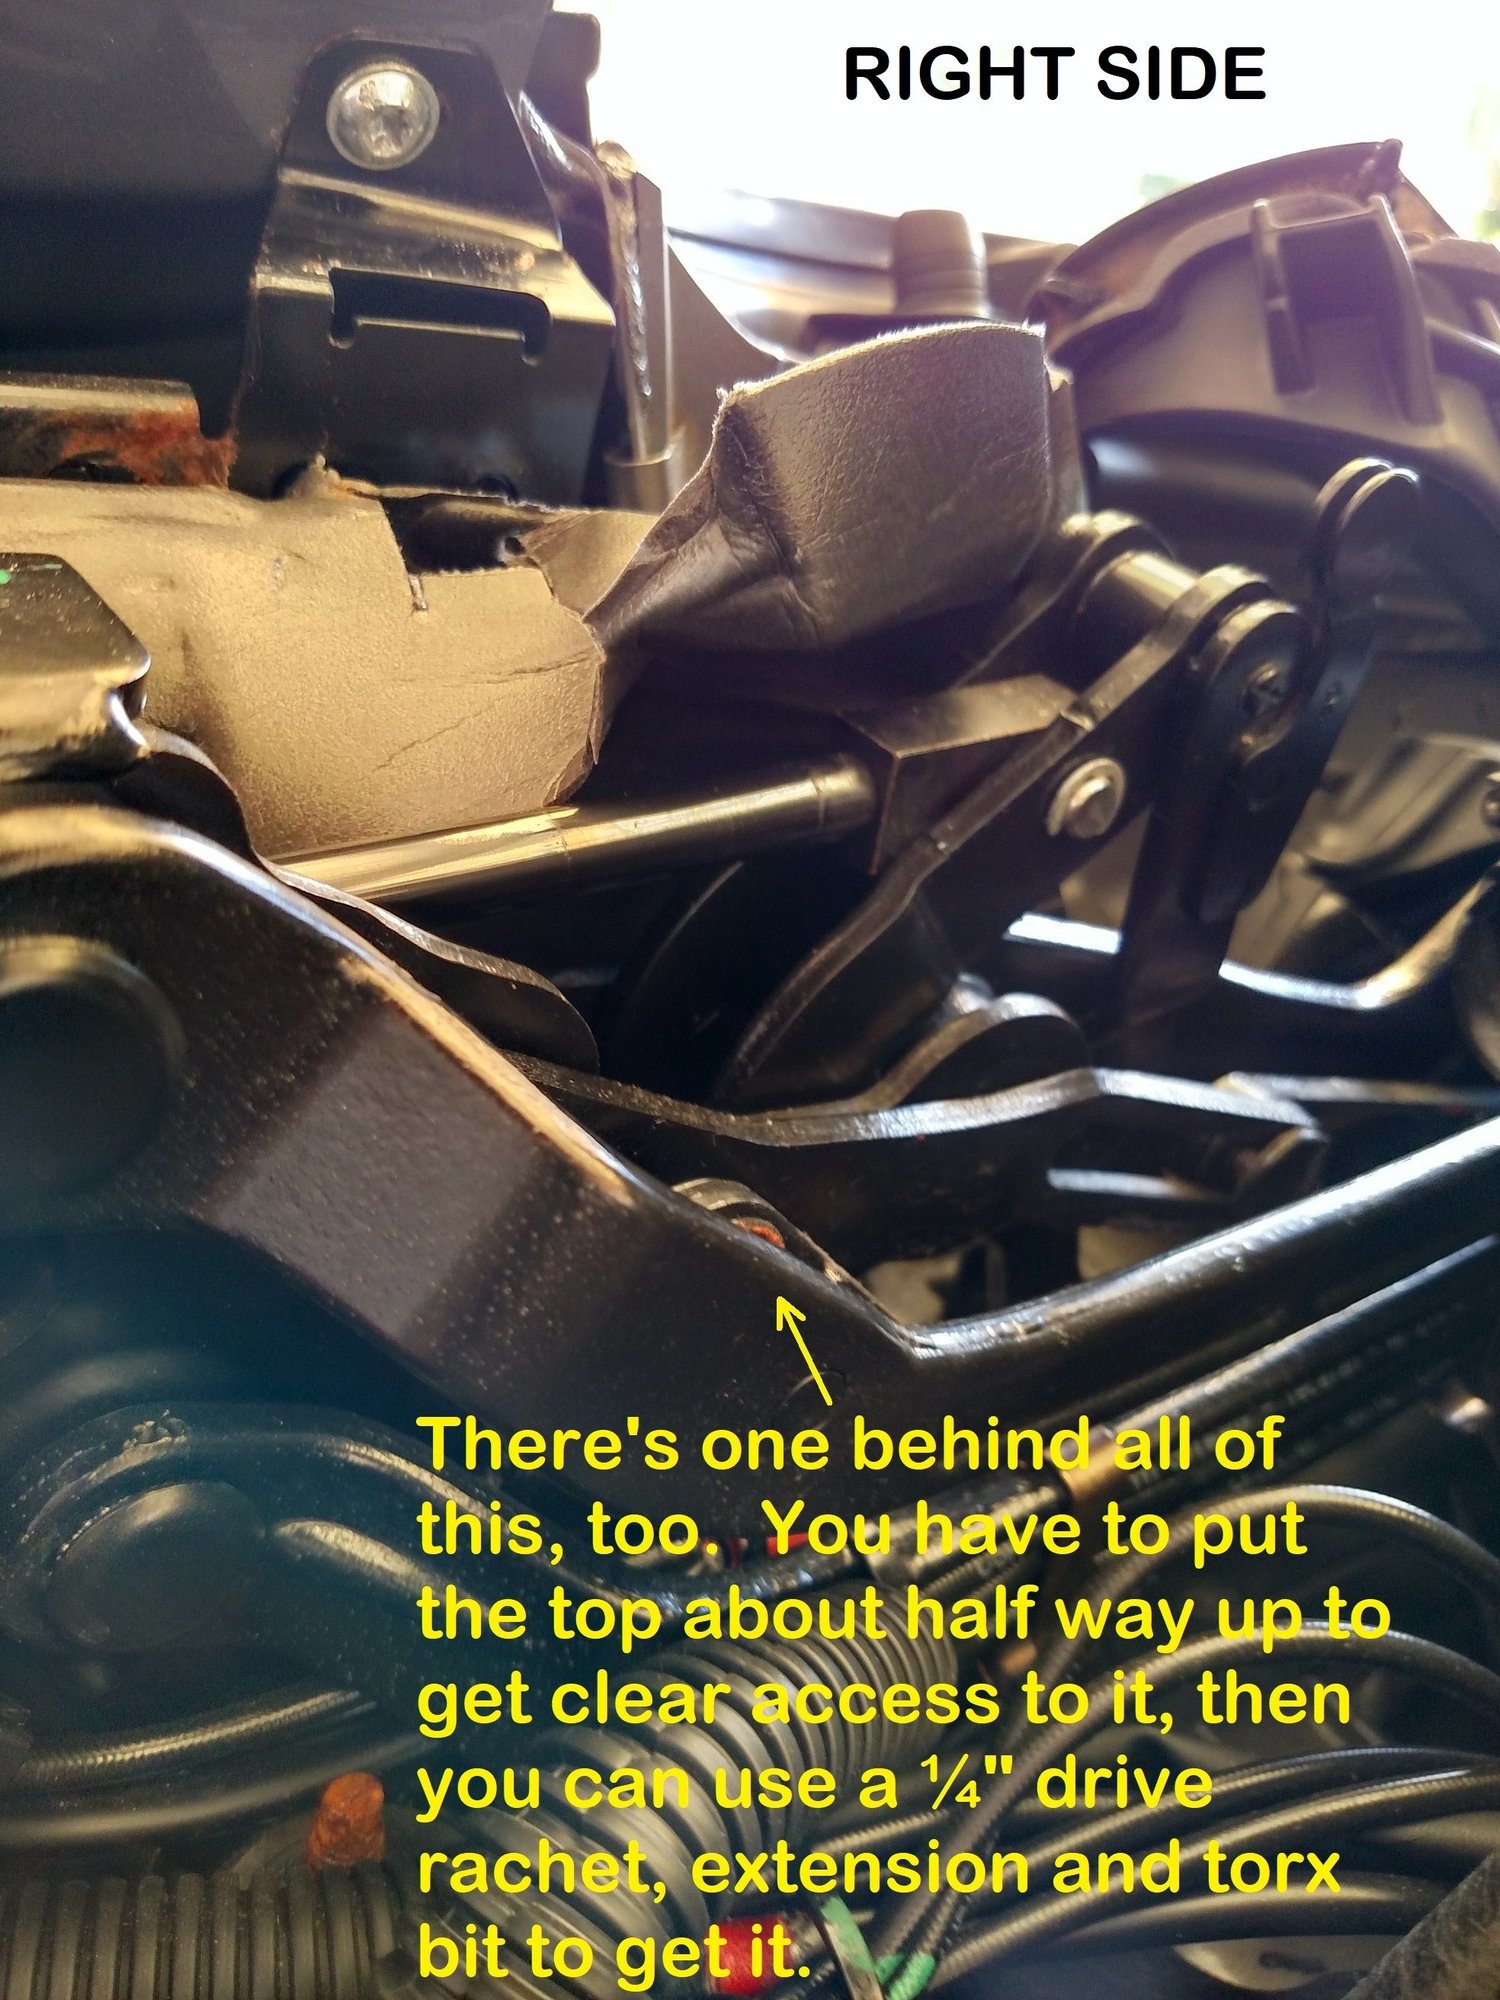
After that, remove the speakers. You also need to unplug the power connectors to the window motors:
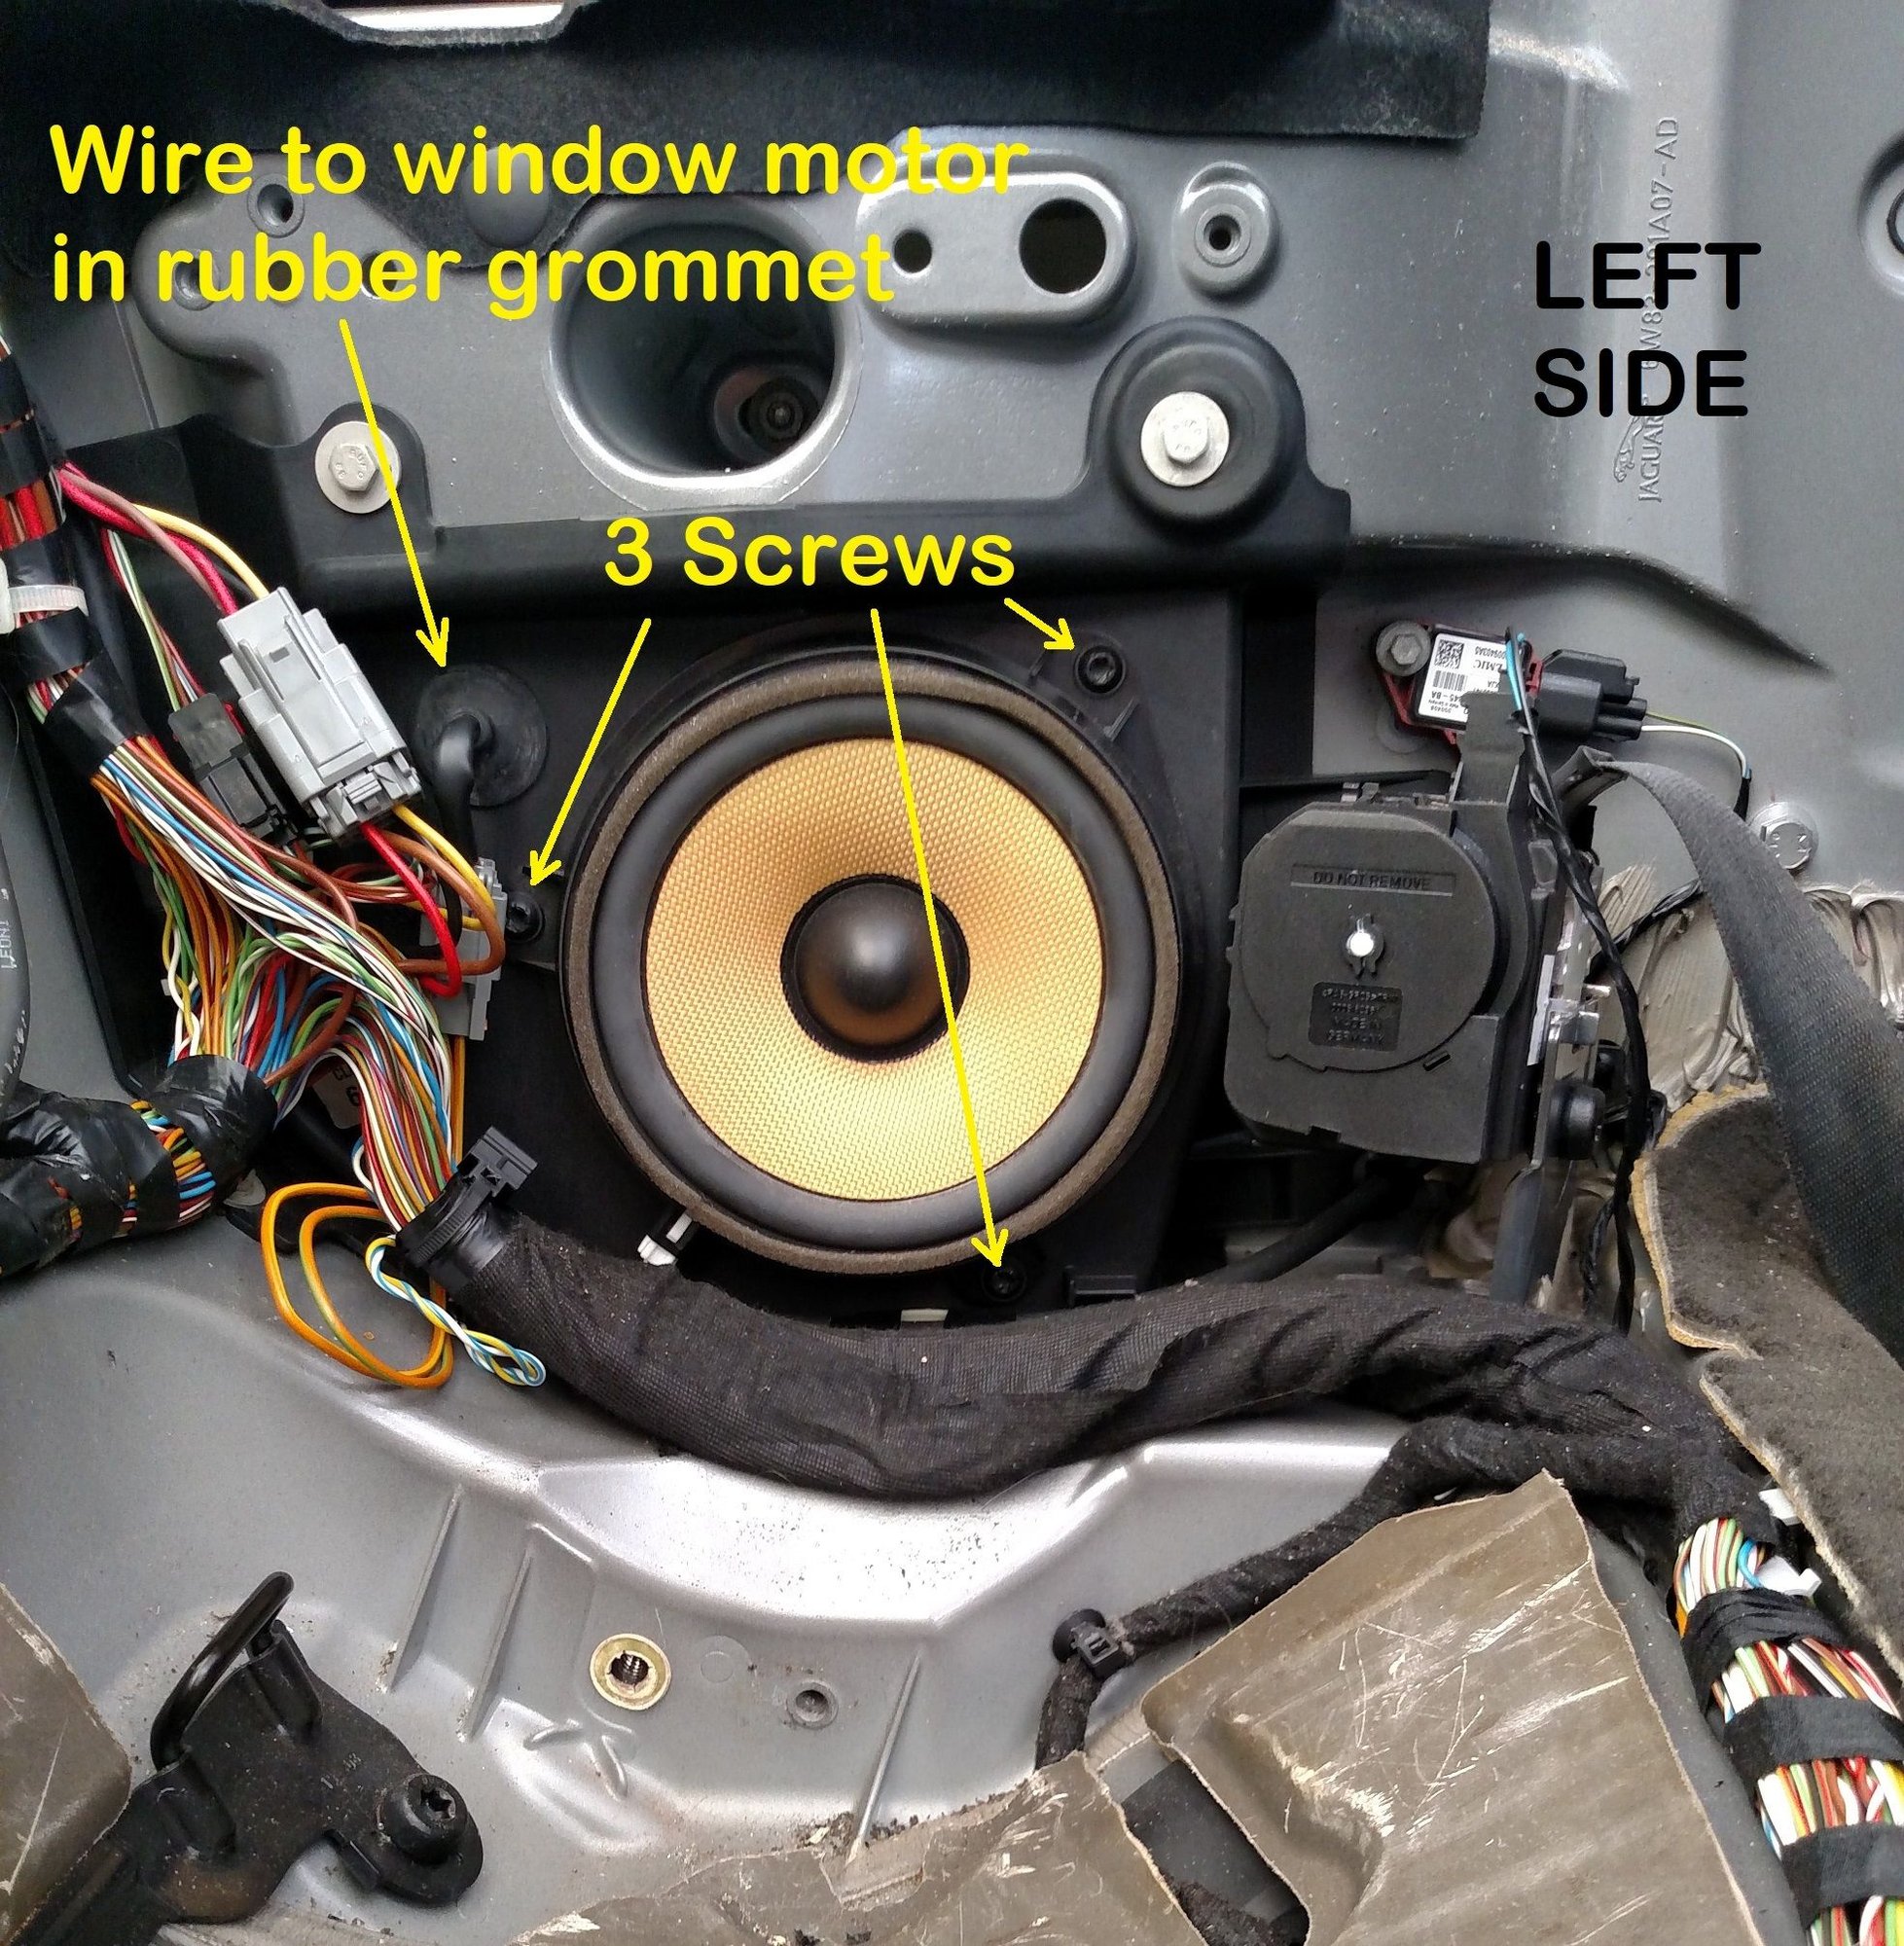
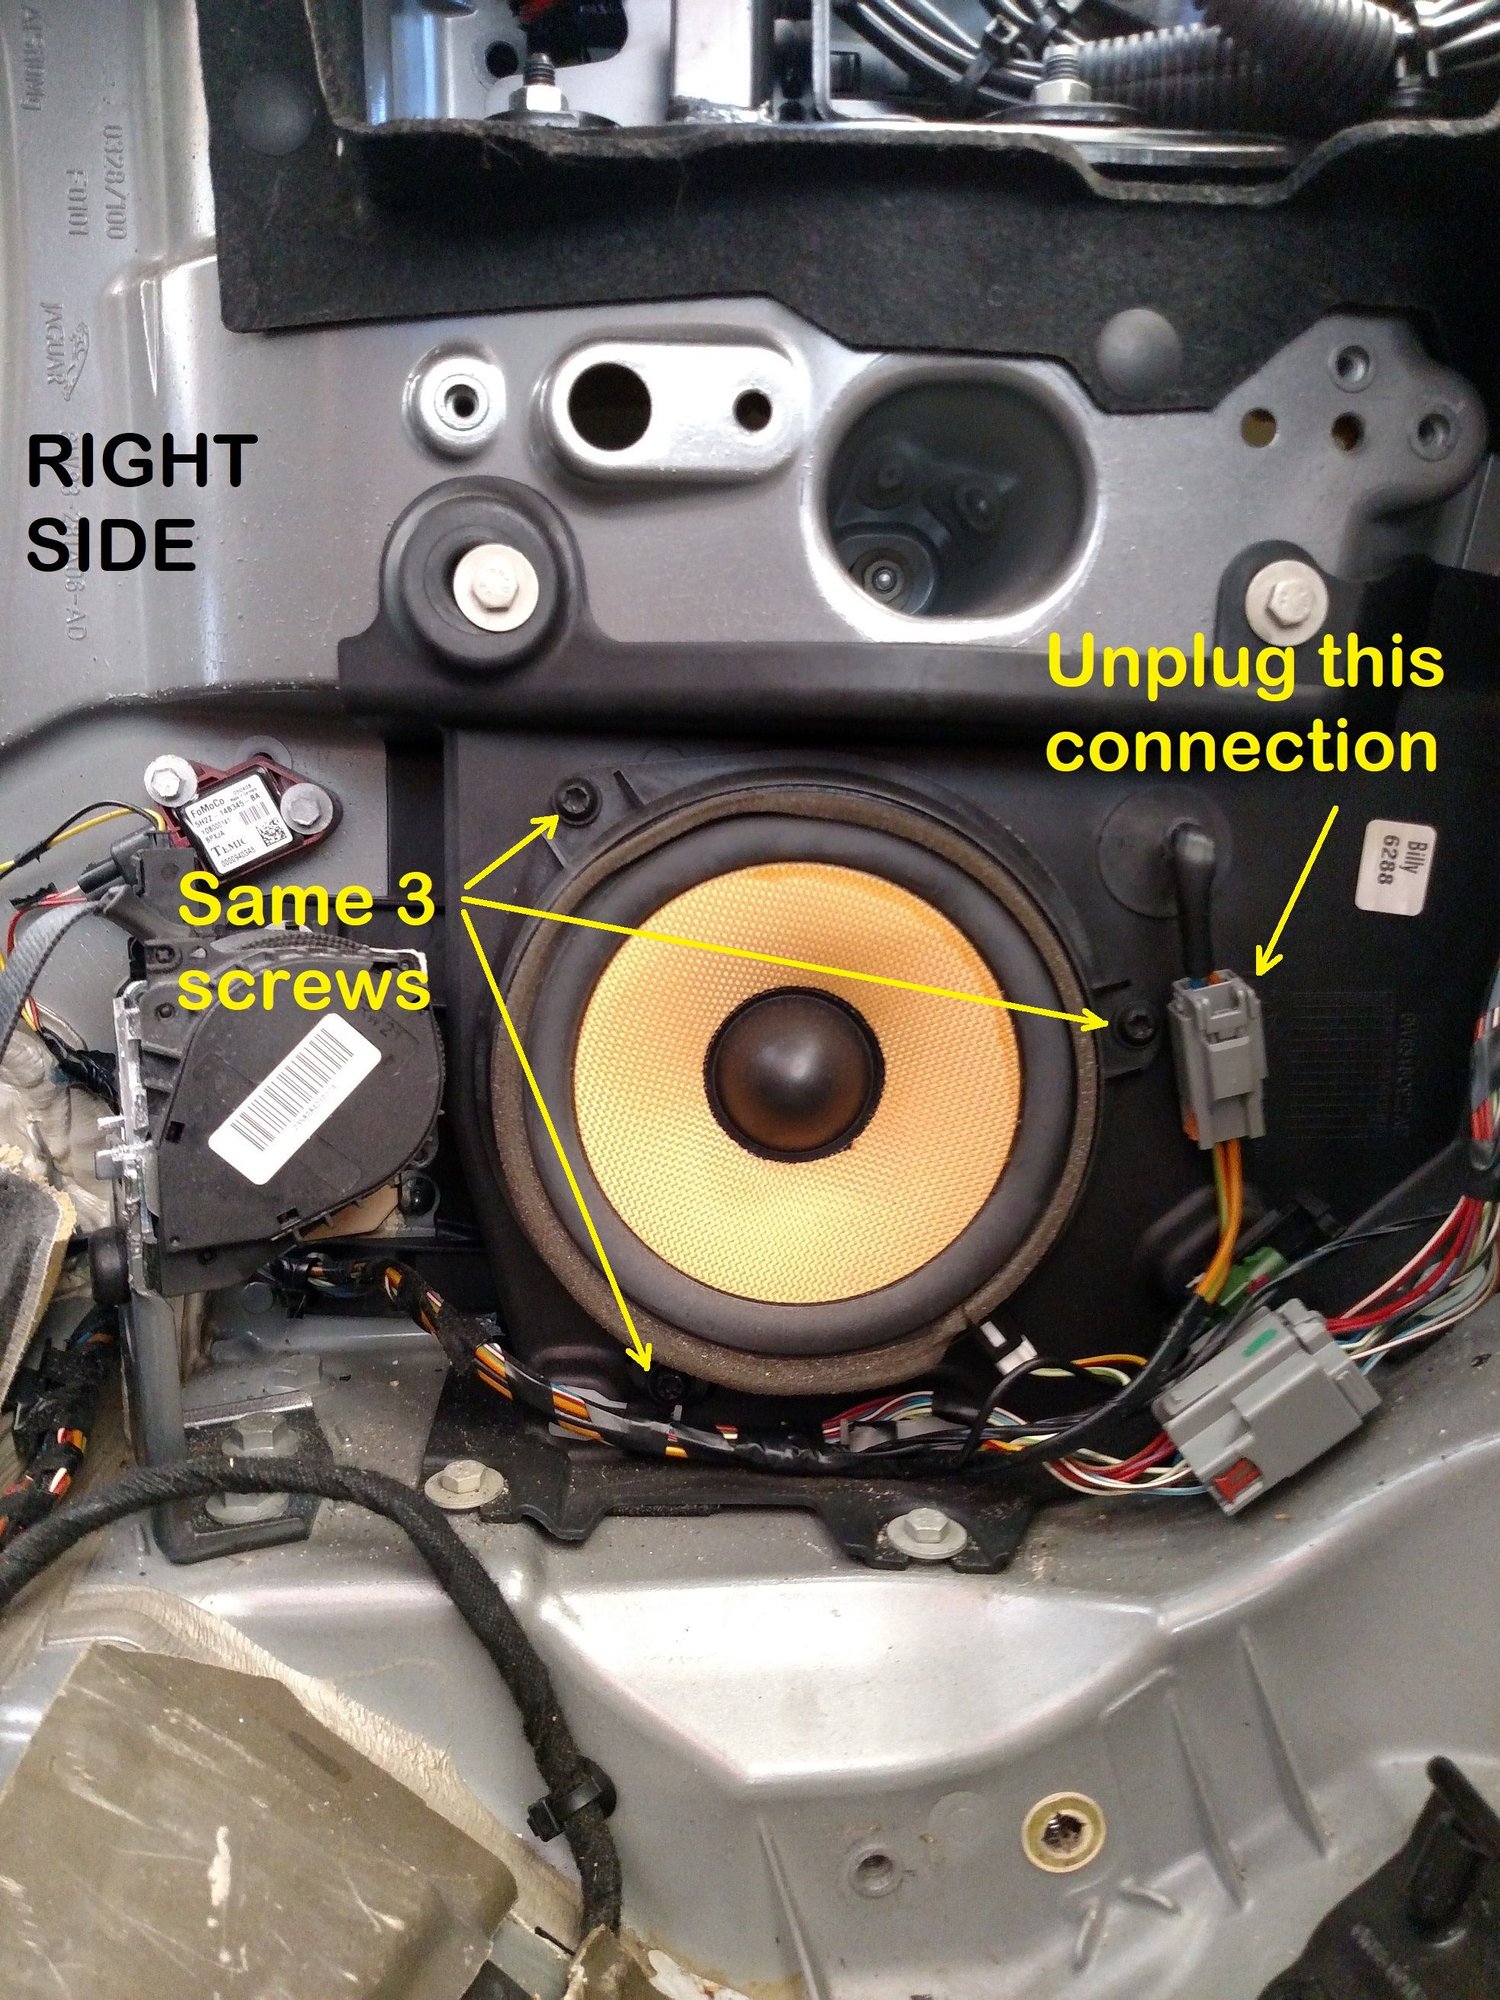
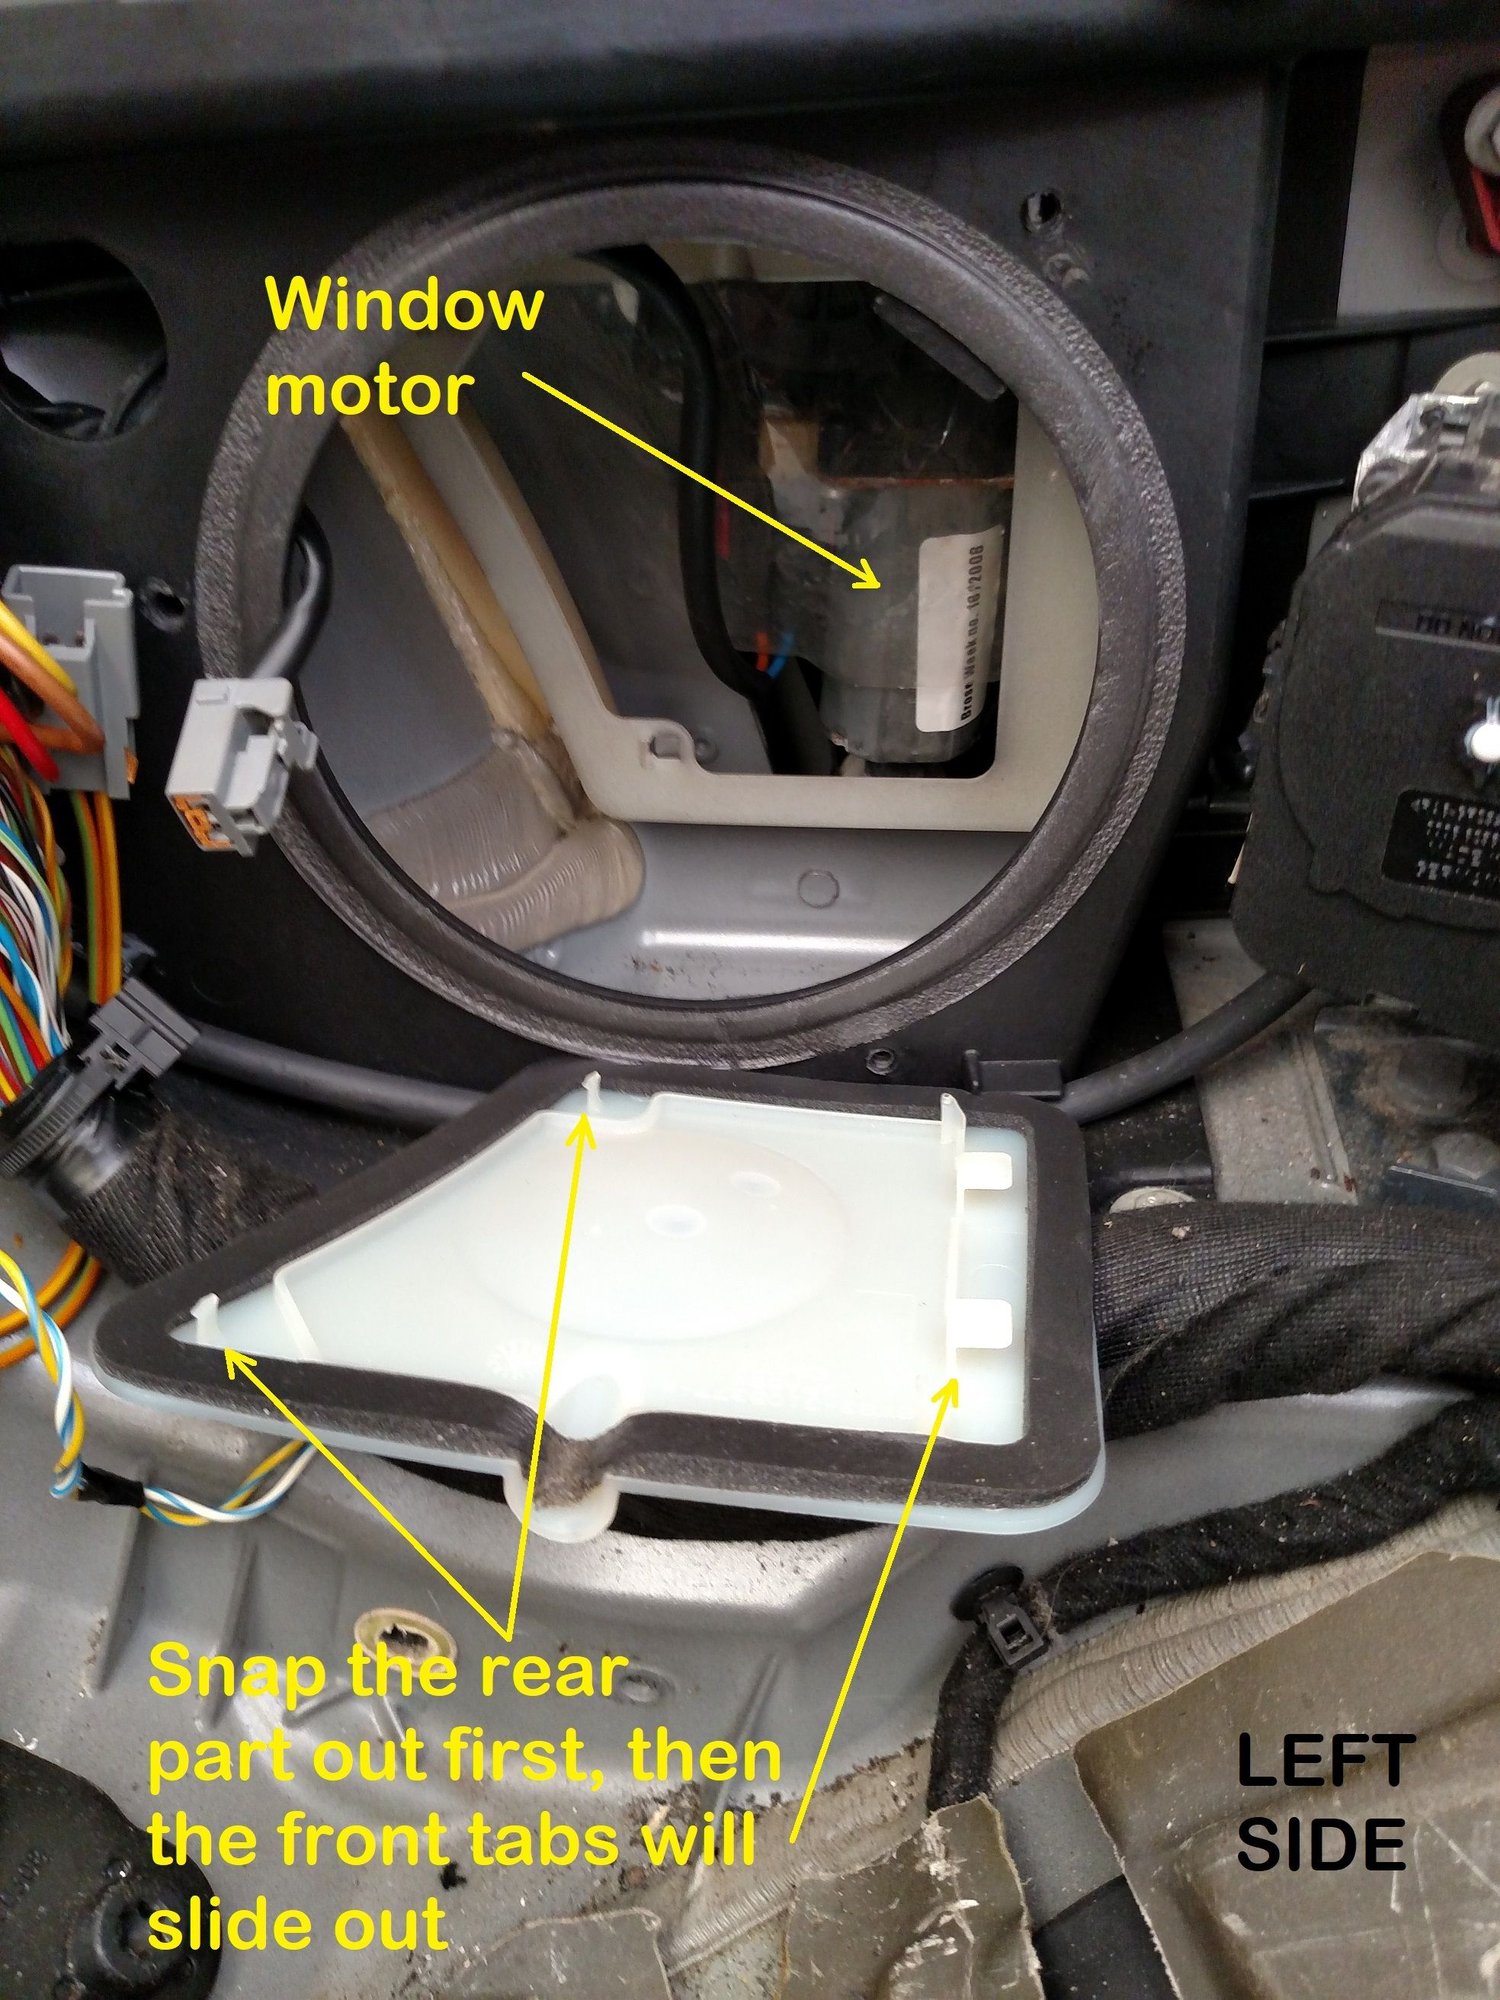
Behind the speakers is a plastic cover over the window motor. It just snaps out.
The seat belt retractor mechanism needs to come out, too. It covers one of the nuts that hold the window mechanism in place. Once out, you can undo the 3 nuts and the mechanism will be free.
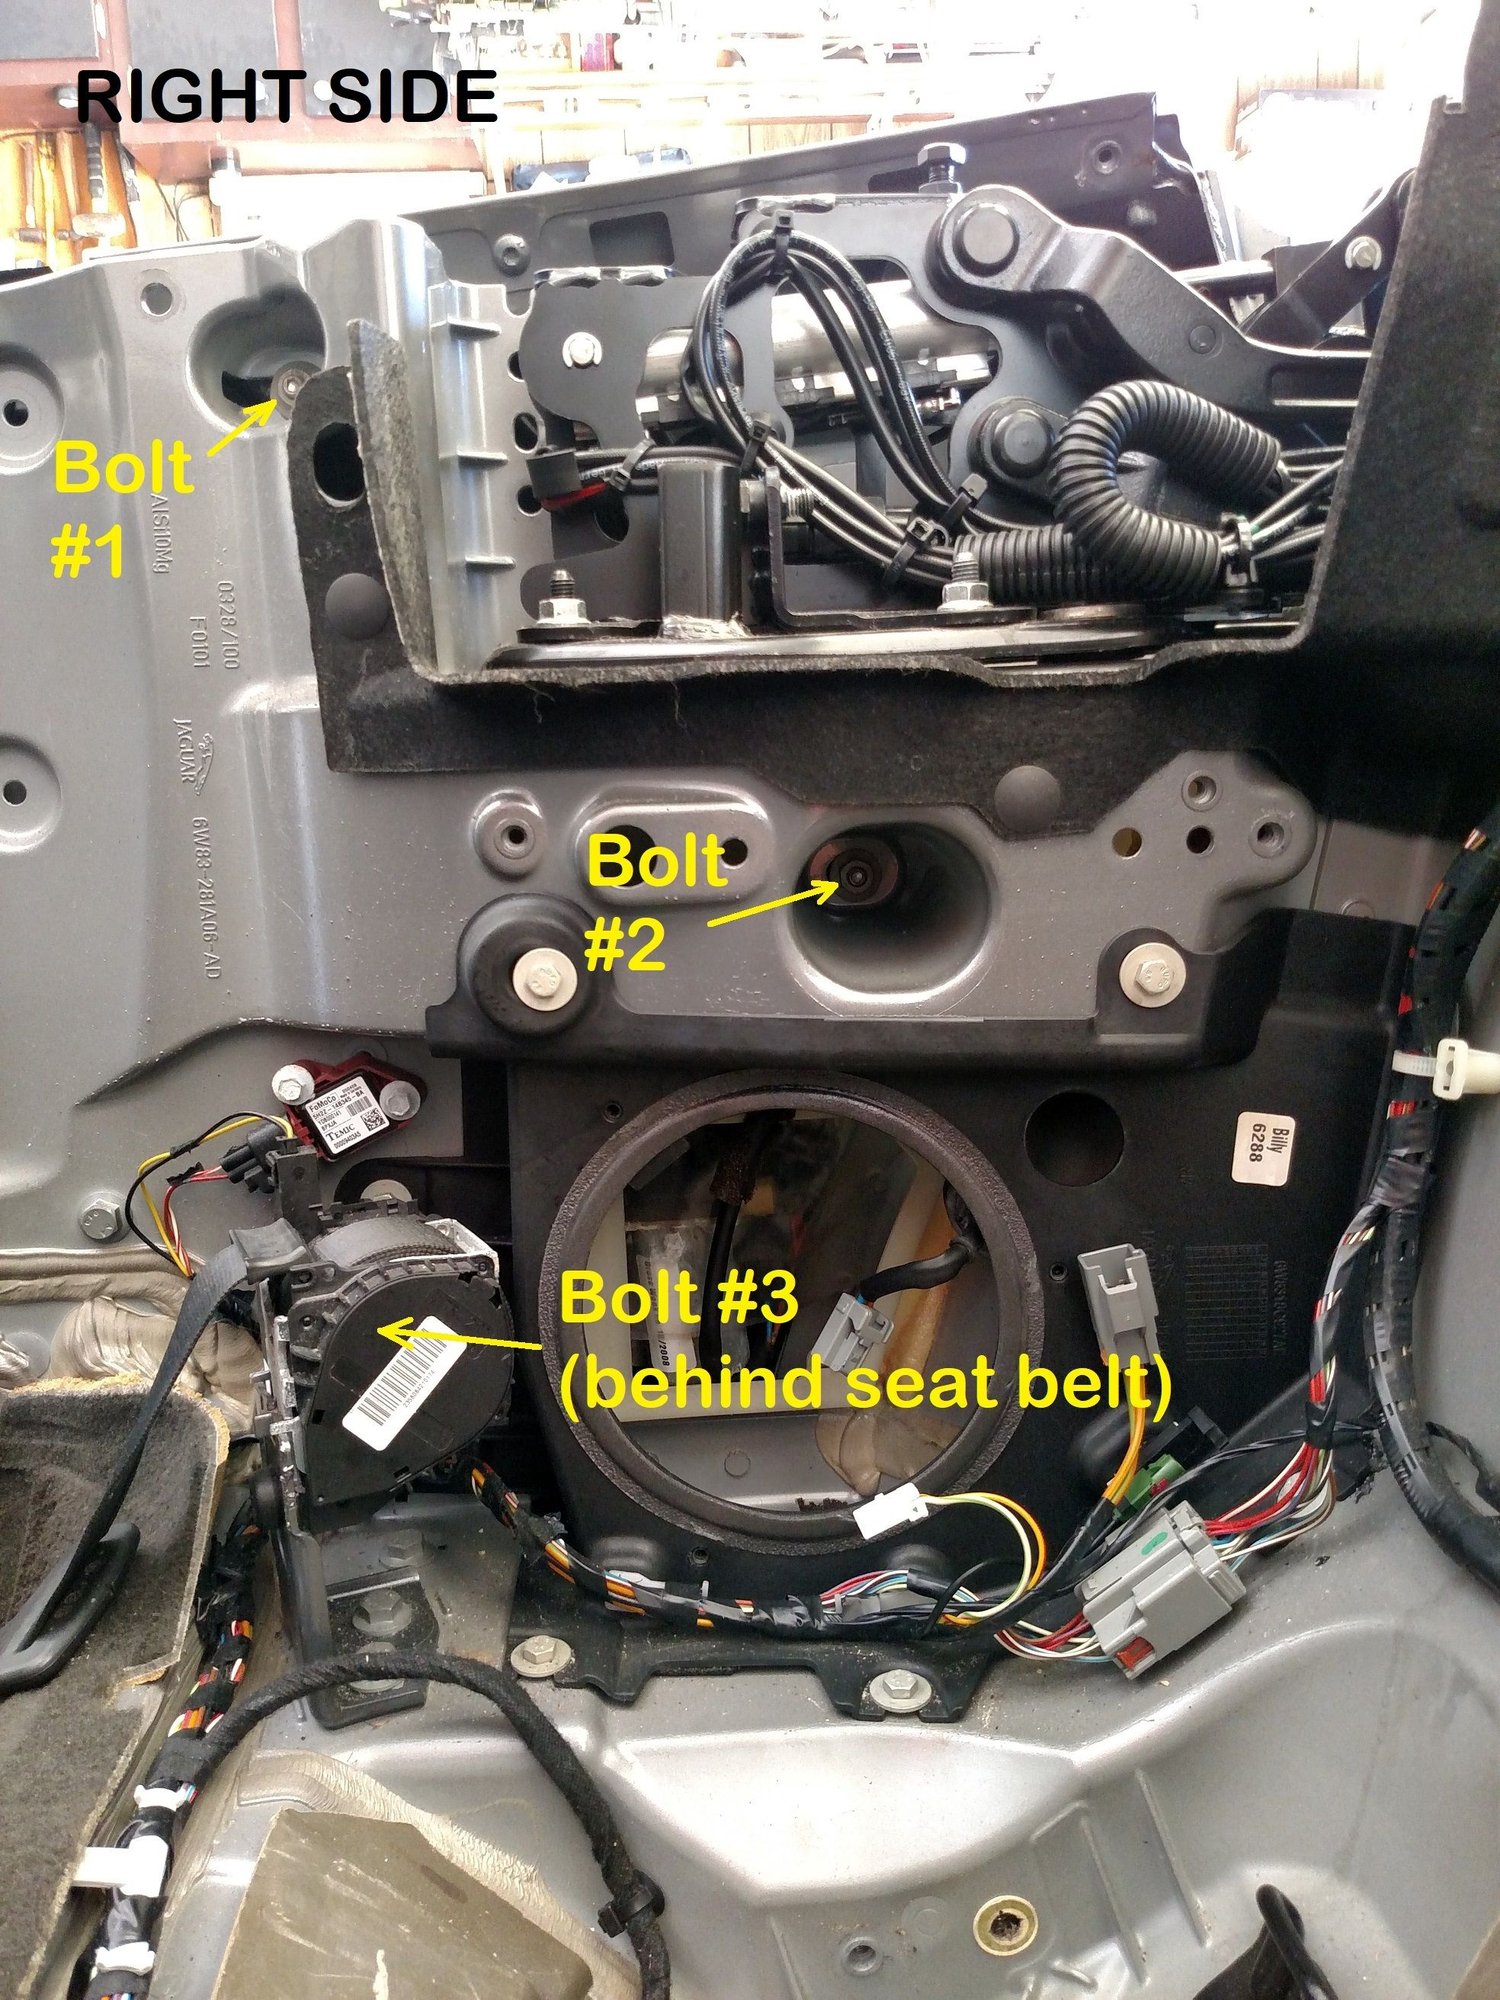
Now, here's where it gets tricky. The window mechanism will only come out when the window is in the full up position. When the mechanism failed and the cable got all wound around the pulleys, it left the window stuck in the down position. In that state it is impossible to get the assembly out through the narrow opening. I had to reach in with a ¼" drive rachet, extension, and 10mm socket and undo the 3 nuts that hold the electric motor to the window regulator. Kind of tricky, and I don't have pictures, cause there's no way to do that and hold the phone at the same time, and it's so buried in there, the pictures probably wouldn't look all that good anyway. Once out, I put the motors back on and removed the window glass. That's easy to do on the bench. Here those buggers are:
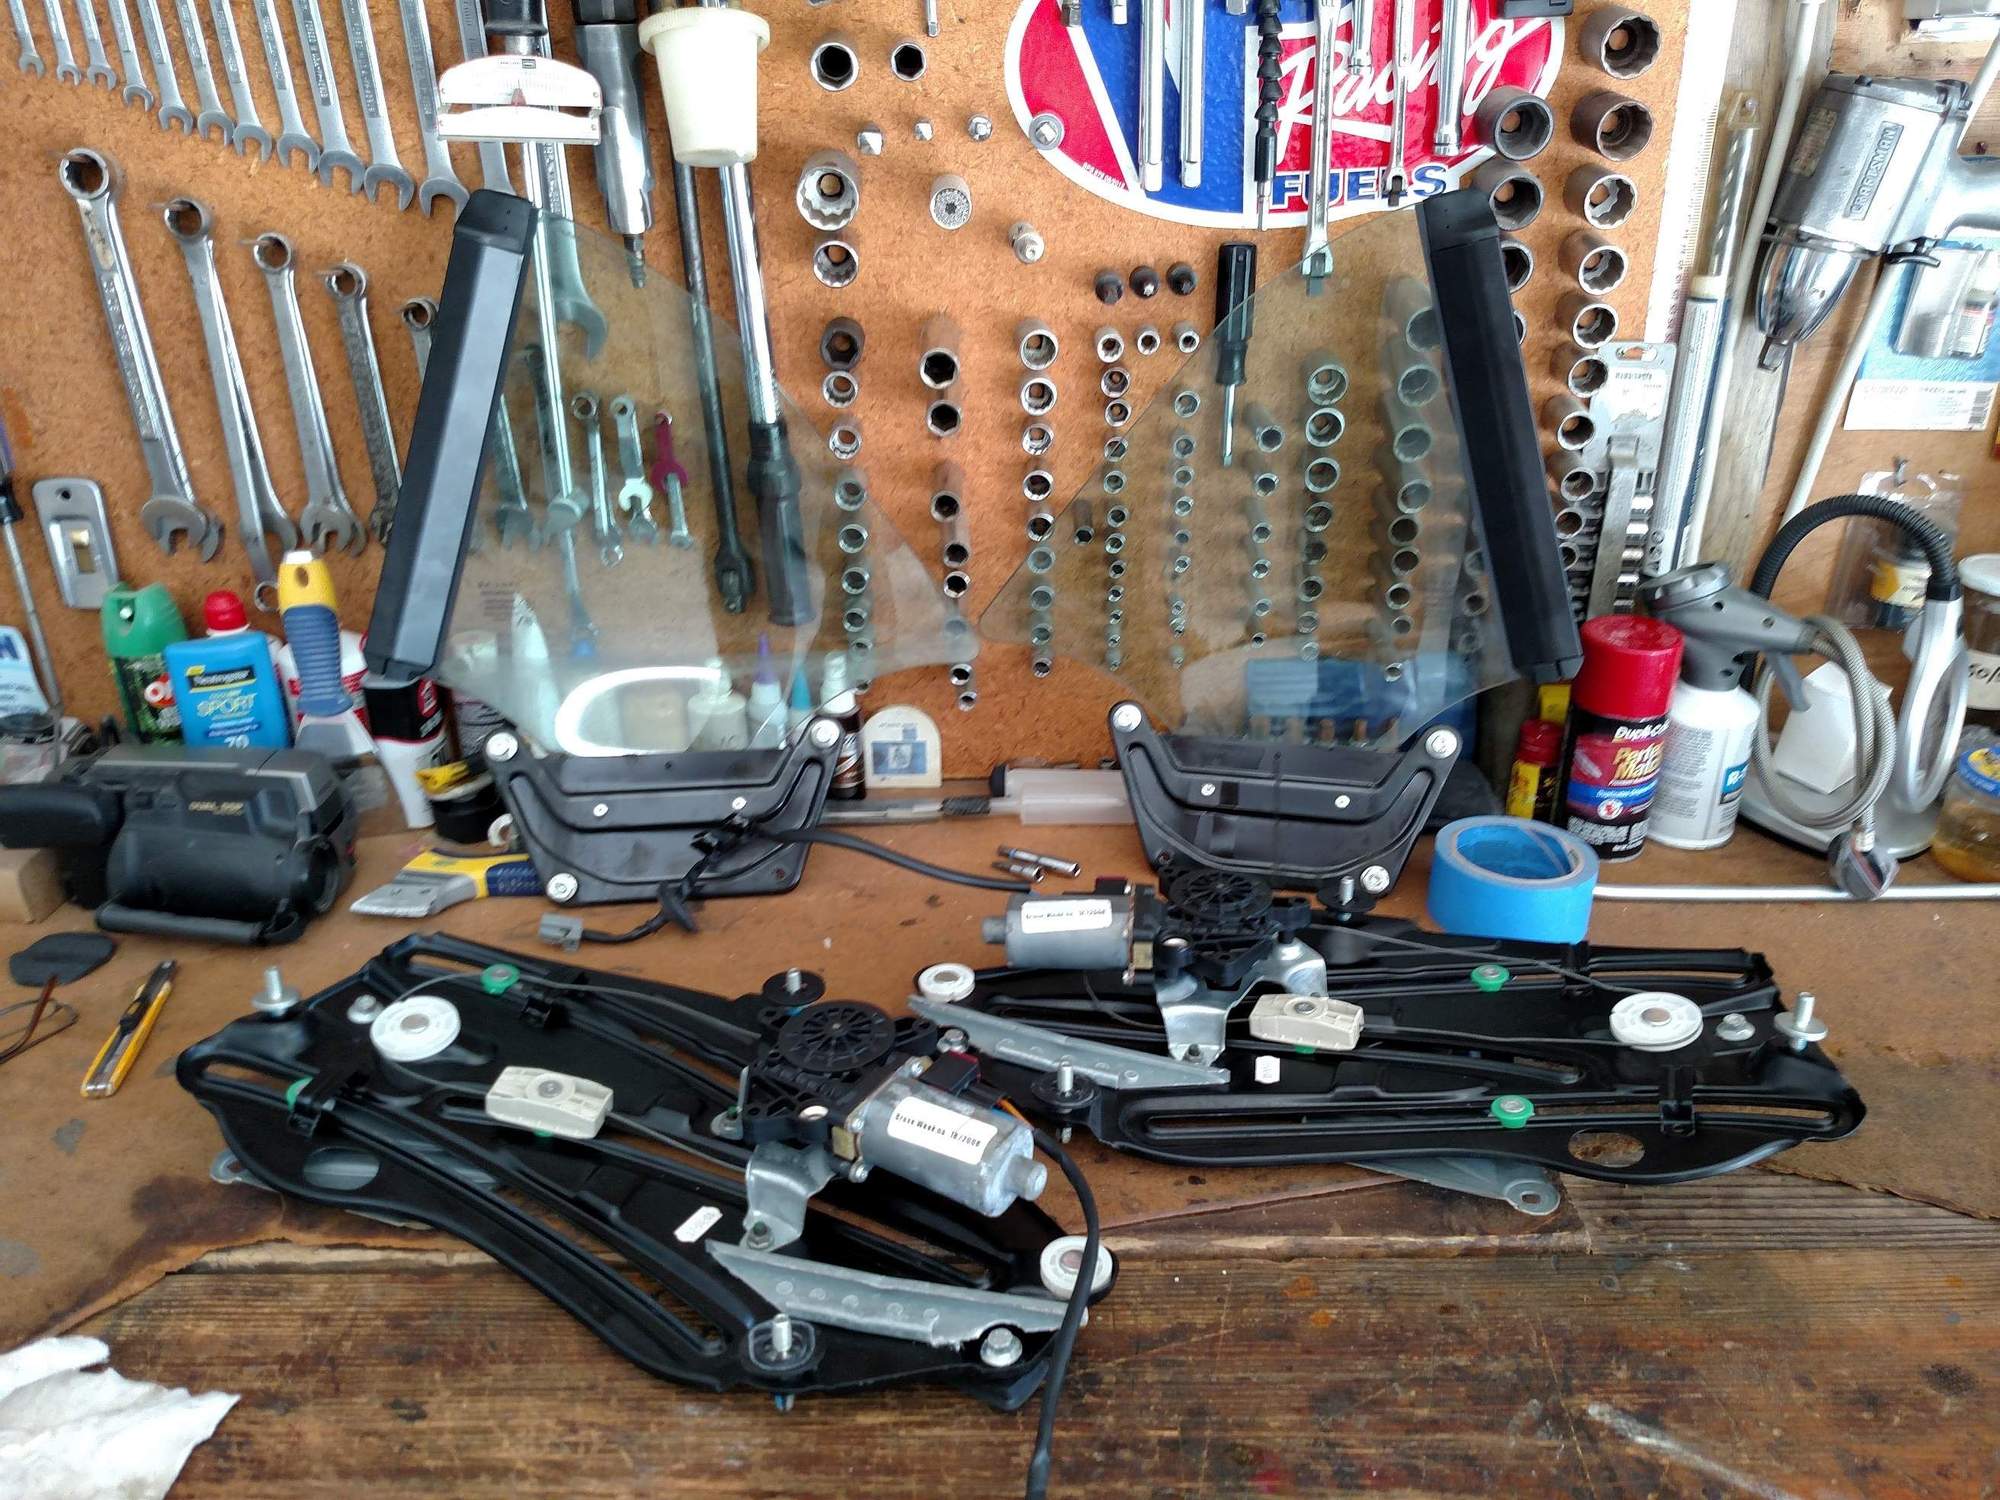
NOTE: The 3 bolts that hold the glass to the regulator are very important. They are the adjustment to get the glass to sit properly in the opening and seal against the gaskets. DON'T CHANGE THE ADJUSTMENT! Best to use a sharpie or something to mark the orientation of the screws so you can put the glass back on exactly as it came off. As far as I can tell, Window Motor World knew not to mess with those and they seemed to be in the same position when I got the parts back.
Here's the parts before. Note how the cables are all gronked.
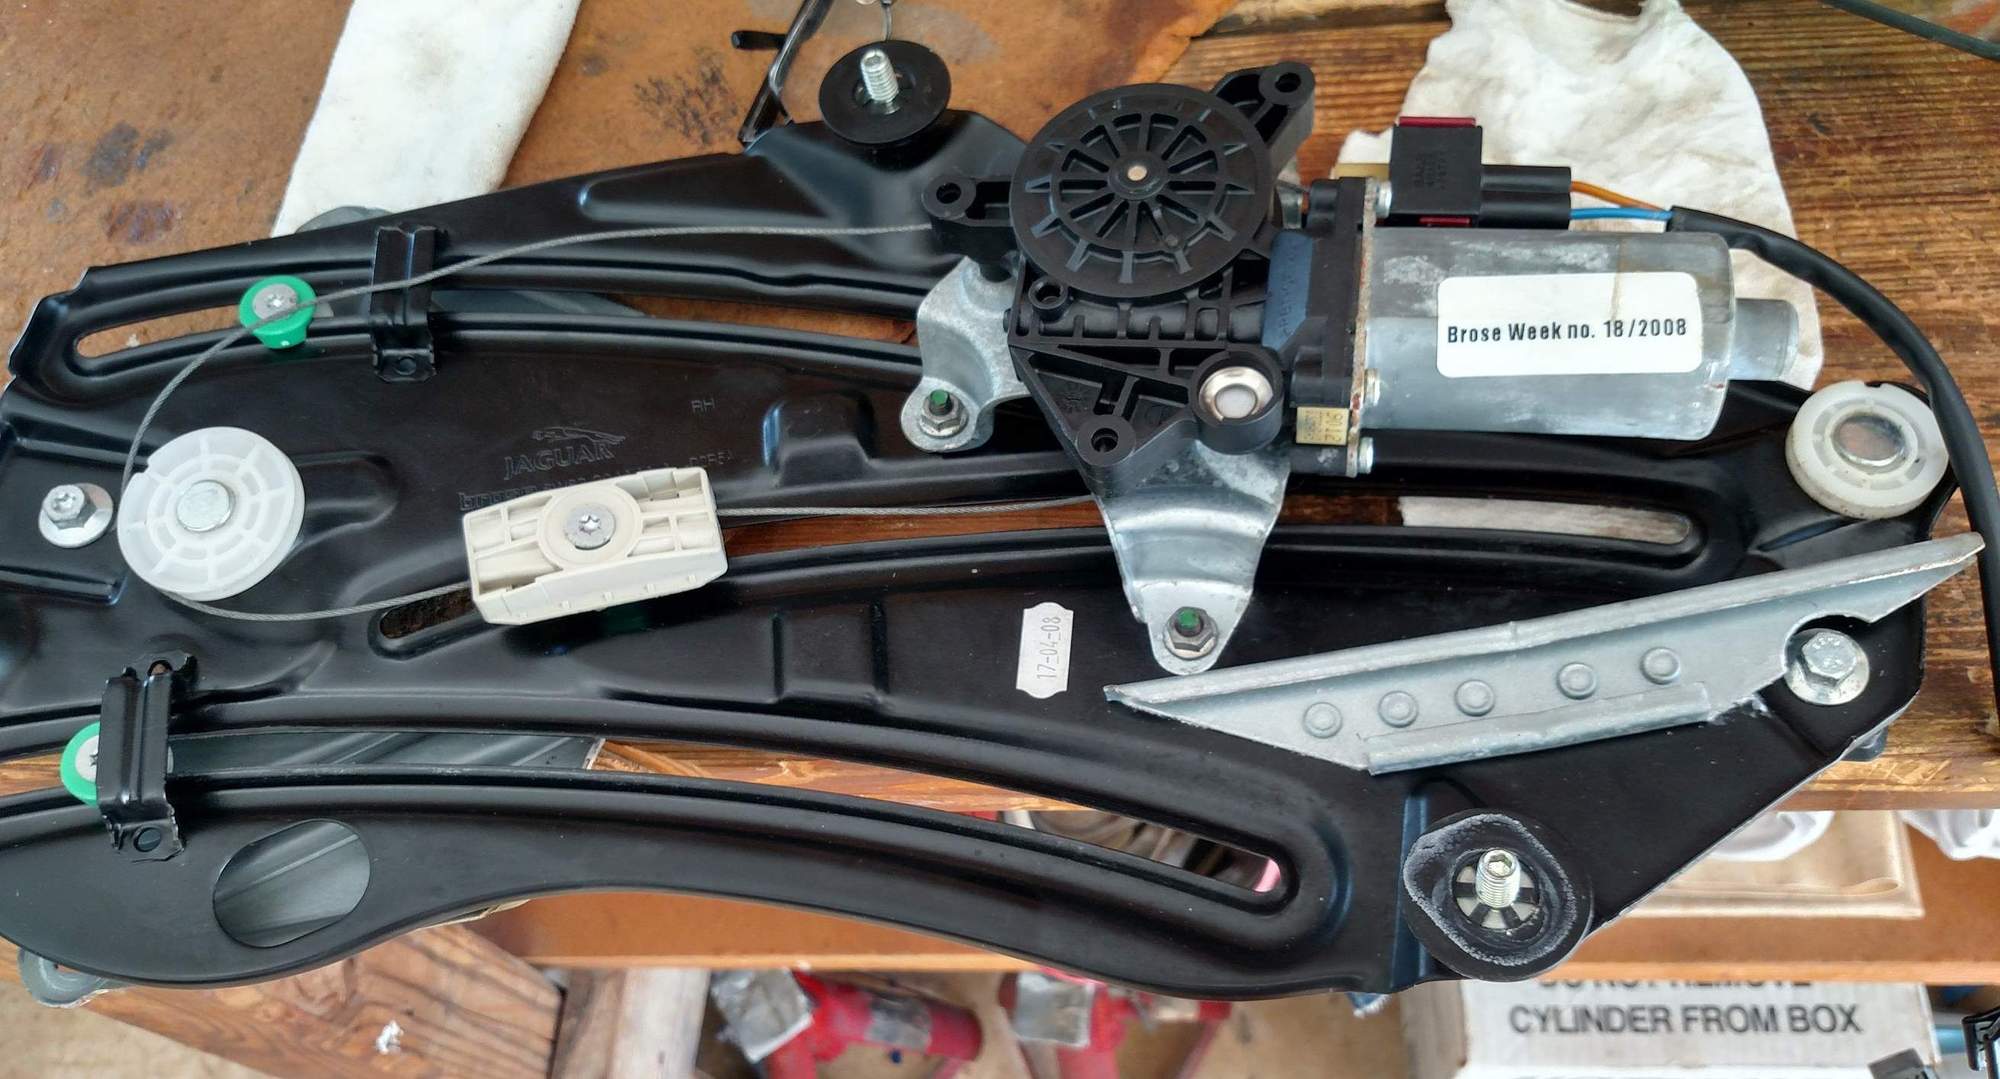
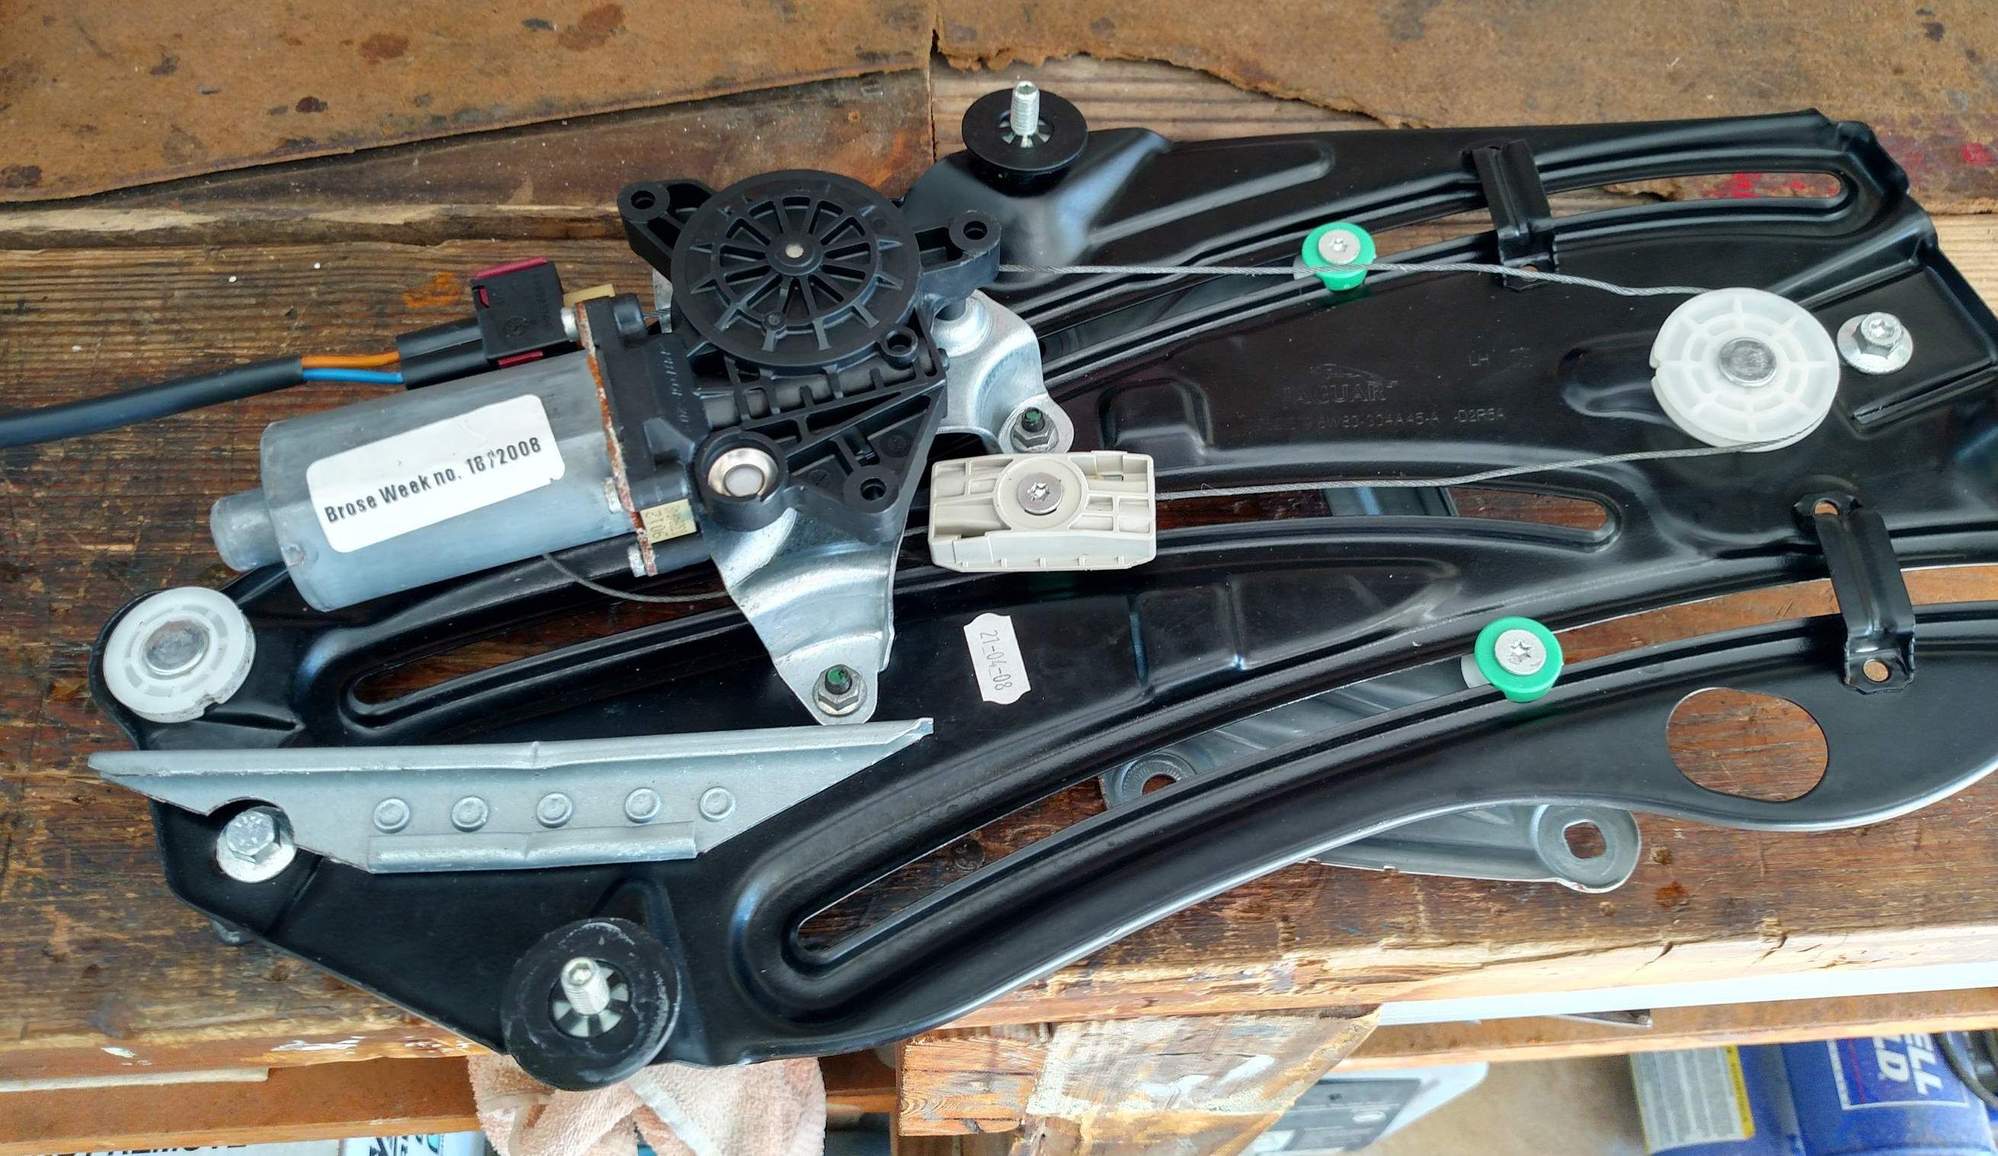
Here they are after WMW did their thing. Notice that the top pulley is now metal. Also looks like they replaced the rectangular plastic slider piece. Cables are tight. Slides are greased. Julie said they also take the motors apart and check the brushes and repair anything in there that needs it.

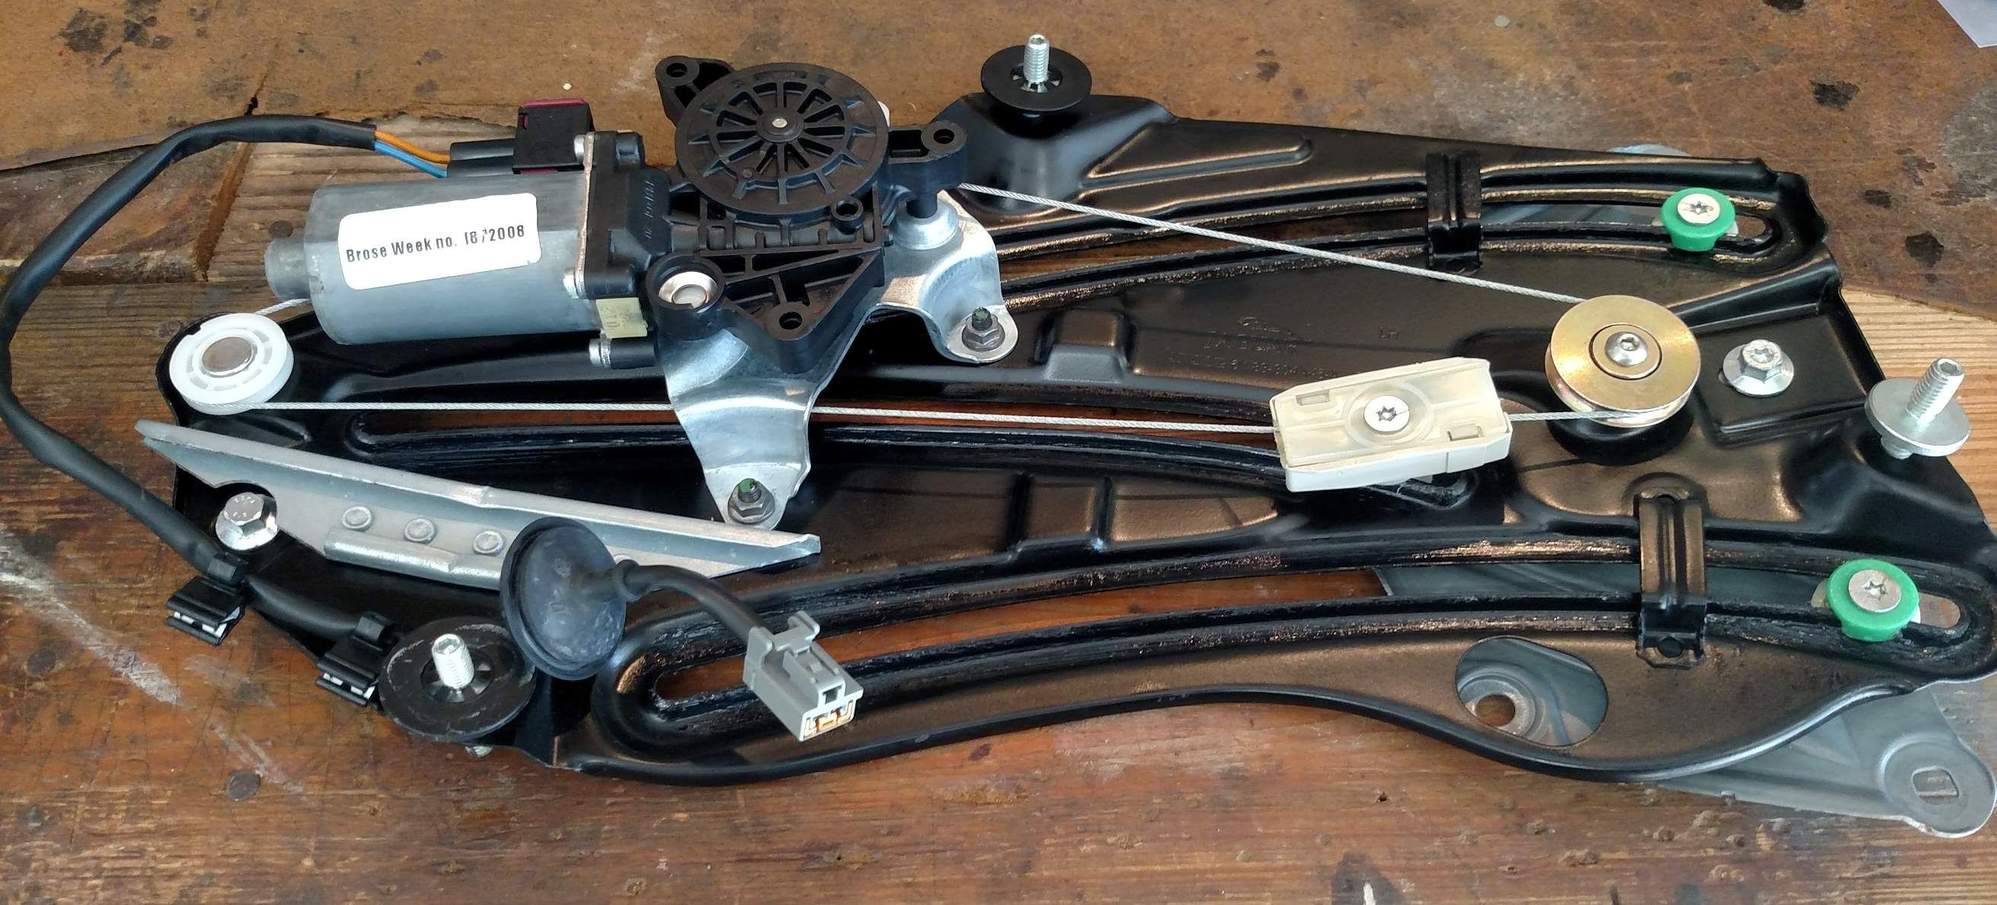
Putting it back together was pretty easy, no surprises there. One more thing. I'm getting older, and my memory's not always perfect, so, word to the wise - I tape the screws to the parts I remove, then lay them out in order so I know what goes where when putting it all back together. Prevents having parts left over when you're done!
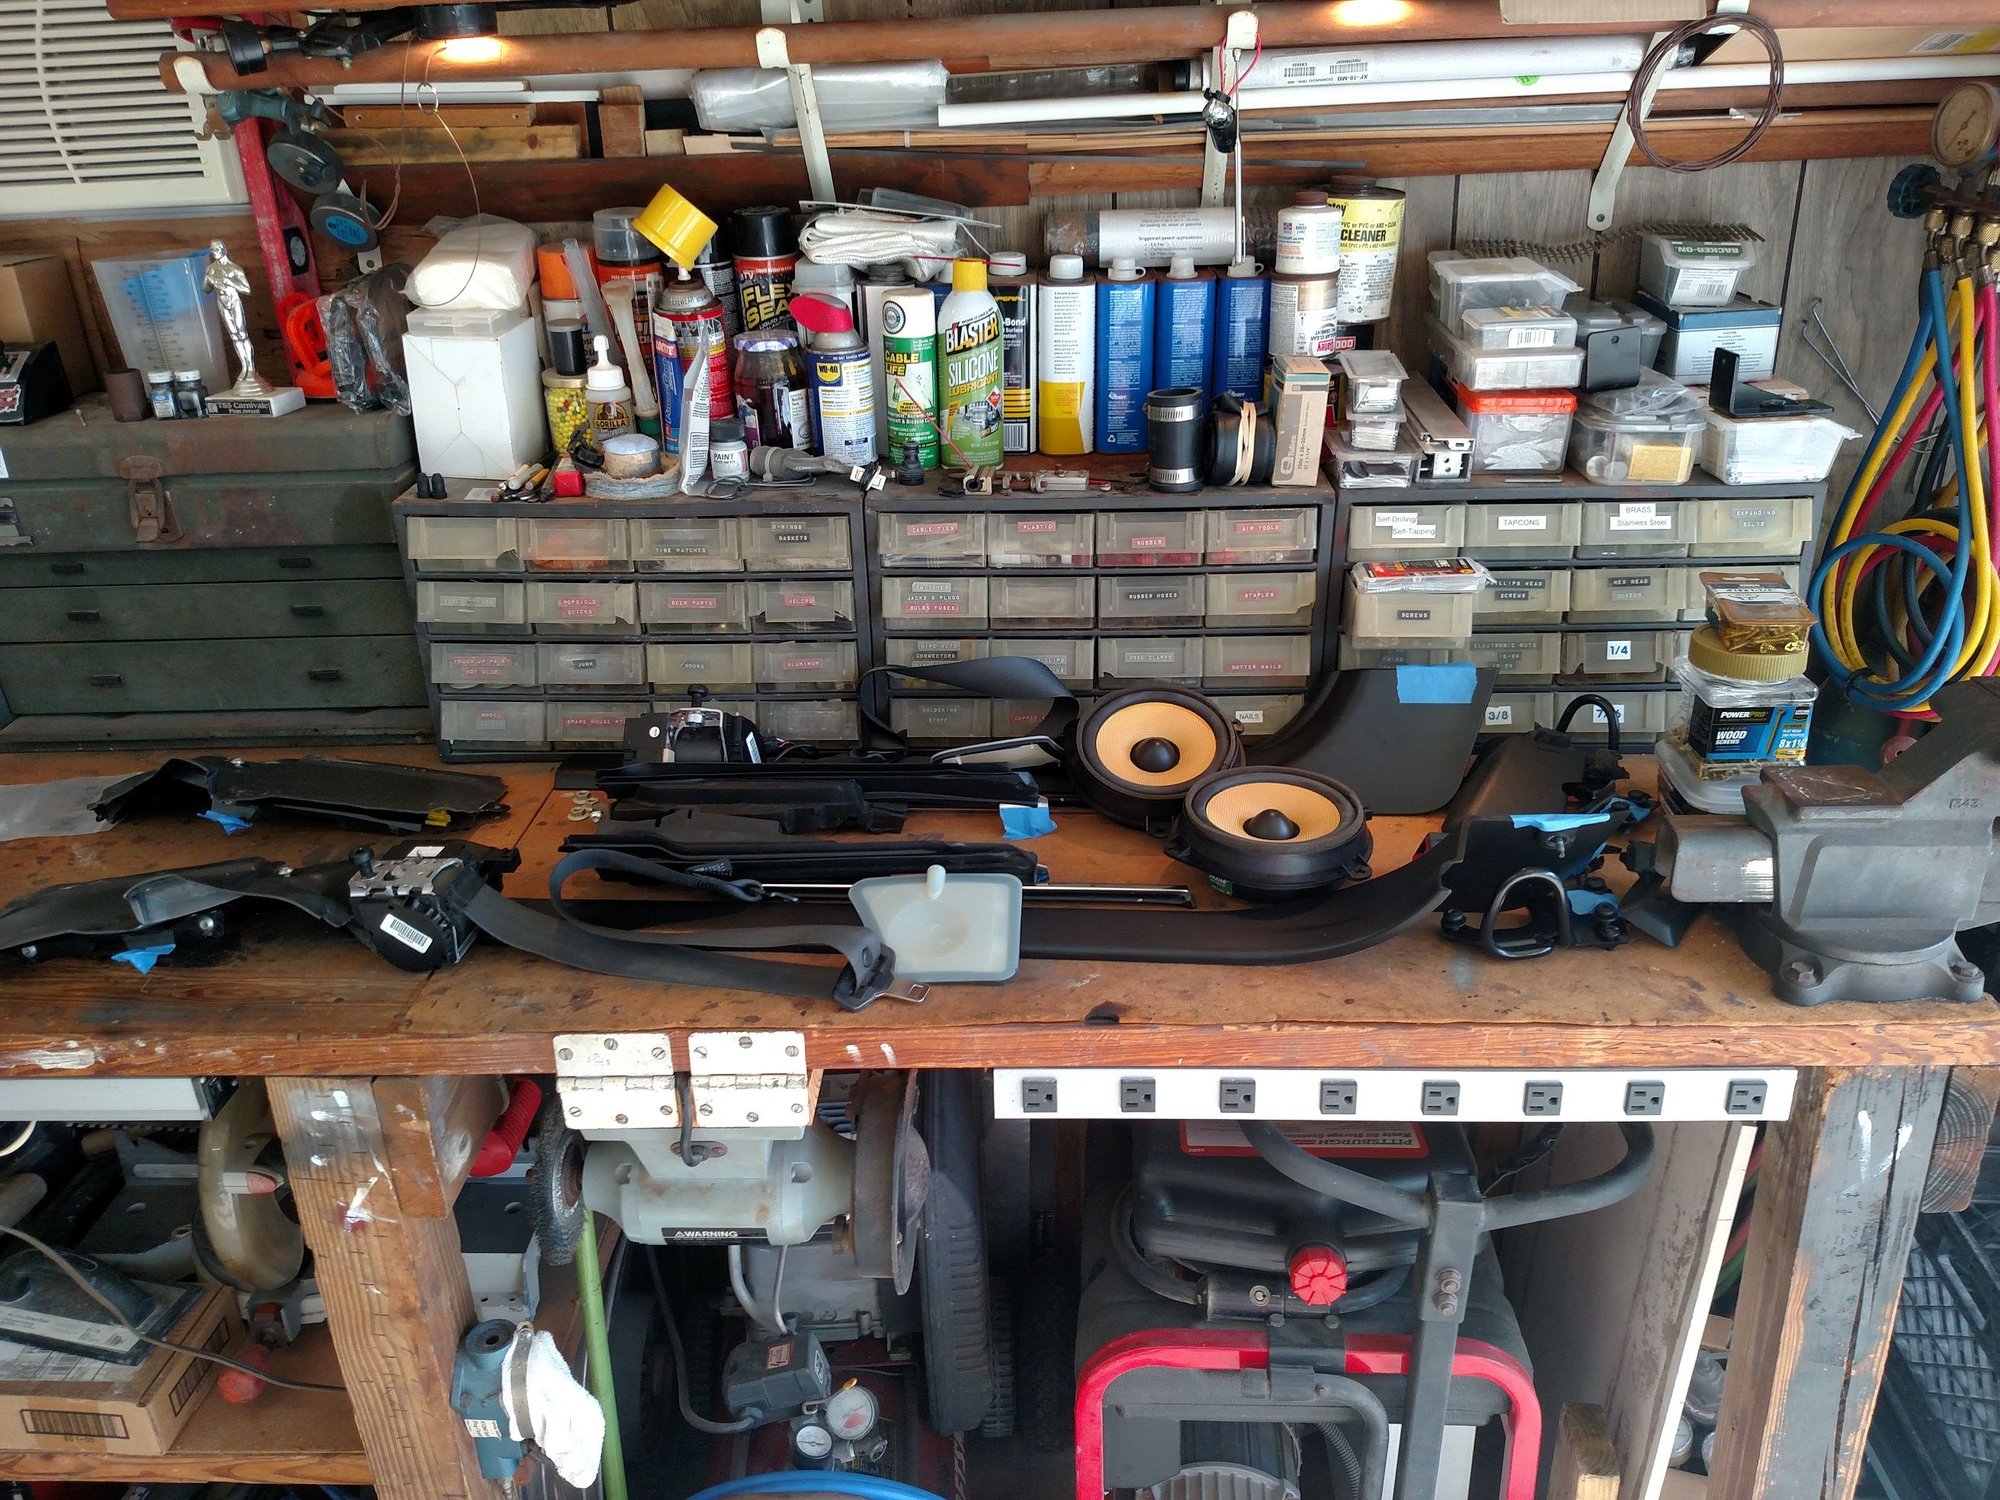
Hope this helps. These kind of jobs can seem a lot more daunting than they really are, but with a little guidance and patience, a Saturday mechanic with a moderate amount of skill can get this done just fine. Bonne chance, mes amies!
-Rick
The following users liked this post:
Cee Jay (01-25-2024)
#25
#26
Thread
Thread Starter
Forum
Replies
Last Post
FS[Western US]: Parting out 1997 XK8 convertible
BobRoy
PRIVATE For Sale / Trade or Buy Classifieds
49
09-18-2016 10:48 AM
Currently Active Users Viewing This Thread: 1 (0 members and 1 guests)


