When you click on links to various merchants on this site and make a purchase, this can result in this site earning a commission. Affiliate programs and affiliations include, but are not limited to, the eBay Partner Network.
I got my first dreaded engine light last week, stopped at Auto Zone and it’s CODE P0128 Coolant Thermostat (Coolant Temp Below Thermostat Regulating Temperature). I guess I should be happy that it’s only a thermostat issue. Back in the day I could buy a $5 part and easily replace it; sadly those days are probably long gone.
I then googled “Jaguar Forums along with a few key words (i.e. P0128, thermo replacement, XKR) hoping to find a thread, video, or pics detailing the R/R of the thermostat on my 2008 XKR. I found one thread, (gkubrak) but that was a water pump project.
I looked through the 4,000 page Service Manual and found the section on diagnostic trouble codes and also the section mentioning the thermostat as part of the cooling system and how to bleed the coolant. But, I was hoping to find a Chilton’s style remove and replace section but I didn’t find it.
In addition, after reading numerous related threads on the topic I realize that there are a lot of other projects that I could do at the same time, like the water pump and supercharger, valley hoses (rfarmery) which I am not opposed to tackling, assuming I don’t create new codes in the process. My mechanical skill level is mediocre at best but with a good video or thread I think I can tackle the thermostat myself...and with the Forum’s guiding hand of course! That is how I replaced my sagging headliner about a year ago; with everyone’s help.
In summation: Does anyone have a thread or video on removing and replacing the thermostat on a 2008 XKR? I would appreciate any advice/links to threads on other parts I should do, “now that I have gone this far!”
Thank you all in advance for your knowledge, opinions, and advice.
Be happy you have the metal housing on the XKR, and don’t have to replace the whole plastic housing + thermostat on an XK. Sorry, don’t have a step-by-step for you, since mines an XK.
Well, after I got the good news from mhminnich I ran out to the car and removed the Engine Cover for the first time. Now I know why there isn't a STICKY on R/R the thermostat!
And kj07xk that was my first thought, "I thought that can't be the thermostat that's not a plastic housing?" Lord, I got lucky twice today.
Now, what is the story on the semi-rotted foam insulation under the Engine Cover, replace it or remove it (and enjoy the whining sound of the supercharger)?
After checking with my parts for the repair - the thermostat and seal are different to the one in the above video - thermostat comes in pieces - I dunno why,
Mc Jag:
Thank you for the YouTube video and the research on the part. I plan on replacing the Thermostat with whichever type I remove, I would prefer the traditional-looking style rather than the 4-piece puzzle version.
I also plan on draining some of the existing coolant out of the system to minimize the mess at disassembly and use towels throughout below.
Last edited by ExKayRick; 02-09-2023 at 11:14 PM.
Reason: incomplete sentence
The foam on my engine cover was starting to rot so I took if off completely - that was years ago, not sure if it helps the engine to run a little cooler. The whine from the supercharger is music to my ears.
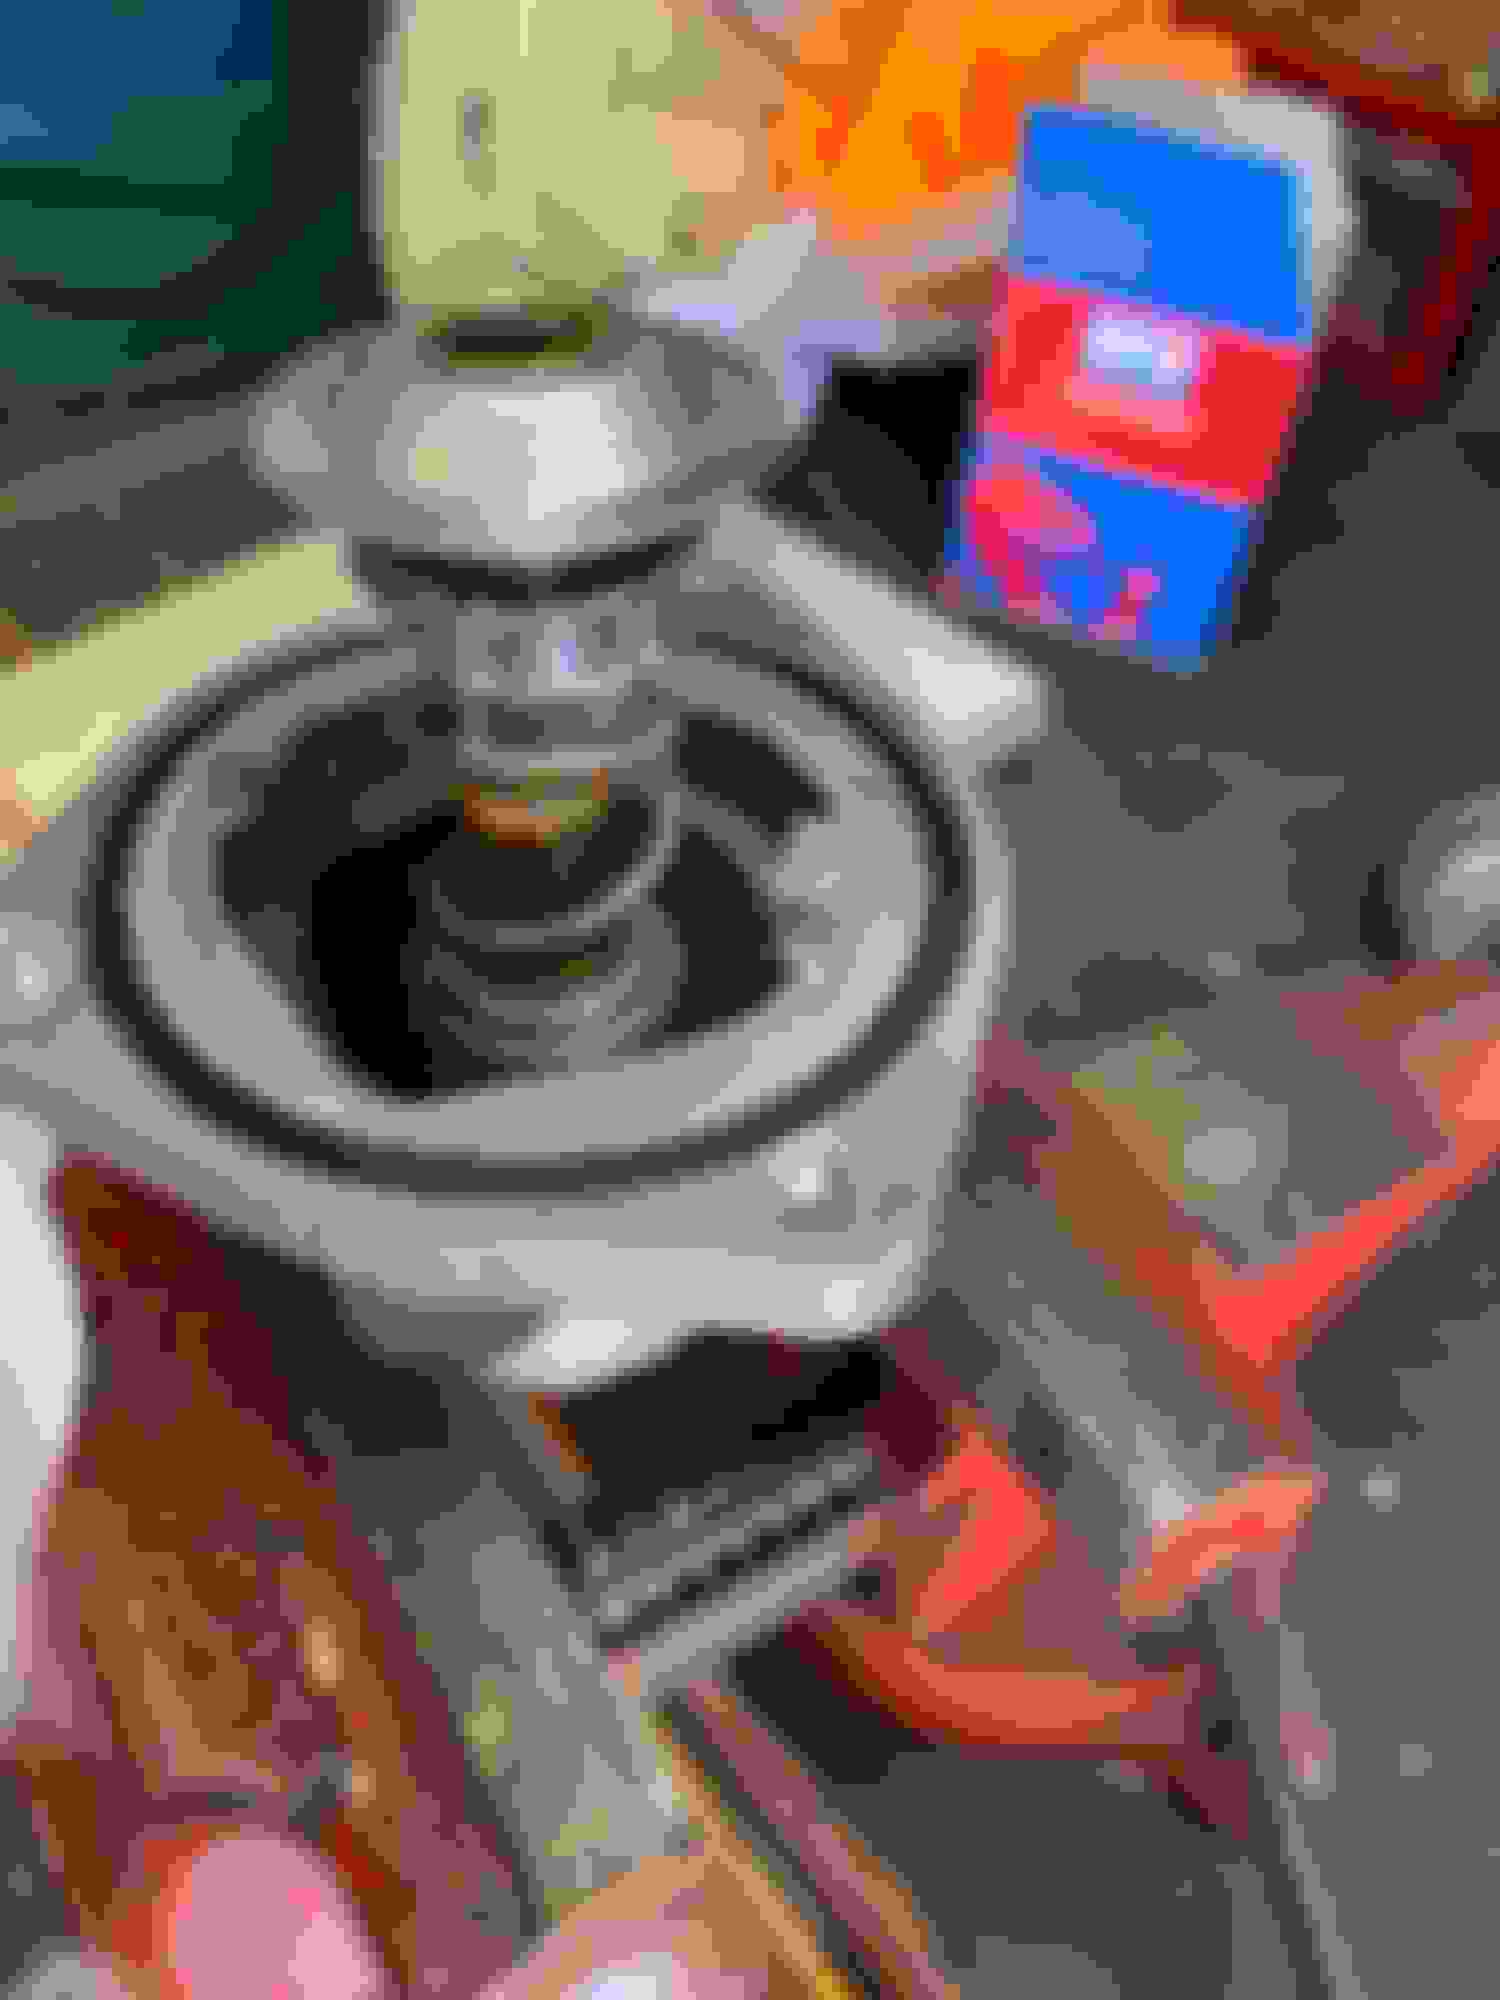
The XKR may have an aluminum housing, but that requires the 4 pc Thermostat. I had it partially removed. View of the inside of the aluminum housing. I placed the one piece onto the housing but the two protruding tabs made it clear the one piece I bought was not going to work.
McJag. your first instinct was correct, the thermostat I need comes in 4 pieces. After removing the Thermostat housing it's clear a standard one-piece thermostat isn't going to fit. I ordered the correct 4 pc thermostat from Amazon for $30 which includes a new housing rubber seal. I removed the aluminum housing elbow from the car so I could inspect and disassemble the piece on my bench, it took a little engineering to figure out how to compress the springs and twist the thermo body off of the aluminum tabs. Reassembly was easier.
Nothing comes easy for me when I am wrenching; that's been the story of my life. In a kitchen, I can kill it, but in the garage, I am a big bag of bad luck. But, I will press on and swap out the part come hell or high water.
I reassembled the old thermo after a cleaning and inspection, I should have tested it, but darkness was coming, so I refilled the coolant and double-checked that I connected the clips and hose clamps. I fired up the engine only to hear a loud squeal like I sucked up a cat. Well, I forgot to remove the rag I put under the housing to catch any dripping coolant. I shut 'er down and looked at the rag wrapped onto the tensioner. I took a beer break and watched a YouTuber change his XKR's serpentine belt. He showed me how to easily put the bonnet in 90-degree mode, which made access 100% better, I used a 3/8" breaker to release the tension and yanked the rag out. Restarted the car, let it run, and added coolant then went for a spin around the block, and alife was good again.
I took lots of pics and I will be detailing the steps of how to do the job. I plan on adding them to the thread but I won't be able to do the final phase until next weekend. But I would be honored if worthy.
Rick
Final Pics and Step by Step Instructions for Thermostat R/R
I know most Forum members can do this job with their eyes closed. These pics and instructions are for the Jag owner like me who wants to accept a fairly simple DIY job, save a few bucks in the process and feel good once it's complete.
REMOVAL AND REPLACEMENT OF 4 PC. THERMOSTAT FOR 2008 XKR
1. I lifted both front tires so that I could comfortably open the coolant drain plug. I only drained about 1/2 a gallon, just to clear the thermostat housing. Remember to loosen the coolant reservoir cap to allow for faster drainage. Also, I did not loosen the coolant drain plug completely, just enough to get a decent **** rate of coolant. See pics. A short-handled wide flat head screwdriver is ideal to open the coolant drain valve.
2. Tighten up the coolant drain plug before starting the thermostat replacement.
3. I also lowered the front end and then started with Removal/Replacement (R/R).
4. Undo the (2) bolts (#7mm) holding the wiring harness bracket located just above the supercharger snout, allowing you to move the wires out of the way.
5. Undo the (3) bolts (#8) on the thermostat housing, the upper two bolts are easy. The third (lower) bolt is harder to get at, I used a small wrench with a rag underneath to catch a falling tool or bolt.
6. Undo the reusable black tie strap by pushing on the tab.
7. Carefully open/separate the thermo housing and release the lower hose clamp from the aluminum housing to allow you to inspect and R/R the 4-pc. thermostat.
8. Remove the old thermostat by compressing and twisting the wings from under the tabs, see pics.
9. Ideally, assembly and compression of the new thermostat requires 4 hands, two to compress and two to twist wings underneath aluminum tabs. See pics. I used a bench vice to stabilize and hold the housing unit while using a second vise to create a fulcrum point to use a piece of wood to compress the new thermo so it twists into position.
10. Reinstall the Thermostat housing by reversing the above steps. Refill coolant.
11. REMOVE THE RAG!!
12. Make sure hose clamps are in place! Looking upward at the coolant plastic drain screw/plug. Closer look at the coolant drain plug Easy to release this plastic strap by depressing the tab. Attached to the aluminum thermo housing. Thermostat housing unit. The old rubber gasket was torn and a contributing factor for the code. Old 4pc. Thermostat, with torn and bulging rubber seal. Reassembling with correct thermostat. This is a two person job. Pic shows how I used my red bench vise to secure the thermo housing and used a heavier blue vice as a pivot point to use the wood to compress the thermostat while twisting the wings under the tabs. I did not have any issues with air pockets in the coolant lines, maybe because I didn't drain entirely, But by loosening this plug air can be released.
Congrats. Glad it worked out well. Where did you get the model Jag in the picture? Great way to own multiple cars w/o having to worry about garage space.
Thanks for pointing this out. Amazon, ebay, and most auto parts sites still recommend the wrong part here. My hoses ran a bit different from the XJR video, so I ended up having to dig up a baby ratchet to fit in the space available to pop the bottom bolt on the housing, but we're back up and running with no lights or trouble codes now.
 02-09-2023, 03:57 PM