When you click on links to various merchants on this site and make a purchase, this can result in this site earning a commission. Affiliate programs and affiliations include, but are not limited to, the eBay Partner Network.
My first ever experience at a Jaguar parts department. Had to order a replacement front wheel (rim) as New York City streets finally took vengeance on this (twice-repaired) wheel. Parts guy, Curtis, spent an hour on the 'phone tracking down a replacement, finally located one in Atlanta, Ga. Huzzahs to Curtis, Glen Cove JLR.
Today I fitted the �50 piece of Jaguar beige plastic I bought from SNG Barratt. Worth every penny, I reckon:
Mine's been missing from day one... I've thought of ordering one, but just don't feel like it's worth the price on principle ...ridiculous in all honestly for a plastic button...
Mine's been missing from day one... I've thought of ordering one, but just don't feel like it's worth the price on principle ...ridiculous in all honestly for a plastic button...
I agree! But having spent so much flippin' money on the car in the first place I got a bit punch-drunk I suppose. Next is the �200-and-something for the replacement centre bit of the front splitter...
This weekend, I fixed my glovebox...again. Last time, a bit of the sh*tty plastic arm linking the lid to the string had broken off, so I drilled another hole a bit further and that did the trick.
However, that was not taking into account the sheer ignorance/stupidity of that dude at the Jag dealership in Belgium, who actually broke the whole thing off the lid by opening the glovebox and pressing it down too hard (the lid didn't open 100% by itself, due to the string being attached further). Sadly I couldn't prove it as I only noticed the arm was off when I got back home...so I had to find another fix.
The sh*t plastic arm (seriously, how could they come up with such a crappy design in a car like this, instead of using something proper like a hydraulic cylinder?? ) being off and unusable (tried to tie it back to the lid with some little metal blades, but it just broke some more!), all that was left was the string/spring system, and a rectangular hole in the glovebox lid...
So I decided to bend 2 little metal blades and screw them together, to form something that would fit firmly enough in the hole in the lid and to screw a black leather strap cut from an old belt of mine to it. And of course, tie the string to the other end of the strap. It sure took some time and fine tuning, but in the end it works and even doesn't look to bad for a DIY fix, the black leather strap hiding the metal blades.
Picture to follow...stay tuned.
Well, at last I managed to take a few pics of the said fix. The black plastic you see at the bottom is the (open) glovebox lid. I think it turned out OK, despite it being good ole DIY...
@ Stuart: nice idea, but these hydraulic cylinders are WAY too long to fit in and do the job... From the side...ish From the front Close-up from the side.
Now it looks a little more luxurious with this actual leather, instead of the original cheap-*** plastic...
Last edited by George Abitbol; 08-13-2023 at 01:08 PM.
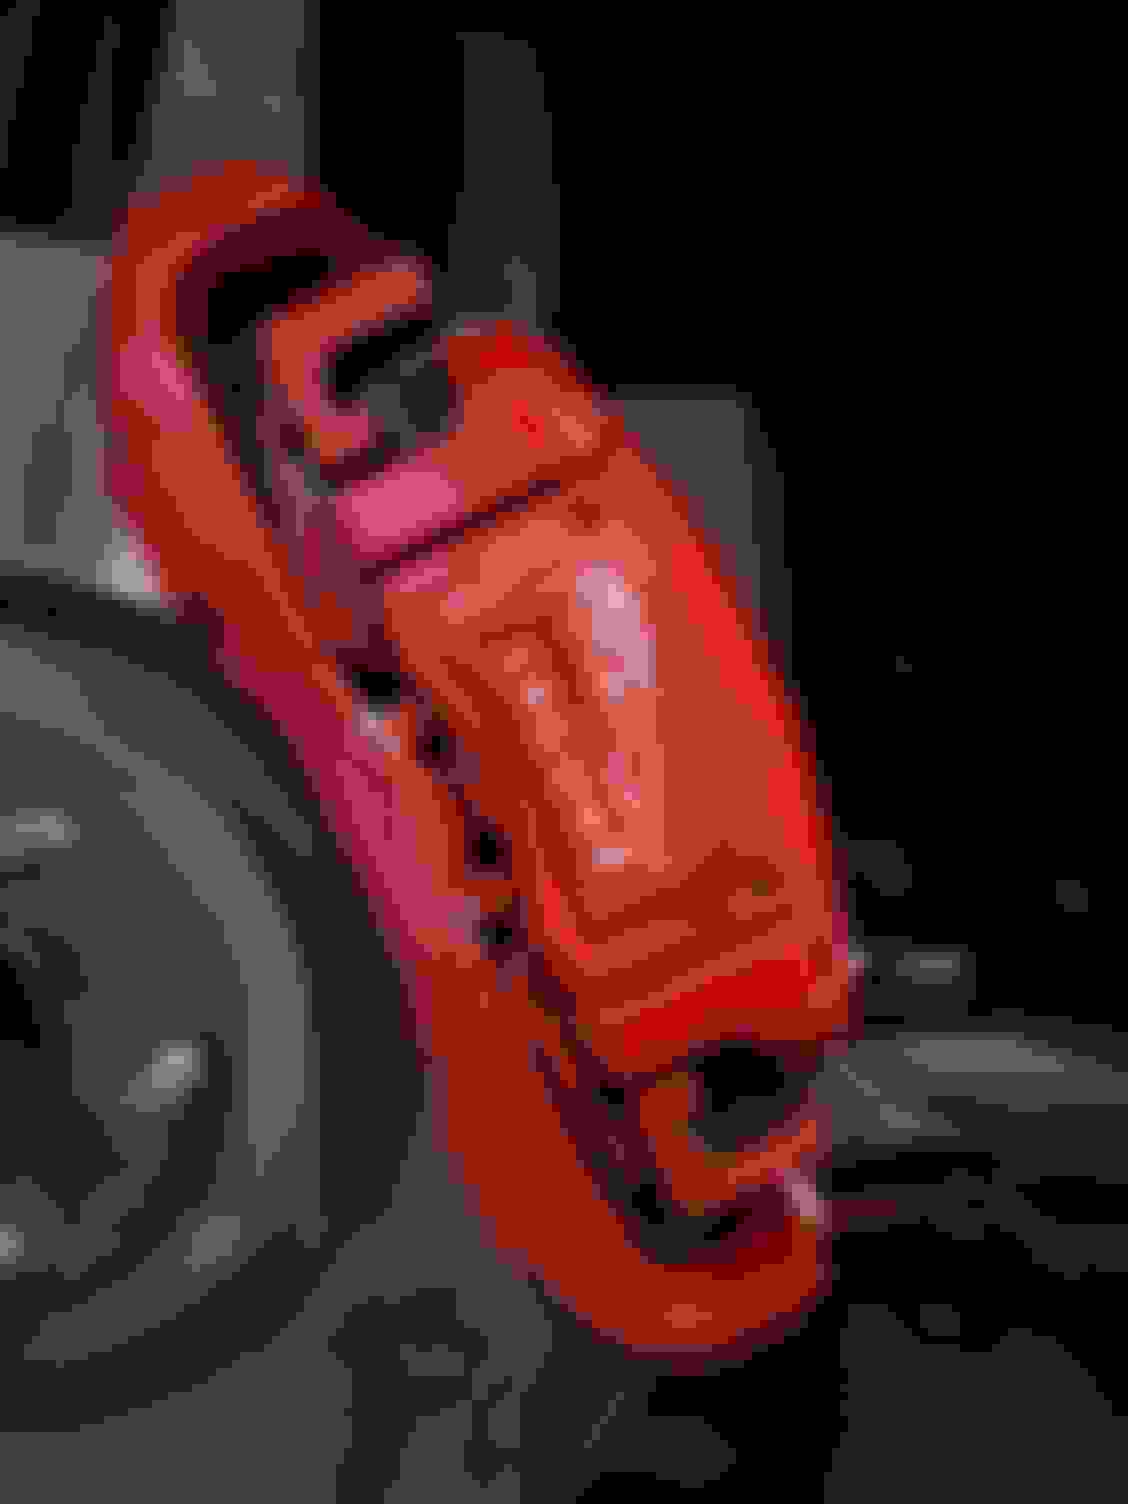
Up on the Quick Jack, removed all 4 wheels (off to the powder coaters..gloss black ) and went about cleaning and refinishing my calipers. They did not have any decals and were a dirty mess. Made the decals on my wifes CriCut.
Also removed my front carbon splitter that was repainted black by the previous owner. I'm hoping i can make it look respectable and save it. Basically sanded all the old black paint off to reveal the original carbon fiber. Just a couple of chips to try and hide. The lower edge is pretty beat up though. I have an idea to hopefully make that look present able also.
Calipers.. I also made a decal set in Black
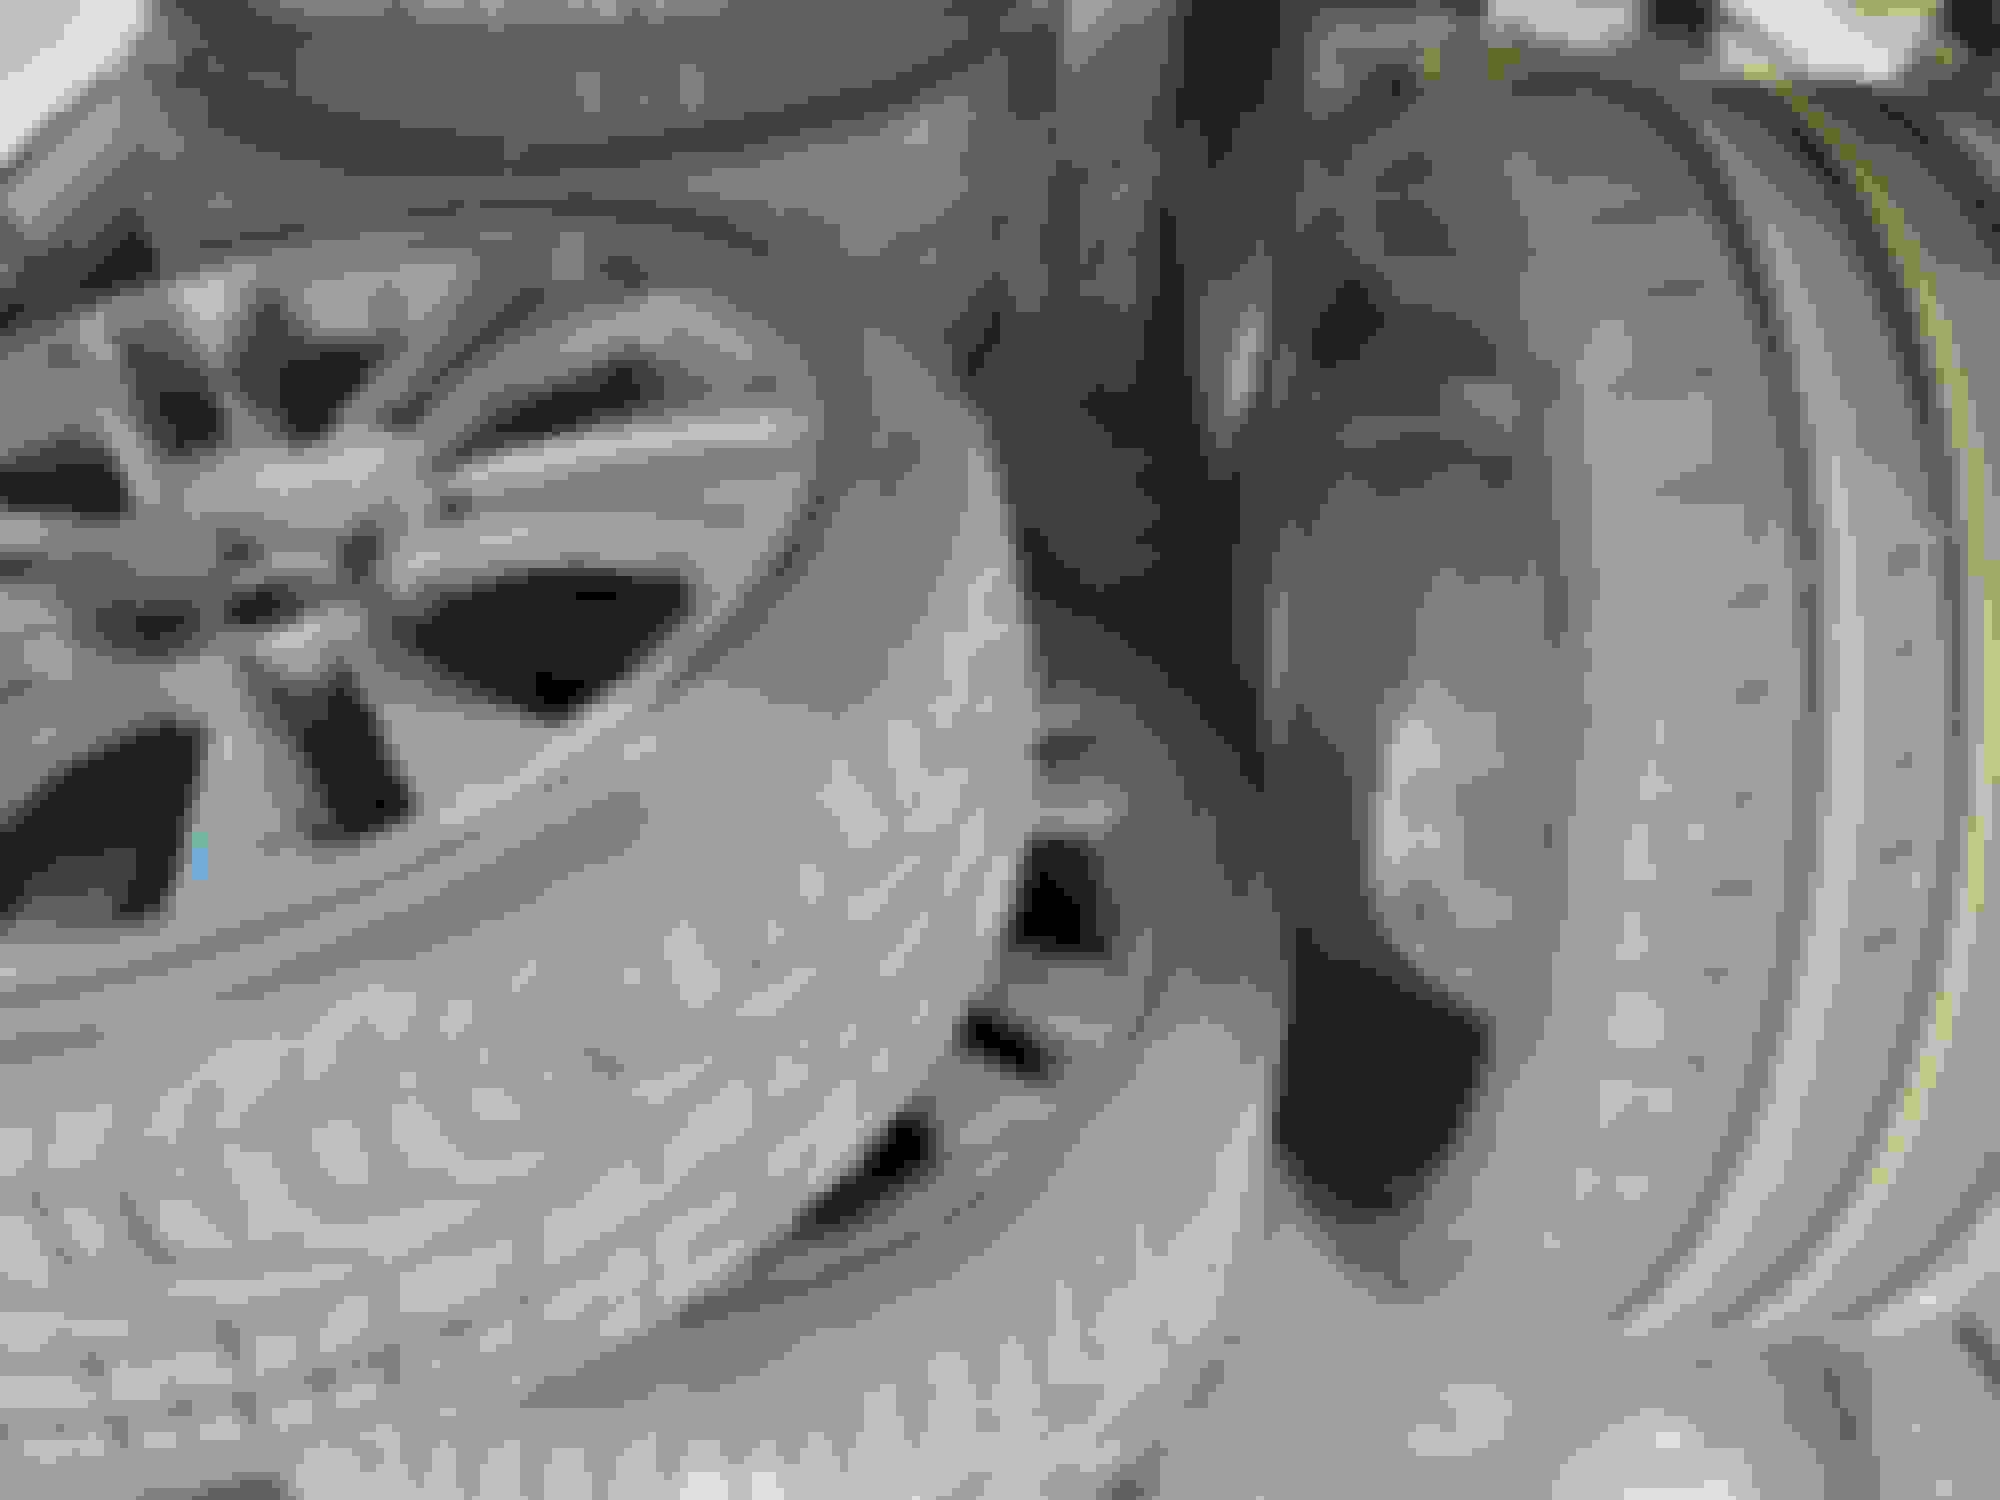
Up on the quick Jack. lifted at the jack points with the large rubber blocks in place. just a regular QJ5000
The Pzeros on the car actually had great tread but the newest was 2017 and the front right inner tread was worn..plus curb rashing on 2 of them Didnt want to chance it with the heat out here. Plus i wanted new tires on the refinished rims.
The carbon splitter as installed when i got the car...painted black.
two chips i have to address along with the really beat up bottom edge.
Sanded half the black off and put some water on it. I hope it turns out just as good in the end.
Last edited by VegasFPace; 08-16-2023 at 01:16 AM.
Great little project and it looks to be progressing extremely nicely I would definitely suggest having the carbon lip cleared and baked in order to retain that glossy look
It's going to look brilliant with the wheels in black
Up on the Quick Jack, removed all 4 wheels (off to the powder coaters..gloss black ) and went about cleaning and refinishing my calipers. They did not have any decals and were a dirty mess. Made the decals on my wifes CriCut.
Also removed my front carbon splitter that was repainted black by the previous owner. I'm hoping i can make it look respectable and save it. Basically sanded all the old black paint off to reveal the original carbon fiber. Just a couple of chips to try and hide. The lower edge is pretty beat up though. I have an idea to hopefully make that look present able also.
Calipers.. I also made a decal set in Black
Up on the quick Jack. lifted at the jack points with the large rubber blocks in place. just a regular QJ5000
The Pzeros on the car actually had great tread but the newest was 2017 and the front right inner tread was worn..plus curb rashing on 2 of them Didnt want to chance it with the heat out here. Plus i wanted new tires on the refinished rims.
The carbon splitter as installed when i got the car...painted black.
two chips i have to address along with the really beat up bottom edge.
Sanded half the black off and put some water on it. I hope it turns out just as good in the end.
Very nice work Tony. (what a weird idea to had carbon fiber painted black like plastic)
a coat of epoxy and a nice polish will bring it back to its glory.
Hello
Today I replaced the original trunk truts who were a little stiff and required to really help lifting the trunk top .
Installed the exact same tailgate struts from Stabilus (Lift-o-mat 287770)> Wish they would have open the trunk quicker by themselves, but it's allready much better than it was.
I also changed the supercharger oil, and although that was not "difficult" the place where the filling bolt is makes it a little back wrecker.
I'm 6'5" and can't figure how shorter guys are getting there! ( do they use a kind of bridge or something?)
Took me 2h30, and considering the colour of the used oil,I'm sooooo glad I did it! Knowing dirty things are running through her veins is really making me anxious.
Managed to get 210ml out of it and filled back with AC Delco oil as it seams according to what everyone up here is using,what's best for it.
(one more check on the todo list! )
I installed the Tesla style radio today. Many thanks to Sean W for his information and install video. Easy install. Mine is 6g/128g and is very fast. The sound improvement is amazing. Temp shows in Fahrenheit and there�s a plug for an external microphone. The downside is that the hazard switch in the trim piece isn�t working�no click when pressed so of course the hazards aren�t working and the airbag light is on. I asked for a new switch from the seller�we�ll see how that goes�
So you really heard the difference in sound quality as soon as you started to play?
You say it's fluid, would you say 6g 128G are enough or do you think the extra money to get the bigger memories is justified?
Will you install rear parking camera? What about the TPMS?
Could you tell which dealer you choosed?
Originally Posted by arenaej
I installed the Tesla style radio today. Many thanks to Sean W for his information and install video. Easy install. Mine is 6g/128g and is very fast. The sound improvement is amazing. Temp shows in Fahrenheit and there�s a plug for an external microphone. The downside is that the hazard switch in the trim piece isn�t working�no click when pressed so of course the hazards aren�t working and the airbag light is on. I asked for a new switch from the seller�we�ll see how that goes�
So you really heard the difference in sound quality as soon as you started to play?
You say it's fluid, would you say 6g 128G are enough or do you think the extra money to get the bigger memories is justified?
Will you install rear parking camera? What about the TPMS?
Could you tell which dealer you choosed?
This unit has a fairly sophisticated eq system. Once I got it adjusted to my liking it’s amazing. It’s very fast and has enough capacity for me. I loaded about 600 songs on it today, took less than 2 minutes. I do have a rear camera, working well. The camera shows on the top half of the screen and the parking sensors show on the bottom half…sound for the sensors comes from rear speakers. I’m thinking about the TPMS. I had disabled the TPMS using Autologic as I was tired of the false warnings. The system I saw uses one of the USB ports…maybe. I bought it from Navihua. They were professional, communicated well, it arrived via UPS in 7 days. I’m still working through the hazard switch issue, but they responded right away, asked for pictures and video that I provided, hopefully they will send a new switch promptly.
Last edited by arenaej; 08-29-2023 at 06:44 PM.
Reason: More information
So, not today but last Friday I went for the hydrogen descaling. And today I drove tested it .
I must say i'm surprised that i felt the difference at the moment I took the car out of the workshop and confirmed it today.
it's like on low speed it's more nervous.Like the difference you feel when you run after 2 days of rest under the sun, and when you run on the morning after a sleepless night.
Then, the noise. It's definitely more present, the pleasing V8 discret roaring when accelerating on a climbing street is much more audible.
I clearly feel it helped the engine to breath, like when you take ventoline after an asthma crisis.
So for 86$ it realy worthed it and as I don't know how the car has been cared of about all this in the past,I'll do another one in around 10.000km or after an internal engine check with a camera if it shows another one would be welcome.
If you've never done it to your XK, have one done. Can't be bad to her.
This unit has a fairly sophisticated eq system. Once I got it adjusted to my liking it�s amazing. It�s very fast and has enough capacity for me. I loaded about 600 songs on it today, took less than 2 minutes. I do have a rear camera, working well. The camera shows on the top half of the screen and the parking sensors show on the bottom half�sound for the sensors comes from rear speakers. I�m thinking about the TPMS. I had disabled the TPMS using Autologic as I was tired of the false warnings. The system I saw uses one of the USB ports�maybe. I bought it from Navihua. They were professional, communicated well, it arrived via UPS in 7 days. I�m still working through the hazard switch issue, but they responded right away, asked for pictures and video that I provided, hopefully they will send a new switch promptly.
Looks like they continue to improve on these units. Yes the TPMS is in 3 parts. 1- the receiver which plugs into one of the USB ports, 2- the sending units/ valves, they are 433mhz, not 315 so they must be replaced, 3- the app. There is a specific app for the TPMS to work so if you buy, make sure they include it. It's nice because it displays the actual air pressure in each tire.

 08-09-2023, 11:08 PM


 ) being off and unusable (tried to tie it back to the lid with some little metal blades, but it just broke some more!), all that was left was the string/spring system, and a rectangular hole in the glovebox lid...


 ( do they use a kind of bridge or something?)
 )
)