experience & pics of replacing the upper cam chain tensioners(2-post with PICS)How To
#1
 04-06-2011, 03:32 PM


Hello to one and all. Thought I would share my experience with pics of replacing the 2nd generation cam chain tensioners with the new metal tensioners the third generation. This thread is in support of "2nd tensions DIY instructions FAQ" by sininnellen. Therefore I will not repeat those instructions. This thread is also in two parts due to the number of pics. The first part, this part, is mostly for the purpost of showing the pics of the inside where the parts are replaced. The second thread will show pics and discuss the problems I ran into with solutions.
The first three pics are of the right bank. First pic shows what it looked like initially but with the tie wrap installed on the exhaust cam sprocket and chain. This is with the 2nd generation tensioner still installed.
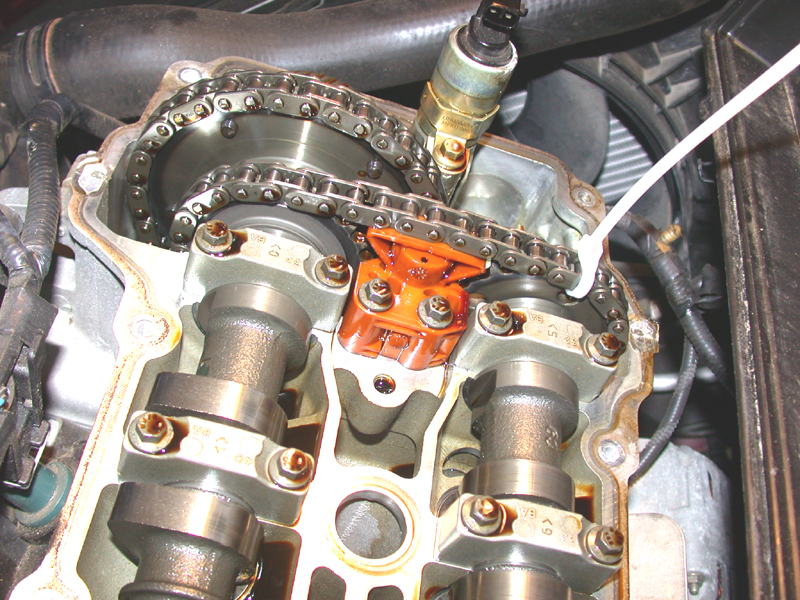
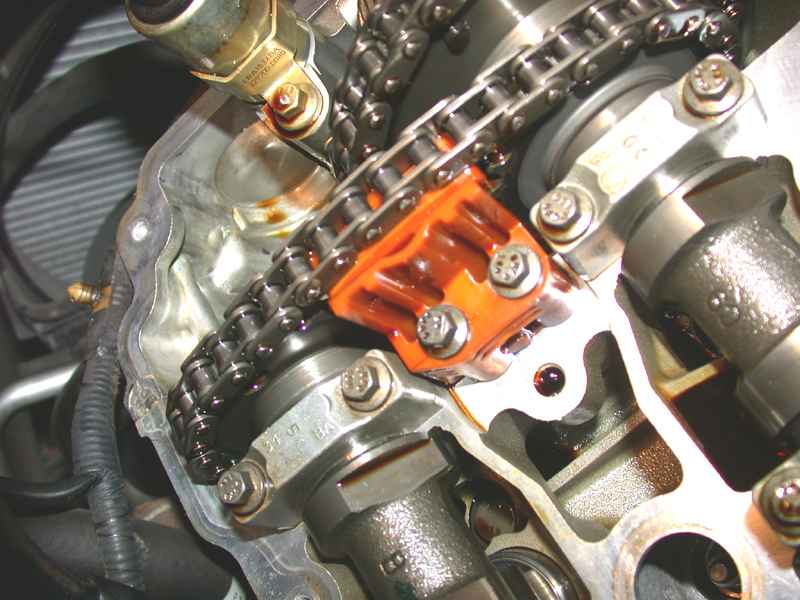
The next two pics show the new metal 3rd generation installed both front and rear view with the tie wrap still installed. Don't forget to remove the tie wrap.


The next set of pics are of the left bank with the first three showing the as was installation, 2nd generation still in place. The next two show the new metal version installed both fore and aft. These last two also show a shop rag jammed in the big hole up there. I thought that was a good idea to avoid any parts falling down the big hole. I did that on both sides. Removing the old tensioners is not a concern here in that they stay in one piece due to the oil in the piston causing a suction that keeps them from falling apart. But, on the right bank you have to remove the red safety pin that holds the new tensioner together before you can install it. Therefore you have to hold it together as you place it. On the left bank you can leave the red pin in place as it is installed. See next to last pic. Just don't forget to remove it. Also the new tensioners are different left to right. They are labeled LB and RB.


To do this job you have to undo the exhaust cam as covered in the FAQ. I will not repeat those instructions except to add that the cam wants to roll down hill when lifted up for tensioner replacement. It will put a twisting load on the cam chain. I anticipated this and put one of the cam cap bolts back in the lower most aft location. This gave the aft end of the cam something to rest on which kept it from trying to twist the chain.
The last pic is the only one that shows the cam caps removed. Also the first pic of the left bank shows a tie wrap holding the oil dip stick out of the way. That worked good.
The torque values for the tensioners and cam caps are 14 and 11 nm respectively.
That is all for this thread. I will continue on with more pics and discussion in the second thread.
EZDriver
The first three pics are of the right bank. First pic shows what it looked like initially but with the tie wrap installed on the exhaust cam sprocket and chain. This is with the 2nd generation tensioner still installed.
The next two pics show the new metal 3rd generation installed both front and rear view with the tie wrap still installed. Don't forget to remove the tie wrap.
The next set of pics are of the left bank with the first three showing the as was installation, 2nd generation still in place. The next two show the new metal version installed both fore and aft. These last two also show a shop rag jammed in the big hole up there. I thought that was a good idea to avoid any parts falling down the big hole. I did that on both sides. Removing the old tensioners is not a concern here in that they stay in one piece due to the oil in the piston causing a suction that keeps them from falling apart. But, on the right bank you have to remove the red safety pin that holds the new tensioner together before you can install it. Therefore you have to hold it together as you place it. On the left bank you can leave the red pin in place as it is installed. See next to last pic. Just don't forget to remove it. Also the new tensioners are different left to right. They are labeled LB and RB.
To do this job you have to undo the exhaust cam as covered in the FAQ. I will not repeat those instructions except to add that the cam wants to roll down hill when lifted up for tensioner replacement. It will put a twisting load on the cam chain. I anticipated this and put one of the cam cap bolts back in the lower most aft location. This gave the aft end of the cam something to rest on which kept it from trying to twist the chain.
The last pic is the only one that shows the cam caps removed. Also the first pic of the left bank shows a tie wrap holding the oil dip stick out of the way. That worked good.
The torque values for the tensioners and cam caps are 14 and 11 nm respectively.
That is all for this thread. I will continue on with more pics and discussion in the second thread.
EZDriver
Last edited by H20boy; 04-06-2011 at 04:58 PM. Reason: Made big pics out of your thumbnails
The following 37 users liked this post by EZDriver:
aardvark64 (04-27-2013),
Alvin Burns (04-06-2011),
Bamaman (01-12-2012),
Bob OB (07-17-2013),
brantman (01-27-2015),
and 32 others liked this post.

Top Answer
04-06-2011, 04:25 PM
This is the second thread of a two thread series on this subject. As mentioned in the first thread this write up supports the thread "2nd tensions DIY instruction FAQ" by sinonnellen. And I won't repeat those instructions here except to cover some problems I had.
The biggest headache I had was removing the cam covers. On the right bank cam cover I had one @#$%^ problem with the lower rear most perimeter bolt. It is really tight in there and the first thing one should do is make sure one can get that thing out before even starting the job. I don't mean removing it first. Just make sure you can get to it well enough to remove it and reinstall it. I used a quarter inch socket set and had to go buy a universal and a long extension in addition. I wish I could have found a combination universal and socket of the correct size which would have been better. But with a short socket, universal and long extension I got it.
On the left bank cam cover removal I hit a real snag and almost gave up. The FAQ says to remove the oil dip bracket nut and gently lift the dip stick bracket off the cam cover nut/stud which is about an inch or more long. I don't think that is possible. At least I'm not strong enough. And I know of one local mechanic that broke that bracket trying to gently lift the bracket off the stud. I was stuck. So I do what I always do. Sit and think. Finally I had it. I got my dremel tool out with a cut off saw blade and cut the stud off just above the nut that was still installed. Then I could gently lift the oil dip stick bracket off the stud after removing the nut. After removing the cam cover I cleaned up the stud end so the nut would easily go back on. The results of this can be seen in the first picture attached. It worked well. Just be careful with the dremel tool and don't damage the cam cover.

The FAQ recommends removing the cooling overflow tank. There is one bolt on top that I removed and pulled it aside with a tie wrap and didn't loose a drop. Worked good.
The next picture shows the comparision of the new metal tensioner with the big plastic tensioner. Quite a difference in size.

The next picture shows the two removed plastic tensioners.

At first I thought they looked pretty good and probably would have kept on cooking. But after a close look as you get in the last picture cracks were starting just above the notch cut out at the bottom of the barrel. As you can see in the picture the cut out has sharp corners that cause stress consentration in that area which in turn causes fatigue cracking.

That is exactly what is happening. These upper tensioners are subject to side load especially during engine start up. Why the notch cut out? I don't know but it sure was a stupid idea and probably ruined a good part.
The engine runs fine with no loud racket on first start up so I guess I did a good job and didn't forget any tie wraps. I did notice one thing though. With the new metal tensioners I can now hear the faint sound of the cam chains running. I couldn't hear that before with the plastic parts. It sounds good to me.
Hope all this helped.
EZDriver
The biggest headache I had was removing the cam covers. On the right bank cam cover I had one @#$%^ problem with the lower rear most perimeter bolt. It is really tight in there and the first thing one should do is make sure one can get that thing out before even starting the job. I don't mean removing it first. Just make sure you can get to it well enough to remove it and reinstall it. I used a quarter inch socket set and had to go buy a universal and a long extension in addition. I wish I could have found a combination universal and socket of the correct size which would have been better. But with a short socket, universal and long extension I got it.
On the left bank cam cover removal I hit a real snag and almost gave up. The FAQ says to remove the oil dip bracket nut and gently lift the dip stick bracket off the cam cover nut/stud which is about an inch or more long. I don't think that is possible. At least I'm not strong enough. And I know of one local mechanic that broke that bracket trying to gently lift the bracket off the stud. I was stuck. So I do what I always do. Sit and think. Finally I had it. I got my dremel tool out with a cut off saw blade and cut the stud off just above the nut that was still installed. Then I could gently lift the oil dip stick bracket off the stud after removing the nut. After removing the cam cover I cleaned up the stud end so the nut would easily go back on. The results of this can be seen in the first picture attached. It worked well. Just be careful with the dremel tool and don't damage the cam cover.
The FAQ recommends removing the cooling overflow tank. There is one bolt on top that I removed and pulled it aside with a tie wrap and didn't loose a drop. Worked good.
The next picture shows the comparision of the new metal tensioner with the big plastic tensioner. Quite a difference in size.
The next picture shows the two removed plastic tensioners.
At first I thought they looked pretty good and probably would have kept on cooking. But after a close look as you get in the last picture cracks were starting just above the notch cut out at the bottom of the barrel. As you can see in the picture the cut out has sharp corners that cause stress consentration in that area which in turn causes fatigue cracking.
That is exactly what is happening. These upper tensioners are subject to side load especially during engine start up. Why the notch cut out? I don't know but it sure was a stupid idea and probably ruined a good part.
The engine runs fine with no loud racket on first start up so I guess I did a good job and didn't forget any tie wraps. I did notice one thing though. With the new metal tensioners I can now hear the faint sound of the cam chains running. I couldn't hear that before with the plastic parts. It sounds good to me.
Hope all this helped.
EZDriver
Last edited by H20boy; 04-06-2011 at 04:56 PM.
#2
04-06-2011, 04:25 PM
This is the second thread of a two thread series on this subject. As mentioned in the first thread this write up supports the thread "2nd tensions DIY instruction FAQ" by sinonnellen. And I won't repeat those instructions here except to cover some problems I had.
The biggest headache I had was removing the cam covers. On the right bank cam cover I had one @#$%^ problem with the lower rear most perimeter bolt. It is really tight in there and the first thing one should do is make sure one can get that thing out before even starting the job. I don't mean removing it first. Just make sure you can get to it well enough to remove it and reinstall it. I used a quarter inch socket set and had to go buy a universal and a long extension in addition. I wish I could have found a combination universal and socket of the correct size which would have been better. But with a short socket, universal and long extension I got it.
On the left bank cam cover removal I hit a real snag and almost gave up. The FAQ says to remove the oil dip bracket nut and gently lift the dip stick bracket off the cam cover nut/stud which is about an inch or more long. I don't think that is possible. At least I'm not strong enough. And I know of one local mechanic that broke that bracket trying to gently lift the bracket off the stud. I was stuck. So I do what I always do. Sit and think. Finally I had it. I got my dremel tool out with a cut off saw blade and cut the stud off just above the nut that was still installed. Then I could gently lift the oil dip stick bracket off the stud after removing the nut. After removing the cam cover I cleaned up the stud end so the nut would easily go back on. The results of this can be seen in the first picture attached. It worked well. Just be careful with the dremel tool and don't damage the cam cover.
The FAQ recommends removing the cooling overflow tank. There is one bolt on top that I removed and pulled it aside with a tie wrap and didn't loose a drop. Worked good.
The next picture shows the comparision of the new metal tensioner with the big plastic tensioner. Quite a difference in size.
The next picture shows the two removed plastic tensioners.
At first I thought they looked pretty good and probably would have kept on cooking. But after a close look as you get in the last picture cracks were starting just above the notch cut out at the bottom of the barrel. As you can see in the picture the cut out has sharp corners that cause stress consentration in that area which in turn causes fatigue cracking.
That is exactly what is happening. These upper tensioners are subject to side load especially during engine start up. Why the notch cut out? I don't know but it sure was a stupid idea and probably ruined a good part.
The engine runs fine with no loud racket on first start up so I guess I did a good job and didn't forget any tie wraps. I did notice one thing though. With the new metal tensioners I can now hear the faint sound of the cam chains running. I couldn't hear that before with the plastic parts. It sounds good to me.
Hope all this helped.
EZDriver
Last edited by H20boy; 04-06-2011 at 04:56 PM.
The following 29 users liked this post by EZDriver:
3timejag (11-16-2015),
aardvark64 (04-27-2013),
Alvin Burns (04-06-2011),
berniekiwi (05-02-2021),
Bob OB (08-08-2013),
and 24 others liked this post.
#3
04-06-2011, 04:50 PM
Veteran Member
But after a close look as you get in the last picture cracks were starting just above the notch cut out at the bottom of the barrel. As you can see in the picture the cut out has sharp corners that cause stress consentration in that area which in turn causes fatigue cracking. That is exactly what is happening.
Yes, there is also a longitudinal groove in the sleeve at the same point. More stress at the plastic key that fits in the groove. Then there is all the effort expended on making voids in the plastic, and not bringing the sides of the barrel all the way to the edge for greater support
It is actually a nicer design than the newer part. In metal, it would have been bulletproof.
A cad program is one thing, but if some junior engineer had taken a 8 ounce hammer and smacked the piston foot sideways, they might have figured it out.
How many miles?
++
Last edited by plums; 04-06-2011 at 04:58 PM.
The following users liked this post:
stetson1 (03-30-2015)
#4
04-06-2011, 04:54 PM
Veteran member
 You can edit and move them around if you like.
The following 2 users liked this post by H20boy:
Alvin Burns (04-06-2011),
EZDriver (04-06-2011)
#5
04-06-2011, 04:55 PM

Senior Member
The biggest headache I had was removing the cam covers. On the right bank cam cover I had one @#$%^ problem with the lower rear most perimeter bolt. It is really tight in there and the first thing one should do is make sure one can get that thing out before even starting the job. I don't mean removing it first. Just make sure you can get to it well enough to remove it and reinstall it. I used a quarter inch socket set and had to go buy a universal and a long extension in addition. I wish I could have found a combination universal and socket of the correct size which would have been better. But with a short socket, universal and long extension I got it.
I had the same problem but not as bad a s you discribe. I use to own a 1/4 Flexible Extension that I wished I still owned and thought I might have to find one to buy. I still might order one as it did come in handy.
1/4� Drive 1/4� Square, Flexible Extension - xxxw-gns282150
The following 3 users liked this post by Glenn Barickman:
#6
04-06-2011, 05:37 PM
Veteran Member
... except to add that the cam wants to roll down hill when lifted up for tensioner replacement. It will put a twisting load on the cam chain. I anticipated this and put one of the cam cap bolts back in the lower most aft location. This gave the aft end of the cam something to rest on which kept it from trying to twist the chain.
The following 3 users liked this post by plums:
#7
04-06-2011, 08:30 PM
Trending Topics
#9
04-06-2011, 09:14 PM
Veteran Member
The following users liked this post:
EZDriver (04-14-2011)

#11
04-16-2011, 03:55 PM
I recently had the secondary cam chain tensioner's replaced and wanted to share with everyone pictures of the old tensioners. I drive a 2001 Jaguar XKR Coupe with 90,000 miles. I purchased the car with 72.000 miles. I called the dealer that serviced the car and he confirmed the car still had the original tensioners. The car has run perfectly, so last year I kept debating whether or not to change them. I waited over the winter with the car in storage, but several months ago I read on the forum several drivers with a MY 2001 had theirs changed, I finally bit the bullet and had them changed. Total cost including parts was $980.
The tensioners have the same small crack that the previous pictures show, but what is different about one tensioner was the plastic shoe separated from the top of the tensioner. You can clearly see that the end of the plastic shoe had fractured completely off and was not found on the car. The top of the shoe shows groves from the cam chain passing over and is quite deep.
My point is that I think I avoided the bullet just in time. The shoe could have let go at any time and would have caused havoc to the engine. I think the car was on borrowed time. I am so glad I had it changed before the current year driving season. I plan on driving the car to several JCNA shows this year and certainly did not want to experience trouble with the tensioners. The car is ranked 6th nationally and 2nd in the NC region.
Thanks to all the forum members who have shared their experience as it convinced me to change mine.
The following users liked this post:
Bob OB (04-11-2014)
#12
04-16-2011, 05:20 PM
Veteran member
John, I'm glad you chose to be proactive on that repair, I realize how much the repair total can lead others to procrastinate for too long. You made a wise choice. Looking at the pics, is there a little piece of plastic (from the shoe edge) missing? Does that mean it is floating around in your engine...hopefully in your oil pan. You going to go exploring to try and find it?
#13
05-02-2011, 05:32 AM

#15
05-03-2011, 08:20 AM
Wow. Totally cracked. Too bad there is no oil pressure gauge to alert you of a problem like this, IF it works like that. Most oil pumps pump a lot more than the engine really needs and excess oil runs out the bypass.
I guess these tensioners can malfunction in a number of different ways. Mine didn't crack, but threw a shoe, allowing the cam chain to get loose. I believe it caused all the random misfire codes on that bank. I am not worried about it loose in the pan, but I will take the pan off and have a look since I'm still down with the AC compressor.
When it rains it pours.
#16
01-12-2012, 01:48 PM

Junior Member
Hi
I finally found the words I was looking for " I believe it caused all the random misfire codes on that bank." !!!
I waited too long I guess. I had 2 occasions where my engine ran rough for 30 -50 seconds when cold, then smoothed out. No check engine lights or codes. I didn't suspect the timing chain. The 3rd time I experienced a rough start up there was a noise on the right bank which didn't go away. It really runs crappy and the exhaust coming out the right tailpipe is cool indicating something wrong on the right bank. Check engine lite now on! I figure the chain must have jumped a few teeth to run this bad. I'm guessing I have to at least change the chain on the right side and believe that requires removing the front cover, Am I right? I have not seen any pictures of the lower chain layouts in postings so far. have I missed them?
#17
01-12-2012, 05:18 PM
Veteran Member
Hi
I finally found the words I was looking for " I believe it caused all the random misfire codes on that bank." !!!
I waited too long I guess. I had 2 occasions where my engine ran rough for 30 -50 seconds when cold, then smoothed out. No check engine lights or codes. I didn't suspect the timing chain. The 3rd time I experienced a rough start up there was a noise on the right bank which didn't go away. It really runs crappy and the exhaust coming out the right tailpipe is cool indicating something wrong on the right bank. Check engine lite now on! I figure the chain must have jumped a few teeth to run this bad. I'm guessing I have to at least change the chain on the right side and believe that requires removing the front cover, Am I right? I have not seen any pictures of the lower chain layouts in postings so far. have I missed them?
I finally found the words I was looking for " I believe it caused all the random misfire codes on that bank." !!!
I waited too long I guess. I had 2 occasions where my engine ran rough for 30 -50 seconds when cold, then smoothed out. No check engine lights or codes. I didn't suspect the timing chain. The 3rd time I experienced a rough start up there was a noise on the right bank which didn't go away. It really runs crappy and the exhaust coming out the right tailpipe is cool indicating something wrong on the right bank. Check engine lite now on! I figure the chain must have jumped a few teeth to run this bad. I'm guessing I have to at least change the chain on the right side and believe that requires removing the front cover, Am I right? I have not seen any pictures of the lower chain layouts in postings so far. have I missed them?
Here is a link to a complete timing job on an S-type 4.0, which is similar.
https://www.jaguarforums.com/forum/s...etc-faq-45579/
#19
01-13-2012, 10:24 AM
#20
01-13-2012, 11:13 AM

When I changed my tensioners I had the same problem with moving the dipstick to take out that valve cover bolt. I never thought to cut the bolt shorter. I like that idea better than what I did. I split the flange like they did on the injector wire rack mounts with an air hacksaw.
For the awkward bolt, could you not have put a second hexagon nut on the stud, tightened the two nuts together and then used a spanner or socket on the lower nut to remove the stud? This is a common technique for removing broken or frozen studs and it would avoid cutting the stud or the flange. Once the stud is out, remove both nuts from it using two spanners and it's ready to go back in.
The following 4 users liked this post by GGG: