
Learned about door window adjustment
#1
 03-26-2012, 04:14 PM

Helped with the texts and videos of this forum (big thanks!) and with JTIS adjusting the windows was a simple task. Here's a short summary of my learnings, want to share with others possibly wondering about the same topic.
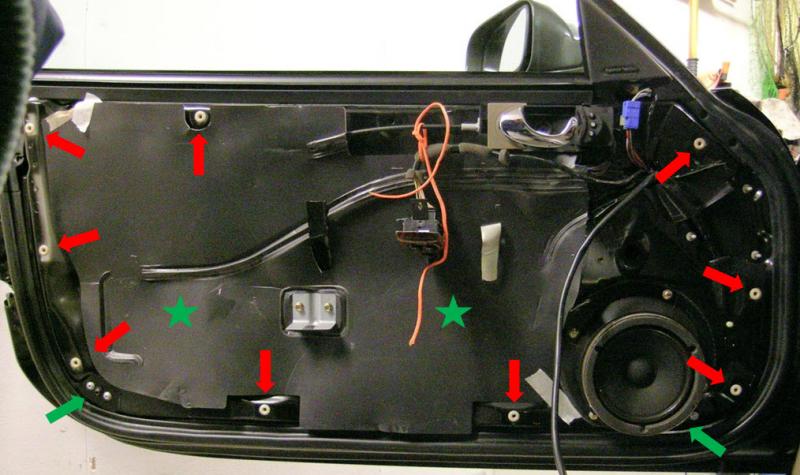
When removing the door casing note the locations of the plastic pins - red arrows in the picture. First take off the three screws etc. which lock the casing to the door frame. Use a wide plastic tool to crack a small opening between the casing and the door, evenly all around the door. Then pull the casing off with fingers, again going evenly around. And the second door casing came out with no broken pins�
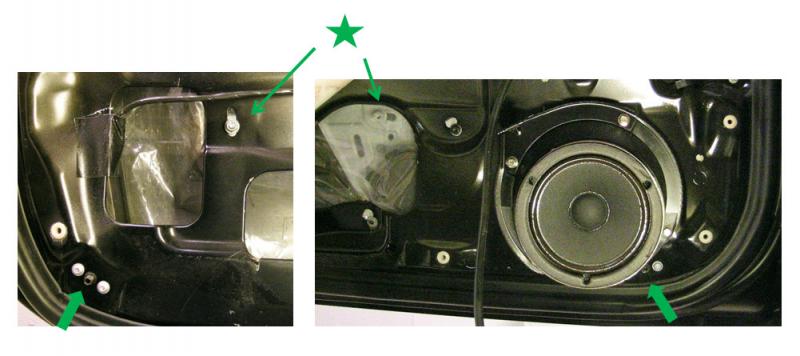
Green arrows mark the lower adjuster screws. These tilt the glass top sideways in-out.
Green stars mark the glass regulator stop adjuster (front one) and the glass lift regulator channel adjuster lock nut (JTIS words, rear one). The front one seems to adjust the glass height limit, the rear one adjusts the parallelism between rear edge of door glass and front edge of quarter light. The front-back tilt of the glass, that is.
JTIS also mentions and pictures "Adjust gap between glass and outer waist rail flange - slacken rear guide upper securing screw" and "With glass in fully raised position, slacken door waist adjuster lock nuts and hand screw adjusters in until they abut the door glass stops". These I did succeed to identify in the door.
Apparently re-adjusting the windows is a routine service item. With this knowledge I managed to do the second door easily and quickly :-)
Jouko
When removing the door casing note the locations of the plastic pins - red arrows in the picture. First take off the three screws etc. which lock the casing to the door frame. Use a wide plastic tool to crack a small opening between the casing and the door, evenly all around the door. Then pull the casing off with fingers, again going evenly around. And the second door casing came out with no broken pins�
Green arrows mark the lower adjuster screws. These tilt the glass top sideways in-out.
Green stars mark the glass regulator stop adjuster (front one) and the glass lift regulator channel adjuster lock nut (JTIS words, rear one). The front one seems to adjust the glass height limit, the rear one adjusts the parallelism between rear edge of door glass and front edge of quarter light. The front-back tilt of the glass, that is.
JTIS also mentions and pictures "Adjust gap between glass and outer waist rail flange - slacken rear guide upper securing screw" and "With glass in fully raised position, slacken door waist adjuster lock nuts and hand screw adjusters in until they abut the door glass stops". These I did succeed to identify in the door.
Apparently re-adjusting the windows is a routine service item. With this knowledge I managed to do the second door easily and quickly :-)
Jouko
Last edited by H20boy; 03-28-2012 at 01:34 AM. Reason: big pics
#2
03-26-2012, 04:47 PM
Veteran Member


Thread
Thread Starter
Forum
Replies
Last Post
99xk8guy
XK8 / XKR ( X100 )
11
06-05-2023 06:28 AM
Currently Active Users Viewing This Thread: 1 (0 members and 1 guests)