When you click on links to various merchants on this site and make a purchase, this can result in this site earning a commission. Affiliate programs and affiliations include, but are not limited to, the eBay Partner Network.
Hi everybody. Thanks as always for all of your help and support with this project. I appreciate the community here and wouldn't have gotten this far into this without y'all.
As some of you are aware I have been poking at the coupe's audio package for awhile. Given all the free time I now have due to the current situation, I thought it was time to do something about it. The goal initially was just to be able to bluetooth calls and audio streaming while parking my phone somewhere neatly. After a ton of research and help from the forum a new list was written up. Below is where I landed before I started tearing the car apart.
Bluetooth Audio streaming
Hands Free calling and possible Android Auto
Torque app for engine monitoring
Fully updated navigation with breadcrumb features so I can find good driving roads again
Full utilization of the audio package already installed (now reduced to keeping the speakers and their locations)
Phone storage and charging in console
On top of this, I also wanted to eliminate anything that wasn't helpful as well as do a sound deadening round on the interior.
I am also trying to keep the interior reasonably stock while making it look like a more modern interface. Some choices of gear and placements were influenced by the goal of making it look factory approximate.
Modern lighting (as it was already apart...)
Below are some of things that might be helpful to consider before you go as far down the rabbit hole as I did with your install:
You will have to take the vast majority of the dash, console and rear seating area apart (if you do speakers, the doors and sails as well)
In mine the headliner also had to move a bit.
The interior plastics trims and molding are OLD, in most cases very brittle and VERY fragile. Expect things to break, be broken already and not easily replaced for any money.
The wiring looms will sticky, gross and may not line up with what your diagram says (especially if your car has had work done before)
Some originality will be lost, you may have to plan to restore the car back if you're looking at it as an investment.
Plan to be careful and think ahead, this took double the time that I planned for it.
You should try to plan for any "while I'm there's" so that you're not waiting for Amazon to deliver a tool or part and your car is scattered across the driveway for a week.
The parts you receive may not line up with your plans and adapting or modifying may become necessary.
So in the next post I will talk about parts and tearing it down.
So you have decided to spend your weekend in the garage and modify your stereo and nav. Here are some of things you will need:
A plan as to how far your willing to go... Are you just adding streaming to the old system or are you doing a full overhaul? This will dictate how much time, energy, cost and broken plastic tabs are in your future. In my case, I found that with the proprietary nature of either the Hardon or Alpine systems in our cars, that you will need to yank most of the old gear out to get a new install to work. Examples are: the stock amp won't engage without a signal from the stock head unit, the stock head unit may or may not talk to your Bluetooth and the nav is basically useless at this point.
You can then decide what parts you will need:
Discount Car Audio has several different adaptors that allow you to port aux jacks or bluetooth into either the base or premier radios / cd changers. Most patch into the antenna feed or CD Changer line and are powered off of the the cigarette lighter power circuit. This makes them easy to install and hide. You will wind up with some sort of control box out on the console though. As my wish list was longer I went a different route. Several posts have great info about these units. You can check Discount's site out here. https://www.discountcarstereo.com/
If you're swapping the head unit for more options then I found InCarTec out of the UK to have the best selection of the fiddly bits as well as being willing to answer questions. Their site is here https://incartec.co.uk/Jaguar/XK8-Coupe
They provided:
Harness: this adapts your new head unit to the jag wiring. I was hoping that the InCarTech one would give me what I needed but the one I received in no way matched the plugs on the back of my stock unit. This meant I did have to tap into the car's wiring. Your mileage may vary on this and I don't blame them. They did also include an antenna adapter that was helpful though.
Amp Delete wiring harness: This is a send from the back of the new head unit to the patch in the trunk that feeds the speaker harness while bypassing the stock amp. My head unit was incompatible with the front connector (I did switch headunits after ordering so this isn't quite on InCar), but the other end for the trunk is fantastic. It patched straight in to the feed and has all of the crossovers built in so that you can power all eight speakers correctly. It greatly simplified wiring the amp and meant I didn't need to purchase new crossovers or crack open the doors. it also directly wired the sub-woofer saving creating new wires. https://incartec.co.uk/product/Jagua...p-bypass-cable
Fascia: They do have the single din fascia's in stock and supposedly can get the fill panel to cover the area that a single din head unit won't cover after removing the old unit. Note that this fascia is incredibly fragile and if it isn't broken when you take it out, it will probably break in handling it. As the stock one is single din compatable already (a nice plus as you don;t need to reinvent how to mount your unit), you may get away without it but that's only if yours doesn't shatter or can still be mounted (the screw tabs will break very easily). https://incartec.co.uk/product/Jagua...gle-DIN-fascia
They do sell all of this as a kit (less the fill panel) for a price.
Steering wheel control adaptor: InCar stocks one that is supposed to be very good, there is also the Axxess ACW1 that has proved to work well. I was able to wire my unit and teach it without the adapter so I can't speak to this intelligently.
As to the Headunit, any good single din unit should fit in the stock location. There is plenty of depth behind the stock piece (at least on my car) for the unit as well as new wiring harnesses. This leaves you plenty of options for what your needs are. . If you still work with physical media, a single disk unit fits and shouldn't interfer with the fascia. This variety allows you to shop options and price easily.
Amps: A five channel amp is necessary to drive the four speaker fills as well as the sub on the premier systems. Four channels are sufficient on the base system unless you plan to add a sub, then a sub amp or a powerd box is needed.
In my system I went a slightly different route with my head unit and I cover why in the next post.
So I got a bit aggressive with my wish list when I started planning this. This drove the choice of head unit as well as the amp. I was trying to keep the car looking 'stockish' while also sticking with what the newer Jags were doing. I wanted to stay single din as to not move all of the secondary controls. I wanted to not have the amp really tie up the trunk or force me to move the original amp rack. I was also trying to not have to spend the money to replace all of the speakers. I very much wanted to keep the sub as it was in very good shape. Overall cost of course was a factor, especially given the current climate. This lead me to the good folks at Joying.
It checks almost all of the boxes right out of the box. Andriod Auto, 4G, Google Maps, Torque App, TPMS, decent audio capabilities, sub controls and drivers, Pandora streaming, WIFI tethering(!), teachable steerinfg wheel inputs as well as all the other usual mod cons.
The other great party trick is, the independent screen!
It became the winner after figuring out:
The screen is very similar to the rectangular layout that the more recent Jag/LR products are using.
It's touch for ease of use and modernizing the interior.
The head unit lives in the stock location (especially as there was no room where I wanted to put it)
You can run it up to 30" away from the base with the optional ribbon cable.
Fun side benefit is the edge of the screen is machined so that it would match the chrome on the shifter and the soon to be added gauge rings.
This tethered option of course leads to the next great win, eliminating the broken and outdated nav system in the center of the dash, Woot! (photos of the install and the new layout will follow)
Picking this unit then lead to how to power everything. As noted before the footprint of the amp was tied to my limits in the trunk. I searched for a five channel as I defs wanted to keep the sub as well the dash mid-fills. That lead to this: https://www.ebay.com/itm/Kenwood-KAC...72.m2749.l2649
There were two main factors here, the pressing one being its footprint. It fits inside of the old rack and doesn't intrude into the trunk, meaning my tools and workbox will still carry. The other factor; it was one of the few brand name 5 channel units that fit into the "I still need front brakes budget".
Other benefits include its overall output, solid tuning options, construction and connectivity. So far it has worked really well with the stock Alpines.
in the next post I will give some thoughts on install, sound deadening and setup.
I was reluctant to interrupt your flow of superbly written posts with anything more than a "like" but this thread has to be acknowledged and applauded.
So you have all of your choices made, shiny new components in boxes all over your dining room table and your ready to get started. This is a good time to get all of your tools together before you excitedly start yanking stuff out and then are sad you forgot something. Below is a not quite complete list of things you might want to have on hand:
6, 7,8 & 10mm sockets and a long and short extension (peferably 1/4" so you don't over torque things)
T27 and other Star drive bits of varying sizes (my car had been apart already and some random bolts got thrown in here and there)
Wire strippers and a sharp set of cutters
P2, P3 and possible P4 Philips and ratcheting screw drive handle
Plastic interior removal tools (prybars and bracket removers)
Gloves (less likely to transfer wire harness sticky to your interior bits as well as keep you from bleeding on the leather)
head lamp
Solder iron and wire frame
heat shrink (and a heat gun or lighter)
Voltage tester and meter
Good sharp scissors and tin snips
Dremel and assorted bits (the fine abrasive cut off wheel is also helpful)
Variety of double sided tapes (actual 3M branded as I found it works best)
felt anti-rattle tape
sound deadening materials
16 and 18 Gauge wire to replace looms if needed
Assorted stereo install kits (wire terminals, splices, end caps etc)
Ziplocs to sort hardware
High quality electrical tape (2 colours make it fun)
Zip ties
Varying sizes of plastic wire loom
moving blankets to protect seats and interior fittings
Clip on work lights (preferably LED as there is less heat emitted)
vacuum to clean out those just unearthed areas of the interior.
Tea (hot or iced, always sweet)
As noted before, if you're planning some "while I'm there's", make sure to have those tools and parts ready so that you are not stalled halfway through. Looking for something breaks your flow if your in a groove.
My "while I am's" were:
gauge and center stack backlighting
rattles in the center vents
clean the HVAC ambient temp sensor
assorted sound deadening projects
replace dash veneers (which didn't work out as planned)
replace the passenger seat module
Some Notes:
At a minimum you are going to have to take some fairly large components out of the interior of the car. Protect whatever areas your working in with covers as again, everything here is fragile and expensive to replace. If you have the convertible, drop the top before disconnecting the battery as this adds to your access.
As discussed before, you have to pull a chunk of the interior out to even add a bluetooth module. My list was: glove box assembly, driver's knee bolster, all of the dash veneers, the complete center console. the center fascia, A-pillar covers, drivers rear sail and seat belt, complete rear seat assembly, trunk liner, floor, amp rack, gauges and the nav screen.
Have an area to lay out these pieces so that they are protected and won't get stepped on or dropped. Ask me how I figured that one out...
Before disconnecting the battery, center the seats in their travel, they aren't as close to the dash or the rear then, giving you a mm or 2 more room to work.
Also move the shifter into drive so you have room to pull the radio (please chock the wheels and set the parking brake so you don't wind up at the end of your driveway asking what happened)
Start in the trunk if possible, it reminds you to disconnect the battery (make sure to have your radio code if you're keeping it) and give you an opportunity to practice taking apart things that won't be in your line of sight every day if you make a mistake.
if you think the interior is tight driving the car, wait till you're upside down in the footwell soldering. Take breaks and stretch before you get frustrated and break some unobtainium piece of trim.
Clean as you go so you're not as frustrated by the previous owner's french fry habit.
After you have the trunk taken apart, move to the interior. I found that getting the center console out first helps. It also give you more room to work. The dash is next, Air bag veneer (the glove box screws are covered by this) Glove box then knee bolster, making sure to check each piece for wiring connectors before you yank it out. Then the veneers (you have to drop the bolster to get the gauge veneer out) then the center and vent covers. The plastic prybars are really helpful here. Remember to be super careful as the newest pieces here are 14 years old and they will break to spite you. Then the rear seat, seat belt and trims. This requires more force than you're probably comfortable with but they more than likely haven't removed since they were installed in Coventry.
With all of this out of the way you can start to crack those shiny boxes open and play with your new toys. The next post will talk about wiring and install.
While this may seem a bit overwhelming, remember humans built it and it is designed to come apart as well as go together. Take your time and it will be fine.
So you're at the point where you want to start cutting and splicing. Here is what I ran into and hopefully it will be helpful. The first goal is to do this as simply and unobtrusively as possible especially if you want to return the car to stock for collector resale. As some of the parts I got didn't quite work out, a more aggressive approach was needed.
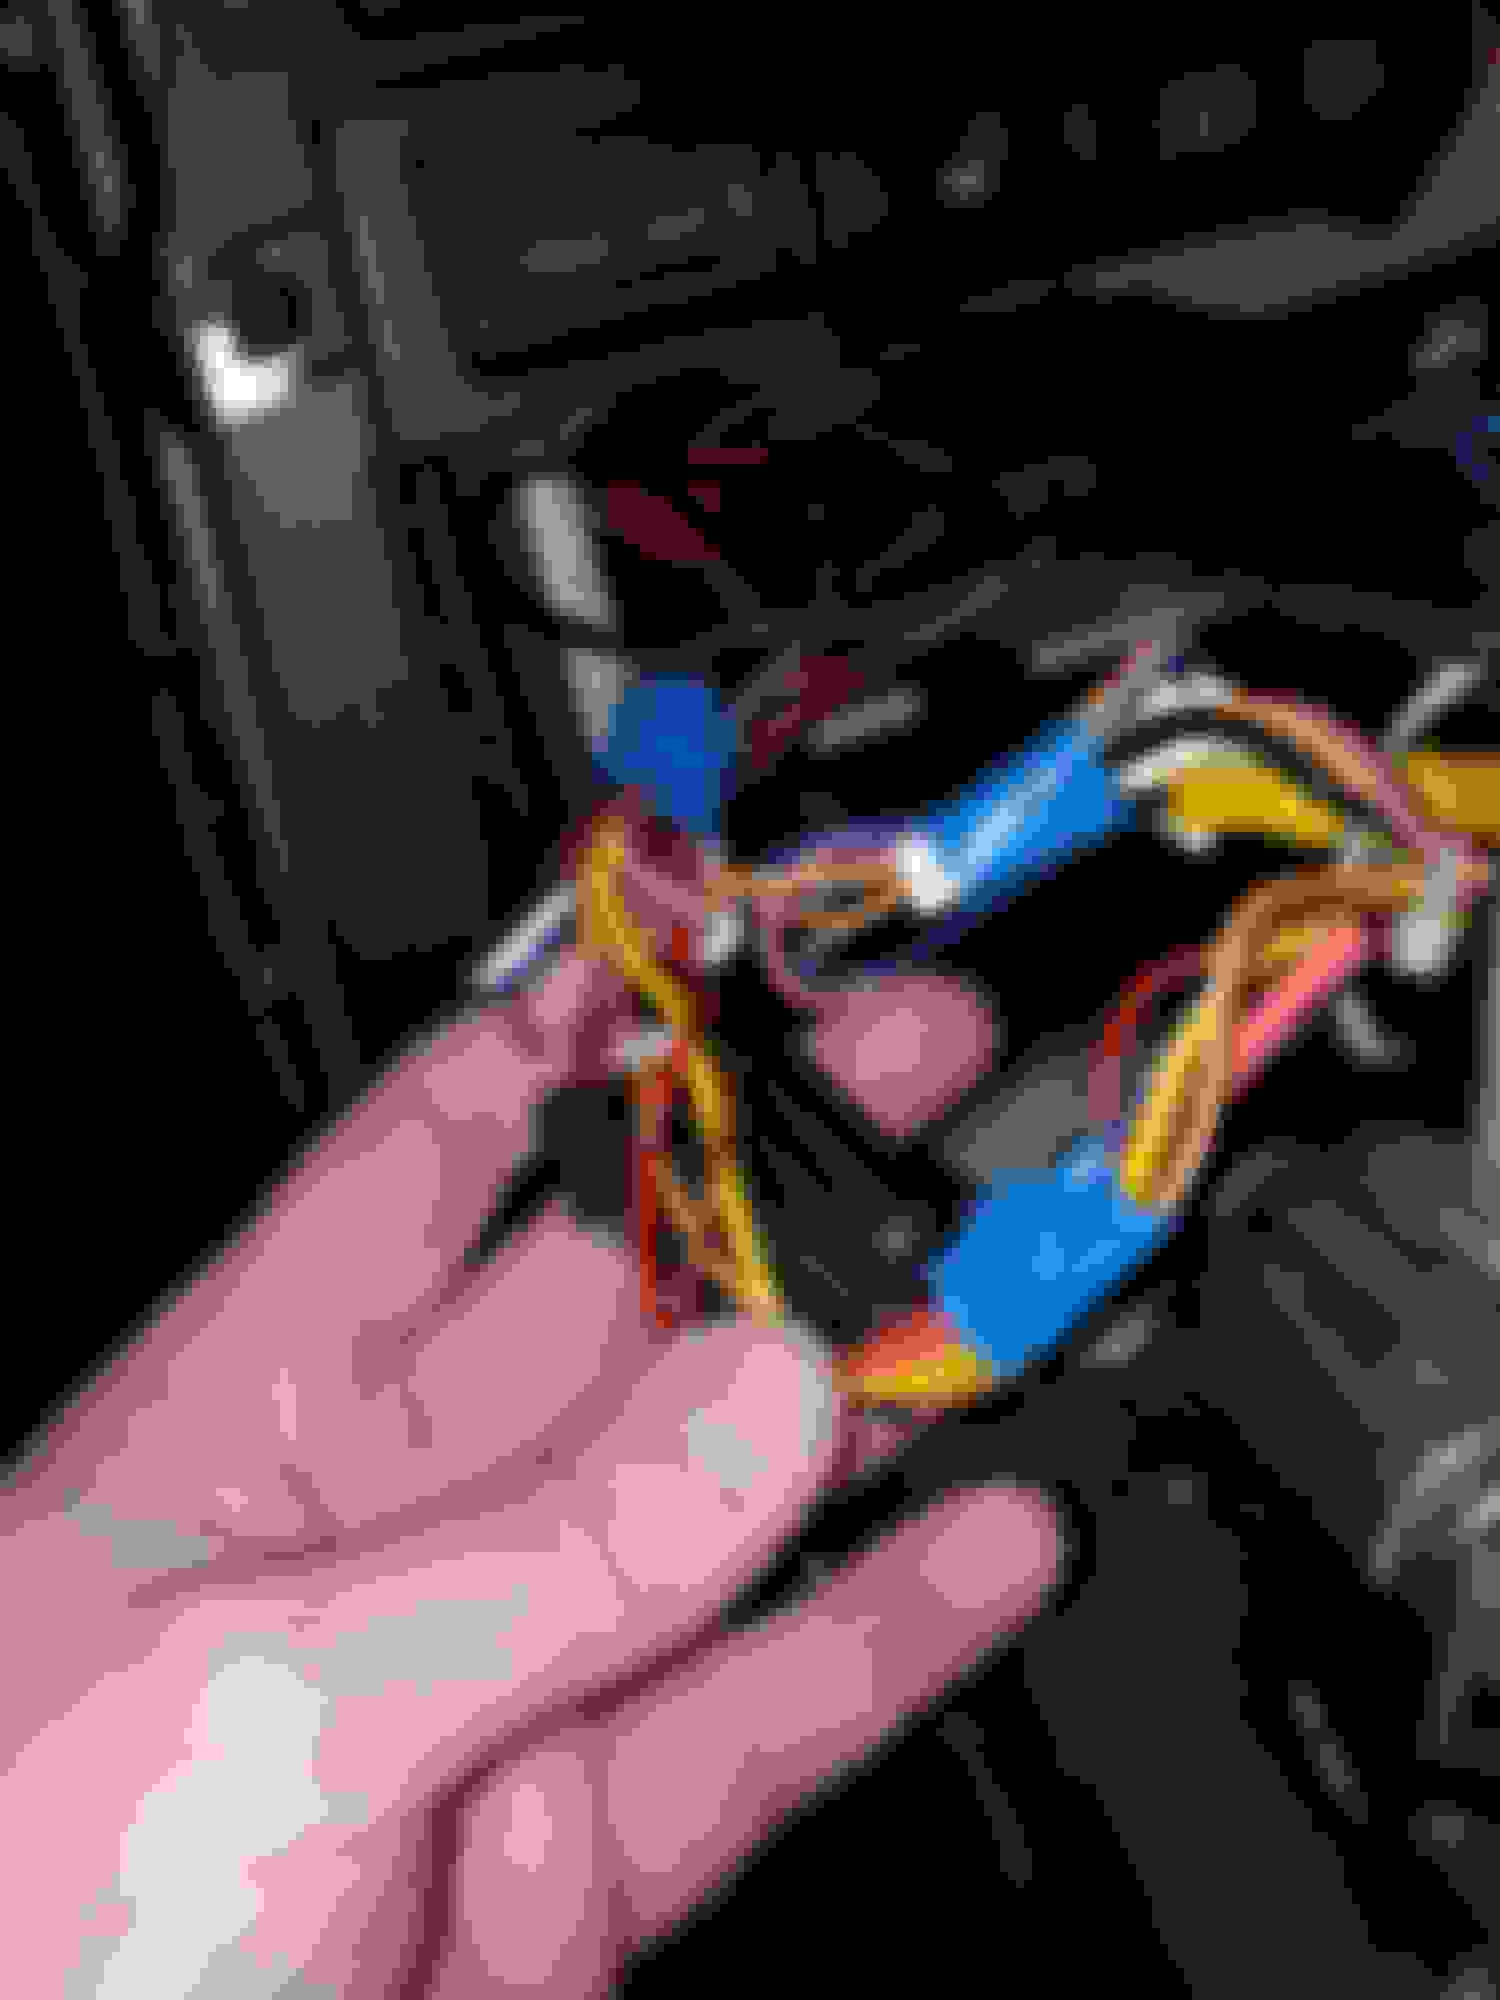
In my case the package that I received from InCar was very complete except for the fact that the harness connectors were not compatible with the stock connectors under the dash. They didn't match in a way that leads me to believe that it may have been incorrectly packaged before it shipped. As I didn't have bandwidth to wait for another shipment during this mayhem, i went ahead and cut up some of the pieces I received. Note that while this was frustrating, the incredible usefulness of the other end of the cable (at the speakers) and the time and equipment saved made up for having to patch power separately. At this point I needed only a minimum numbers of wires from the car to get power and radio connectivity. I pulled: 12v Power (constant), 12v Switched (from the ignition), Ground, Antenna power activation, Antenna Feed (for signal) power switched (for the amp), dimmer and the positive wire from the steering wheel controls (they ground to activate so only one wire was needed). These were cut away from the stock harness plugs and tied into the patch for the head unit. The other harness plugs and the Alpine AiNet cable were wrapped and tucked back in the dash.
As to sending audio signal to the speakers the InCar harness is designed to patch straight out of the head unit and use its internal amp to drive the cones. You would tie it in at the dash, run it down the car to the trunk and then plug it into the speaker harness past the old amp. This does make a great value proposition as it eliminates a new amp as well the additional wiring. But do note that the InCar harness doesn't power the sub off the internal amp in the head unit so if you want to retain it, you still need to provide a sub amp for it. In my use case though, I wanted to use RCA's to send signal and also use an 5 channel amp. In this case that meant cutting back the vast majority of the loom (15 feet or so) and only using the end with the tails, the InCar-built crossovers (that do the signal split for the doors and dash midfills)and the subwoofer wires. Having the crossovers and that end pre-built meant that I didn't have to cut up the Alpine amp connectors, the factory speaker loom or spend hours signal tracing the amp. Once it was patched, a signal test shows that the separation at the doors and dash is very good and there are no obvious issues with that set up.
In the center stack and console there is plenty of room to run RCA's as well as the signal wire for the amp. You can easily place the cables and dress them neatly. Under the rear seat, there is an oval pass through right at the end of the console that should keep the run neat as well as protect it from damage. At least in the coupe there is an easily accessed hole to the trunk that you can run your loom through. You can find it just behind the rear seat belt reel on the drivers side. You do have to remove the sail though to make a path to the package shelf though. In the trunk following the trunk harness gives you plenty of clearance for new wires and a proper dress. Some plastic loom covers isn't a bad idea especially where it goes into the trunk.
The amp originally was going to slide into the rack that held the cd changer and the nav. Once I got it in hand though, I realized that there is no way to adjust it once it was slid in. That meant that I had to punt and change the config. After emptying the rack, I unbolted the original shelves, turned them 90 to the front and reattached them. A thin piece of diamond plate (don't worry, it will get painted black) went on the brackets and the amp bolted to that. I have another piece of trunk liner that am planning to trim to cover the openings and the cable runs back to the harness. The patch to the speakers is above it and towards the front of the car mounted to the fender well . It is easily accessed with the rack empty. Since the battery is right underneath it, powering it was easy with the included kit, just note that the ring terminals for that gauge wire need a different tool to be installed. In the photo you can see the tail end of the InCar harness feeding the speakers.
Later today I will post the final install photos of the dash and head unit.
Let me know if you have any questions in the meantime.
After scrolling back through the TLDR post's above, here is a much abbreviated version of the final result.
The head unit lives in the original location. The screen replaces the nav setup completely (only the harness is left, which would help if you decided to go back for resale). The veneer is cut using several tools including hand files. The screen now rests basically flush with the veneer so it doesn't look tack on or like its floating. The wiring is all removable less the one connector under the dash that would have to be added back in.
With just the stock alpines, it performs so far beyond my expectations. The original amp felt muddy and flat but this is a vast improvement. There is near infinite adjustment between the head unit and the amp which has helped greatly with tuning. The speaker placement is already pretty good and the mid fills on the dash create a solid sound stage. It rips with the windows down and at full chat. I was really hoping that I wouldn't be forced to "upgrade" the speakers and as of now, i can't even irrationally justify it.
The gauges now being red is one of my favorites. These were done with off the shelf led lamps with no modification.
The cover for the head unit will be adapted from the old stereo face. The plan is to remove the buttons and adapt a single din drawer like when you went from factory to single din. I will update when that is completed but I am waiting for parts.
Be aware that while the veneer is fairly delicate on the edges, the aluminum backer will chew through delicate bits and cutting tools. I destroyed the first test piece just learning what pressure to apply to the material. Some hand finishing is also probably going to be needed. I have ordered a used, matched set for the dash so that I can do a final finished piece as well as replace the failed veneer on the airbag cover.
There is a custom bracket behind the screen to bring it level with the veneer. I felt that with the finished edge of the screen it would look better than being behind the veneer as well as hide some of the cut surface.
Torque, Nav, Radio and all the other mod cons work as expected and there is also a split screen function that allows two apps plus the clock to be up at once.
Let me know if you have any questions or other concerns.
I was reluctant to interrupt your flow of superbly written posts with anything more than a "like" but this thread has to be acknowledged and applauded.
Graham
Graham, thank you very much for the kind words. I just hope that I can give back to the community a little after all the help I have received.
Hello. Your installation looks great. Would this system fit in a 92 XJS? I've had a quick read of your posts but cant see the make or model and the link doesn't work.
Hello. Your installation looks great. Would this system fit in a 92 XJS? I've had a quick read of your posts but cant see the make or model and the link doesn't work.
Cheers, Stephen
Stephen, The system I used is from a company called Joying. www.joyingauto.com
They have since updated the unit to work with Android 10.0 (mine is 8.1) but it doesn't look like any of the form factors have changed.
As to your question of it fitting in the XJS, that depends...??
From what I can find online, it looks like a standard single din radio will fit in the dash without issue. That means the base unit will work and should mount. You will have to do some careful measuring to determine how much the screen will interfere with the surrounding controls though. Cardboard templates are definitely going to be your friend here. What is nice about this unit is that you can mount the screen to the head unit directly or create custom mounts to put it wherever you want with the extension cable.
Another positive here is that they make several sizes of this unit so while you may need to go to a larger or smaller screen, you have options. Also as the unit has an internal amp, you shouldn't need to add additional amps unless you want to. I am not sure how many speakers are included in the '92 XJS so I will defer to the experts.
One other thought on the installation of the screen. I have one of these in my El Camino, and I tried mounting the screen using magnets ( Mag Daddy Panel Magnets). It works, and does not distort the screen. Might make for some interesting mounting options. Might even be able to use one of the Magnetic cell phone mounts.
GREAT INFO! I�m in the middle of a similar Joying install with the 6.3� screen. You mention �self learning steering controls�. I found the steering wheel screen but can�t figure out how to get the system to �learn� the buttons. Sounds like it can be done without additional equipment, can you provide some details?
Carlos. 97 xk8
Originally Posted by extheaterkid
So I got a bit aggressive with my wish list when I started planning this. This drove the choice of head unit as well as the amp. I was trying to keep the car looking 'stockish' while also sticking with what the newer Jags were doing. I wanted to stay single din as to not move all of the secondary controls. I wanted to not have the amp really tie up the trunk or force me to move the original amp rack. I was also trying to not have to spend the money to replace all of the speakers. I very much wanted to keep the sub as it was in very good shape. Overall cost of course was a factor, especially given the current climate. This lead me to the good folks at Joying.
It checks almost all of the boxes right out of the box. Andriod Auto, 4G, Google Maps, Torque App, TPMS, decent audio capabilities, sub controls and drivers, Pandora streaming, WIFI tethering(!), teachable steerinfg wheel inputs as well as all the other usual mod cons.
The other great party trick is, the independent screen!
It became the winner after figuring out:
The screen is very similar to the rectangular layout that the more recent Jag/LR products are using.
It's touch for ease of use and modernizing the interior.
The head unit lives in the stock location (especially as there was no room where I wanted to put it)
You can run it up to 30" away from the base with the optional ribbon cable.
Fun side benefit is the edge of the screen is machined so that it would match the chrome on the shifter and the soon to be added gauge rings.
This tethered option of course leads to the next great win, eliminating the broken and outdated nav system in the center of the dash, Woot! (photos of the install and the new layout will follow)
Picking this unit then lead to how to power everything. As noted before the footprint of the amp was tied to my limits in the trunk. I searched for a five channel as I defs wanted to keep the sub as well the dash mid-fills. That lead to this: https://www.ebay.com/itm/Kenwood-KAC...72.m2749.l2649
There were two main factors here, the pressing one being its footprint. It fits inside of the old rack and doesn't intrude into the trunk, meaning my tools and workbox will still carry. The other factor; it was one of the few brand name 5 channel units that fit into the "I still need front brakes budget".
Other benefits include its overall output, solid tuning options, construction and connectivity. So far it has worked really well with the stock Alpines.
in the next post I will give some thoughts on install, sound deadening and setup.
This thread just makes me feel old. I don't have the energy to tackle something like this.
having ambitious goals often makes things very complicated. All I wanted was to play my iPhone music catalog thru the factory Jag stereo system via Bluetooth / no wires no mini jacks.
I wanted No phone hookup, (who wants to tied to phone call every single minute anyway). No screen, just a simple Bluetooth hookup for music.
For this all I needed was the plug and play Discount Stereo product. One hour of installation where it hooked up to the CD player
and I was good to go.
Keeping it simple helps one get to the finish line without great expense or undue aggravation.
 08-29-2020, 03:02 AM