
Back-lit or not?

#22
 09-10-2011, 02:51 PM
edit: My fan control dial does light up.
Last edited by xenophobe; 09-11-2011 at 12:51 AM.
#23
09-10-2011, 05:51 PM
Veteran Member
Jaguar part numbers are:
LCD bulb: JLM11965
If you have blue bulbs: JLM20308
If you have green bulbs: JLM20309
They are all around the $5.00 neigborhood online.
The following users liked this post:
smoggyx100 (12-26-2013)
#24
09-10-2011, 06:32 PM
The little fan on the left and on each side of the upper LCD screen. (F/C and EXT)
#25
09-12-2011, 08:36 PM
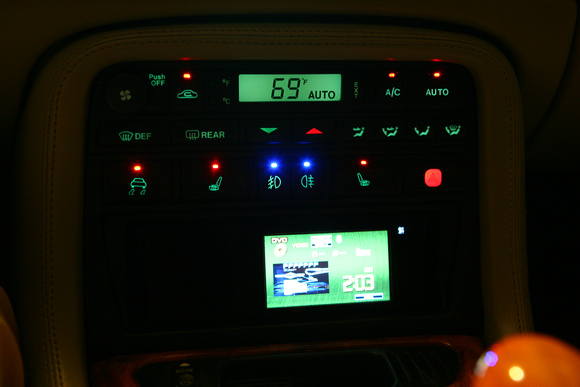
Sorry to do this to you Matt and Sam, but this morning I drove my car before it was light out and I remembered this post so I looked, and sure enough, my fan control knob IS illuminated. I then thought that maybe it might be just a phosphorescent glow in the dark thing, like the buttons on some remote controls that glow for a bit after being in the light. So, when I got home and pulled into the Jaguar sanctuary (my garage). I keep the santuary dark for the Jaguar to rest. Sure enough, with headlights off, the button is not lit up, with headlights on, it is definitely lit, not a glow in the dark coating or anything, clearly backlit.
#26
09-12-2011, 08:49 PM
Veteran member
Keith, though not entirely even, each letter and the line inbetween on the jgate should be illuminated. After i get my a/c lights cleared up, we'll start showing our jgates too.
Reverend, if it makes you feel better, my F/C and EXT, along with fan knob is also out. I'll be going 'in' in the next few days for a good look. If you get into it before i do, pleaes let us know your observations.
Reverend, if it makes you feel better, my F/C and EXT, along with fan knob is also out. I'll be going 'in' in the next few days for a good look. If you get into it before i do, pleaes let us know your observations.
#27
09-20-2011, 10:50 AM
Veteran member
OK, I disassembled my A/C panel last night, and it wasn't as bad as I had expected it to be. It took three (3) screws to remove the pack from the console trim, then another two (2) screws for the rear panel to come apart. Once that was open, you can see 7 or 8 smaller wedge bulbs w/ a black base and blue condoms, and two larger, brown-based, blue condom LCD backlight units.
It turns out I had one of the smaller ones out nearest my fan control knob. I ordered the $6.50 bulb from the dealer (JLM20308), along with a couple spares just in case. I considered replacing them all with the LED neo-wedge T3 from Autolumination Instrument Panel Light Bulbs & Lamps), but I would need these eight, plus another 5 for the auxiliary switch packs, in order to make them all match...and then do I get the blue or green so the color works correctly (filament color and LED color are totally different. The blue condom turns a warm yellowish color of the filament into green light output) and for $25-30 I didn't want to take a chance that they wouldn't look good, light up all the various areas they're supposed to, or be the wrong color, so I decided to stick with the basic filament type. Some LEDs put all the light straight ahead, and if I need light going to the sides also, my luck it would be a total waste of time and money.
As for the EXT and F/C sides not being lit, it appears that the two (2) larger T4 wedge bulbs backlighting the LCD are responsible for illuminating these text areas on the sides. I'm not sure how to get them some more light from the backlight bulbs - maybe a little fibre optic between them? nah, I'll pass. I did replace them with new bulbs that I had from WhiteXKRs little electrical upgrade he did for me. I can see them, but they're noticably dimmer. I'm just happy to know that mine are actually not burned out, but just suffering from the 'shared' light syndrome.
I've got pics of the disassembly and will confirm the part number when I get them tomorrow and install them.
It turns out I had one of the smaller ones out nearest my fan control knob. I ordered the $6.50 bulb from the dealer (JLM20308), along with a couple spares just in case. I considered replacing them all with the LED neo-wedge T3 from Autolumination Instrument Panel Light Bulbs & Lamps), but I would need these eight, plus another 5 for the auxiliary switch packs, in order to make them all match...and then do I get the blue or green so the color works correctly (filament color and LED color are totally different. The blue condom turns a warm yellowish color of the filament into green light output) and for $25-30 I didn't want to take a chance that they wouldn't look good, light up all the various areas they're supposed to, or be the wrong color, so I decided to stick with the basic filament type. Some LEDs put all the light straight ahead, and if I need light going to the sides also, my luck it would be a total waste of time and money.
As for the EXT and F/C sides not being lit, it appears that the two (2) larger T4 wedge bulbs backlighting the LCD are responsible for illuminating these text areas on the sides. I'm not sure how to get them some more light from the backlight bulbs - maybe a little fibre optic between them? nah, I'll pass.
I did replace them with new bulbs that I had from WhiteXKRs little electrical upgrade he did for me. I can see them, but they're noticably dimmer. I'm just happy to know that mine are actually not burned out, but just suffering from the 'shared' light syndrome. I've got pics of the disassembly and will confirm the part number when I get them tomorrow and install them.
#28
09-22-2011, 11:38 PM
Veteran member
I've decided to look into that knob again, going to pull the connector behind it (i didn't do it when I changed that bad bulb) but thinking it has another bulb inside of it.
Also, I think I'm going to try and go with all new LEDs in the locations behind the buttons, but not the display backlight. now that i have a few new ones in , the nearby buttons seem dimmer... figures. I've decided to try the green wedges.
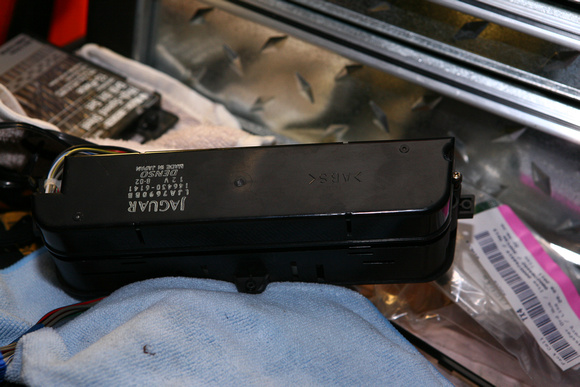
Anyway, here are the pics showing how to get into the backside of it...
Removing the two small gold screws on the end.
Now open and remove the plastic 'static' shield
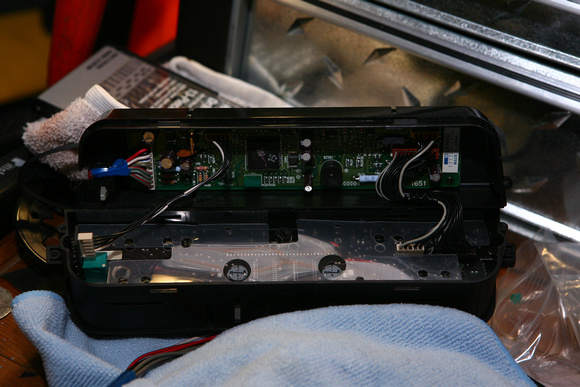
See all the wonderful bulbs? I count eight (8) small (T4) JLM20308 black base (one by the fan control knob is already pulled) -> $6.35 ea at dealer, and two (2) large (T5) size bulbs, OEM has a brown base, the ones in the pic are aftermarket replacements.
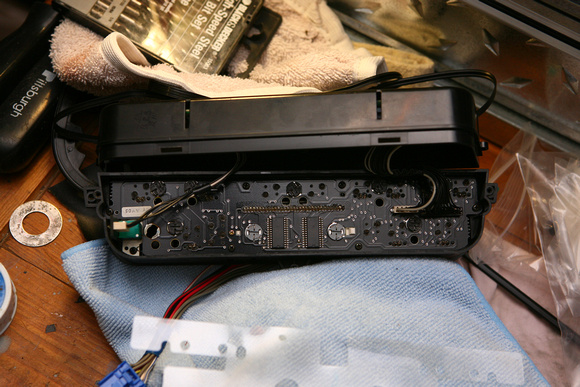
See all these backlighting the 2nd row buttons? All are the larger, T5 type except for the one behind the hazards..no idea what that one is.
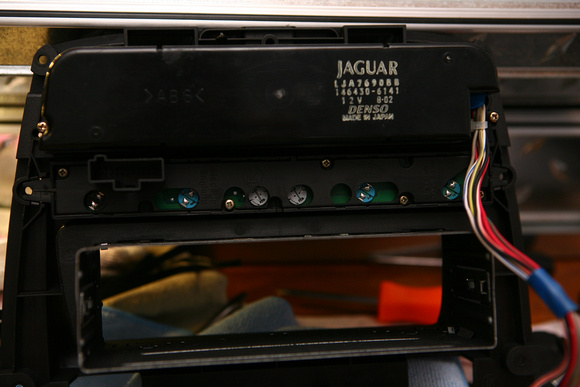
Here's the final result (still think there's a bulb behind that knob!!!)
If you have any questions about the LEDs, you can ask whiteXKR, he was nice enough to replace a bad LED on one of my fog light buttons, and while we were at it, he agreed to do ALL new bulbs for a small cost, and since i was going with new, I asked for amber on the traction control (hard to discern from the red ones), blue on the fogs, and red on the seat heaters. Turn around time on that was about 2 weeks, but most of that was probably waiting on the correctly ordered bulbs.
Also, I think I'm going to try and go with all new LEDs in the locations behind the buttons, but not the display backlight. now that i have a few new ones in , the nearby buttons seem dimmer... figures. I've decided to try the green wedges.
Anyway, here are the pics showing how to get into the backside of it...
Removing the two small gold screws on the end.
Now open and remove the plastic 'static' shield
See all the wonderful bulbs? I count eight (8) small (T4) JLM20308 black base (one by the fan control knob is already pulled) -> $6.35 ea at dealer, and two (2) large (T5) size bulbs, OEM has a brown base, the ones in the pic are aftermarket replacements.
See all these backlighting the 2nd row buttons? All are the larger, T5 type except for the one behind the hazards..no idea what that one is.
Here's the final result (still think there's a bulb behind that knob!!!)
If you have any questions about the LEDs, you can ask whiteXKR, he was nice enough to replace a bad LED on one of my fog light buttons, and while we were at it, he agreed to do ALL new bulbs for a small cost, and since i was going with new, I asked for amber on the traction control (hard to discern from the red ones), blue on the fogs, and red on the seat heaters. Turn around time on that was about 2 weeks, but most of that was probably waiting on the correctly ordered bulbs.
#30
09-23-2011, 02:40 PM
Veteran Member
If you have any questions about the LEDs, you can ask whiteXKR, he was nice enough to replace a bad LED on one of my fog light buttons, and while we were at it, he agreed to do ALL new bulbs for a small cost, and since i was going with new, I asked for amber on the traction control (hard to discern from the red ones), blue on the fogs, and red on the seat heaters. Turn around time on that was about 2 weeks, but most of that was probably waiting on the correctly ordered bulbs.
Orange-water clear, 3mm- digikey.com part number 67-1074-ND
Blue-water clear, 3mm- digikey.com part number 67-1747-ND
Red-water clear, 3mm- digikey.com part number 754-1254-ND
The old ones need to be desoldered (an inexpensive spring type vacuum desoldering tool works fine) and the new ones soldered in, observing the polarity (short leg = cathode = flat side on circuit board silk screen).
If anyone wants me to do this for them PM me with your needs. I have one spare set of LEDs for the foglight/seat heater/stability control button module to do identically to Matt's.

Thread
Thread Starter
Forum
Replies
Last Post
Currently Active Users Viewing This Thread: 1 (0 members and 1 guests)