
Check out my detective skills on this air leak
#1
 01-03-2013, 11:37 AM

I think I am attempting to remedy a problem that is uncharacteristic for either our 4.0 or 4.2 models xk8-xkr.
A little history - several months ago, I took my xk8 w/ 150,000 miles to the transmission shop to have it rebuilt and new torque converter installed. (whole other thread for that saga) then afterwards, it went directly to the body shop to have a new bonnet installed and some paint work due to flying debris on the highway. Overall, it was out of commission for a good three months combined, very little driving except to confirm repairs went smoothly. It was then that I noticed quick, but somewhat rough starting in the mornings, even if it wasn't sitting for long overnight, so I obviously suspected a vacuum/air leak as this was the cause a couple years ago when I found all the gaps. My fuel trims during these years were always right on par, short term (STFT) never got over 8% or 9% (if it ever leans a particular direction, its on the lean side), and my long term trims (LTFT) stayed between 5% and 7% on both banks. However, after this span of time without much use and driving, I suspect more leaks.
At first, I accused my throttle body (TB) gasket, though it and the EGR gaskets were recently replaced this last summer (2012). Shooting some throttle body cleaner around the TB and under it near the EGR flange didn't do anything to the STFT data I was monitoring live. Shots around my MAFS, air pipe (also physically inspected) and other vacuum line Norma connectors didn't make it hiccup; even thoroughly cleaned the MAFS. Hard reboot and the next day resulted in the same high LTFT and spiking STFT (20 to 25%) on startup.
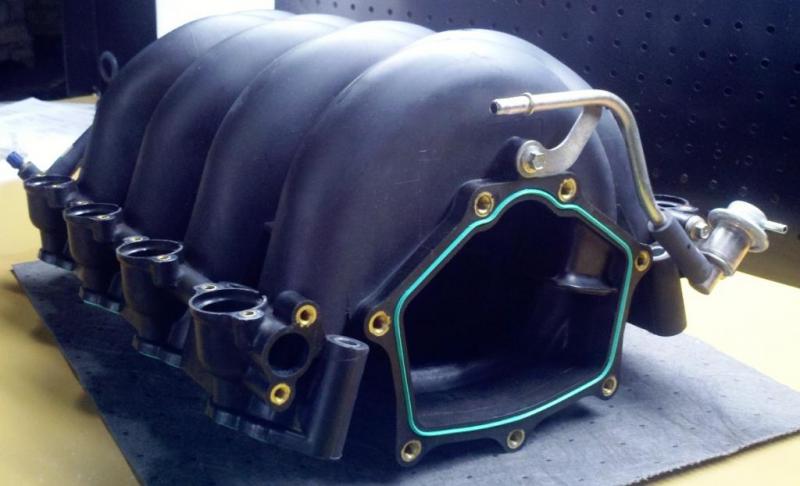
What I believe I've found are leaking intake manifolds on both sides, bank 2 being the absolute worst near #8 cylinder, and a smaller one near #1 and #3. Here's my video diagnosis.
I've printed the instructions from JTIS, and it doesn't seem too difficult, unless I missed something (attached PDF). This is where you jump in if I did. My new gaskets arrived yesterday, and I plan on starting this on the weekend. I'll try to document the process w/ pics and a writeup afterwards.
If anyone has any other advice before I tackle this job, please feel free to speak up. I'm planning to clean out the intake and remove as much carbon deposits as I can; I may even take it into a machine shop to have it professionally cleaned.
Anything else I should be doing while I'm in there?
A little history - several months ago, I took my xk8 w/ 150,000 miles to the transmission shop to have it rebuilt and new torque converter installed. (whole other thread for that saga) then afterwards, it went directly to the body shop to have a new bonnet installed and some paint work due to flying debris on the highway. Overall, it was out of commission for a good three months combined, very little driving except to confirm repairs went smoothly. It was then that I noticed quick, but somewhat rough starting in the mornings, even if it wasn't sitting for long overnight, so I obviously suspected a vacuum/air leak as this was the cause a couple years ago when I found all the gaps. My fuel trims during these years were always right on par, short term (STFT) never got over 8% or 9% (if it ever leans a particular direction, its on the lean side), and my long term trims (LTFT) stayed between 5% and 7% on both banks. However, after this span of time without much use and driving, I suspect more leaks.
At first, I accused my throttle body (TB) gasket, though it and the EGR gaskets were recently replaced this last summer (2012). Shooting some throttle body cleaner around the TB and under it near the EGR flange didn't do anything to the STFT data I was monitoring live. Shots around my MAFS, air pipe (also physically inspected) and other vacuum line Norma connectors didn't make it hiccup; even thoroughly cleaned the MAFS. Hard reboot and the next day resulted in the same high LTFT and spiking STFT (20 to 25%) on startup.
What I believe I've found are leaking intake manifolds on both sides, bank 2 being the absolute worst near #8 cylinder, and a smaller one near #1 and #3. Here's my video diagnosis.
I've printed the instructions from JTIS, and it doesn't seem too difficult, unless I missed something (attached PDF). This is where you jump in if I did. My new gaskets arrived yesterday, and I plan on starting this on the weekend. I'll try to document the process w/ pics and a writeup afterwards.
If anyone has any other advice before I tackle this job, please feel free to speak up. I'm planning to clean out the intake and remove as much carbon deposits as I can; I may even take it into a machine shop to have it professionally cleaned.
Anything else I should be doing while I'm in there?
Last edited by H20boy; 01-03-2013 at 11:39 AM.
#2
01-03-2013, 01:11 PM
Veteran Member
#3
01-03-2013, 02:40 PM
Veteran Member
Matt-
I had my intake manifold off about nine months ago...wanted to change the knock sensors, and decided to 1) make that job easier, and 2) take a few things apart so I could learn more about them. Here are a few things you might consider- probably more than you want to do but...
1) New gaskets for throttle body-induction elbow and induction elbow-intake manifold...could also replace the EGR-induction elbow gasket.
2) New o-ring gasket for brake booster vacuum line connection at induction elbow
3) New part-load breather hose...pretty cheap and really hard to replace with the intake manifold on the engine
4) New heater hoses to replace the two that run underneath the intake manifold
5) A fantastic ultrasonic cleaning of your fuel injectors at InjectorRX...see my experience with them HERE.
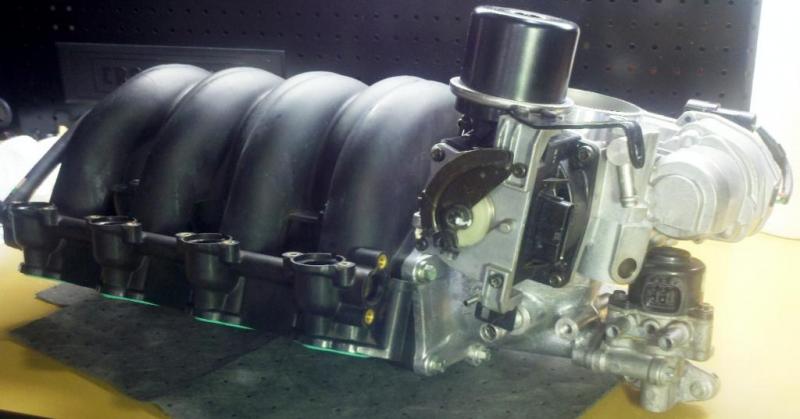
6) I sense that you're a clean freak like me, so with the top bits of the engine removed, you'll have lots of opportunities for cleaning areas that you don't otherwise get to. As seen in the snaps below, I took some time to get everything as clean and shiny as possible...looks pretty good for a 16 year old engine, imo.


.
I had my intake manifold off about nine months ago...wanted to change the knock sensors, and decided to 1) make that job easier, and 2) take a few things apart so I could learn more about them. Here are a few things you might consider- probably more than you want to do but...
1) New gaskets for throttle body-induction elbow and induction elbow-intake manifold...could also replace the EGR-induction elbow gasket.
2) New o-ring gasket for brake booster vacuum line connection at induction elbow
3) New part-load breather hose...pretty cheap and really hard to replace with the intake manifold on the engine
4) New heater hoses to replace the two that run underneath the intake manifold
5) A fantastic ultrasonic cleaning of your fuel injectors at InjectorRX...see my experience with them HERE.
6) I sense that you're a clean freak like me, so with the top bits of the engine removed, you'll have lots of opportunities for cleaning areas that you don't otherwise get to. As seen in the snaps below, I took some time to get everything as clean and shiny as possible...looks pretty good for a 16 year old engine, imo.
.

#6
01-07-2013, 10:21 PM
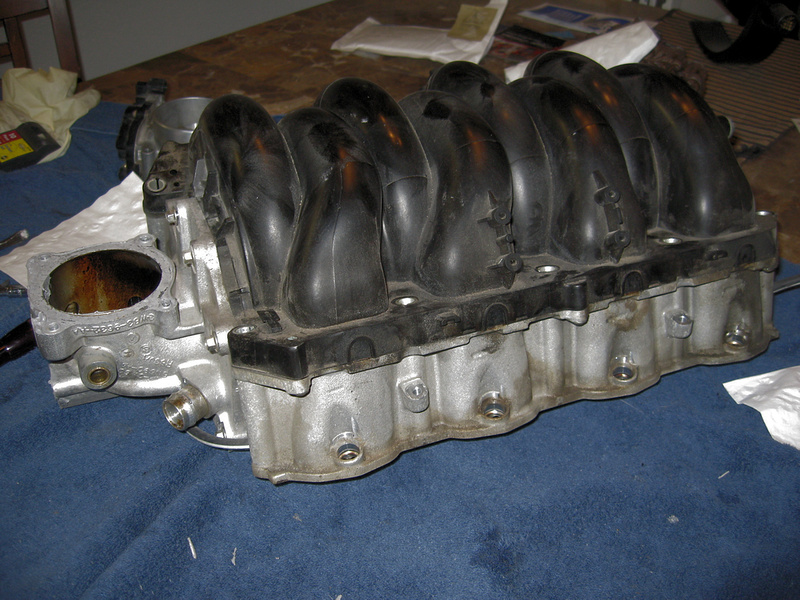
holy toledo, i've just now gotten my intake off the car and its on my dining room table...its a filthy mess. I also spent 30 minutes getting a plastic tab fished out from the intake valve that I didn't vacuum from under the fuel rail and it dropped into the intake when I pulled the manifold. Skip a simple step like 'cleanup' and look what happens. Lesson learned.
I've got lots of cleaning and a couple broken plastic parts to order before this is ready to reassemble and put back on.
Besides the air leak, nothing a little Seafoam couldn't clean up. (sarcasm)


I've got lots of cleaning and a couple broken plastic parts to order before this is ready to reassemble and put back on.
Besides the air leak, nothing a little Seafoam couldn't clean up. (sarcasm)
#7
01-08-2013, 08:24 AM


Veteran Member
Trending Topics
#8
01-08-2013, 10:34 AM
#9
01-08-2013, 11:19 AM

Suggest using another method of finding a vaccum leak using a smoke generator. Here is a link to DIY generator: DIY How-to: build a vacuum leak detection machine - Pennock's Fiero Forum. There are also some very expensive dealer-type smoke generators available.
My local master mechanic uses a small hand-held smoke generator, which emits a thin stream. It looks homemade, but it was very effective finding a miniscule vacuum leak on my car. A simple cigarette might also work as a smoke generator.
My local master mechanic uses a small hand-held smoke generator, which emits a thin stream. It looks homemade, but it was very effective finding a miniscule vacuum leak on my car. A simple cigarette might also work as a smoke generator.
#11
01-08-2013, 07:50 PM
Veteran Member
That DIY smoke generator is simple genius. I'm definitely going to make one.
.
#12
01-19-2013, 06:54 PM
Ok guys, I got my inlet back on. I'll have some more photos up later, as well as a few lessons learned for all you future attempters of this project.
However, I'm not certain that my leak(s) were entirely fixed with this change of gaskets.
I changed part #4 on both banks, after cleaning up all the parts and surfaces well. I didn't make any mistakes there.
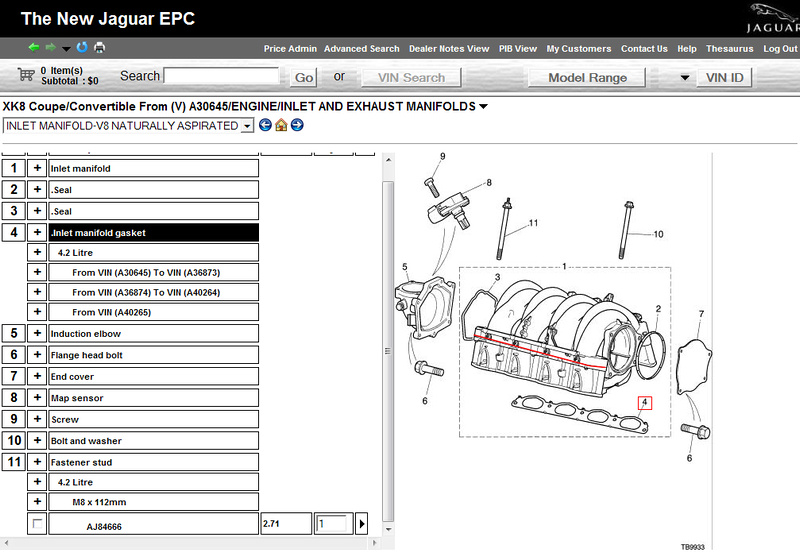
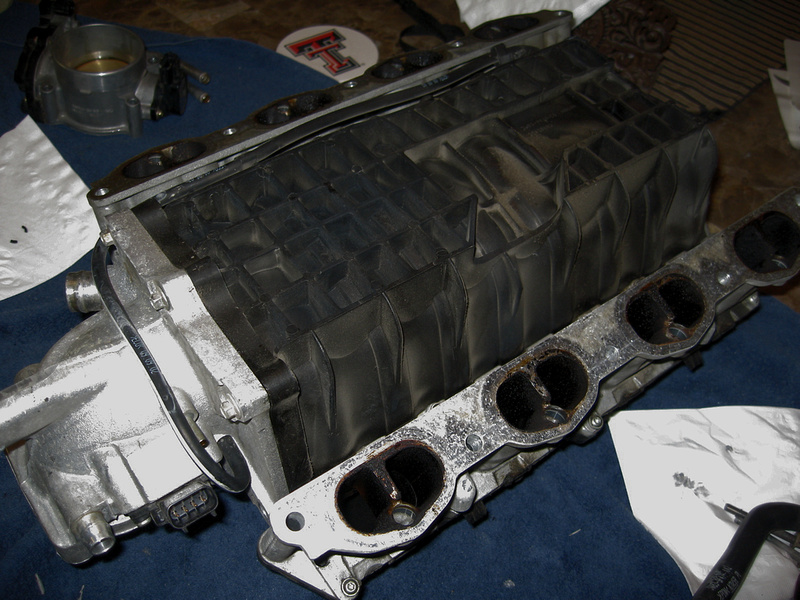
Selectively placing my can of TB cleaner straw, and dispersing it at the bottom of the inlet, it is well sealed. However, unknownst to me before hand, there appears to be another location for a gasket between the plastic and aluminum components, yet it's gasket is not mentioned in the JEPC as shown above. I found four bolts that are leaking air...yes, up through them. My initial investigation where I shot some TB cleaner in the general area of those cylinders could have very well been this intermediate mating surface and not the main block-to-manifold. I'm wondering if someone can confirm that the gasket shown in the S/C inlet assembly is the same...it appears it is, and I may take this thing apart again and do it also. Its the only way air could get into the inlet at this bolt hole, if the main gasket is correctly seated.

However, I'm not certain that my leak(s) were entirely fixed with this change of gaskets.
I changed part #4 on both banks, after cleaning up all the parts and surfaces well. I didn't make any mistakes there.
Selectively placing my can of TB cleaner straw, and dispersing it at the bottom of the inlet, it is well sealed. However, unknownst to me before hand, there appears to be another location for a gasket between the plastic and aluminum components, yet it's gasket is not mentioned in the JEPC as shown above. I found four bolts that are leaking air...yes, up through them. My initial investigation where I shot some TB cleaner in the general area of those cylinders could have very well been this intermediate mating surface and not the main block-to-manifold. I'm wondering if someone can confirm that the gasket shown in the S/C inlet assembly is the same...it appears it is, and I may take this thing apart again and do it also. Its the only way air could get into the inlet at this bolt hole, if the main gasket is correctly seated.
#13
01-19-2013, 11:40 PM
Veteran Member
#14
01-21-2013, 07:55 PM
I went ahead and ordered a couple #2s with cheese. An old sponsor of ours had them at only $17 each, so it couldn't hurt. I see so many interchangeable parts across these S/C and N/A cars, even the lower inlet manifold part numbers are identical for each car...so I'm wagering my lunch tomorrow these upper ones are long lost twins as well. I'll have it apart this next weekend, and hoping it shuts down all those little leaks. i am beginning to miss driving her.
#15
01-24-2013, 11:43 PM
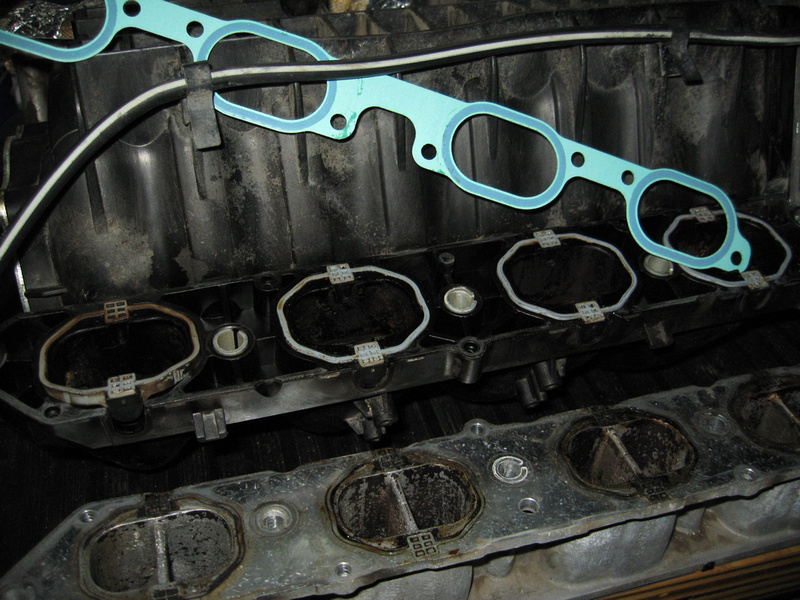
Well, I got the upper part of the manifold separated from the lower half, and found that my theory that the s/c upper gasket i noted above will not work. {sigh}
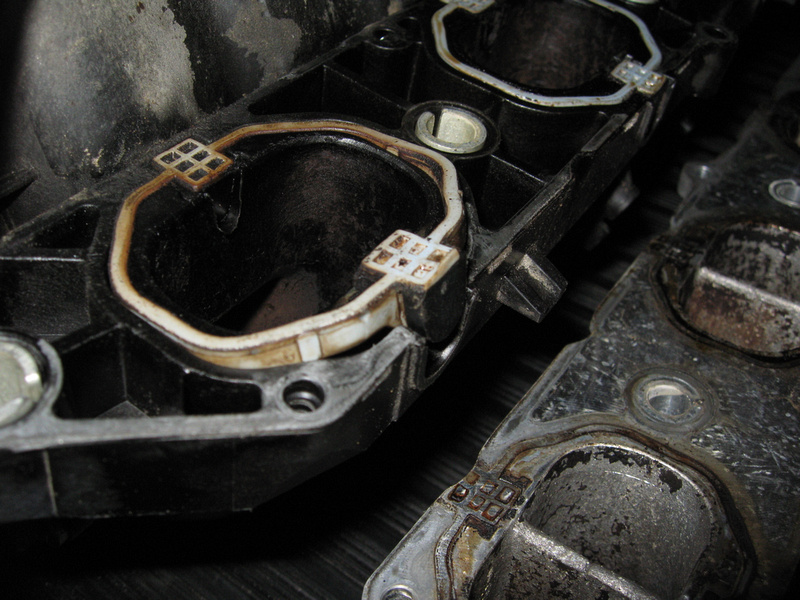
And then I tried to remove one of them..


Ummm, that's not good. I have no idea what I can replace it with...do any of you recognize this part? Nothing stamped on it, so nothing to go on. I'm disgusted w/myself, I should have just cleaned them up and put it back on the dang thing.
And then I tried to remove one of them..
Ummm, that's not good. I have no idea what I can replace it with...do any of you recognize this part? Nothing stamped on it, so nothing to go on. I'm disgusted w/myself, I should have just cleaned them up and put it back on the dang thing.
#16
01-24-2013, 11:55 PM
Veteran Member
Someone else might have an idea about the part.
But, since the thing is an "assembly" not meant to come apart, the thing to do might be to clean the mating surfaces, lay down two films of epoxy and clamp the two back together with the idea that the joint will never come apart or leak again.
But, since the thing is an "assembly" not meant to come apart, the thing to do might be to clean the mating surfaces, lay down two films of epoxy and clamp the two back together with the idea that the joint will never come apart or leak again.
#17
01-25-2013, 08:09 AM
Veteran Member
6) I sense that you're a clean freak like me, so with the top bits of the engine removed, you'll have lots of opportunities for cleaning areas that you don't otherwise get to. As seen in the snaps below, I took some time to get everything as clean and shiny as possible...looks pretty good for a 16 year old engine, imo.
How did you clean the EGR buildup out of the intake elbow? I've heard that it can be difficult to remove.
#18
01-25-2013, 10:12 AM
Veteran Member
Nah, it's pretty easy with the induction elbow out of the car. Degreaser, soap and a soft wire brush is all you need. And by the way, in early cars (like mine) there's no sensor for the ECM to figure out whether the tube connecting the exhaust manifold and EGR valve is actually in place. My ECM can tell if the EGR valve is connected, but NOT if there is exhaust gas flowing through. So I removed the tube and blanked off the ports on the exhaust manifold and EGR. So no more dirty stuff flowing through. On the later cars, I believe, the ECM has an additional sensor that detects whether exhaust gasses are indeed flowing through the EGR.
Matt-
Ouch. In our early cars, that whole assembly is one piece, with eight little rubber gaskets for each intake port. Now that yours has been...well, "compromised" shall we say, I'm not sure what you should do. But you're not alone in this kind of thing...I have often berated myself for going just a bit too far in taking something apart or altering it, and then realizing I've just created more work and expense for myself. Sorry, buddy.
.
Last edited by The Coupe; 01-25-2013 at 10:15 AM.
#19
01-25-2013, 12:30 PM
Lesson learned, thx for the sympathy. After realizing the extent of my error, i just bought a salvage manifold from an 09 xf (yes, same part number across xj, xf, xk8, and stype. ) i figured the newer the better. Only cost me $140 shipped, so not beating myself up too badly. I'll swap my new gaskets over to this unit after a cleanup and leave the middle alone.
#20
01-25-2013, 12:43 PM

Senior Member
Hi Matt, just wondering if you can clarify the symptoms that led you down this path... You wrote "quick but somewhat rough starting in the mornings". Are you saying that cold starts were normal, no unusual cranking etc, however, once started, during the initial 5 - 8 seconds or or so at high idle it was rough, like the engine was almost misfiring sort of but it wasn't really? And during this time, did you notice a slight popping sound from the exhaust, very very slight, but there nonetheless? And then as the idle lowered after 10-12 seconds down to normal all was fine? Hmmm, am I describing what you experienced? If so, I wonder just how uncommon it really is. I described my symptoms and I noticed that if I very slightly blip the throttle it seems to half clear it up, but really, just a little. Anyhow, anxiously awaiting your results.