
Check out my detective skills on this air leak
#21
 01-25-2013, 02:02 PM

Veteran Member
#22
01-27-2013, 02:16 AM
Gus, I don't plan on removing any of the parts when I get the salvage manifold. I'm only going to swap the gaskets on the bottom, and for both the end plate and intake elbow. Basically, not going to separate the plastic from the aluminum. I might have misled you also, that gasket wasn't broken when I split it apart, I did that upon extracting it.
Steve, I would say your description is accurate, thought I can't recall any popping from the exhaust...but when it runs rough trying to catch up to the very poor short term fuel trims, there was lots of unusual sounds. Last time I chased a CEL from too lean of a fuel trim, it was simply a matter of repairing vacuum lines themselves, not anything around the intake as the cause. So, this is a more extreme case to expect. I'm not shocked or anything, with as many miles as she has. Gaskets age, and I never expect them to seal forever, no matter their purpose. This time, its just a little bigger than my others.
I'm learning how to pinpoint these leaks too, not just blasting away with the spray. Short, sometimes pinpoint streams at just a small location has ruled out certain potential sources, while confirming others...like dripping a few drops of the throttle body cleaner atop my subject bolts...pretty cut and dry there if it the trims dive suddenly.
#23
01-28-2013, 11:32 AM
Update: Not having to worry about possibly screwing up the intake any more than I already did with the spare coming from a salvage yard this week, I took Coupe's advice and used Permatex atop all of those individual rubber gaskets following a quick cleanup. What I found also when I was cleaning the aluminum mating surface (let's call them - extensions), I noticed that there was some scoring around the outside bolt holes. It appears that the sleeves in those bolt holes that guide the bolts through the plastic part of the manifold were over-torqued pushing them deeper into the manifold. The bolt and its little washer push down on the sleeve, not the plastic body of the manifold (at least on mine), and those sleeves basically tries to lift and separate the plastic portion from the extension as it met resistance at the aluminum extension, enough to compromise the very small gasket. That's why three of my four corners were leaking at the bolts.
I tapped the corner sleeves back into the plastic portion, and once the Permatex had cured, I put it all back together, only this time, torquing it less than the JTIS specifies (probably 3/4) and fired her up with great anticipation. I did clear the ECM by doing a hard reset, and at ignition, I was rewarded with STFT all in the negative (rich...yah!!!). I shot some quick blasts of TB cleaner at the previous leak locations, with not even a blip of the trims.
Feeling confident, I've driven the car to work today, and monitored the data all the way here, about 20 miles on the highway. My STFT likes to be in the -1 to -2 range at idle, + 2 to +3 at speed, and LTFT has dropped consistently all the way, now resting at + 4 to +5, and I fully expect it to continue to fall before it levels off hopefully around +2/+3
I've got more pics to share and another video to upload in a day or two, along with some of those tips I mentioned for doing this yourself, including how to pull the entire manifold w/o removal of the TB and draining the coolant system.
Coincidentally, I am going to have a rather large paperweight to put into storage with the arrival of my spare intake assembly. I am, however, very excited that I've managed to solve this puzzle.
#26
02-01-2013, 12:01 PM
My intake from the 09 XF arrived yesterday, and was pleasantly surprised to see they sent me the whole assembly, including the fuel rail, pressure sensor, pressure regulator, all 8 injectors, and the XF's version of the intake elbow, which contained the MAP sensor. Perfect for me, since I just overtorqued mine and cracked the housing, and the part numbers were identical, so I swapped it over. I'll clean it up, dissassemble the injectors from the rail, and box everything up for future parts use. I should really call and thank the salvage place, I enjoyed the transaction process, but instead, i'll just promote them here.  A Plus Auto Parts

A Plus Auto Parts
#27
02-01-2013, 01:19 PM
Veteran Member
#28
02-03-2013, 09:14 AM
Hi Matt, I had a siilar issue with my composite intake, but it was just the seal at the intake elbow that was the culprit. FWIW... I orderd an intake from ebay from a lincoln LS 3.9 L. It LOOKED the same. When I got it I noticed the intake for the 3.9 did NOT have the "bridges" in each port... everything else was the same. I ALSO noticed a very poor match to the ports... mass production. I matched the ports to the new gaskets but was left with a "blunt" face of the bridge in the head that I DID NOT like.
with very careful sealing and a shop vac stategicley placed, I "knife-edged" the bride in the heads to enhace the flow. When it was re-assembled, not only were my fuel trims back to normal and the cel off, I feel about 25 hp (estimate) more power!... The 3.9L intake flows more air without the bridges!... The car does INDEED run MUCH better... all through the range... the transmission even shifts better. due impart to the repaired air leaks.... see if yours is shifting better now too.
with very careful sealing and a shop vac stategicley placed, I "knife-edged" the bride in the heads to enhace the flow. When it was re-assembled, not only were my fuel trims back to normal and the cel off, I feel about 25 hp (estimate) more power!... The 3.9L intake flows more air without the bridges!... The car does INDEED run MUCH better... all through the range... the transmission even shifts better. due impart to the repaired air leaks.... see if yours is shifting better now too.
#29
02-10-2013, 03:04 PM
Intake manifold project complete, at last. I learned alot about doing this one myself, and when said and done, I am glad I chose to tackle it personally as opposed to paying someone to do it for me.
As a result, I believe I have now squashed all vacuum leaks either at the manifold, throttle body, EGR valve, or the intake elbow below the throttle body.
I do also believe that my first attempt to put the newly gasketed manifold back onto the block, I overtorqued those long bolts and did push the metal sleeves into the top half of the manifold, and it pushed apart the lower aluminum extension.

I discovered other potential sources for these leaks, and in the future I hope to put together a schematic of the whole system, and show everyone where they should look specifically for these leaks, and what may be necessary to correct them. It could either be a simple cleaning and re-torque, new gasket, or new o-ring. During this venture, I didn't risk anything, and made every effort to check, and if it was suspect, change/replace these sealed points.
My MAP sensor o-ring was one that I didn't consider, and it was a little oily when I removed it. It did clean up ok, and sealed more tightly when I tightened it back onto the intake elbow. The vacuum line on the passenger side was also questionable, as when I 'wiggled' the line at the elbow itself, a vacuum hiss could be detected.

If any of you get to the point where you need to remove this, as mentioned by the coupe above, its like chinese handcuffs, pulling the tube out alone breaks the black locking insert. You'll notice it wants to come out with the tube. Keep it pressed against the face of the elbow, and the tube will pull right out. It should have some resistance, as the o-ring should be grabbing it the entire time. The ring won't come out, and it won't be pushed into the elbow either, as it is set into its own recessed groove in that brass sleeve. If it doesn't have much resistance with that o-ring when removing or reinstalling, i'd grab a replacement.
A new part from jag included the replacement locking sleeve (black), the brass insert (lord knows how the OLD one comes out, so I didn't use it) and the o-ring can be seen inside the brass...just had to draw that out and put it in my old brass insert.

I also found that removal of that rigid vacuum line can be hard to remove, and I broke the end off of mine - lost about an inch. When I removed the fraying heat shield 'sock', I found a rather convenient connector just outside of the passenger side shock tower. Press in, and it pulls right out. If I had known that, I wouldn't have broken it!


Valves looked very clean after some rag applied brake cleaner and finger-power cleaning. I did replace those heater hoses underneath as I mentioned earlier.
My LTFTs are now in the 3-4 range, slowly coming down, and on a cold start, my car no longer has any + STFTs, no immediate spike in RPMs to compensate and rough running symptoms. I'm fairly pleased with myself and rewarded the vert with some new floor mats, a lower bumper underskirt, and that intelligent brake stop flasher. See my other thread for that little install.
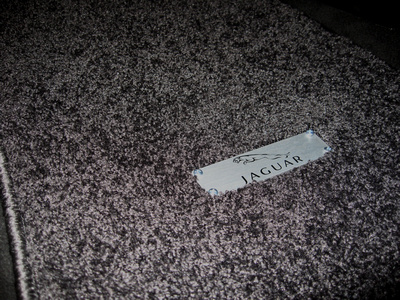
The new floor mats (didn't want to do a thread solely for these, but wanted to show them off). They're 54oz custom mats from ebay, charcoal color, with those jaguar plates provided by some seller in the UK who makes them himself - drilled on the corners ready for bolting to something else besides floor mats, but they worked great here. The company selling the mats doesn't offer the logo option, so I thought I'd try this route instead. Hey, at least this way, it won't get dirty and discolor like my embroidered logo on the old driver mat did.


As a result, I believe I have now squashed all vacuum leaks either at the manifold, throttle body, EGR valve, or the intake elbow below the throttle body.
I do also believe that my first attempt to put the newly gasketed manifold back onto the block, I overtorqued those long bolts and did push the metal sleeves into the top half of the manifold, and it pushed apart the lower aluminum extension.
I discovered other potential sources for these leaks, and in the future I hope to put together a schematic of the whole system, and show everyone where they should look specifically for these leaks, and what may be necessary to correct them. It could either be a simple cleaning and re-torque, new gasket, or new o-ring. During this venture, I didn't risk anything, and made every effort to check, and if it was suspect, change/replace these sealed points.
My MAP sensor o-ring was one that I didn't consider, and it was a little oily when I removed it. It did clean up ok, and sealed more tightly when I tightened it back onto the intake elbow. The vacuum line on the passenger side was also questionable, as when I 'wiggled' the line at the elbow itself, a vacuum hiss could be detected.
If any of you get to the point where you need to remove this, as mentioned by the coupe above, its like chinese handcuffs, pulling the tube out alone breaks the black locking insert. You'll notice it wants to come out with the tube. Keep it pressed against the face of the elbow, and the tube will pull right out. It should have some resistance, as the o-ring should be grabbing it the entire time. The ring won't come out, and it won't be pushed into the elbow either, as it is set into its own recessed groove in that brass sleeve. If it doesn't have much resistance with that o-ring when removing or reinstalling, i'd grab a replacement.
A new part from jag included the replacement locking sleeve (black), the brass insert (lord knows how the OLD one comes out, so I didn't use it) and the o-ring can be seen inside the brass...just had to draw that out and put it in my old brass insert.
I also found that removal of that rigid vacuum line can be hard to remove, and I broke the end off of mine - lost about an inch. When I removed the fraying heat shield 'sock', I found a rather convenient connector just outside of the passenger side shock tower. Press in, and it pulls right out. If I had known that, I wouldn't have broken it!
Valves looked very clean after some rag applied brake cleaner and finger-power cleaning. I did replace those heater hoses underneath as I mentioned earlier.
My LTFTs are now in the 3-4 range, slowly coming down, and on a cold start, my car no longer has any + STFTs, no immediate spike in RPMs to compensate and rough running symptoms. I'm fairly pleased with myself and rewarded the vert with some new floor mats, a lower bumper underskirt, and that intelligent brake stop flasher. See my other thread for that little install.
The new floor mats (didn't want to do a thread solely for these, but wanted to show them off). They're 54oz custom mats from ebay, charcoal color, with those jaguar plates provided by some seller in the UK who makes them himself - drilled on the corners ready for bolting to something else besides floor mats, but they worked great here. The company selling the mats doesn't offer the logo option, so I thought I'd try this route instead. Hey, at least this way, it won't get dirty and discolor like my embroidered logo on the old driver mat did.
Last edited by H20boy; 02-10-2013 at 03:06 PM.
The following users liked this post:
The Coupe (02-10-2013)
#30
02-10-2013, 04:52 PM
Veteran Member

Thread
Thread Starter
Forum
Replies
Last Post
rachelstr
S-Type / S type R Supercharged V8 ( X200 )
7
09-03-2015 12:59 PM
Currently Active Users Viewing This Thread: 1 (0 members and 1 guests)