When you click on links to various merchants on this site and make a purchase, this can result in this site earning a commission. Affiliate programs and affiliations include, but are not limited to, the eBay Partner Network.
I finally got around to replacing the passenger's "Door Closed" micro switch. I was so tired of staring at the perpetual red dashboard light, manually raising the window to full up every time the door opened, and not being able to lock the car. The combination of Reverend Sam's video and Gus' repair instructions are essential to tackling this job. Here I provide additional instructions to both that fill in some gaps.
NOTE:Do not start this project until you acquire the tiny nuts & bolts to attach your new switch to the latch. (See my comments 3 & 4 to Gus' instructions below)
Watch Reverend Sam's video on how to get the door latch out & back into the car and THEN read my notes.
1. Before disconnecting the battery, lower the window about an inch to make getting the window rail out much easier. Then raise the window all the way up (to give you the clearance you'll need to get the latch mechanism out. "Now" disconnect the battery. Remember to do this in reverse during re-installation.
2. The window rail rides in a slot through the square aluminum block you'll see at the bottom of the window. To get the rail out, once you've removed the 3 screws, just rotate it away from the aluminum block and out of its slot. Don't worry about window re-alignment. The rail goes right back into place. Just don't touch the Allen Adjusting Screw at the bottom of the rail.
3. The window rail does not need to actually come out of the door. Just lay it down inside the door.
4. If you just yank on the actuating rod end to try and get it to pop off of its ball, as Sam said, it will feel like a lot of force, but if you lever it off with a screw driver it pops free with very little drama.
5. When re-installing the latch make sure the actuating arm(s) that hang down are clear of the latch and on the outside of the latch (they will want to hang "inside" of the latch when free).
6. Make sure you reconnect the actuating rod end(s) BEFORE re-installing the window rail. I did a Passenger Door, so I didn't get to address the clip that Reverend Sam broke on the door lock actuating rod.
Here are some extra comments to Gus' excellent piece on replacing the "Door Closed" micro switch. Once again, go over his piece really well BEFORE reading my notes.
http://www.jagrepair.com/DoorLatchRepair2000xk8.htm 1. The "Stays" that Gus accidentally drilled out are actually nubs on the switch itself (see pic). They keep the switch located on its mount. The switch is held in place only by a springy plate above it that keeps the switch pressed in place on its mount.
2. To remove the switch just pry it up from its mount a bit and slide it out from under the springy plate.
3. Replacement switches do not include these nubs, so you must be prepared to affix the new switch with 1/16" (or smaller?) little screws and nuts, as you can see in one of Gus' photos.
4. I was caught unaware of this and after going through the entire removal processes I wasn't too keen on the idea of putting it all back together just to get those screws, so I looked for an alternative solution. It turns out that my orange Weed-Eater cord, with its ribbed cross section was perfect. I was able to tightly wedge the cord through the holes in the mount and the switch, and I left enough cord sticking out of the springy plate to facilitate future removal if necessary. They're not going anywhere and the switch is actually much more secure than the original (see pic).
5. After buying your replacement switch, root around for what will go through its little holes and that you will use to attach it BEFORE attempting this job.
6. Before installing your new switch put it next to the OEM switch and bend the thin metal actuating lever to match that of the original. If you do not do this, it is possible that the latch mechanism will not move the switch's lever enough to actuate the switch.
7. Your replacement switch will come with three wires. Note Gus' multimeter photos. The switch is "Closed" when the door is unlatched. If your replacement switch comes with wires attached (like mine), identify which wire is correct and cut the other one off.
BTW: Many folks recommend spraying WD40 up and around the latch to clear this problem (Door stuck open annunciation). Once you take the latch out of your car and play with it a bit to see how the latch's mechanisms and the switch work, you'll realize that the WD40 won't do a thing. "If" perchance, some time after spraying the WD around, the problem goes away, it's only because the switch is working intermittently and just coincidentally started working again. Mine did this for a few years until the switch failed completely. I haven't cut it open yet to access the actual failure mode, but essentially it is mechanically jammed in the "Door Open" position - the little button will not move at all.
Ahhhh, .... no more red light, no more managing the interior lights, and so nice to be able to lock my car again! What a great feeling it was to see the window fully raise when I closed the door. Sweet.
I should add that the switch I used was an OMRON D2SW-3L3MS. It's sealed and less than $10.
.....
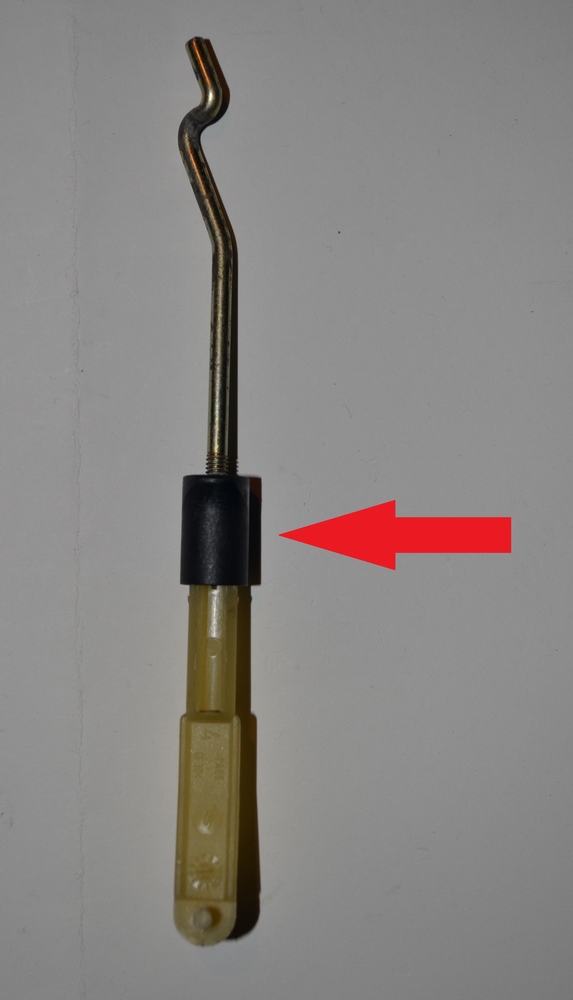
4. If you just yank on the actuating rod end to try and get it to pop off of its ball, as Sam said, it will feel like a lot of force, but if you lever it off with a screw driver it pops free with very little drama. ......
NO!
The link is NOT designed to be forced or popped off its ball. It is designed to separate:
1. note the BLACK collar:
2. slide it DOWN:
3. press the metal rod out through the slot in the plastic arm. The plastic arm stays on the door latch:
Hi Graham! It's OK - I wasn't talking about "that" rod (that's the mechanical locking/unlocking rod in the driver's door). I was talking about the actuating rod that opens the door. It's the other one, and it does just pop off the ball fixture on the operating lever.
Like I said, because I was working on my passenger door, I didn't get to play with the rod in your photos, so those pics and your explanations are GREAT additions to this thread. Thank you so much.
RE: XK8 door actuator mechanism. I know this is an old post but does anyone know how to properly, as in exacty, set the two rods (handle and lock) for appropriate lengths? I've not seen this addressed and I think it is affecting my door locking.
I didn't fiddle with the lengths so I can't help you, but it might be worth your while to PM Graham (GGG) if he doesn't see your post here. He has a lot more experience with the driver's door.
RE: XK8 door actuator mechanism. I know this is an old post but does anyone know how to properly, as in exacty, set the two rods (handle and lock) for appropriate lengths? I've not seen this addressed and I think it is affecting my door locking.
There's three linkages on the driver's door (RHD shown here):
1. Interior Door Handle (red) - cable
2. Exterior Door Handle (blue) - metal rod/plastic connector
3. External Door Lock (green) - metal rod/plastic connector
I don't think it's an exact science and have never read any guidance on setting lengths. I've always just checked there's some free play in the rods to ensure the operating levers in the Door Latch aren't under tension.
Having just completed replacement of the micro-switch I'll add some points which might assist someone else later.
1. I found an alternative switch "Snap-Action Switch with 16.3mm Roller Lever: 3-Pin, SPDT, 5A" which will also do the job. The width is shorter than the Omron but the critical distance between the mounting holes and the lever arm is the same. 2. As Jim M suggested, I looked around for something to mount the micro-switch and I used pieces of cotton bud shafts, cut to length and additional security with a dab of super glue at each end. 3. If the link between the external lock and the latch is too short then you will not be able to lock the car with the remote fob or the key. I found that just letting the two parts fall into their natural position before locking the collar seemed to be right. 4. If you pull down on the lower external lock link with the battery connected the window will come down and damage you. 5. The 'fir tree' clips securing the door card are fragile and can't be bought just anywhere.
Hopefully it's good for another 16 years and 210,000 kilometres.
I replaced the passenger (LHS) switch today with the part suggested from Omron. To secure the new switch I used 2 of 15 mm x 2.5 mm countersunk head machine screws each with a washer and a nut. It was easy to drill a countersink in the front surface of the door lock plate to recess the screw heads. The existing holes in the door lock plate are 3 mm and the holes in the micro switch are 2.5 mm so a perfect fit. Thanks to those who posted on this. Made the whole exercise easier but still took more than half a day
Hi guys, I wonder what is the difference between microswitches: Omron D2SW-3L1MS Omron D2SW-3L2MS Omron D2SW-3L3MS
For some reason, the correct one 3L3MS is not available in my country so I would like to know if I can use 3L1MS or 3L2MS?
Thank you.
I has a quick look and it seems it is the same switch but with various lever styles. The style you want is simulated roller lever. It might be possible to use your old lever on a new switch but not sure. Anyway the lock is designed to take the simulated style.
No 4 in the original post ...Screwdriver ?? !! use a crowbar from above and flick it off with that and when you put it back put the fitting on the ball and a block of foam 3x3x3 behind the link to hold it. then put the crowbar on it horizontal and push it on.
I has a quick look and it seems it is the same switch but with various lever styles. The style you want is simulated roller lever. It might be possible to use your old lever on a new switch but not sure. Anyway the lock is designed to take the simulated style.
Thank you. I also found out only the "upper" part of the switch that comes without cables - therefore I would be able to change them without cutting wires, soldering, etc...These are called SNAP ACTION: https://www.tme.eu/cz/details/zma03a...ap-action/c-k/
Anyone did such change? Thank you
Not sure. It doesn't look right. Surely you can get the correct part? CZ is part of the EU so should be easy.
Actually I found out from the supplier that the only difference between 3L3MS and 3L2MS and 3L1MS is the upper clip so I will buy one of these available and reuse the original clip...
 07-05-2017, 10:38 AM