
HOW TO: Recover the A-Pillars & Windshield Header with New Upholstery (Video)
#21
 10-04-2011, 08:47 AM

LOL @ Matt! 
Here's a tip: don't do like I did and cut the fabric from the end of the roll. A yard would have been enough to cover the A-pillars and the headliner behind the visors, but I cut from the end of the roll, now the fabric isn't long enough to re-cover the headliner. If I had cut the fabric the other way I would still have the full 60 inches to work with. So now it's another trip to Joanne's. Hope I can find the exact same fabric. Otherwise I'll be doing the A-pillars all over again.
Here's a tip: don't do like I did and cut the fabric from the end of the roll. A yard would have been enough to cover the A-pillars and the headliner behind the visors, but I cut from the end of the roll, now the fabric isn't long enough to re-cover the headliner. If I had cut the fabric the other way I would still have the full 60 inches to work with. So now it's another trip to Joanne's. Hope I can find the exact same fabric. Otherwise I'll be doing the A-pillars all over again.
#24
10-06-2011, 11:52 AM
Veteran member
Three of the four fabric colors have arrived, and it looks like Med Gray #2005 is going to be it. Here is a pic of it taken outside with the existing a-pillar alongside the samples.
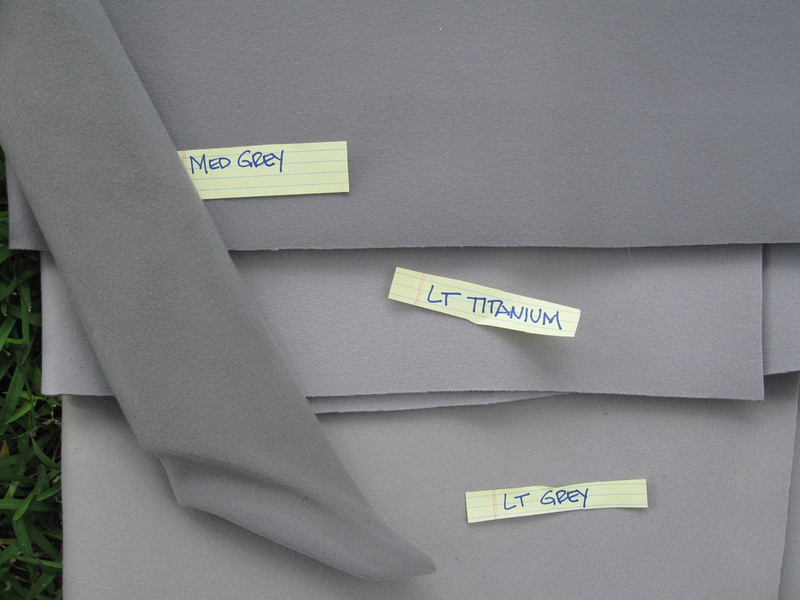
I'll let you know if Ox Gray is any closer, but I doubt it. I thought for sure it would be a much lighter grey, but I'm glad I got all three to make sure. I just want it to closely match the convertible fabric. which won't get replaced, at least not this year.
I'll let you know if Ox Gray is any closer, but I doubt it. I thought for sure it would be a much lighter grey, but I'm glad I got all three to make sure. I just want it to closely match the convertible fabric. which won't get replaced, at least not this year.
Last edited by H20boy; 10-06-2011 at 12:32 PM. Reason: ox gray, not ox bow
The following users liked this post:
ipurr2 (10-20-2011)
#26
10-07-2011, 01:56 AM
Thanks for the video. My A pillar fabric was loose and puckering. I removed the original fabric, then removed the crumbled foam adhesive from pillar and fabric back, then spray adhesive and re-applied the original fabric following the recommendations in the video and they look great now. Took maybe a half hour each.
Syd
Syd
Last edited by tcsyd; 10-07-2011 at 01:57 AM. Reason: typo
#28
10-07-2011, 07:43 AM
Veteran Member
Thanks for the video. My A pillar fabric was loose and puckering. I removed the original fabric, then removed the crumbled foam adhesive from pillar and fabric back, then spray adhesive and re-applied the original fabric following the recommendations in the video and they look great now. Took maybe a half hour each.
Syd
Syd
Last edited by WhiteXKR; 10-07-2011 at 07:57 AM.

#33
10-07-2011, 02:28 PM
Veteran member
I used the OXY clean spray bottle and a tooth brush to clean my visors, they cleaned up really well. Its very mild but lifts the dirt so it can be wiped off with a terry cloth.
My a-pillars and header are done! That header was a bee-otch, i gave myself about a 1/2-inch outside of the original fabric's pattern, and because of its length, if your off by a little bit on the angle (I worked from the center outward) I ended up running out of material at a corner, so pulled and retried, nope too much...after about 3 times, I got the right proportions and it worked great. The center hole for the homelink doesn't need to be trimmed, as long as its large enough for the unit to fit through, that 'll save you some headache. I only poked holes for the visors and their electrified clips, and wherever the screws needed to be stuck through the fabric, well it got stuck. I think It looks good.
I found the electrified clips difficult to remove, first the little screw-flap, then after the screw was removed...then what? I applied more and more pressure, wiggled, and it eventually just pulled free. Oh, and I broke a small piece of my side airbag sensor plastic tab (on the inside) as that puppy was a tight fit getting it back into the a-pillar. Luckily, its wedged in there pretty solid...its not going anywhere.
Still waiting on your video rev, I almost took pics, but didn't knowing your HD motion picture would put my pics to shame.
#34
10-07-2011, 03:09 PM
The visors are a press mold design, which is impossible to duplicate with sewing or gluing. I have seen an XKR with the A pillars, visors and header panel all covered in skived leather, which has the thickness of the steering wheel leather, and looked great! the car was from Arden of Germany.
Jim
Jim
#35
10-07-2011, 03:50 PM
I used the OXY clean spray bottle and a tooth brush to clean my visors, they cleaned up really well. Its very mild but lifts the dirt so it can be wiped off with a terry cloth.
My a-pillars and header are done! That header was a bee-otch, i gave myself about a 1/2-inch outside of the original fabric's pattern, and because of its length, if your off by a little bit on the angle (I worked from the center outward) I ended up running out of material at a corner, so pulled and retried, nope too much...after about 3 times, I got the right proportions and it worked great. The center hole for the homelink doesn't need to be trimmed, as long as its large enough for the unit to fit through, that 'll save you some headache. I only poked holes for the visors and their electrified clips, and wherever the screws needed to be stuck through the fabric, well it got stuck. I think It looks good.
I found the electrified clips difficult to remove, first the little screw-flap, then after the screw was removed...then what? I applied more and more pressure, wiggled, and it eventually just pulled free. Oh, and I broke a small piece of my side airbag sensor plastic tab (on the inside) as that puppy was a tight fit getting it back into the a-pillar. Luckily, its wedged in there pretty solid...its not going anywhere.
Still waiting on your video rev, I almost took pics, but didn't knowing your HD motion picture would put my pics to shame.
My a-pillars and header are done! That header was a bee-otch, i gave myself about a 1/2-inch outside of the original fabric's pattern, and because of its length, if your off by a little bit on the angle (I worked from the center outward) I ended up running out of material at a corner, so pulled and retried, nope too much...after about 3 times, I got the right proportions and it worked great. The center hole for the homelink doesn't need to be trimmed, as long as its large enough for the unit to fit through, that 'll save you some headache. I only poked holes for the visors and their electrified clips, and wherever the screws needed to be stuck through the fabric, well it got stuck. I think It looks good.
I found the electrified clips difficult to remove, first the little screw-flap, then after the screw was removed...then what? I applied more and more pressure, wiggled, and it eventually just pulled free. Oh, and I broke a small piece of my side airbag sensor plastic tab (on the inside) as that puppy was a tight fit getting it back into the a-pillar. Luckily, its wedged in there pretty solid...its not going anywhere.
Still waiting on your video rev, I almost took pics, but didn't knowing your HD motion picture would put my pics to shame.

I didn't realize that the clip that holds the visor was electrified. I stuck a screwdriver in the clip to try to give me something to hang onto to pull it out. Of course, as soon as the screwdriver shorted the contacts it blew a fuse. I haven't even looked for the fuse yet. I assume it doesn't power anything else, but maybe I'm wrong.
#36
10-08-2011, 03:29 PM
Veteran Member
I was just browsing the WLSheadliners.com site and they now do professional visor recovering for a fairly reasonable fee:
Recovered sun visors by WLS Headliners
#37
10-09-2011, 03:42 AM
Veteran member
I was just browsing the WLSheadliners.com site and they now do professional visor recovering for a fairly reasonable fee:
Recovered sun visors by WLS Headliners
Recovered sun visors by WLS Headliners
#38
10-20-2011, 03:23 PM

#39
10-20-2011, 07:54 PM
Veteran Member
You certainly can glue the original back, but in my opinion it will look better and will be much easier to get a good, smooth result that looks and feels like new if you use new foam backed material. This material is very inexpensive at under $20 a yard, so if you are going to the trouble to do it, you might as well do it right.
The following users liked this post:
ipurr2 (10-20-2011)