HOW TO: Recover the A-Pillars & Windshield Header with New Upholstery (Video)
#41
 10-20-2011, 08:33 PM


#43
10-28-2011, 11:25 PM

#44
10-31-2011, 05:33 PM
Well, I wasn't quite happy with the headliner material I got (Jo Ann fabrics) the color is close, but not close enough for me. Also the actual texture of the headliner looks kind of cheap.
So I decided to use their headliner material as the padding, and I got some fake micro-suede type material that is almost an exact match for the color of the old headliner. Hopefully it will look somewhat respectable, and not so much Pimp My Ride once I am done.
So far I have about $50 into it, $20 for the headliner material, $20 for the micro-suede, and a can of 3M aeresol trim adhesive.
#46
11-06-2011, 03:26 PM
I've got some pics I'll try to get posted this evening. My interior color code is for Cashmere, but the tag that was on the backside of the headliner said "Oatmeal."
Overall it looks MUCH better than the old sagging material, but there are a couple of spots where the glue got too heavy and bled through the fabric. I don't think anyone but me would notice though, the actual material pattern is a bit splotchy looking anyway.
Overall it looks MUCH better than the old sagging material, but there are a couple of spots where the glue got too heavy and bled through the fabric. I don't think anyone but me would notice though, the actual material pattern is a bit splotchy looking anyway.
#47
11-06-2011, 04:51 PM
Here's the pics;
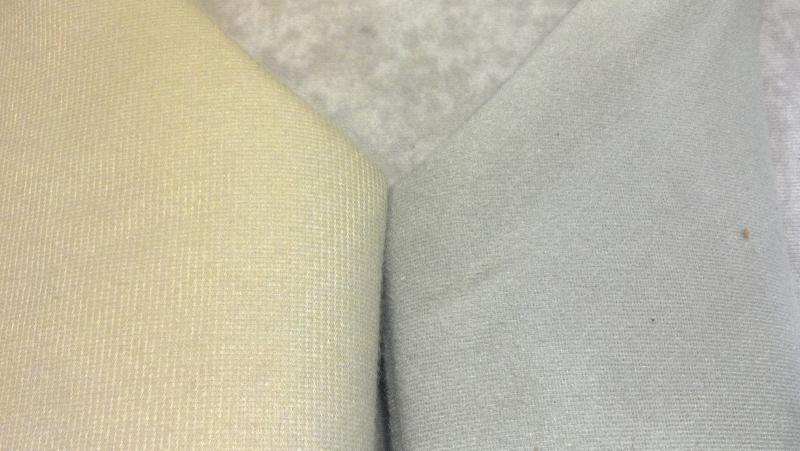
This is the Jo-Anns headliner material on the Left, the OEM Jaguar material on the right, and the triangle at the top is the microsuede I used as the final outer layer.

There is a picture of the inside of my R.H. saide A-pillar trim to show the difference between my 2002 and the later style in the Rev's video.
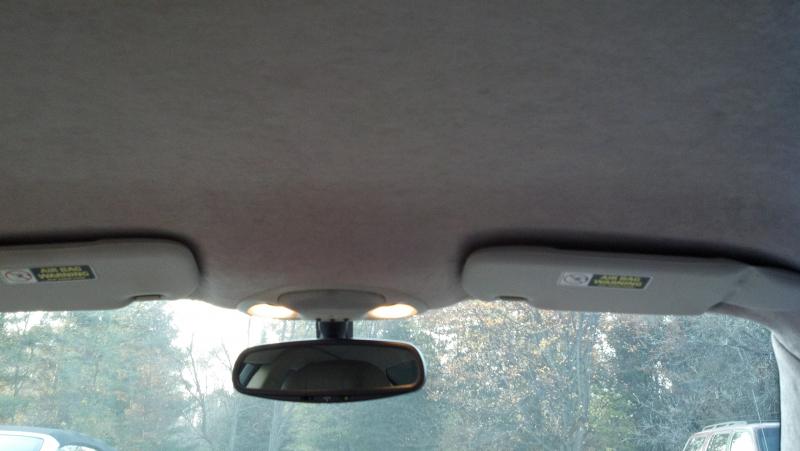
There's the headliner competed and installed. It's hard to get a picture in that small cabin.

Completed headliner and L.H. side A-pillar. The thing at the top of the A-pillar is my bluetooth microphone.
This is the Jo-Anns headliner material on the Left, the OEM Jaguar material on the right, and the triangle at the top is the microsuede I used as the final outer layer.
There is a picture of the inside of my R.H. saide A-pillar trim to show the difference between my 2002 and the later style in the Rev's video.
There's the headliner competed and installed. It's hard to get a picture in that small cabin.
Completed headliner and L.H. side A-pillar. The thing at the top of the A-pillar is my bluetooth microphone.
#52
02-11-2012, 10:09 AM


Veteran Member
I did this A-pillar reupholstery repair yesterday. Our XK8's interior is Cashmere, and my wife could not find a fabric match that would pass her inspection at Joanne's or any of the other fabric stores in our area. So we went to good ol' Auto Interiors and Tops (which has been in business here for nearly 40 years). Instead of 3 or 4 choices of "beige" headliner material, they had more than 20. She spent over 30 minutes looking at every one of them, matching them up with the A-pillar I brought inside the shop and carrying samples outside to look at them in the sunlight. She finally made her selection, we purchased one-half yard of material, and I'm sure the guys at the shop were glad to see her leave....
I came home and did the start-to-finish reupholstery to both A-pillars in about 75 minutes. I think they look great. She wanted perfection which just ain't gonna happen because there is no such animal as a perfect fabric match more than six years after the car was built. After doing the job the first time and learning the tricks on the fly, I'm sure a second attempt would result in even tighter and more professional edges. A half-yard of material is enough to do both A-pillars twice. So I'll see how my initial attempt holds up and if I see any wrinkling or cupping (or if she starts complaining about them), I'll do them again with the leftover material....
I have no idea if part numbers for headliner material are standard from shop to shop, but for those of you with Cashmere interiors, my invoice shows my headliner fabric as part number PH HL 2. I paid $10 for a half-yard of material....
Last edited by Jon89; 02-11-2012 at 10:15 AM.
#53
02-11-2012, 10:17 AM
Veteran Member
#54
02-11-2012, 10:30 AM
Veteran Member
I did this A-pillar reupholstery repair yesterday. Our XK8's interior is Cashmere, and my wife could not find a fabric match that would pass her inspection at Joanne's or any of the other fabric stores in our area. So we went to good ol' Auto Interiors and Tops (which has been in business here for nearly 40 years). Instead of 3 or 4 choices of "beige" headliner material, they had more than 20. She spent over 30 minutes looking at every one of them, matching them up with the A-pillar I brought inside the shop and carrying samples outside to look at them in the sunlight. She finally made her selection, we purchased one-half yard of material, and I'm sure the guys at the shop were glad to see her leave....
I came home and did the start-to-finish reupholstery to both A-pillars in about 75 minutes. I think they look great. She wanted perfection which just ain't gonna happen because there is no such animal as a perfect fabric match more than six years after the car was built. After doing the job the first time and learning the tricks on the fly, I'm sure a second attempt would result in even tighter and more professional edges. A half-yard of material is enough to do both A-pillars twice. So I'll see how my initial attempt holds up and if I see any wrinkling or cupping (or if she starts complaining about them), I'll do them again with the leftover material....
I have no idea if part numbers for headliner material are standard from shop to shop, but for those of you with Cashmere interiors, my invoice shows my headliner fabric as part number PH HL 2. I paid $10 for a half-yard of material....
I came home and did the start-to-finish reupholstery to both A-pillars in about 75 minutes. I think they look great. She wanted perfection which just ain't gonna happen because there is no such animal as a perfect fabric match more than six years after the car was built. After doing the job the first time and learning the tricks on the fly, I'm sure a second attempt would result in even tighter and more professional edges. A half-yard of material is enough to do both A-pillars twice. So I'll see how my initial attempt holds up and if I see any wrinkling or cupping (or if she starts complaining about them), I'll do them again with the leftover material....
I have no idea if part numbers for headliner material are standard from shop to shop, but for those of you with Cashmere interiors, my invoice shows my headliner fabric as part number PH HL 2. I paid $10 for a half-yard of material....
If the material has a few puck marks but is otherwise tight, moisten a clean towel with clear oil based paint thinner and dampen (do not soak) the pucked area. That will soften the adhesive temporarily and smooth out the area. Repeat a couple of times if necessary.
Last edited by WhiteXKR; 02-11-2012 at 10:36 AM.
The following users liked this post:
Jon89 (02-11-2012)
#55
02-11-2012, 03:37 PM
Veteran Member
#56
04-16-2012, 02:56 PM

I bought some of the fabric from Joann's (interestingly one store had a totally different shade but the other one had an almost perfect match) and I'm ready to tackle the job. One thing that confuses me is doing the header - how did you apply the adhesive to that part? Just spray it on and work quickly? Or do it without adhesive?
#57
04-16-2012, 07:32 PM
Veteran Member
It is the exact same principle as recovering a headliner...only smaller. You clean the old board and use adhesive on both the board and the fabric.
Review some of these guides to get the idea ... Auto headliner installation guide
Review some of these guides to get the idea ... Auto headliner installation guide
#59
04-16-2012, 08:50 PM
Veteran Member
#60
04-22-2012, 10:08 AM
Shortly after I recovered the A-pillars I also recovered the header piece at the top of the windshield. I finally got around to compiling that video, and I added it to the first post in this thread, just below the A-pillar video.
Here's the video if you want to watch it without having to go back to page 1. I don't cut myself, bang my knuckles, or cuss, so it's really not that exciting. Sorry.
Hey... can one of the mods change the title of the thread so it includes "windshield header" or whatever that piece is called?
Jaguar XK8 Windshield Header Recovering - YouTube
Last edited by Reverend Sam; 04-22-2012 at 10:23 AM.