
MEGA Nav Upgrade details!...plus Integrated Gauges, XM radio and Real Time Traffic

 Its just a backlit button to me!
#22
 02-05-2011, 02:24 PM
For those interested, I have updated the file "Adding HKS CAMP-2 Optional Sensors to XK8-R how to" at the beginning of this thread to revision 2 now that I have completed installing the intercooler water temp. sensor.
I have added photos and some additional detail to that section.
I have added photos and some additional detail to that section.
#23
02-05-2011, 08:07 PM

Have you monitered the coolant temp yet for the supercharger? I am very curious as to the temps you are seeing. I also have a gauge in the supercharger circuit but it is totally isolated from the engine, has a second pump & its own resevoir. In addation the supercharger radiator has been taken out & a larger resevoir fitted which feeds the Killer Chiller. I have used many different configurations of pulleys as well as superechargers, so this is of great interest to me. How much boost are you running, how high does the temp go on hard acceleration, can yoiu see the temp drop as soon as you back off the throttle???
The following users liked this post:
WhiteXKR (02-09-2011)
#24
02-05-2011, 08:21 PM
I just installed this today. My steep driveway is still covered in snow  , so all I have been able to do is idle in the garage so far.
What this has told me so far is that separation of the radiator and intercooler circuits is probably not necessary as I had the engine at full operating temperature and the intercooler circuit only rose 4 or 5 degrees F.
I do plan to take and post some data once I get untrapped. I'll be looking at performance over different ambient temperatures, and I also plan to experiment with manual control of the fans. Then, once I have that data, I plan to upgrade to the Nameless Performanace Intercooler and compare. The HKS CAMP 2 has graphing capability a 10 minute playback feature which should come in handy here.
, so all I have been able to do is idle in the garage so far.What this has told me so far is that separation of the radiator and intercooler circuits is probably not necessary as I had the engine at full operating temperature and the intercooler circuit only rose 4 or 5 degrees F.
I do plan to take and post some data once I get untrapped. I'll be looking at performance over different ambient temperatures, and I also plan to experiment with manual control of the fans. Then, once I have that data, I plan to upgrade to the Nameless Performanace Intercooler and compare. The HKS CAMP 2 has graphing capability a 10 minute playback feature which should come in handy here.
#25
02-05-2011, 08:35 PM
#26
02-05-2011, 08:51 PM
#27
02-05-2011, 08:57 PM
#28
02-05-2011, 09:03 PM

#30
02-12-2011, 10:22 AM
Based on feedback, I have added a couple of cautonary notes to the original post:
CAUTIONARY NOTES:
1) These write-ups are not full step by step procedures. Instead they provide suggestions and details on the parts of the install that are not necessarily obvious from the manufacturers installation instructions or that are specific to the Jaguar XK8/XKR.
These installations require significant modification to your vehicle wiring. Do not undertake this yourself unless you are confident in what you are doing.
2) Never apply any signals (audio, video or control) to this aftermarket equipment without power and ground both reliably connected. Doing so may damage the equipment.
Last edited by WhiteXKR; 02-12-2011 at 10:34 AM.
#31
03-13-2011, 05:27 PM
I have a few weeks under my belt with this upgrade, and I am happy to say it has been performing well. One issue has surfaced, however..but there are a couple of easy solutions.
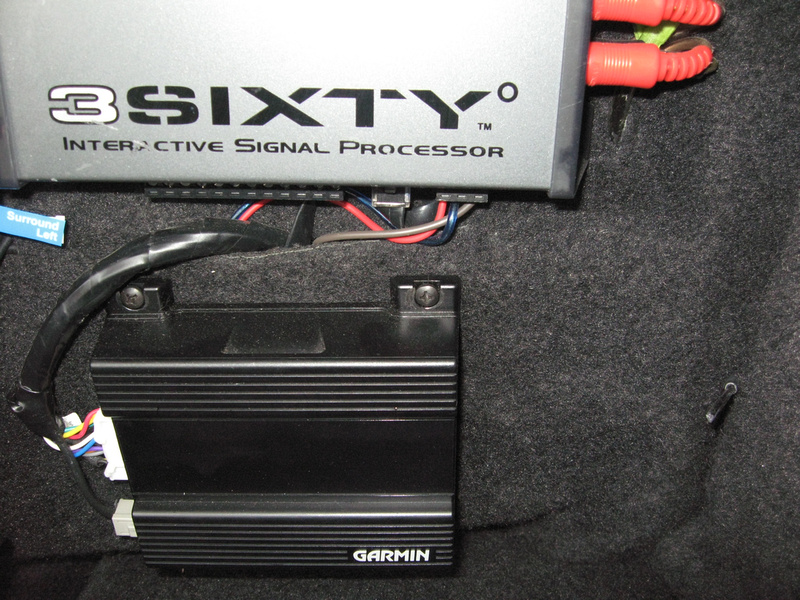
The Garmin GVN-53 uses an RF remote control. The installation instructions warn 'Do not install the GVN-53 inside a metal housing or where it might be shielded from you by a metal object." I first thought this might be an issue for trunk mounting of the unit, but initial testing did not reveal a problem. In actual use however, driving through areas with varying RF interference, and also when putting luggage in the trunk, I found that the signal was weak enough to cause operational problems: sometimes multiple presses required of the same key, or even total non-reponsiveness of the remote. This is probably due to the fact that our cars have a steel gas tank separating the passenger compartment from the trunk.
If you are considering a future installation, an obvious solution is to mount the GVN-53 hidden somewhere in the passenger compartment. In my case I was not keen on redoing the harness that I had already custom installed for the trunk. I also like the unit mounted in the trunk near the battery...it provides for very easy access for upgrading the software in the Garmin with a flash card in the future.
I came up with a solution that costs about $5 and is extremely easy to fabricate and install. It works a treat. The remote performs flawlessly now. It is basically a 13 foot length of coaxial cable (I used 75 ohm cable from a car radio antenna extension cable) that provides an RF path between the passenger compartment and the trunk. The ends of the cable have the braid stripped back 1.6" to provide a tuned wire 'antenna' at each end. The braid is then grounded at one end to the car chassis. The cable travel the same route from the center console to the trunk as the convertible top hoses.
A couple of pictures should make it clear. Note that I exposed the antenna at the console for the photo. It is normally just hidden in the Kuda mount, right below the remote.
#34
03-13-2011, 07:23 PM
Only connection is ground...cannot be simpler. Obviously the closer the antenna on each end is to the base unit and the remote, the better this will work. In my case, it is within a couple of inches of each.
It NEVER misses a keypress now
Last edited by WhiteXKR; 03-14-2011 at 07:05 AM. Reason: Added: 'Cut off the exposed foil shield.'
The following users liked this post:
H20boy (03-20-2011)
#36
03-13-2011, 08:55 PM
#38
03-14-2011, 07:02 AM
Yes, ordinary televsion coax cable should work fine. It's diameter is slightly larger, and it is a little stiffer to work with, but it should be OK. If you use that, go with a 13 foot length, the 12 ft from the Metra extension cable was just barely long enough.
#39
03-20-2011, 03:07 PM
Veteran member
Thanks whitexkr, ran my new RF extension cable (I just paid the $6 at the auto parts store for the part). Not too difficult, and will test out this week while driving the car. The best time to test is driving at highways speeds, that's my remote's weak point. <edit> BTW, I did this run of line w/o removing a single panel (ok, the carpet in the boot not-withstanding), just pulled it thru the corner of the boot/convertible shelf where there was a factory hole, tucked it under that carpet, routed it between the seat back and side panel, around the corner of the lower seat cushion, up and under the lower seat cushion bolt/fastener, then up the console. It reached to the gear shift going that route, but should be plenty long enough. I like to use the remote sitting on the ashtray anyhow. <edit>
Here are some pics, took a black marker to the plastic sheath, since mine was visible in the boot. Its hard to get it close to the Garmin w/o it sticking out from the side, so I'm going to see if this location is close enough to work well, and consistently before i start moving it closer.

Here are some pics, took a black marker to the plastic sheath, since mine was visible in the boot. Its hard to get it close to the Garmin w/o it sticking out from the side, so I'm going to see if this location is close enough to work well, and consistently before i start moving it closer.
Last edited by H20boy; 03-20-2011 at 03:16 PM. Reason: added install note to paragraph 1
#40
03-20-2011, 08:11 PM