My project...
#221
 10-26-2012, 09:07 PM

Great job on the rebuild!
#222
11-12-2012, 11:25 AM

Good day everyone!!!
It has, once again been awhile since I have been able to play with the Jag and get on here to tell you about the fun I've been having with her...
Here is the example of the lugs... The larger is what should be on there, but if it wasn't for the donation from H20BOY, I wouldn't have the 15 I have now... I still need five more, so I will be hoping for the best at the local salvage yard or Ebay...

I am going to bite the bullet and pay the dealer for the wheel stud... What can you do sometimes?! Unless someone has an old rear wheel hub and lugs that they aren't using... I will pay for shipping!! (I haven't forgotten H20BOY!)...
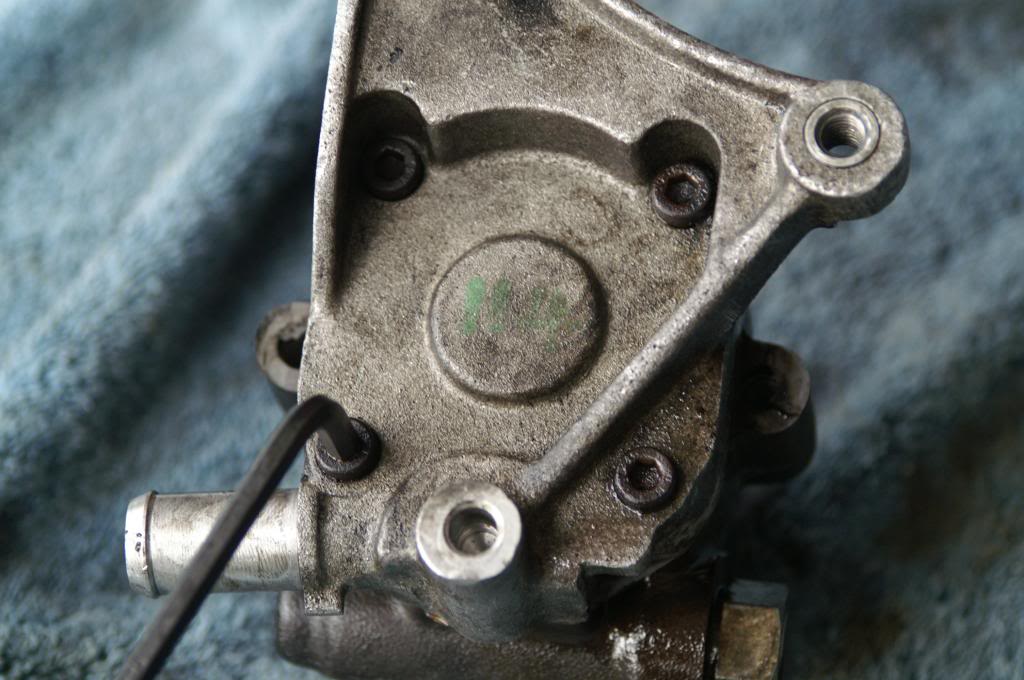
So, I think I had a leak at the power steering pump... I took it out and tore it down... Here you go:
It is held together by four 5mm hex bolts... These weren't too bad to get loose...

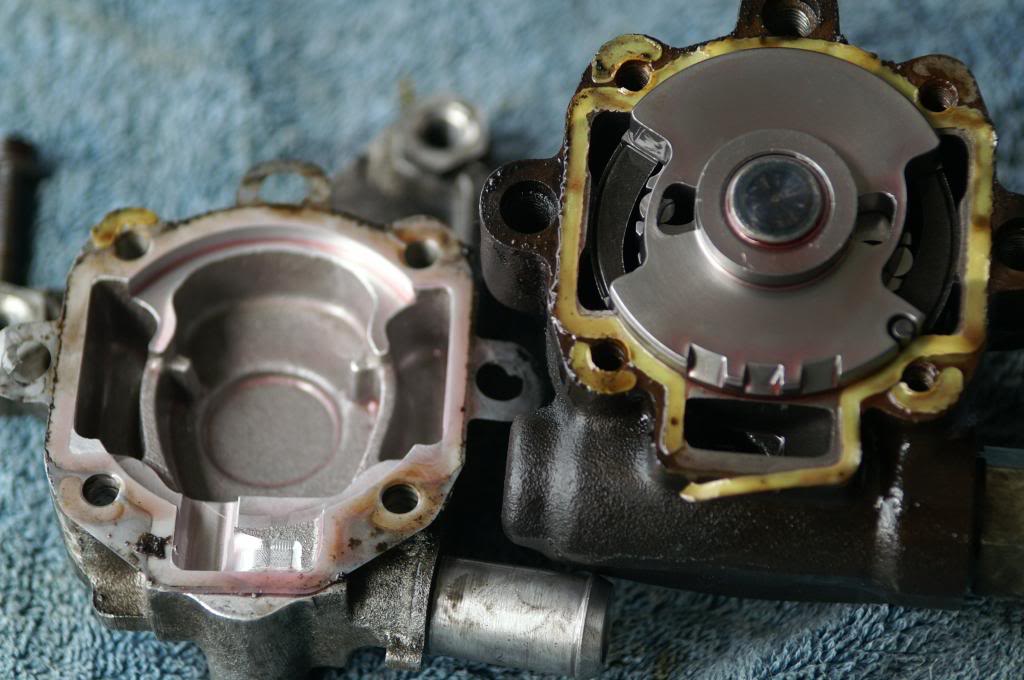
And this is where I think the leak was...

Too easy...
(HAVE I MENTIONED THAT I DESPISE PHOTOBUCKETS NEW UPDATE!?!?!?!?! Don't fix what isn't broken, cause now it is!!!!!)
Here is the break (yellow stuff) and the clearish white gasket (on the left)... I used the solid gasket to trace a replacement using the cardboard from the back of a thing of paper... I use the single sheet cardboard, not the box cardboard... (finally got the pic to copy from photobucket...)
Note the pin and spot for it on the top part... This is stationary in the pump... Also note the bronze bushing in the center...
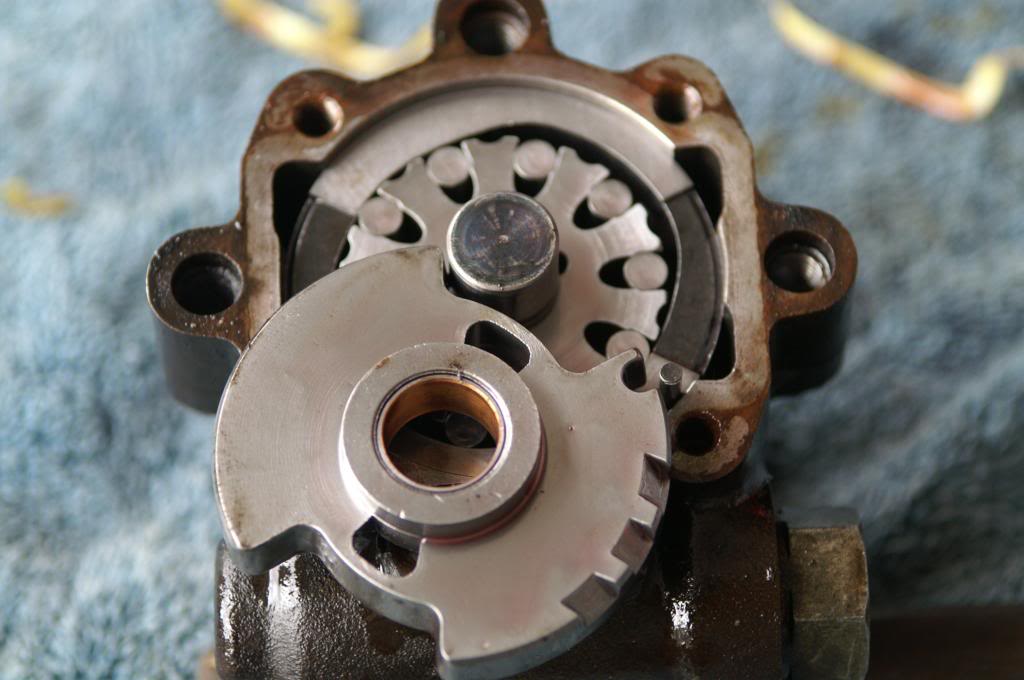
These came out next... The pin just sits in there... there are ten of these bearings...
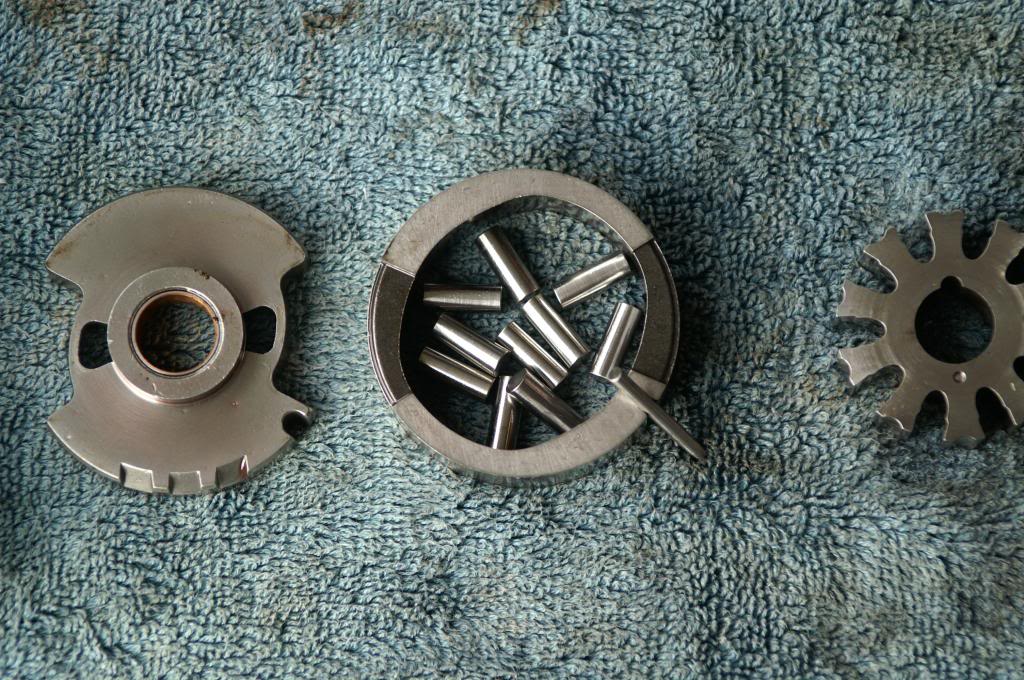
The drive gear for the bearings... The "keyway" at the top of the center is where the little pin (in the center of the next picture) goes... It locks the center shaft to the drive gear... What I didn't get a shot of is the cutout for the pin that is in the center shaft...

This plate is actually two plates... the other side has a rubber gasket (next pic) that mates up to the steel pump body... Note the pin...
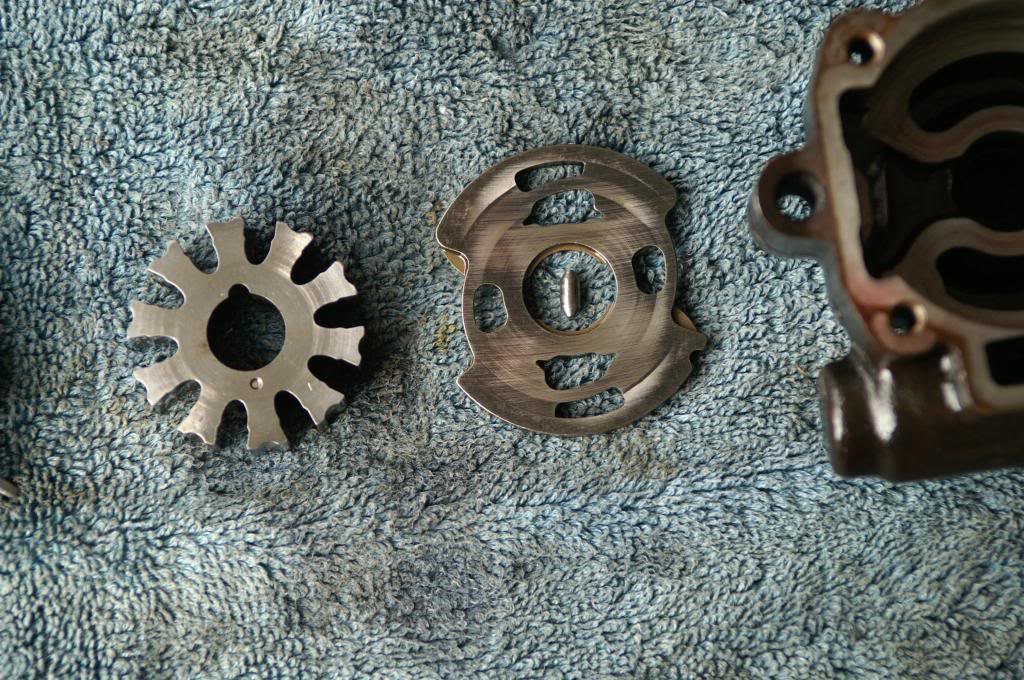

And where it goes... Also lines up with the long locating pin...

And the interesting part... The bearing for this is pressed on to the shaft, but doesn't see any fluid... The seal is on the opposite side of the bearing... This came out pretty easily...


And finally, this is what is on the other side of the high pressure hose... In this order as it came out of the pump...

And that is it for today... I had to trim the feed hose due to excessive force getting the darn thing off... I will replace the hose today, just for SAGs...
The list is getting smaller for the Jag!! Almost ready to sell her!! Awwwwwwwwww, just kidding everyone!!! I'm gonna get a coolant cap today if possible... Still getting the squashed hoses upon cool down... Thanks for the tip guys/gals!!
Cheers for now!!
It has, once again been awhile since I have been able to play with the Jag and get on here to tell you about the fun I've been having with her...
Here is the example of the lugs... The larger is what should be on there, but if it wasn't for the donation from H20BOY, I wouldn't have the 15 I have now... I still need five more, so I will be hoping for the best at the local salvage yard or Ebay...
I am going to bite the bullet and pay the dealer for the wheel stud... What can you do sometimes?! Unless someone has an old rear wheel hub and lugs that they aren't using... I will pay for shipping!! (I haven't forgotten H20BOY!)...
So, I think I had a leak at the power steering pump... I took it out and tore it down... Here you go:
It is held together by four 5mm hex bolts... These weren't too bad to get loose...
And this is where I think the leak was...
Too easy...
(HAVE I MENTIONED THAT I DESPISE PHOTOBUCKETS NEW UPDATE!?!?!?!?! Don't fix what isn't broken, cause now it is!!!!!)
Here is the break (yellow stuff) and the clearish white gasket (on the left)... I used the solid gasket to trace a replacement using the cardboard from the back of a thing of paper... I use the single sheet cardboard, not the box cardboard... (finally got the pic to copy from photobucket...)
Note the pin and spot for it on the top part... This is stationary in the pump... Also note the bronze bushing in the center...
These came out next... The pin just sits in there... there are ten of these bearings...
The drive gear for the bearings... The "keyway" at the top of the center is where the little pin (in the center of the next picture) goes... It locks the center shaft to the drive gear... What I didn't get a shot of is the cutout for the pin that is in the center shaft...
This plate is actually two plates... the other side has a rubber gasket (next pic) that mates up to the steel pump body... Note the pin...
And where it goes... Also lines up with the long locating pin...
And the interesting part... The bearing for this is pressed on to the shaft, but doesn't see any fluid... The seal is on the opposite side of the bearing... This came out pretty easily...
And finally, this is what is on the other side of the high pressure hose... In this order as it came out of the pump...
And that is it for today... I had to trim the feed hose due to excessive force getting the darn thing off... I will replace the hose today, just for SAGs...
The list is getting smaller for the Jag!! Almost ready to sell her!! Awwwwwwwwww, just kidding everyone!!! I'm gonna get a coolant cap today if possible... Still getting the squashed hoses upon cool down... Thanks for the tip guys/gals!!
Cheers for now!!
#223
12-15-2012, 07:01 PM
Good day everyone!!
Yep, I am still kicking... Again, I have been away with busy work and the such... The wife had to use the truck today so I got to drive the Jag... I don't usually pick the Jag due to the factory amp craping out on me, so no radio... But it is still a fun drive to work when I do drive it...
So, another update and an interesting find... I got the splined wheel stud from the dealer... $2.26...... The double threaded version is over 8 bucks... I installed that today just before taking off from work... I also did a little experiment... I got new tires and aligned it up a bit a while back (before the lug nut donation from H2O)... The car drove as smooth as glass... After the lug nut swap, I would get a constant bounce at 60ish, and again at 75ish, and so on... So, I put two acorn style and three original washer style per wheel... The acorn style tightened first to center the wheel, then the washer style to clamp it down... It worked... Smooth as glass all the way up to 110... ***Ummm, of course that was on a test track by my house!!!*** So, if you have a constant bounce or vibration and balancing the wheels (even road-forced) doesn't help, it might be the wheel that nanometer off center... Additionally, you can do what I did, but go that extra step and swap the acorn style for originals after the other three are tight... I am missing five originals, so I have to leave it as is until I get the rest of the set...
This weekend is the mesh grill that I have been putting off weekend after weekend... I don't know why the big emergencies always happen on my days off!!!!! Gotta go here and do this.... Gotta go there and do that.... But, the shop is done... All I have to do now is build the work benches and run the electrical...
Be back this weekend with more pictures!!!
Cheers all and happy holidays to you and yours!!!!!
The following 3 users liked this post by bluexk8ragtop:
#224
12-15-2012, 09:29 PM
Senior Member
Wow, got home from work today and assembled my new chair for my computer station, opened Jaguar Forums, then stumbled onto your incredible journey. Kudos to you bluexk8ragtop!
I am so inspired as I begin my mechanical adventure on my XKR. First head gaskets, then to suspension, bushings and lowering springs.
Although I'm starting with a beautifully maintained cat, I envy the challenge you have undertaken to bring your abused feline back to health, thank you for sharing with us all.
Happy Hollidays to all
__________________
BK
2000 XKR conv
93,000 mi
currently stock,
Upcoming mods,
ported heads
powerflex bushings
H&R springs
#225
12-16-2012, 10:57 AM


Join Date: Apr 2012
Location: Summerville, South Carolina
Posts: 24,662
Received 4,299 Likes
on
3,716 Posts
#226
03-13-2013, 09:18 PM
Good day everyone!!!
It has indeed been a while since I've been typing to all you great Jag fans... I will try to post on here more often!! And, by all means contact me if you have any specific questions - I'm still looking for the old shifter knob for the one that asked me!! Life got pretty crazy around the time I was to trade the mesh grill... SO, I still have that and will pull that apart my next fee day or evening off...
I got the windshield replaced finally the other day... Oh, what a mess!! I had a wiring harness sticking out of the covering that I just didn't notice with the glass in place... I think the guy bent my windshield wiper arms putting them back on... AND my mirror isn't perfectly centered in the spot provided... UGH!! Whatever am I going to do?!?!!?
Well, the good news is that I fixed my fuel door issue... I've not had a good plastic part that attatches to the door since I got the car... So, it has been flapping while driving... I just recently had my electric wiring installed in my shop and I have lots of wire left over... I took a good length of wire and made a loop to catch the factory plunger and it looks perfect... Operates the normal way and you can't even tell it only cost me about 0.0000823 cents... I'll try to get pictures tomorrow...
If anyone has a spare undamaged oil pan collecting dust, I would love to purchase that from you!!!
Has anyone done a radio conversion? I think I lost the output from my radio - like the volume control is stuck on zero, even though the numbers change... Or I would like to go original if I can find one... I replaced the amp and played with the controls like someone suggested... The radio is the only other logical option, other than a connector failure...
That's it for now... Cheers all!!!
Last edited by bluexk8ragtop; 03-13-2013 at 09:22 PM. Reason: I cann't speell
#228
04-24-2013, 08:29 PM
There's got to be some members recently changing out their head units for a more modern version, surely they'd like to donate to your build...the list of parts/systems you haven't actually put a wrench or socket on it will be shorter to draft. What are we on, year and a half.
Well, I just wanted to let everyone know I fixed my radio... Now, either the cable that goes to the amp worked it's way out of the radio, or the ground connections on the back of the radio aren't very good... Not real sure what actually fixed the issue... BUT IT WORKS!!!
I am currently trying to revive the paint and get her to shine like new... My CEL came on on my way home... I still haven't pulled the codes to figure out what she is complaining about now... Maybe one of her cam sensors failed and she want's me to installe the one I have on the shelf in the shop...
My top is manual for now, but it stays down more than up since it has gotten warm out... I'm having an issue with the drivers side top piston... It is like the top is way out of adjustment for some reason... The DS is very hard to free up to put the top down, and also to lock into place once it's back up... The pass side is almost too easy, if that is possible... Has anyone needed to adjust theirs?!
I can't find the shifter knob!! Sorry!!
Well, I will get some pictures of the gas door locking wire eventually...
Cheers everyone!!!
#229
04-25-2013, 12:25 AM
Good day everyone!!!
Well, the good news is that I fixed my fuel door issue... I've not had a good plastic part that attatches to the door since I got the car... So, it has been flapping while driving... I just recently had my electric wiring installed in my shop and I have lots of wire left over... I took a good length of wire and made a loop to catch the factory plunger and it looks perfect... Operates the normal way and you can't even tell it only cost me about 0.0000823 cents... I'll try to get pictures tomorrow...
That's it for now... Cheers all!!!
In case you're curious on how much $$$ your DIY fix saved you. The piece that you made from wire for 0.0000823 cents to replace the plastic catch on the fuel door flap, cost me $18 plus $10 shipping from the Jaguar dealership! For crying out loud, it's a chunk of stinkin' plastic...not gold!!!
Cheers!
Jon
The following users liked this post:
User 070620 (01-10-2014)
#230
04-25-2013, 08:29 PM
Blue...Glad to hear your still knocking around! I certainly enjoyed reading the posts of your epic rebuild. You had us all on the edge of our seats.
In case you're curious on how much $$$ your DIY fix saved you. The piece that you made from wire for 0.0000823 cents to replace the plastic catch on the fuel door flap, cost me $18 plus $10 shipping from the Jaguar dealership! For crying out loud, it's a chunk of stinkin' plastic...not gold!!!
Cheers!

Jon
In case you're curious on how much $$$ your DIY fix saved you. The piece that you made from wire for 0.0000823 cents to replace the plastic catch on the fuel door flap, cost me $18 plus $10 shipping from the Jaguar dealership! For crying out loud, it's a chunk of stinkin' plastic...not gold!!!
Cheers!
Jon
I need the name of your Jag dealer please, which is where I will be getting all my parts from, from now on... ...and I owe you a beer!!!
Thanks much!!!!!
Cheers!!!
#231
04-25-2013, 10:02 PM
That is exactly what I thought too!! I looked on the website and didn't find just the plastic part... So, I called them thinking I would have better luck talking to a human... Well, Hampton Jaguar here in Lexington did not OR would not sell me just the catch, but insisted I buy the whole door with catch for $81 plus tax...
I need the name of your Jag dealer please, which is where I will be getting all my parts from, from now on... ...and I owe you a beer!!!
Thanks much!!!!!
Cheers!!!
I need the name of your Jag dealer please, which is where I will be getting all my parts from, from now on... ...and I owe you a beer!!!
Thanks much!!!!!
Cheers!!!
I got the part from Tulsa Jaguar in Oklahoma. The parts and service managers both dug into finding me just the Fuel Door Striker Latch without having to purchase the complete fuel door. They came up with part number HJA3097AD. They said it was kind of an obscure listing for just that part. They ordered it and shipped it to me. Their web address is www.tulsajaguar.com. They're good folks!
If you're ever in the Springfield-Branson, Missouri area, PM me and we'll meet up for a beer. I feel like I owe you a beer, or two, for all the knowledge you've shared with us on the forum!
Cheers!
Jon
#232
04-26-2013, 06:56 PM
I got the part from Tulsa Jaguar in Oklahoma. The parts and service managers both dug into finding me just the Fuel Door Striker Latch without having to purchase the complete fuel door. They came up with part number HJA3097AD. They said it was kind of an obscure listing for just that part. They ordered it and shipped it to me. Their web address is www.tulsajaguar.com. They're good folks!
If you're ever in the Springfield-Branson, Missouri area, PM me and we'll meet up for a beer. I feel like I owe you a beer, or two, for all the knowledge you've shared with us on the forum!
Cheers!
Jon
If you're ever in the Springfield-Branson, Missouri area, PM me and we'll meet up for a beer. I feel like I owe you a beer, or two, for all the knowledge you've shared with us on the forum!
Cheers!
Jon
I appreciate that!! Sometimes I feel like I'm boring you all with this stuff, but it is great to know that some of yous guys and gals are putting this info to good use... Honestly, it was a lot of fun... Except for the never-ending 32 valves; removal, clean, seals, then re-install...
Cheers!!!
#233
05-02-2013, 07:55 PM
I got the part from Tulsa Jaguar in Oklahoma. The parts and service managers both dug into finding me just the Fuel Door Striker Latch without having to purchase the complete fuel door. They came up with part number HJA3097AD. They said it was kind of an obscure listing for just that part. They ordered it and shipped it to me. Their web address is www.tulsajaguar.com. They're good folks!
If you're ever in the Springfield-Branson, Missouri area, PM me and we'll meet up for a beer. I feel like I owe you a beer, or two, for all the knowledge you've shared with us on the forum!
Cheers!
Jon
If you're ever in the Springfield-Branson, Missouri area, PM me and we'll meet up for a beer. I feel like I owe you a beer, or two, for all the knowledge you've shared with us on the forum!
Cheers!
Jon
I just wanted to pass on that the website is www.jaguartulsa.com... I'm still waiting on the good news about the part being avail...
Thanks again for sharing!!!
Cheers all!!!
#234
05-02-2013, 08:40 PM
Good day all!!
I just wanted to pass on that the website is www.jaguartulsa.com... I'm still waiting on the good news about the part being avail...
Thanks again for sharing!!!
Cheers all!!!
I just wanted to pass on that the website is www.jaguartulsa.com... I'm still waiting on the good news about the part being avail...
Thanks again for sharing!!!
Cheers all!!!
Oops...you're correct on the web address! It appears that I was a little dyslexic with the web address I gave you. My apologies, sir! I hope they take care of you, like they did me.
Cheers!
Jon
#236
06-17-2013, 09:39 PM
Good day all!!!
First I want to thank everyone for the compliments on the project!! It does mean a lot to me that this info is being used!!!
Today has been a wash, compound, and wax day... I got the hood done due to a splitting headache that just didn't want me to work on the jag... After I got to my meeting at work this evening, my window stopped working again... UGH!!! So, I determined that it would be a good idea to figure out what the deal was!!! This is what I found:
*I pulled the door modules from both doors and swapped them... No change either side: (DS didn't work, PS did work)...
*I pulled the motors from both sides and swapped them... No change either side...
*I put the modules back in their original sides with the motors swapped... No change either side... So, at this point I have ruled out the two main items in the system...
*I can't swap the switches, so I went over the switch with my voltmeter... Nothing odd... This leaves the wires between the modules and the motors...
*One by one, I ohm'd them out and only the one that goes to the switchs came up with .998 ohms; all else .0004.....
*NOW WHAT?!?! WELL, the module to the motor didn't have a ground wire... It wasn't until I started on the wires from the switch to the motor/modules did I find a huge problem... Apparently, the ground wire from the door module has 6.433K ohms (6,433.000 ohms)... That is nearly an open when it comes to a ground wire!! I tapped into the wire near the module and used a temp wire right to ground and the motor worked for the drivers door!!! Now the question is: Should I find the problem in the wire and repair, or add another wire at my tap and go to ground?!?!?
Well, that is where I left it for tonight...
I am using the convertible a lot... I am thinking about hooking up the lines for the top, but keep the latch manual... I have to adjust the driver side piston as it has way too much force on it right now... Not sure on how to adjust that yet...
That is all for now... I will get some more pics on here as soon as I get the paint cleaned up and wax done...
I just got a 2004 Honda ST1300ABS and I have agreed that one of the toys has to go... Sooooooo, I will be putting up the cat for sale in the near future... But my goodness do I wish I could keep all the toys!!!
Cheers all!!!!
#238
06-20-2013, 07:24 PM
Good day all!!!
Good and bad news... I found where the problem is/was for the window not working... I am not sure if it is a connector or a fancy water seal for the wires that go from the door into the kick panel area of the car... Well, the bad connection or break is right at that item on the body of the car... That is the good news...
The bad news is that I now have THREE new issues... I think I have a totally unrelated coolant issue... A possibly unrelated footwell lighting issue... And a totally related window switch issue... The window switch is easy, but I have to find a switch... I must have popped a resistor in my troubleshooting... Not sure how, but that is what the circuit board is telling me... Now, I just noticed the lights were on while I was driving home from work... I may have a bad door switch, but that hasn't been determined yet... And I don't even want to deal with the coolant leak for another week... UGH!!!!
Cheers for now everyone!!
#239
07-26-2013, 07:40 PM
I had a wonderful time reading your epic trials and tribulations restoring that Jag. I can't believe how brave and fearless you are when it comes to a challenge. I on the had am your exact opposite. I would not attempt to do half of what you did. I would like to pick your brain as I have complete trust that you know what you are doing. My hydraulic lines are shot and since i very rarely lower my top, i have never bothered to repair them primarily because of the exhorbitant cost of the lines. The last, i read you were still going manual concerning the top and I would like to know how you managed to wire the rear quarter windows. I've seen all kind of modifications for the top but i want to do the most drastic of all. I want to chuck the hydraulic system altogether and go strictly manual. I've got my hex key and I'm ready to go. The only thing blocking my way is a separate switch to open and close the rear windows. I wonder if you could explain to a novice how this is done.
#240
07-26-2013, 08:03 PM
Veteran Member
Hi Sam- Here is a very thorough treatment of the subject: https://www.jaguarforums.com/forum/x...op-down-37826/