My project...
#101
 08-13-2012, 01:24 PM


Good day everyone!!
This is just a question for this post... Will a short block and heads from a 4.2L take the place of the short block and heads from our 4.0L? Using all the electronics and manifolds from the 4.0L, but the block, crank, pistons, rods, heads, and camshafts are from the 4.2L... There is a short block and heads out of NJ that I wouldn't mind having to build from the bottom up and swap out the 4.0L eventually... Those few head bolts that wouldn't tighten are getting to me...
Thanks everyone!!!
Cheers!!
#102
08-13-2012, 03:49 PM
#103
08-13-2012, 08:31 PM
Cheers!!
#104
08-13-2012, 08:34 PM
Good day everyone!!
Well, I got the oil pressure up to all the ports it needs to be... I made a mess in doing so, but all passages appear to be free and clear... Sorry guys and gals, I don't have any pictures today... I'm not sure how much I will get done tomorrow either... I have a 30 year old tractor to repair for the farm... We'll see how that goes... I might be able to get some more cleaning done in the engine bay... It is still pretty dirty from all the oil leaks and such...
Cheers everyone!!!
#105
08-13-2012, 08:38 PM


Join Date: Oct 2007
Location: PHX some of the time
Posts: 117,438
Received 6,321 Likes
on
5,508 Posts
#106
08-13-2012, 08:53 PM
Cheers!!!
#107
08-13-2012, 09:01 PM
Veteran Member
Join Date: Nov 2006
Location: Glasgow, Scotland UK
Posts: 47,302
Received 9,010 Likes
on
4,113 Posts

#108
08-14-2012, 02:01 PM
Veteran Member
Hello Blue,
Wow, what a saga. I've been away from the forum for a few weeks, and clearly I've been missing some good stuff.
First off, I'm in Greenville, about 90 minutes from you. So perhaps we can meet up at some point. Second, thanks for your military service, and welcome home.
Third, I am in utter disbelief at the condition of your car as purchased. Someone would have to work pretty hard to trash a car so thoroughly. Amazing. And kudos to you, you are a brave man, with vision!
Keep those photos coming...you're digging into areas where most of us fear to tread.

.
Wow, what a saga. I've been away from the forum for a few weeks, and clearly I've been missing some good stuff.
First off, I'm in Greenville, about 90 minutes from you. So perhaps we can meet up at some point. Second, thanks for your military service, and welcome home.
Third, I am in utter disbelief at the condition of your car as purchased. Someone would have to work pretty hard to trash a car so thoroughly. Amazing. And kudos to you, you are a brave man, with vision!
Keep those photos coming...you're digging into areas where most of us fear to tread.
.
#109
08-14-2012, 06:04 PM
Hello Blue,
Wow, what a saga. I've been away from the forum for a few weeks, and clearly I've been missing some good stuff.
First off, I'm in Greenville, about 90 minutes from you. So perhaps we can meet up at some point. Second, thanks for your military service, and welcome home.
Third, I am in utter disbelief at the condition of your car as purchased. Someone would have to work pretty hard to trash a car so thoroughly. Amazing. And kudos to you, you are a brave man, with vision!
Keep those photos coming...you're digging into areas where most of us fear to tread.
.
You are very welcome... Thanks!! It has been a long time coming!! It feel different but good to not have to wear the same uniform every day...
I totally agree... I think they tried to see how long it would last without maintenance, or very little... It even looks like they took this thing off-roading... Amazing!! Thank you!!
Today has me stumped again... More to post...
Cheers!!!!
#110
08-14-2012, 06:21 PM
Good day everyone!!!
Well, it has been an interesting day to say the least!!! I got my X5 brake issue fixed early A.M. so I started in on the Jag... I got tired of seeing all the white residue all over everything so I spent hours wiping down everything blue or plastic... What a difference!! I found a few things interesting under the car while I was under there looking for the bloody "mark" the crank needs to be at for setting timing... I noticed the right inner tierod was bent pretty good... The mark that was on the drain plug probably saved the oil pan as the mark on that looks like there is a foil thin section keeping the oil in the motor... And the reason for this post without pictures...
I have a serious question to ask everyone!! I don't have the "mark" I mentioned a second ago... The mark to set timing just doesn't exist... I went around four times and I did not see it... Would the 99's have a different method to set the crank? I have a couple threaded holes that don't have bolts, the torque converter bolts, a few weld marks, and ONE small hole in the center of the area where the mark should be... For those that have done this, where is the woodruff key on the crank when the CPS pin is installed?! Maybe the small hole is the mark I need to use if the key is in the correct spot...
Okay, I'm gonna work on pictures now... Be back in a few...
Thanks all!!!
Cheers!!
#111
08-14-2012, 06:23 PM

#112
08-14-2012, 07:44 PM
Hi Blue,
First I just want to say WOW!! I have been following your thread in utter amazement at your accomplishments in such a short time. I agree with some of the previous posts (I can't stop reading).
Next To address your crankshaft issue. If my memory serves me, I believe there was only one hole in the flywheel that the pin would fit in but it has been awhile since I had to deal with that. I could be wrong.
Best of luck and again, WOW.
#113
08-14-2012, 08:12 PM
Good day everyone!!! (Something is telling me to go for a swim as this is the second time I've had to post a message twice! And this was a lot to post for this one!!)
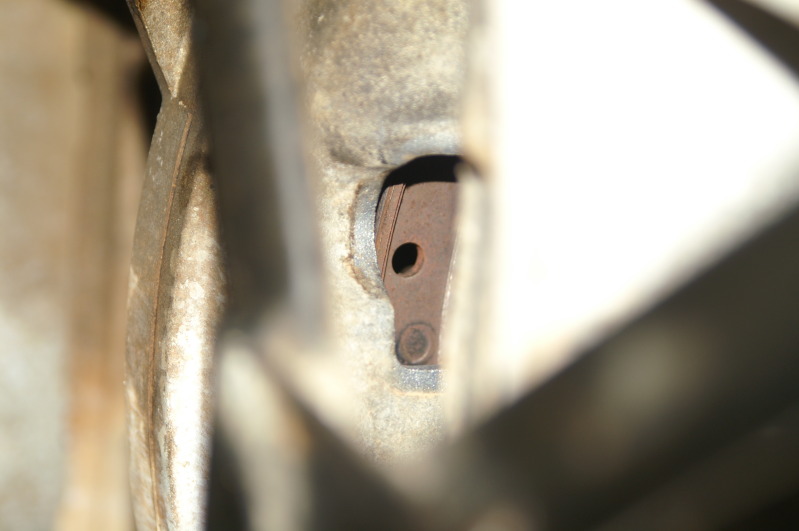
Okay, first things first... Here is the small hole in the flywheel that only comes around once per revolution... There is also a shot of one of the welds...
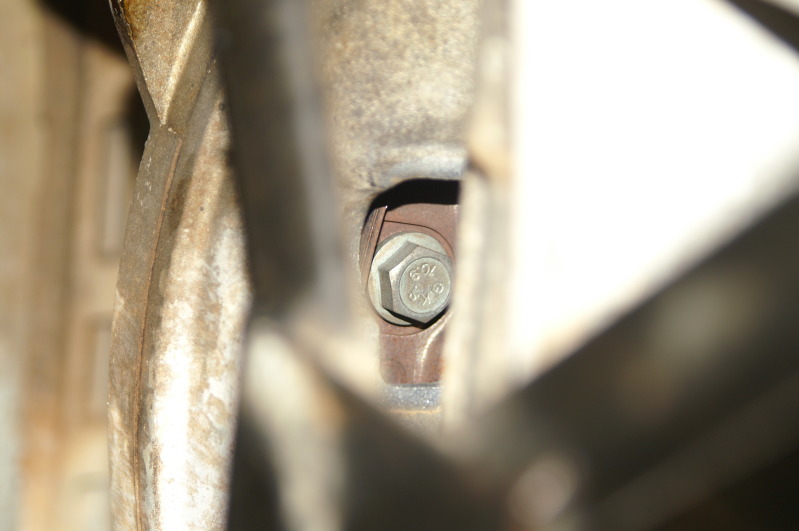
And the torque converter bolt...
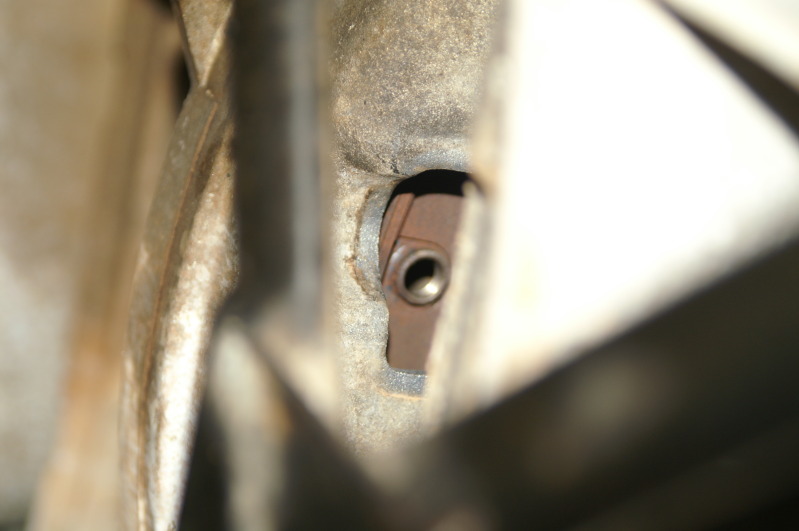
and one of the (blurry) threaded holes that has no bolt... The threads look clean as if they have been used... But what would they be used for on this car? Hmmmm.......
I forgot to take a picture of the oil pan at the drain hole... I will be replacing the oil pan in the near future...
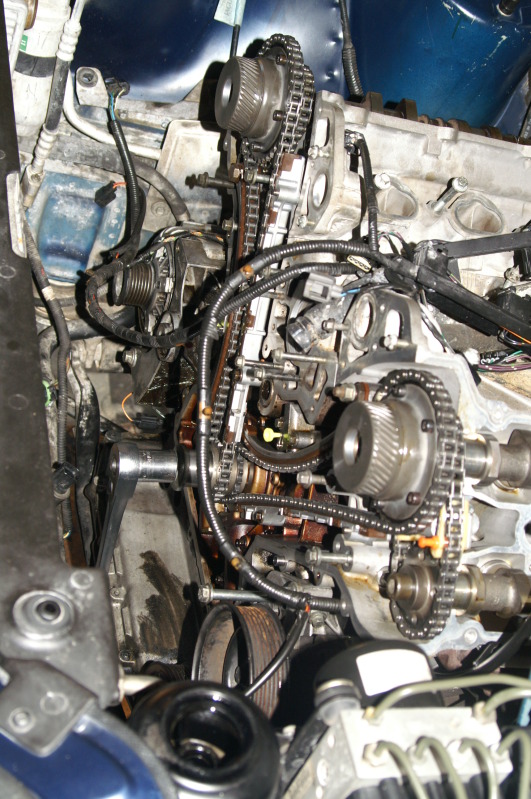
Here is a shot of all the timing chains in place... Kinda because I am waiting on two tappets (lifters) from the dealership... Once I get them, I can install the exhaust cam on the pass side... I also don't have the cam bolts tighten or the cam caps installed... I'm still turning the crank TRYING to locate the starting point mark for setting up this timing...
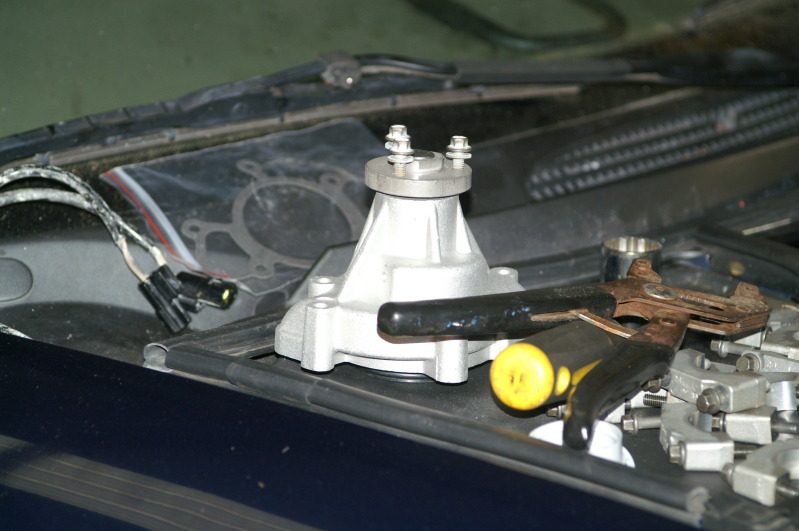
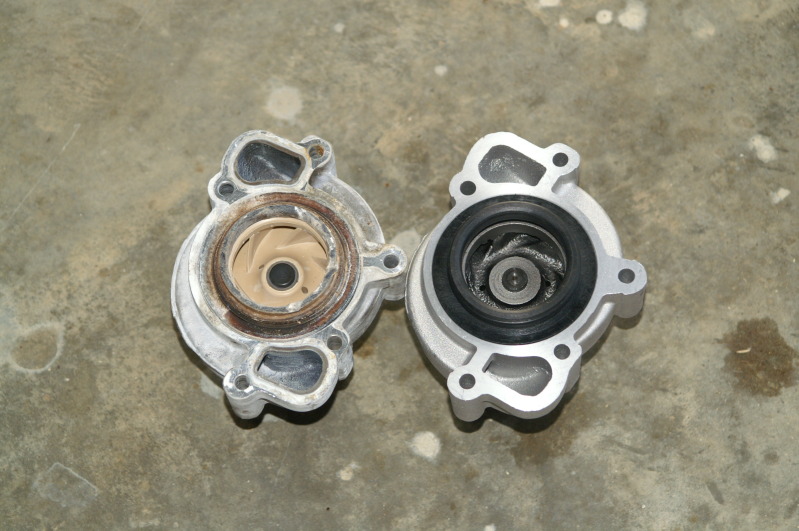
Here is my new water pump... And next to my old water pump... This new one has metal fins, but the price for the dealer pump wasn't much different... I went with this one cause it has the metal fins... The dealer confirmed they still have the plastic fins... The fins on my old pump are still good... The plastic border that holds the big O-ring failed, which is the same for the new one... Hmmmmmm...
Okay, so here are the shots I took of the blue paint that use to have this crappy white film all over it... I didn't get all of it as you may notice, but I wouldn't know I missed a spot until it dried white... This stuff is terribly hard to get off!!


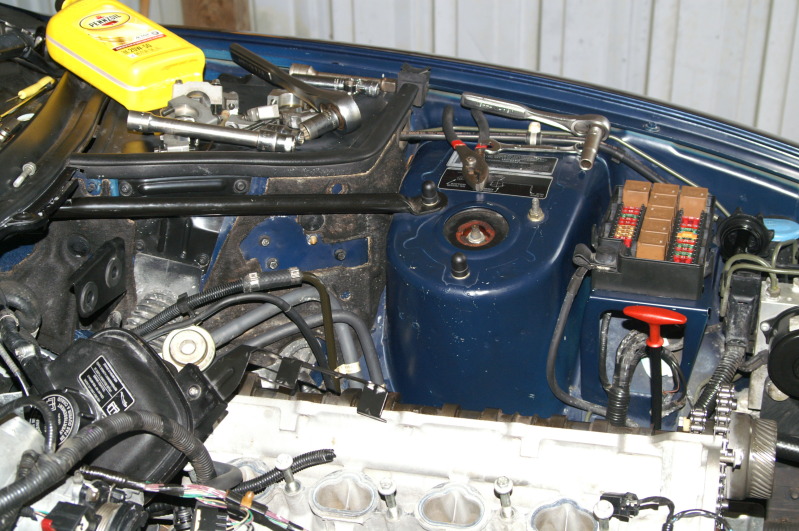
Now, I know I missed some under the fuse panel, but it was hard enough to get down beside it... I even pulled the fuse box from it's home to have more access... A side note that might make some viewers upset, but... I've had power applied to the car almost the entire time... To listen to the radio and turn the motor over to purge the air from the oil passages, and any debris that may have gotten down in there...

I have to mention this funny part that had me a little worried... Do you see that little red oil checker thingy?! Well, I pulled that out after I took the head off to clean it and check the O-ring... Well, I didn't put it back BEFORE I put the head back on... It took me over an hour to figure out how to get that back in there without pulling the head again... As it turns out, if you pull the PS pump, you can wiggle it back into place without bending it at all... I was worried!!
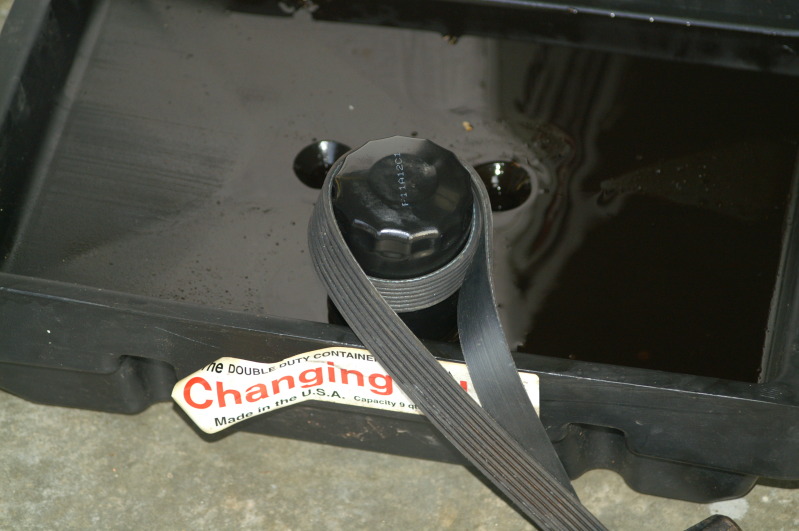
I'm not going to refer to the person that worked on this car prior to me getting it as a MECHANIC anymore... He put the oil filter on so tight I had to use my last resort method (short of stabbing it with a screwdriver and making a complete mess)... If I can get the accessory belt around the filter, I have always gotten them off... I was in doubt my failproof method was going to work today, but it finally started turning...
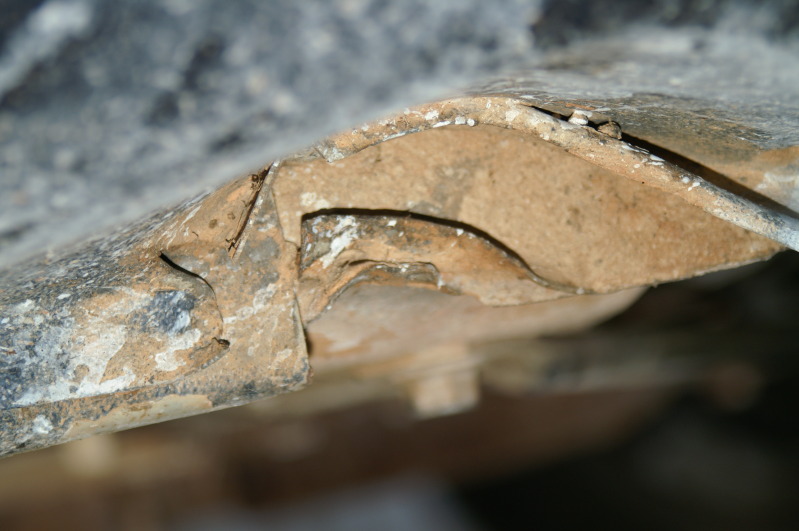
I'm sure you all may recognize this "before" picture...
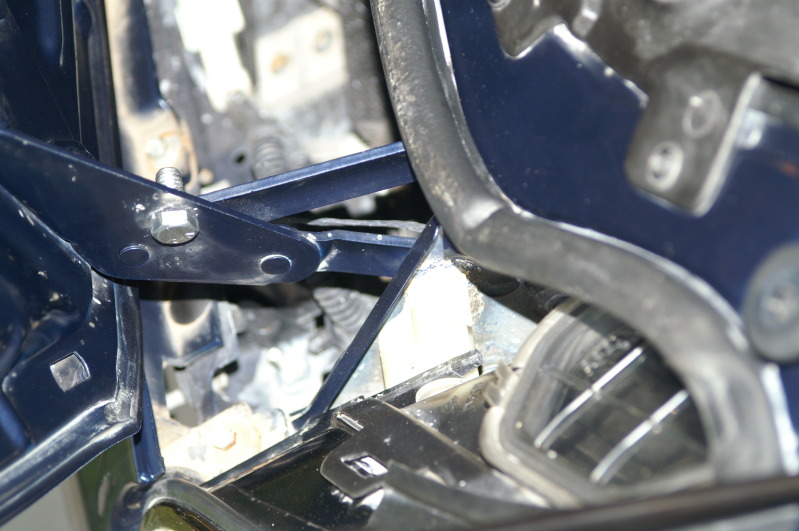
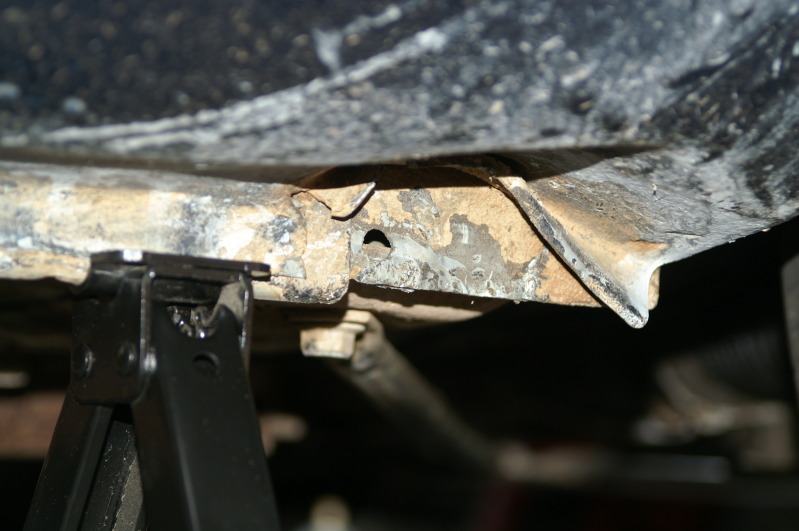
Well, this is about the extent of my body work abilities... I have to pull the inner fender plastics to get to the main damage, if I can even get to it... Here is my 1st "after" picture...
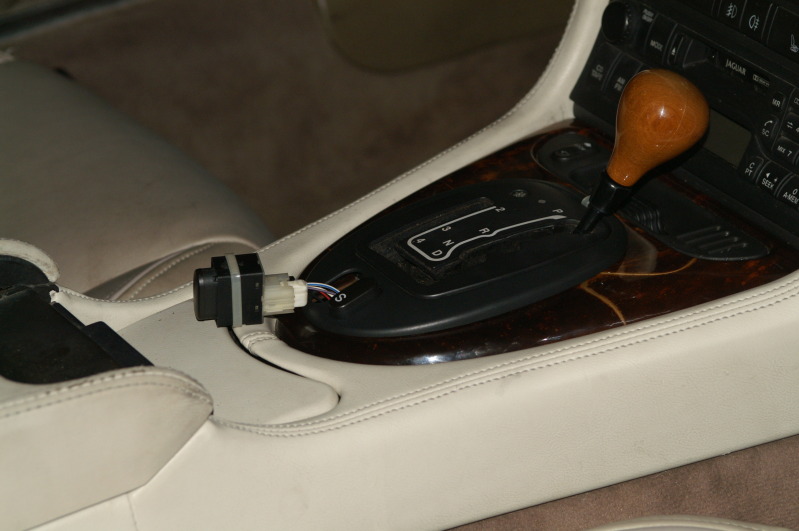
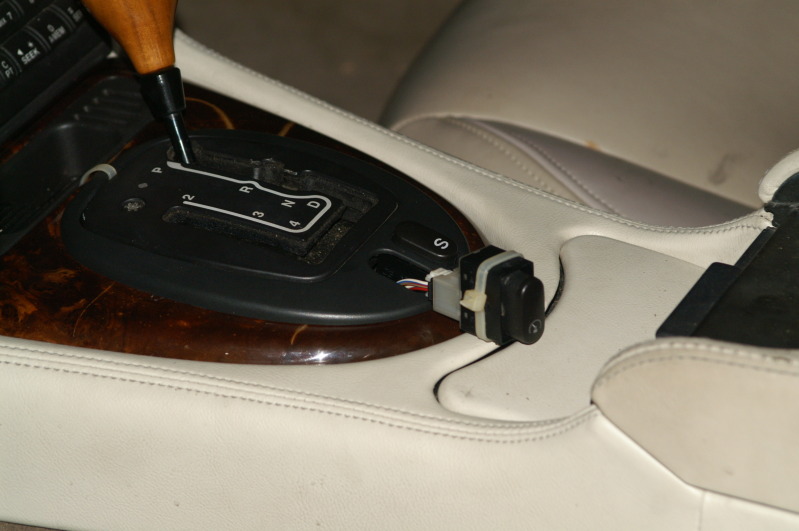
And finally, the shifter... I tried to get the broken cruise switch to stay and I got it to work, but it wouldn't install due to the fix... Soooo, I will just have to purchase a new cruise switch to finish up the final touches to the interior... I noticed that the center console looks whiter than the other leather, seats included... Did they come like that?!
Well, that's all for today... (mental note - copy before hitting POST button!)
If anyone wants a picture of a specific item on the car, speak up now while it's still apart!! I so totally need a hydraulic lift!!! Maybe I can get one for Christmas!! Ahem!!!
Cheers everyone!!!!
Okay, first things first... Here is the small hole in the flywheel that only comes around once per revolution... There is also a shot of one of the welds...
And the torque converter bolt...
and one of the (blurry) threaded holes that has no bolt... The threads look clean as if they have been used... But what would they be used for on this car? Hmmmm.......
I forgot to take a picture of the oil pan at the drain hole... I will be replacing the oil pan in the near future...
Here is a shot of all the timing chains in place... Kinda because I am waiting on two tappets (lifters) from the dealership... Once I get them, I can install the exhaust cam on the pass side... I also don't have the cam bolts tighten or the cam caps installed... I'm still turning the crank TRYING to locate the starting point mark for setting up this timing...
Here is my new water pump... And next to my old water pump... This new one has metal fins, but the price for the dealer pump wasn't much different... I went with this one cause it has the metal fins... The dealer confirmed they still have the plastic fins... The fins on my old pump are still good... The plastic border that holds the big O-ring failed, which is the same for the new one... Hmmmmmm...
Okay, so here are the shots I took of the blue paint that use to have this crappy white film all over it... I didn't get all of it as you may notice, but I wouldn't know I missed a spot until it dried white... This stuff is terribly hard to get off!!
Now, I know I missed some under the fuse panel, but it was hard enough to get down beside it... I even pulled the fuse box from it's home to have more access... A side note that might make some viewers upset, but... I've had power applied to the car almost the entire time... To listen to the radio and turn the motor over to purge the air from the oil passages, and any debris that may have gotten down in there...
I have to mention this funny part that had me a little worried... Do you see that little red oil checker thingy?! Well, I pulled that out after I took the head off to clean it and check the O-ring... Well, I didn't put it back BEFORE I put the head back on... It took me over an hour to figure out how to get that back in there without pulling the head again... As it turns out, if you pull the PS pump, you can wiggle it back into place without bending it at all... I was worried!!
I'm not going to refer to the person that worked on this car prior to me getting it as a MECHANIC anymore... He put the oil filter on so tight I had to use my last resort method (short of stabbing it with a screwdriver and making a complete mess)... If I can get the accessory belt around the filter, I have always gotten them off... I was in doubt my failproof method was going to work today, but it finally started turning...
I'm sure you all may recognize this "before" picture...
Well, this is about the extent of my body work abilities... I have to pull the inner fender plastics to get to the main damage, if I can even get to it... Here is my 1st "after" picture...
And finally, the shifter... I tried to get the broken cruise switch to stay and I got it to work, but it wouldn't install due to the fix... Soooo, I will just have to purchase a new cruise switch to finish up the final touches to the interior... I noticed that the center console looks whiter than the other leather, seats included... Did they come like that?!
Well, that's all for today... (mental note - copy before hitting POST button!)
If anyone wants a picture of a specific item on the car, speak up now while it's still apart!! I so totally need a hydraulic lift!!! Maybe I can get one for Christmas!! Ahem!!!
Cheers everyone!!!!
#114
08-14-2012, 08:23 PM
Hi Blue,
First I just want to say WOW!! I have been following your thread in utter amazement at your accomplishments in such a short time. I agree with some of the previous posts (I can't stop reading).
Next To address your crankshaft issue. If my memory serves me, I believe there was only one hole in the flywheel that the pin would fit in but it has been awhile since I had to deal with that. I could be wrong.
Best of luck and again, WOW.
First I just want to say WOW!! I have been following your thread in utter amazement at your accomplishments in such a short time. I agree with some of the previous posts (I can't stop reading).
Next To address your crankshaft issue. If my memory serves me, I believe there was only one hole in the flywheel that the pin would fit in but it has been awhile since I had to deal with that. I could be wrong.
Best of luck and again, WOW.
Well, what I couldn't get in the pictures was the actual "tone ring" that sits just above where this "mark" should be... The flywheel is actually the tone ring... The square holes are equal all the way around except for one section where it's like two holes are combined... Unfortunately, I don't remember what that trigger point was by... It may have been the small hole, but I can't say for sure right now... This method is great, but the older method took the guess work out of getting it right... I like the timing marks on the sprockets and chains...
Thanks much!!!
Cheers!!
#115
08-14-2012, 08:26 PM
Veteran Member
Hey Blue...what you are missing the the official Jaguar flywheel locking tool. See the small tool in the center of the picture: Jaguar Timing Tensioner Tool Rental - Jaguar Service Tools
#116
08-14-2012, 08:33 PM
Hey Blue...what you are missing the the official Jaguar flywheel locking tool. See the small tool in the center of the picture: Jaguar Timing Tensioner Tool Rental - Jaguar Service Tools
I know I have to pull the CPS and install the tool, but I can't find the "triangluar arrow indent" as the procedure says to know when to install the tool... I only have holes, bolts and welds... I don't think this is the original flywheel...
Cheers!!
#117
08-14-2012, 09:18 PM
Veteran Member
#118
08-14-2012, 09:29 PM
#119
08-15-2012, 07:36 AM
Hello Blue
Like everyone else on the Forum I have really been enjoying your posts. Your doing a great job and for many of us this has been a real learning experience. So, thanks on both accounts.
By the way, I zoomed in on your engine photos and noticed that your top strut bushing look like they are in need of replacement. I have a used set, both sides, that are in very good condition and would be happy to donate them to your project. I also have a set of used, but also in very good condition, lower front control arms...both arms for both sides. Their also yours if you need them. You pay the shipping and I will send them along, just let me know.
Keep up the good work.
Tim V.
#120
08-15-2012, 07:49 AM
Hello Blue
Like everyone else on the Forum I have really been enjoying your posts. Your doing a great job and for many of us this has been a real learning experience. So, thanks on both accounts.
By the way, I zoomed in on your engine photos and noticed that your top strut bushing look like they are in need of replacement. I have a used set, both sides, that are in very good condition and would be happy to donate them to your project. I also have a set of used, but also in very good condition, lower front control arms...both arms for both sides. Their also yours if you need them. You pay the shipping and I will send them along, just let me know.
Keep up the good work.
Tim V.
Like everyone else on the Forum I have really been enjoying your posts. Your doing a great job and for many of us this has been a real learning experience. So, thanks on both accounts.
By the way, I zoomed in on your engine photos and noticed that your top strut bushing look like they are in need of replacement. I have a used set, both sides, that are in very good condition and would be happy to donate them to your project. I also have a set of used, but also in very good condition, lower front control arms...both arms for both sides. Their also yours if you need them. You pay the shipping and I will send them along, just let me know.
Keep up the good work.
Tim V.
Now that you mention it, I forgot to include yesterday that while I was under the car finding all these other issues, I noticed the inner tie rod on the pass side was was bent... It was probably causing the inside wear on the front tires, and probably even the spare...
Thanks again!!
Cheers!!!