My project...
#141
 08-19-2012, 09:27 PM

Veteran Member
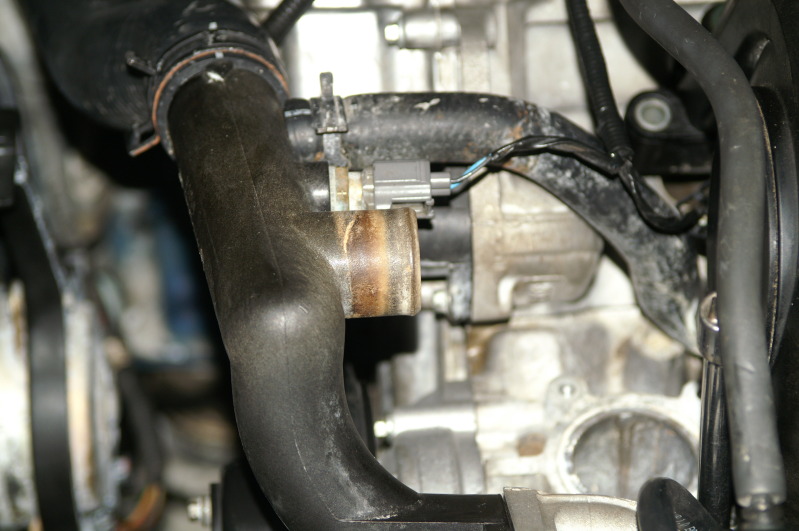
Here is something I found that I think all of you should take a look at soon... Maybe this is very well known issue that didn't make it to the PO of this car, but this is again something I found upon reassembly... Bottom coolant hose is nearly worn through by the fan shroud... Some mod needs to be done here...
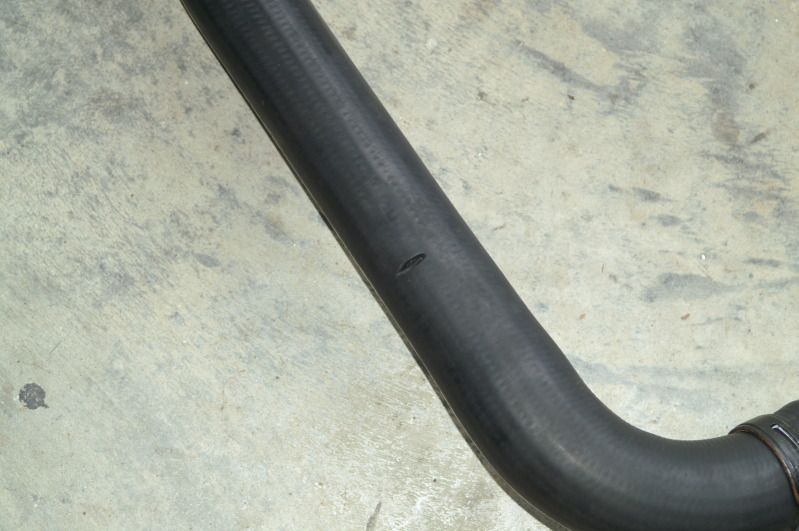
Graham suggested trimming the hose where it goes into the block and then rotating the entire hose to give more clearance. This seems to have done the trick pretty well on mine. Hope that helps a bit.
#142
08-20-2012, 06:00 AM

Veteran Member
It's unfortunate you didn't have the thermostat housing before you put the intake manifold back, the rear bolts are a pain.
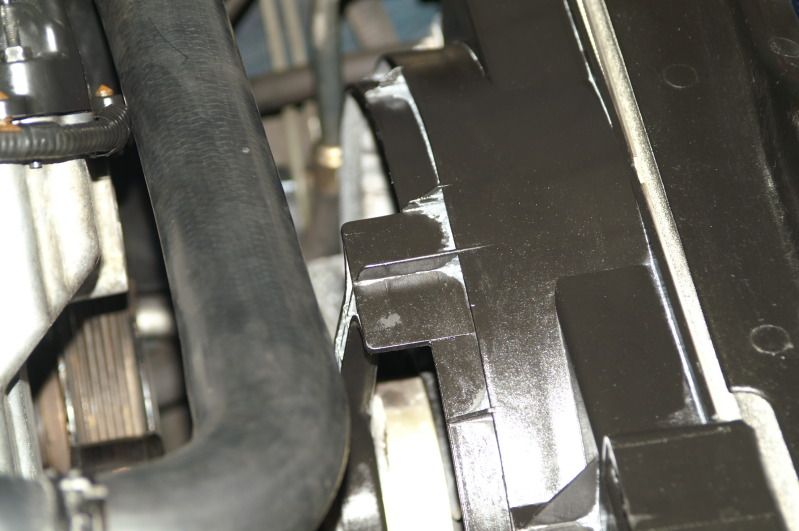
That problem with the lower radiator hose was flagged a couple of months ago. I checked mine and found the same crease, cut the brace at a angle to clear.
RJ________________
97 XK8 86K mi
That problem with the lower radiator hose was flagged a couple of months ago. I checked mine and found the same crease, cut the brace at a angle to clear.
RJ________________
97 XK8 86K mi

#144
08-20-2012, 12:03 PM
Veteran Member
Join Date: Nov 2006
Location: Glasgow, Scotland UK
Posts: 47,302
Received 9,010 Likes
on
4,113 Posts

#145
08-20-2012, 12:09 PM

Join Date: Oct 2007
Location: PHX some of the time
Posts: 117,438
Received 6,322 Likes
on
5,509 Posts
#146
08-20-2012, 01:42 PM
Veteran Member
Wow! An amazing journey and fun to watch. It was like those old Saturday morning serial episodes (not that I remember them). But don't leave us hanging, be sure and update when the last engine parts go on it.
This was so interesting to everyone, we need to convince you to move on to other areas. How are those suspension bits & bushes doing?
This was so interesting to everyone, we need to convince you to move on to other areas. How are those suspension bits & bushes doing?
#147
08-20-2012, 03:34 PM

Wow! An amazing journey and fun to watch. It was like those old Saturday morning serial episodes (not that I remember them). But don't leave us hanging, be sure and update when the last engine parts go on it.
This was so interesting to everyone, we need to convince you to move on to other areas. How are those suspension bits & bushes doing?
This was so interesting to everyone, we need to convince you to move on to other areas. How are those suspension bits & bushes doing?
You all make me laugh!! Thanks so much!!
I know I have to do the PS tie rod and maybe a steering rack investigation... There was NO power steering fluid at all and I hate to imagine why... The pump was a total joke and had to be replaced... I think new bearings were installed in the rear and I HOPE they were done correctly, but the adjustment looks off for the rear tires...
Oh, I still have the oil pan to do... I guess a total once over wouldn't be a bad idea given the condition of the motor and interior... I think a trans fluid change might be in order...
What color antifreeze do you all recommend? I've heard different views on what should be used... I currently have the green stuff, but haven't opened them yet...
Cheers all!!!
#148
08-20-2012, 03:40 PM
Veteran Member
Join Date: Nov 2006
Location: Glasgow, Scotland UK
Posts: 47,302
Received 9,010 Likes
on
4,113 Posts

#149
08-20-2012, 04:04 PM
Veteran Member
#151
08-21-2012, 08:32 PM
Good day all!!
I'll keep everyone posted every step of the way... I don't have a good camera that takes video... I'm using my Minolta Maxxium 7D that is more than a few years old, but I love the easily adjustable white balance selector...
I don't have my thermostat housing yet, but I do have a good question for everyone... The way I see it, the newest stuff is the best to use as my 99 motor is pretty much the same as the 2001 and such... My coolant part number is the older yellow stuff, but the 2001 uses the pink (in the bottle) stuff that turns orange when mixed... I'm essentially starting over with a clean slate, so why not go with the orange stuff?! I'm old school here guys and gals... I've only had vehicles that used the green stuff... In this situation, I think the orange is the way to go... I've also read up that the float in the overflow tank isn't just an air filled float... It will only float when the coolant hits a specific gravity... Anyone have evidence of this, or do I need to do a test!? LOL!!
Thanks for your attention and help guys and gals!!!
Cheers everyone!!
#153
08-22-2012, 05:34 AM
Thanks much!! I think I found a TSB yesterday right before bed, but haven't had time to read it fully yet... Something about going from yellow to orange after a flush using this special tool... yada yada yada...
Gonna go with orange...
Thanks again!!
Cheers!!
Gonna go with orange...
Thanks again!!
Cheers!!
#154
08-22-2012, 10:44 AM
Veteran Member
I use orange as well and a flush might not be a bad idea anyway. I flushed mine when I changed it, even though the old fluid still looked good and it had orange originally. It's nice piece of mind to get out whatever is in there and replace it with something you know. The flush procedure is pretty easy, just drain the old, fill with flush, get the car up to temp (while running the heater) and run the stuff through then allow it to drain.
#155
08-22-2012, 08:18 PM
Good day everyone!!!
Well, my part came in!!! It wasn't suppose to get here until tomorrow!! Whooo hoo!!! I got this super cleanser stuff that you actually keep in the system for six hours of actual run time... It may seem like a long time, but the needle got to half way and didn't budge after that... I guess there is enough anti boil properties to treat the whole system... After that I am filling with orange stuff!!! A few key notes I want to point out... If there is a strange noise coming from the pump, DON'T automatically think it is the fact there isn't any coolant in the system!!!! Check the bolts!! I forgot to tighten them AFTER I put the belt on... They were on good enough to not have things flying, but they obviously made noise with the motor running!!!
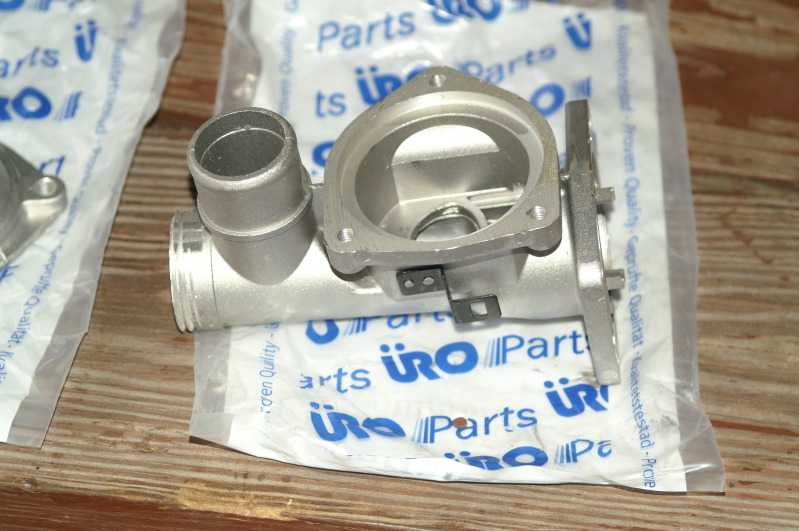
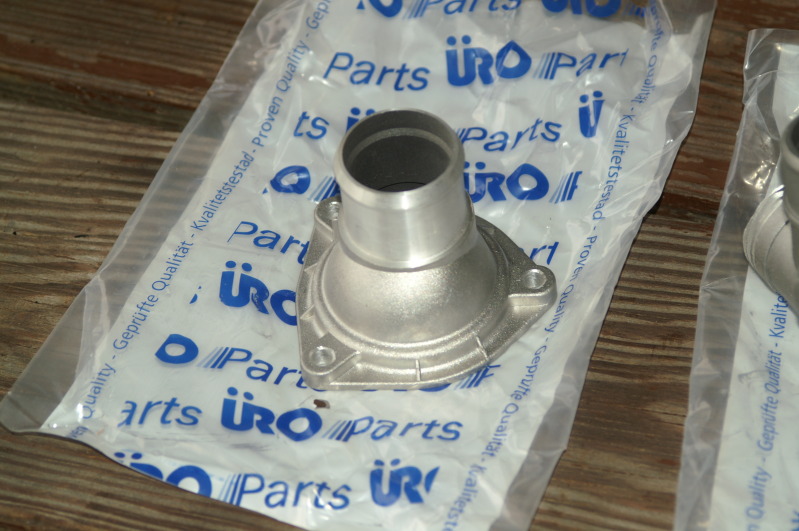
Here is what I did today... Here are the parts... All state they have been tested ok with no leaks... The cap looks like it wasn't really casted all that well... I didn't like how the threads turned out... But... If it holds, I'm good...

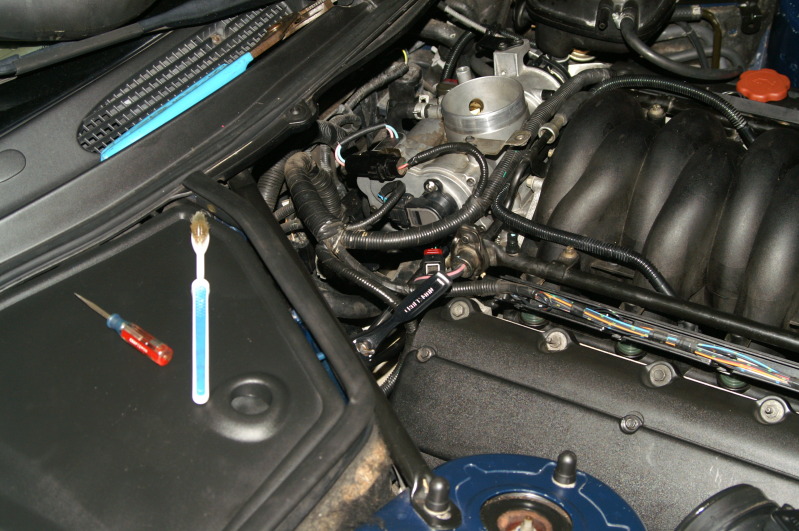
I pulled the intake... Kinda... I pulled all the bolts and loosened the two that hold the intake to the top of the block... Then just lifted it slightly...
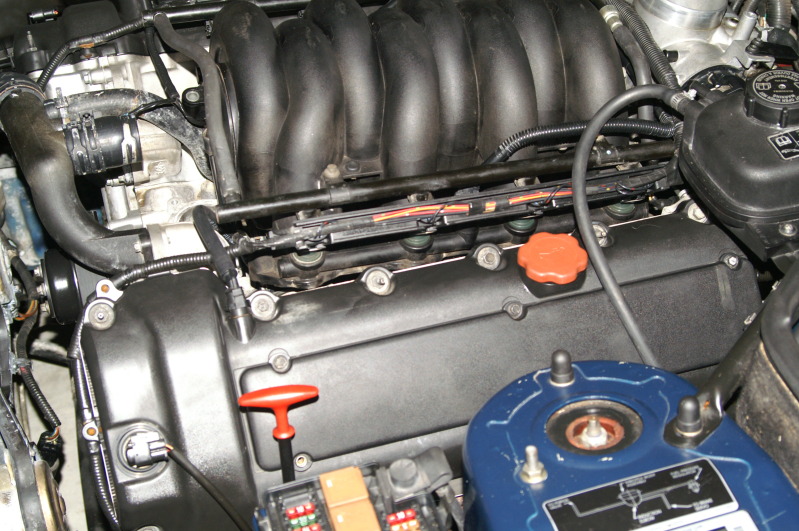

And my highly technical intake holding up device... Use with caution if you have one of these speciality tools...

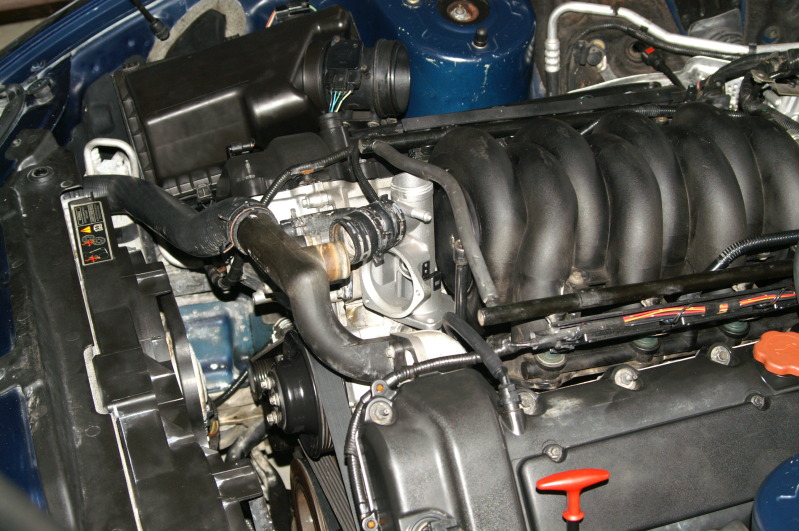
This is how I had to get the hose on... I'm sure you really should put the outter part on AFTER the thermostat housing... Take it from here first...
Then like this...
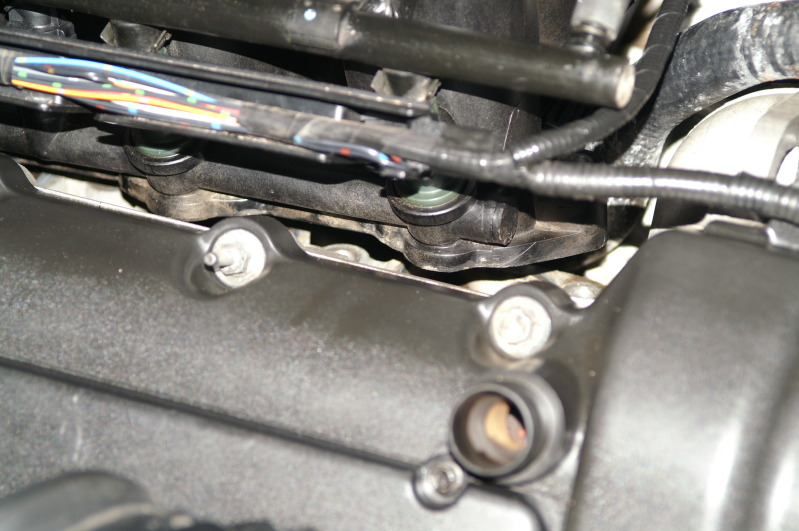
The thermostat cap only goes on one way... AND the kit doesn't come with bolts... Keep your old ones or you will have to scrounge up some that work... Remember, don't forget these two bolts back here... See the ratchet hiding in there?
The biggest thing I would change out with this project is the bottom hose clamp!! I fought with that for well over half an hour... I think I had the PS pump out when I pulled the hose... Or I had the fan assy out already... Really!! Get a long extension and a 1/4 socket... Line up the worm clamp and tighten away!!! I have to swap out that hose anyway, so a new clamp will be installed... And same goes for on the thermostat cover... Not as bad, but still a pain!!!
Oh, I used the old thermostat... I was going to take the guts out and just use the outter shell to fill the gap for the gasket... But, it opened and all is well... I did notice the level went down (as expected) after it opened... I will top it off tomorrow prior to leaving for work... Yep!! I'm trusting it to go to work...
I did take it out for the initial test run (on real roads) after the rebuild... It was amazing... Accelerated smooooooth and fast... I didn't want to go WIDE OPEN just yet... I'll break it in a little before that... I get to take the beautiful wife out tomorrow with the top down... I can't wait!!
I still have the traction control and stability control... I also have an ABS light, so that is my next project... There have been tons of write-ups on that though... BUT, everything else is gone... No restricted performance or incorrect part installed... I'm loving this!!! Top is still manual operated... But, it is still great!!!
I parked it overnight on the clean spot in the carport area where I worked on it... I will be able to tell if anything is leaking and what it is tomorrow morning... I will keep everyone posted on that!! The steering is a little ummmmmmm... easy? It's almost like it works toooo well... I might just have some play on that PS area... I'll see if the boss will let me put it up on the rack tomorrow (I'll offer it up as a practice vehicle!!)... I'll have to take it easy going to work with the traction control issue... I'm not sure how easy it will be to roast the tires if it's raining...
That is all for now guys and gals...
Cheers everyone!!!
Well, my part came in!!! It wasn't suppose to get here until tomorrow!! Whooo hoo!!! I got this super cleanser stuff that you actually keep in the system for six hours of actual run time... It may seem like a long time, but the needle got to half way and didn't budge after that... I guess there is enough anti boil properties to treat the whole system... After that I am filling with orange stuff!!! A few key notes I want to point out... If there is a strange noise coming from the pump, DON'T automatically think it is the fact there isn't any coolant in the system!!!! Check the bolts!! I forgot to tighten them AFTER I put the belt on... They were on good enough to not have things flying, but they obviously made noise with the motor running!!!
Here is what I did today... Here are the parts... All state they have been tested ok with no leaks... The cap looks like it wasn't really casted all that well... I didn't like how the threads turned out... But... If it holds, I'm good...
I pulled the intake... Kinda... I pulled all the bolts and loosened the two that hold the intake to the top of the block... Then just lifted it slightly...
And my highly technical intake holding up device... Use with caution if you have one of these speciality tools...
This is how I had to get the hose on... I'm sure you really should put the outter part on AFTER the thermostat housing... Take it from here first...
Then like this...
The thermostat cap only goes on one way... AND the kit doesn't come with bolts... Keep your old ones or you will have to scrounge up some that work... Remember, don't forget these two bolts back here... See the ratchet hiding in there?
The biggest thing I would change out with this project is the bottom hose clamp!! I fought with that for well over half an hour... I think I had the PS pump out when I pulled the hose... Or I had the fan assy out already... Really!! Get a long extension and a 1/4 socket... Line up the worm clamp and tighten away!!! I have to swap out that hose anyway, so a new clamp will be installed... And same goes for on the thermostat cover... Not as bad, but still a pain!!!
Oh, I used the old thermostat... I was going to take the guts out and just use the outter shell to fill the gap for the gasket... But, it opened and all is well... I did notice the level went down (as expected) after it opened... I will top it off tomorrow prior to leaving for work... Yep!! I'm trusting it to go to work...
I did take it out for the initial test run (on real roads) after the rebuild... It was amazing... Accelerated smooooooth and fast... I didn't want to go WIDE OPEN just yet... I'll break it in a little before that... I get to take the beautiful wife out tomorrow with the top down... I can't wait!!
I still have the traction control and stability control... I also have an ABS light, so that is my next project... There have been tons of write-ups on that though... BUT, everything else is gone... No restricted performance or incorrect part installed... I'm loving this!!! Top is still manual operated... But, it is still great!!!
I parked it overnight on the clean spot in the carport area where I worked on it... I will be able to tell if anything is leaking and what it is tomorrow morning... I will keep everyone posted on that!! The steering is a little ummmmmmm... easy? It's almost like it works toooo well... I might just have some play on that PS area... I'll see if the boss will let me put it up on the rack tomorrow (I'll offer it up as a practice vehicle!!)... I'll have to take it easy going to work with the traction control issue... I'm not sure how easy it will be to roast the tires if it's raining...
That is all for now guys and gals...
Cheers everyone!!!
Last edited by bluexk8ragtop; 08-22-2012 at 08:31 PM.
#156
08-23-2012, 12:46 AM
Blue,
What a great thread! I'm blown away by your thorough documentation of your project! It has been absolutely riveting. I have looked forward to reading your updates every day!
I've heard of people turning lemons into lemonade, but you've shown us how to turn a lemon into a respectible Jag...step by step. A tip of the hat to you, sir! You are an inspiration.
Thank you for sharing and please keep us informed as you tackle the other issues on your car.
Good Show!
Jon
#157
08-23-2012, 04:58 PM
Blue,
What a great thread! I'm blown away by your thorough documentation of your project! It has been absolutely riveting. I have looked forward to reading your updates every day!
I've heard of people turning lemons into lemonade, but you've shown us how to turn a lemon into a respectible Jag...step by step. A tip of the hat to you, sir! You are an inspiration.
Thank you for sharing and please keep us informed as you tackle the other issues on your car.
Good Show!
Jon
What a great thread! I'm blown away by your thorough documentation of your project! It has been absolutely riveting. I have looked forward to reading your updates every day!
I've heard of people turning lemons into lemonade, but you've shown us how to turn a lemon into a respectible Jag...step by step. A tip of the hat to you, sir! You are an inspiration.
Thank you for sharing and please keep us informed as you tackle the other issues on your car.
Good Show!
Jon
Cheers!!
#158
08-23-2012, 05:05 PM
Good day everyone!!
I have discovered a huge thing today... Like I mentioned before that I was still getting the stability and traction control errors... Well, I work for a total car care company and we used my car (yep, took it to work!!) for the test vehicle on the NEW and amazing alignment machine... The inner tie rod is bent and that threw out the front toe, but the rear bearing replacement threw off the rear as well... Once I dialed in those (as much as possible with a bent tie rod), those error messages went away... So there you have it guys and gals...
Cheers everyone!!
#159
08-23-2012, 06:34 PM
Veteran Member
Thanks for the update! I am really happy about your well earned success and have no doubt about the joy it will bring you. I thoroughly enjoyed your adventure and definitely learned from it.
BTW the coolant needle will be halfway from 185 to about 230F. See https://www.jaguarforums.com/forum/x...e-gauge-62813/
#160
08-23-2012, 07:11 PM
Thanks for the update! I am really happy about your well earned success and have no doubt about the joy it will bring you. I thoroughly enjoyed your adventure and definitely learned from it.
BTW the coolant needle will be halfway from 185 to about 230F. See https://www.jaguarforums.com/forum/x...e-gauge-62813/
BTW the coolant needle will be halfway from 185 to about 230F. See https://www.jaguarforums.com/forum/x...e-gauge-62813/
Well, what do you know!! I thought it was kind of odd how it got to mid way quickly then didn't budge until the thermostat opened which it would slightly drop... I did see it drop today when it was raining pretty good... And this was after it was already up to temp... I may pull the output of the sensor and direct it directly to the gauge... or get a digital readout and put it where the ashtray is... Hmmmmm... thinking here...
Thanks much!!
Cheers!!!