
Nav Pics
#21
 06-14-2010, 09:16 AM

I think you're putty is definitely the way to go to get it positioned. If you use a piece of plastic or something to go from the bolts that held in the original GPS, you can use that for a backing plate, and your putty to line everything up, then the pressure from the wood piece can hold it in place if the putty cradles it enough.
#22
06-14-2010, 09:25 AM
Veteran Member
Ah ha! I figured out how I'm going to do the speaker. I have a set of old amplified computer speakers. They are very small and the transformer is 12vdc. I'm going to crack them open and use the amplifier and one speaker. I'll just open the GPS and take the output from the speaker and run it directly to the input from the amplifier. I'm not sure what the impedance is supposed to be, but in my experience it doesn't make much difference at very low power settings anyway. Then I'll just mount the speaker behind one of the two holes on either side of the GPS. Heck, I could mount one speaker behind each hole. Then, I'll use the pot from the computer speakers to adjust the volume, but I'll leave the pot behind the bezel. Volume adjustments can still be done by the touch-screen volume control on the GPS.
#23
06-14-2010, 09:36 AM
#24
06-14-2010, 10:53 PM
Veteran Member
OK, I wasn't quite sure if I should hijack jnporcello's thread, or start my own, but another thread on this topic seemed a little redundant. I'm doing something similar to him. First of all, I wanted to make sure the GPS was positioned precisely in the center of the opening. I took his idea with the blue stuff and changed it up a little. I wrapped up my Garmin 1490t in plastic wrap (like the kind used to wrap sandwiches) and positioned it exactly where I wanted it on the bezel. I then taped it in place, making sure it stayed exactly where I wanted it. Then, I simply mixed up some Bondo body filler and applied it at the upper corners and top of the GPS. See pic:

After the Bondo hardened (about 10 minutes) I test fit the installation in the dash, just to make sure everything was going to fit. It was still looking good, so I pulled out the GPS and here's what it looked like so far:

The plastic wrap kept the Bondo from sticking to the GPS, which is what I wanted. I then pulled the piece of tape off of the bottom of the bezel and repeated the Bondo process along the bottom of the GPS. I also went back and added some more bondo to the top, and I realized at this point that I wanted to go ahead and leave the GPS in place, so I removed the plastic wrap and taped up the GPS before I applied the bondo.

That seemed to be holding it in very well, but Bondo isn't very strong in tension, so I wanted to add some kind of brace behind the GPS to keep it pushed forward. I didn't want the Bondo to break and for the GPS to fall back into the hole some day while I was pushing on the touch screen. I used a piece of aluminum angle from wicksaircraft.com. It's dirt cheap, easy to cut with a band saw, and very strong. Here's a link to what I used:
http://www.wicksaircraft.com/catalog...155/index.html
Of course, I had this laying around from when I built a gyrocopter a few years ago. Most people won't have it in their garage, but Wick's doesn't care if you only want to order a foot of the stuff. That's how much you need, by the way, one foot.
I cut some notches in the end of the aluminum angle and drilled a couple of holes, and here is what it looks like:

I then installed the aluminum angle in the dashboard, and here's what it looks like:

I then test fitted the bezel/GPS assembly. To my surprise, there was only an eighth inch or so of space between the angle and the back of the GPS unit. My plan was to drill a couple of holes in the angle, tap the holes to receive screws, and use screws to put pressure on the back of the GPS. However, now that I see how little space there is, I think I'm just going to get some of that foam double-sided tape and put two or three layers on the aluminum angle. I'll cover the tape with paper or something because I don't want it to stick to the GPS, I just want it to put some pressure on the GPS to keep it from being pushed backwards.
I'm partial to Garmin products, but one of the problems I ran into was that the power connector was pushing against a metal piece of the dashboard behind the GPS. I don't have any pictures right now, I'll post them tomorrow, but cutting away that piece of metal was an absolute bitch. I finally got it done, though, and now the GPS fits nicely into the dashboard.
Tomorrow I'm going to figure out which wires from the plug are the power wires, and wire the GPS into switched power so it automatically comes on when I start the car and turns off when I turn it off. So far the GPS seems loud enough without adding a speaker. I went for a quick drive and got up to 60mph or so, and I could hear it just fine. It might be totally different on the freeway with big-rigs driving by, though. I'm also going to get some of the mesh stuff tomorrow and make the thingys to cover the holes where the switches were.
After the Bondo hardened (about 10 minutes) I test fit the installation in the dash, just to make sure everything was going to fit. It was still looking good, so I pulled out the GPS and here's what it looked like so far:
The plastic wrap kept the Bondo from sticking to the GPS, which is what I wanted. I then pulled the piece of tape off of the bottom of the bezel and repeated the Bondo process along the bottom of the GPS. I also went back and added some more bondo to the top, and I realized at this point that I wanted to go ahead and leave the GPS in place, so I removed the plastic wrap and taped up the GPS before I applied the bondo.
That seemed to be holding it in very well, but Bondo isn't very strong in tension, so I wanted to add some kind of brace behind the GPS to keep it pushed forward. I didn't want the Bondo to break and for the GPS to fall back into the hole some day while I was pushing on the touch screen. I used a piece of aluminum angle from wicksaircraft.com. It's dirt cheap, easy to cut with a band saw, and very strong. Here's a link to what I used:
http://www.wicksaircraft.com/catalog...155/index.html
Of course, I had this laying around from when I built a gyrocopter a few years ago. Most people won't have it in their garage, but Wick's doesn't care if you only want to order a foot of the stuff. That's how much you need, by the way, one foot.
I cut some notches in the end of the aluminum angle and drilled a couple of holes, and here is what it looks like:
I then installed the aluminum angle in the dashboard, and here's what it looks like:
I then test fitted the bezel/GPS assembly. To my surprise, there was only an eighth inch or so of space between the angle and the back of the GPS unit. My plan was to drill a couple of holes in the angle, tap the holes to receive screws, and use screws to put pressure on the back of the GPS. However, now that I see how little space there is, I think I'm just going to get some of that foam double-sided tape and put two or three layers on the aluminum angle. I'll cover the tape with paper or something because I don't want it to stick to the GPS, I just want it to put some pressure on the GPS to keep it from being pushed backwards.
I'm partial to Garmin products, but one of the problems I ran into was that the power connector was pushing against a metal piece of the dashboard behind the GPS. I don't have any pictures right now, I'll post them tomorrow, but cutting away that piece of metal was an absolute bitch. I finally got it done, though, and now the GPS fits nicely into the dashboard.
Tomorrow I'm going to figure out which wires from the plug are the power wires, and wire the GPS into switched power so it automatically comes on when I start the car and turns off when I turn it off. So far the GPS seems loud enough without adding a speaker. I went for a quick drive and got up to 60mph or so, and I could hear it just fine. It might be totally different on the freeway with big-rigs driving by, though. I'm also going to get some of the mesh stuff tomorrow and make the thingys to cover the holes where the switches were.
Last edited by Reverend Sam; 06-14-2010 at 10:55 PM.
#25
06-15-2010, 06:43 AM
Okay, here are the pics of the jig and speaker material I used to make them look more "factory" than a flat backing piece. My friends tell me its a little over the top, but they also say they'd never know it wasn't factory, so I'll let you decide
It did take quite a bit of pounding. The mesh I had was harder than you think. I also had to go slowly, because too hard pounding, or pressing it in the vice would tear the mesh.


It did take quite a bit of pounding. The mesh I had was harder than you think. I also had to go slowly, because too hard pounding, or pressing it in the vice would tear the mesh.


#26
06-15-2010, 03:33 PM
Veteran Member
I just went to TWO car stereo shops and they told me that they don't have the mesh! I was pissed. I was going to set up a rig identical to yours, but now I can't find the mesh. I can't even find it on eBay. The guys at both stereo places told me that all of their speakers always come with the mesh.

#31
06-16-2010, 12:03 PM

Junior Member
Join Date: May 2010
Location: Toronto
Posts: 6
Likes: 0
Received 0 Likes
on
0 Posts
DO NOT USE THE GARMIN 5000! I bought one today and tried to use it. I was just checking out the fit and I quickly discovered that it is too thick at the bottom. There is a piece of metal down low behind the existing GPS that can't be moved. The Garmin 5000 sits on a little widget from which it gets power (see pic). That widget is too big to fit behind the trim plate thingy. So... I'm going to take it back to CompUSA and get a Garmin 1490t.
It kinda sucks, too, because the 5000 has in input for a back up camera. I don't really need a back up camera, but it would be kinda cool to have it. Also, the lady's voice on the 5000 was barely audible, even when I was stopped at an intersection.

It kinda sucks, too, because the 5000 has in input for a back up camera. I don't really need a back up camera, but it would be kinda cool to have it. Also, the lady's voice on the 5000 was barely audible, even when I was stopped at an intersection.
#33
06-16-2010, 12:29 PM
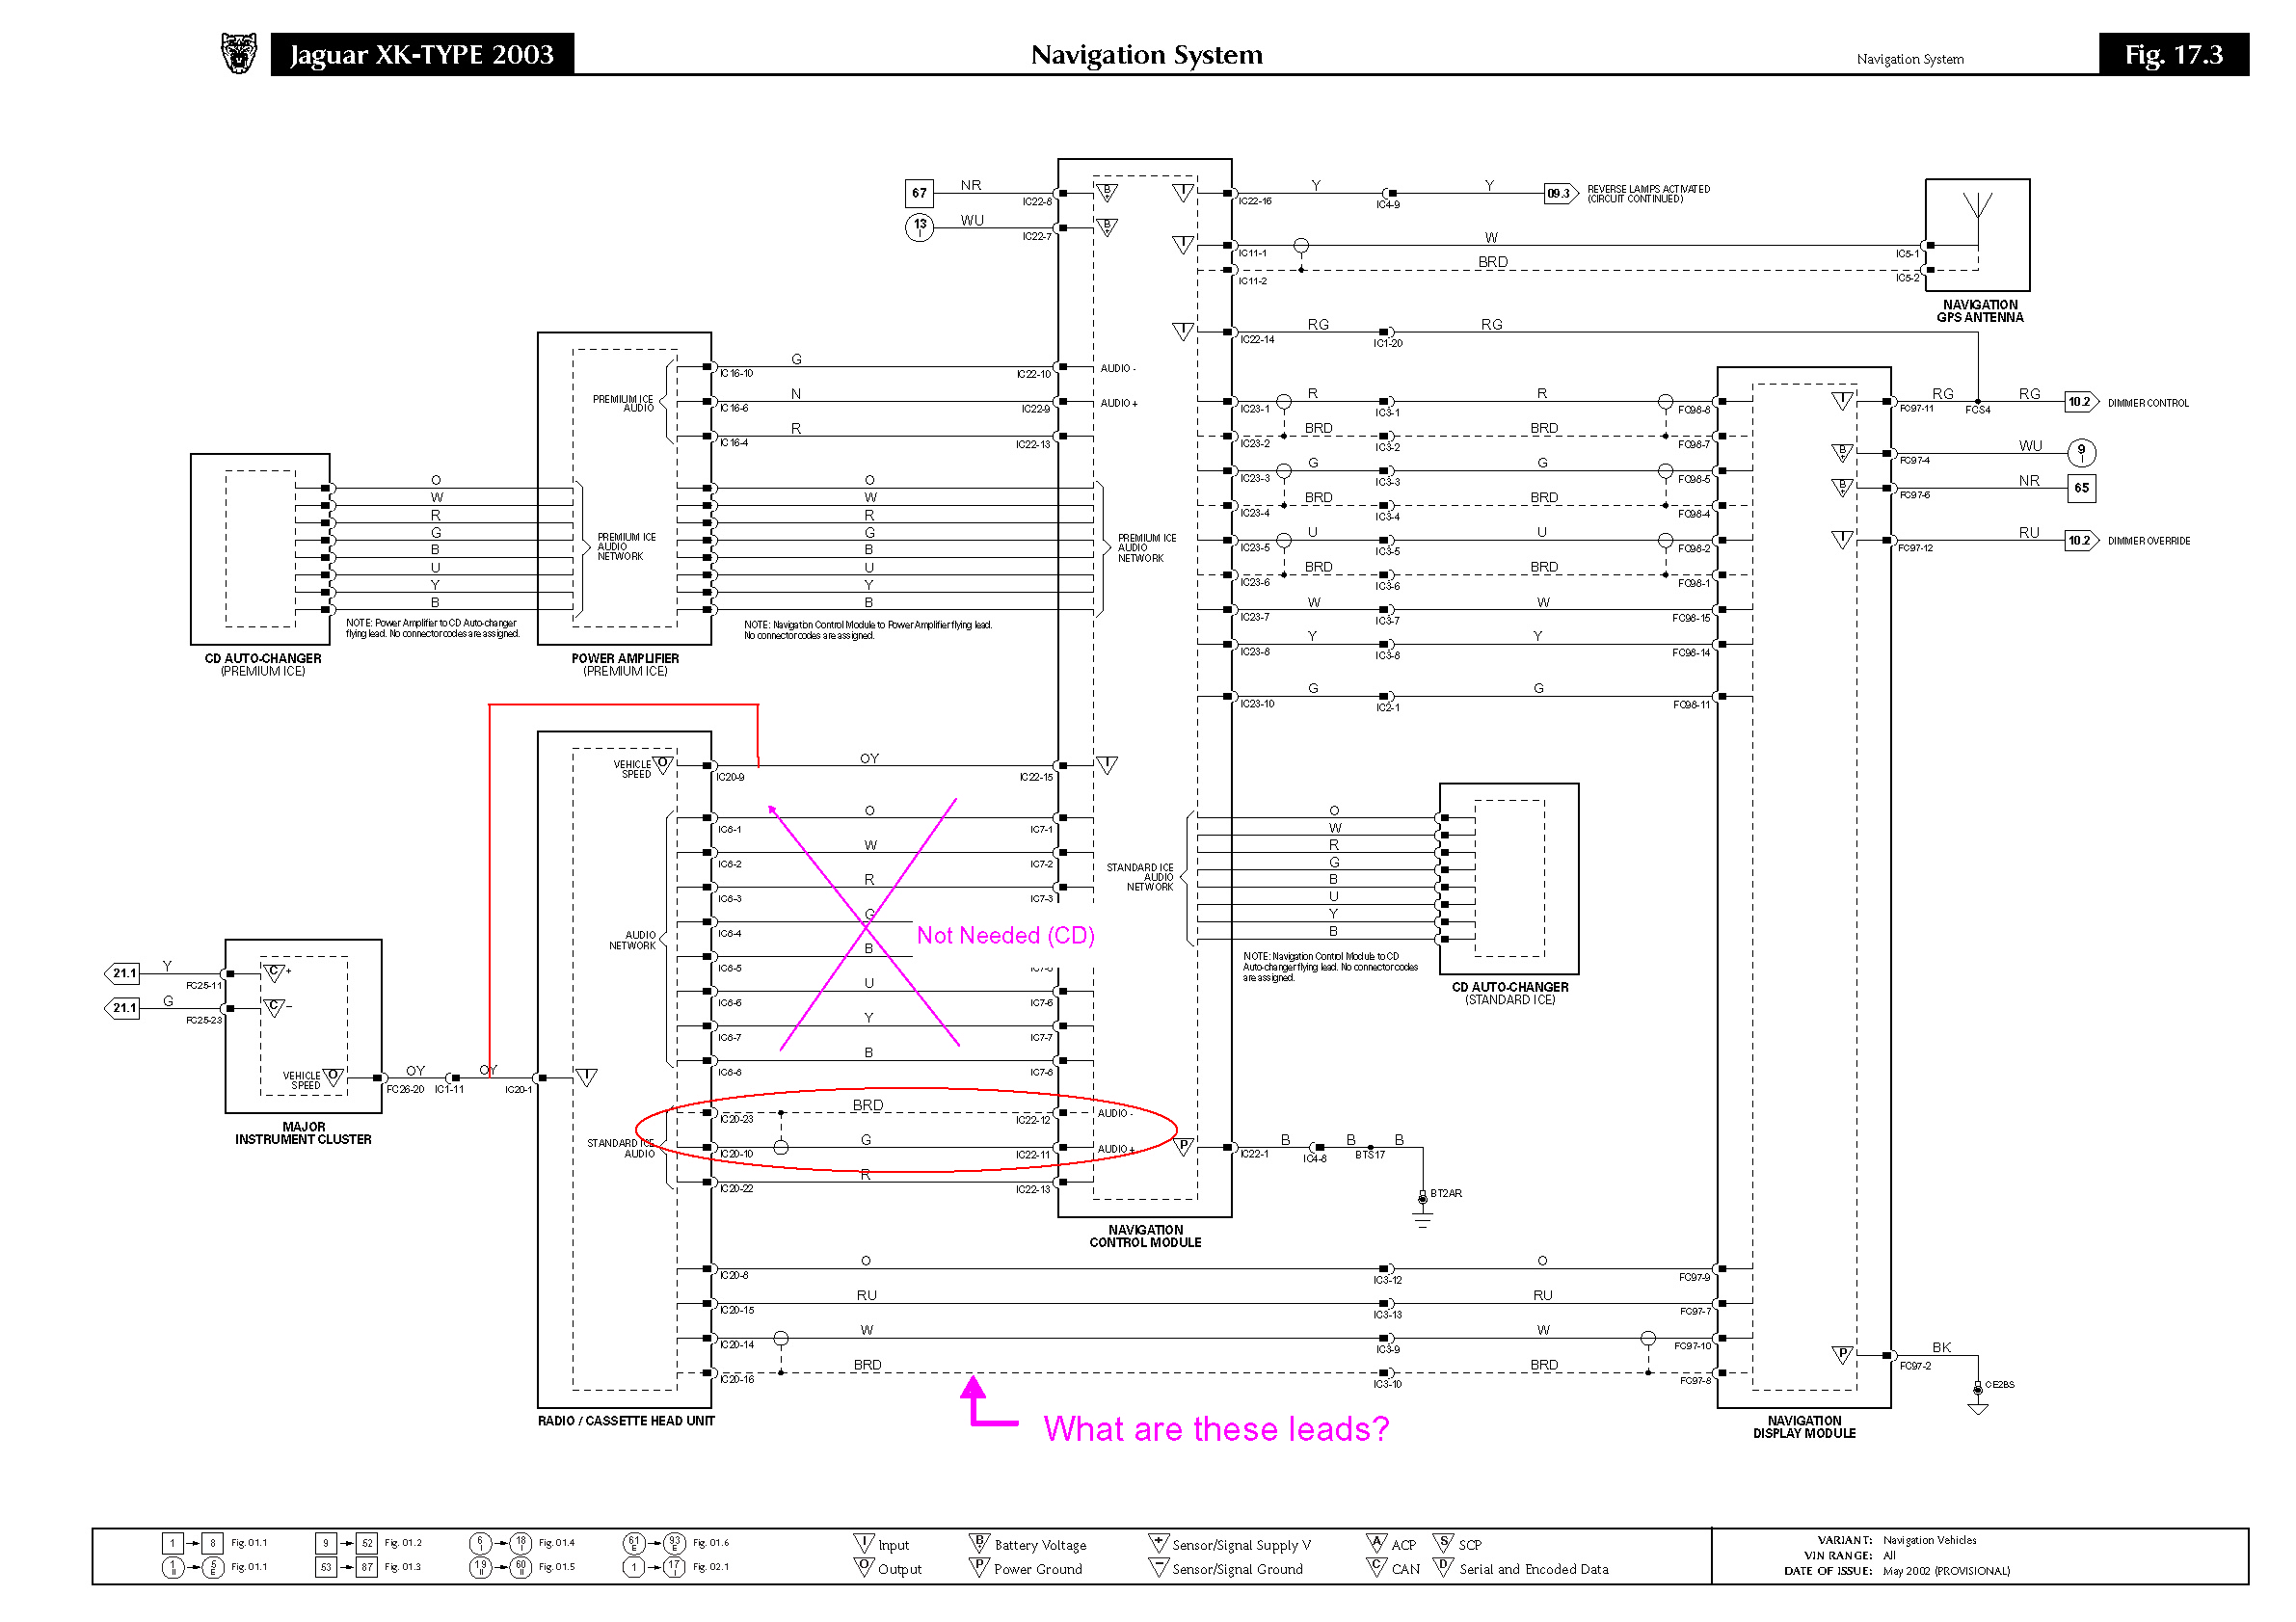
The power leads are in the smaller wiring harness. I believe it was the BK and BRG ones. If I remember correctly they were on the bottome (away from the clip) and in the middle. In your diagram you are looking at power to the control module, which is in the trunk, you want to look at power to the display unit, so look at the diagram from that perspective and double check the colors. Good luck.
#34
06-17-2010, 12:34 AM
Senior Member
I wonder if those 4 wires at the bottom of the screen are the Navigation Audio going from the display into the input of the head unit. Since the head unit has a volume control setting for the Nav voice then the audio should be running from the Nav system to the head unit.
If someone has there dash apart to check out those 4 wires I would love to know if that's the audio, cause that's what I want to locate before I start the install so the audio outputs of the nav are integrated into the Jaguar system.
Dave B
If someone has there dash apart to check out those 4 wires I would love to know if that's the audio, cause that's what I want to locate before I start the install so the audio outputs of the nav are integrated into the Jaguar system.
Dave B
#35
06-17-2010, 08:13 AM
Veteran Member
I wonder if those 4 wires at the bottom of the screen are the Navigation Audio going from the display into the input of the head unit. Since the head unit has a volume control setting for the Nav voice then the audio should be running from the Nav system to the head unit.
Dave B
Dave B
#36
06-17-2010, 09:02 PM
Veteran Member
OK... I got the Garmin 1490t all mounted in the dash and wired in. I used these nifty little splice thingys that you squeeze onto the wire with pliers. They have a little metal thing in them that cuts into the insulation and makes contact with the wire so you don't have to actually cut the wire. They worked great, although they are a little bulky (not as bulky as crimps or wire nuts would have been, though). I got them at Radio Shack. They really made the job easier. Plus they are easily removable.
For anyone who is curious, to get 12vdc behind the nav unit that comes on when the key is on, you need to splice into the Black/Pink wire (negative) and the White/Blue (+12vdc). There are two plugs onthe nav unit. One of them has all solid color wires. Just push that one to the side. The other one has all two-color wires and is slightly smaller. That's the one with the voltage that you need.
Anyway, the next step is to put the wire mesh over the two holes where the controls used to be and cover it with speaker fabric. The wire mesh is supposed to be here tomorrow.
#37
04-05-2011, 01:31 AM
Veteran member
Apologies for resuscitating an old thread, but I would really like to do this mod - probably using a TomTom device. I have a couple of questions:
- any signal reception problems? Do you advise an external antenna?
- can you hear the satnav voice ok from inside the dash?
- how can you make it so that the satnav switches on and off with the ignition (on a TomTom, for example, there's a button on top of the unit to switch it on & off)?
- any issues when pushing on the screen? Has the glue held up to use?
TIA
#38
04-05-2011, 01:14 PM
Veteran Member
Apologies for resuscitating an old thread, but I would really like to do this mod - probably using a TomTom device. I have a couple of questions:
- any signal reception problems? Do you advise an external antenna?
- can you hear the satnav voice ok from inside the dash?
- how can you make it so that the satnav switches on and off with the ignition (on a TomTom, for example, there's a button on top of the unit to switch it on & off)?
- any issues when pushing on the screen? Has the glue held up to use?
TIA
- any signal reception problems? Do you advise an external antenna?
- can you hear the satnav voice ok from inside the dash?
- how can you make it so that the satnav switches on and off with the ignition (on a TomTom, for example, there's a button on top of the unit to switch it on & off)?
- any issues when pushing on the screen? Has the glue held up to use?
TIA
To answer your questions, I have no reception problems at all. I don't see any need for an external antenna, however I'm not familiar with Tom Toms. They might not have reception as good as the Garmin that I used.
The second time I installed it I took some metal flashing like what is used to waterproof around windows and door sills, and cut the flashing slightly larger than the two openings. I painted it flat black and just glued it into place in the openings with contact cement. It looks decent, but not as good as jnporcello's. However, even with the openings completely sealed, I still have no problem hearing the GPS, even when the top is down.
My nav unit is hard wired into the car, so when I start the car it automatically turns on and when I turn off the car it turns off. I don't really foresee wanting to turn it off when the car is running, but I'm going to add a switch to the right opening that will allow me to do that. On my Garmin the unit turns itself off after 30 seconds when it loses power. I have it wired in to "switched" power so turning off the car removes power to the GPS and it shuts down after 30 seconds.
I put an aluminum bar behind the unit on mine, I could hit it with a hammer and it wouldn't fall back into the cavity behind the unit. I have no problems with pressing on the screen at all.


Thread
Thread Starter
Forum
Replies
Last Post
Finbarr1975
X-Type ( X400 )
11
09-16-2023 02:52 PM
mikiep
XK8 / XKR ( X100 )
14
12-20-2019 07:37 PM
Currently Active Users Viewing This Thread: 1 (0 members and 1 guests)