When you click on links to various merchants on this site and make a purchase, this can result in this site earning a commission. Affiliate programs and affiliations include, but are not limited to, the eBay Partner Network.
So, I've used many many threads and links from this site over the years and I've finally taken the time to photograph my own work done to my car. I apologize to those who could have benefited from this earlier, but hopefully this helps someone in the future.
Anyway, my hoses inevitably ruptured and I decided to buy the hoses manufactured by TopHydraulics. Taking apart the interior proved to be far easier than I had expected (except for the rear passenger speaker).
First I placed the top in manual operation by turning the petcock on the pump counterclockwise ~720 degrees, removing the drivers side pillar fabric, pulling the top of the passenger side pillar fabric loose, the small round plastic cover to the right of the lighting dome, removing the drivers and passenger sun visors, removing the lighting dome, the interior overhead fabric and using the provided allen wrench to release the top latch.
I used interior panel tools to pry the pillar fabric pieces loose - they're held in by plastic tabs - and only loosened rather than removing the passenger side so that I didn't have to unplug the electrical connector in it.
I used the same tool to remove the round plastic tab.
The sun visors were a little more work - I had to remove a plastic cover from where the visor connects to the car using a flat head screwdriver then removed the two screws holding them on with a phillips head screwdriver. The latches for the sun visors required me to use a knife tip to pry the plastic flap open so I could access the screw and leave these dangling (they have electrical connectors).
The lighting dome only required the use of my fingers to pry off of the roof by pulling down on the rounded end until it pulled off, then disconnecting the electrical connectors.
Once all of these are removed the top fabric should just fall down and then you can disconnect the electrical connections for the sun visor holsters and you should be left with this (plus bolts, I didn't do such a great job photographing every step..)
Then I lowered the now unlatched top by pressing down the lift cylinders from the outside (you can feel them and they are pretty easy to push) and easily pulled the top from the front.
I removed the center console from the car too, however I forgot to put it in drive before removing power so I removed the gear selector knob to give it the space it needed to come out.
With the top down I removed the driver's side seat which required me to have it all the way forward to reach the back two bolts, then power it all the way back and remove a plastic cover (which only requires you to pull towards the front of the car to remove it) to access the front two bolts and lift the seat out.
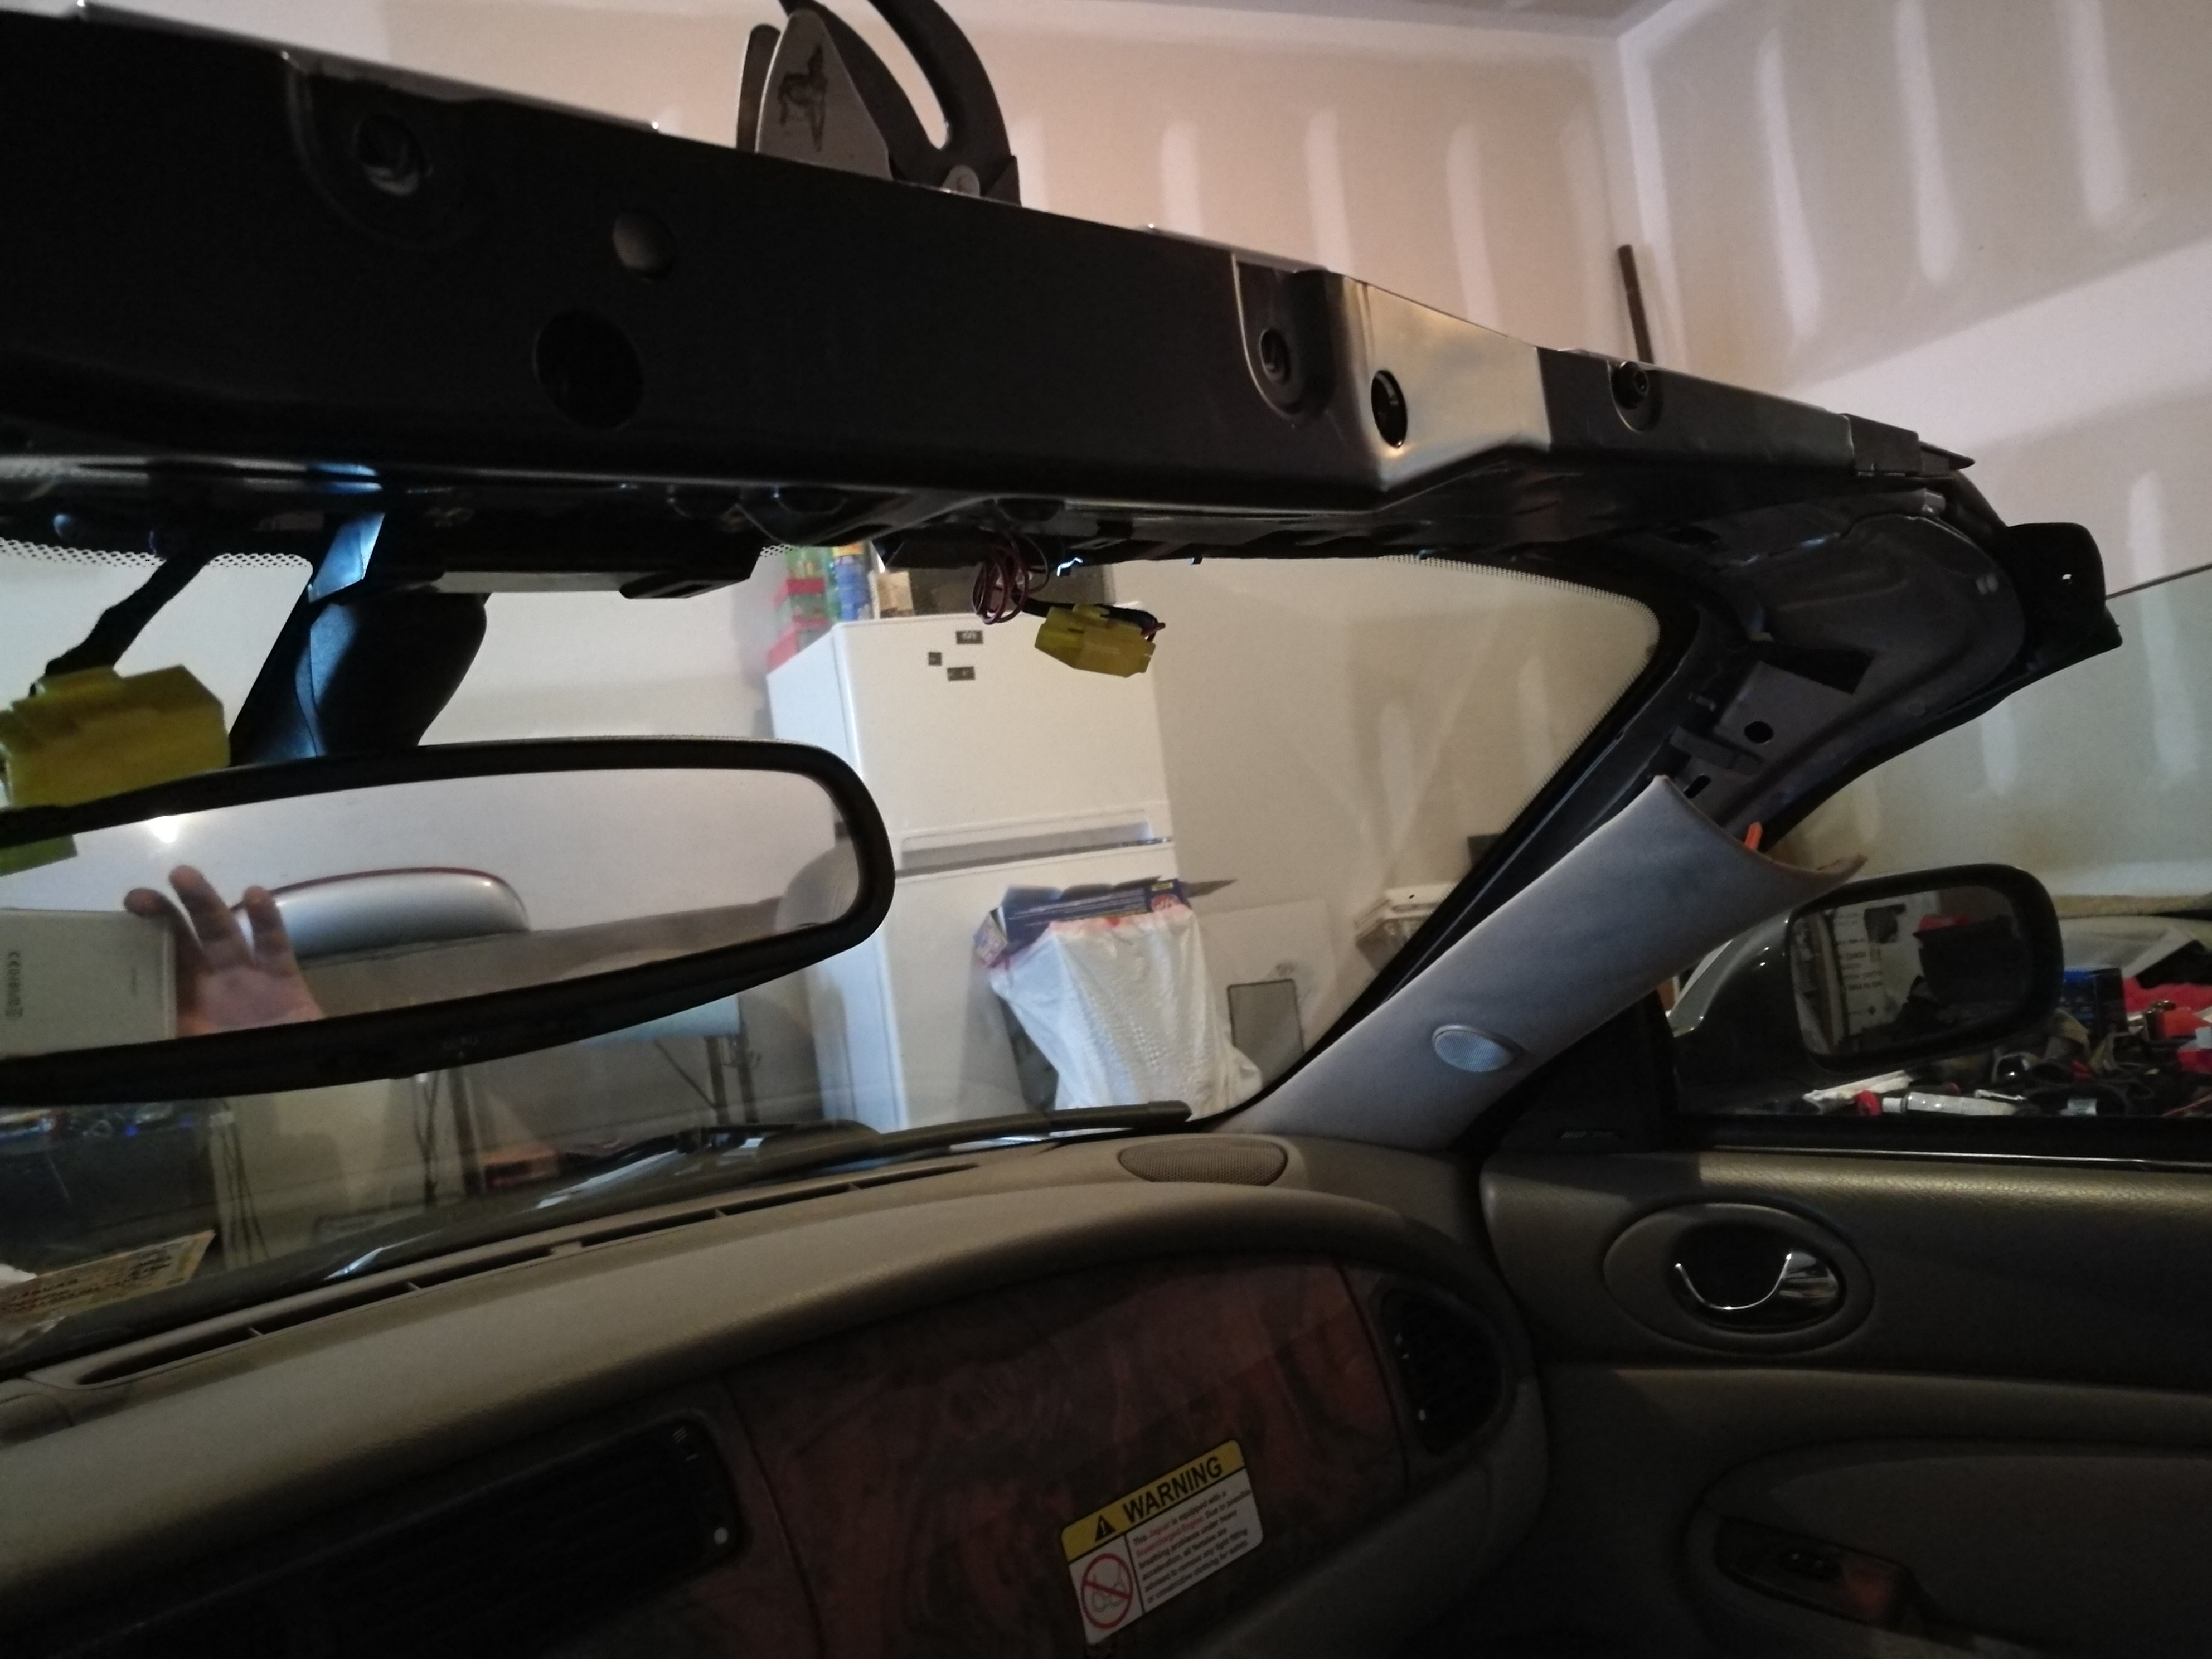
Now, I decided to undo the bolts holding the latch assembly to the car. First there is a cover over the top that requires 4 screws to be removed. Two of them are easily accessible towards the center of the top and 2 are located under the gasket at the top left and top right of the windshield. With this off you can access the bolts. Some of these bolts must only be loosened not removed. You can tell which ones to only loosen by looking at the metal where they are held and noting you can remove the metal with them still attached. My hoses were not in the greatest shape...
The rear seats came out by releasing two bolts under the lower cushion and pulling it out which gave access to two bolts for the back cushion. The back cushion also requires removing for screws holding the rear seatbelts in position, then the back cushion lifts out.
With my seats now removed, I removed the Jaguar logo on the drivers side step area (on the floor covered by the door when shut). I used a box cutter blade to carefully separate it from the car (it's glued to the car) which gave access to three bolts holding the step area to the car. This allowed me to remove a plastic panel that is under the dash and extends from the hood release to the footrest. With all this removed I had access to the hydraulic line's path from the latch to the back speaker.
I connected the new hydraulic lines to the latch and used the plastic connector supplied by top hydraulics and a zip tie to connect the two new lines together and pulled down the A-frame, under the driver's side fabric, along the center console, and behind the passenger seat - removing and replacing all zip ties along the way.
Once to the speaker, I had to remove the rear quarter panel and the speaker. To do so, I unscrewed three screws holding the top leather panel and removed it. Then I pulled up on the plastic cover for the front passenger seatbelt to gain access to it's securing bolt and unscrewed it. The speaker panel is held on by clips, the door gasket, and one tab with a bit of fabric towards the rear of the car at this point.
The speaker was more difficult. There is a bar immediately above it which need to be removed and the 4 bolts securing it are tough to get to. Also, the speaker has 4 bolts/ nuts holding it in that must be removed and an electrical connector, then it lifts out.
With the speaker removed I pulled the hoses to the trunk and connected them to the pump and replaced my lost hydraulic fluid.
Now, during this replacement I decided it would be a good idea to install a new stereo at the same time since I'd have the interior so removed and would be running lines down the same paths. So, while running the hoses down my A-frame and under the driver's side carpet I ran a microphone line to the stereo. From the stereo to the trunk is a slightly different path that goes under the rear seats as apposed to in front of them, so I did that part separately but did leave some string from the passenger area to the trunk so that I could easily pull the wiring for the speaker channels and remote line to the amplifier and the satellite radio antenna line. I also installed a raspberry pi 3 as a retropie for those times I'm waiting to pick someone up or have dropped someone off and am waiting for them to be done with their appointment. I used converter to change the HDMI signal to component and ran that to the stereo's aux in line (as seen on the front of the head unit) and used another adapter to get video into my stock display (I can't remember the name of it, but it was someone else's how-to post, so you may be able to find it).
I'm not sure if there's enough detail in this, but let me know and I'll elaborate wherever you need me to.
Great job and thanks for the pictures. I have ordered the hoses from Top Hydraulics and will be tacking this job next weekend.
Two questions for you:
1) why was it necessary to take off the sill plate on the driver's side? If the hose runs from the fusebox side to the center console side, wouldn't it just snake under the carpet?
2) did you remove the passenger side interior quarter panel for the stereo work or was it necessary to run the hoses? It seems it should be able to stay in place (assuming only the latch hoses are done) and the hoses run up the back side of the rear seat.
I have looked at other threads on this and also on Gus' site, but this is not discussed in detail.
p.s. Did you have help? and how long did it take you?
Last edited by Jag#4; 03-15-2017 at 08:52 PM.
Reason: added questions
The plate was removed in order to get the carpet up and to remove the plastic cover that extends from the hood release to the foot rest. There are zip ties that must be removed to pull the hoses and subsequently replaced. The rear quarter panel was removed for running the hoses as well. There are zip ties running behind the speaker that I don't believe can be accessed with the speaker still installed. If you look at the picture of my rear quarter panel removed, you can see that I ran my stereo wires outside of the speaker as I didn't see any useful reason to run them near the hydraulic lines any more than necessary. I'm sorry I don't have any photos taken with the speaker removed.
I didn't have any help doing the work (except having my wife help me remove my hood), and during this replacement and stereo install I was replacing my valve cover gaskets, bank 1 coil pack cover, bank 1 coil packs, both banks' spark plugs and gaskets, water pump (was a leaking aftermarket), thermostat, upper radiator hose, belts, adjusting the passenger window height, replacing the passenger headlight lens, and cleaned the engine and bay. All items together took me about a week - part of which was waiting for the hoses to come in since I wanted to verify the hose was ruptured and it wasn't the latch itself leaking. I photographed the engine work much more thoroughly, and I'll write that up at a later time.
I also forgot to mention that the stereo install was the most research intensive. I looked all over for an easy solution to installing a new head unit or entire system and there isn't one. There isn't a harness for these cars and with any piece of the system missing the entire system stops working. Sooo I printed off the wiring diagram for the entertainment system and navigation system and used positap connectors to get the head unit connected. For the speakers, I just reused the existing speaker wires with the new amp.
Hi Guys. I'm fresh from the "Shower". Happened yesterday. My question is what do I use to clean the interior of all the hydraulic fluid?
The headliner/trim, walnut & leather seats received a liberal spray.
I'm keen to get it cleaned up asap. Any tips & tricks on what to use, & how to go about it?
Thanks in advance!
Appreciate the detailed information. I am in the process of installing the front hoses and latch. Is is necessary to remove the front seat and the rear top cushion? Any other hints from the forum would be greatly appreciated.
Appreciate the detailed information. I am in the process of installing the front hoses and latch. Is is necessary to remove the front seat and the rear top cushion? Any other hints from the forum would be greatly appreciated.
As the hoses going from the left side from the car to the middle console you have to remove the driver's front seat.
The same for the rear cushions to have better access as the hoses going from the left side of the middle console to the right rear speaker side but it is really easy to remove the cushions.
The front seat is not difficult either just the electric connector on the bottom is a bit tricky to reach (it was on my car at least) but will come off.
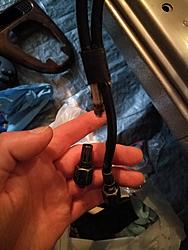
I am in the middle of the job, I have removed the rear speaker on the passenger side and I expected to see the end of the hoses. Exactly where does the hoses terminate for the front latch? As you can see from the photo they seem to continue. Do they terminate in the trunk (boot)
by the pump? This is looking down from the passenger side rear where the top cylinder is located - yes I see it has a minor leak
Good write up and photos Ryan. Haven't installed my new sound system yet, and those photos show me what's going on in behind the back seat and through the convertible top area for routing the wires and cables through to the trunk.
. AN\nother tip is when it comes time to route the hoses from the trunk (boot) to the car, raise the roof as it will make the job a lot easier. So I have one question for the group, should I leave the carpet where the driver's seat and pedals are or should that be removed to allow for the hoses to be run? If it does indeed need to be removed, what is the easiest way?
Couple of tips that I can share: the Jaguar kick sill can be removed with a hot air gun and some patience https://www.youtube.com/watch?v=AKY-3CAvWDo. AN\nother tip is when it comes time to route the hoses from the trunk (boot) to the car, raise the roof as it will make the job a lot easier. So I have one question for the group, should I leave the carpet where the driver's seat and pedals are or should that be removed to allow for the hoses to be run? If it does indeed need to be removed, what is the easiest way?
I just lifted the carpet up as I didn't want to remove it, it was a bit fiddly but worked out quite well at the end.
I'm going to just run all my wires straight down the center under the console and then under the back seat. No carpet removal, no dicking around possibly breaking clips or having to use double sided tape to stick the sill back on. Just so you know, double sided tape has depth. So your sill won't glue back on perfectly flush. Recipe for dirt and grime to get in under there. Also, I don't know the gap between the bottom of the door and the sill. You could be replacing the sill one day because the door damaged it by rubbing it all the time. Just run everything right down the middle.

 03-15-2017, 02:19 PM