Oil Pressure Gauge alongside Satnav
#1
 11-01-2012, 01:01 PM

When I posted my experience of fitting the Prize Draw RealGauge module to my XK8’s coolant temperature gauge, I said I’d follow it up with some means of fitting an oil pressure gauge, while keeping the satnav for further options. This is the way I chose and how I went about it.
First I had to decide where to put the gauge and then to purchase one suitable for that location.
I don't like accessories to look as if they've been added - an OE look is essential to me, so the options are rather limited. In fact the only place I found suitable was where Jaguar put the Trip Meter Switch Pack. Its position on the dashboard is a reasonable one for visibility, though less so the higher the steering wheel is positioned, but even this choice was not straightforward as the aperture is only 1 1/2 inches diameter and I couldn't find a suitable gauge of that size.
Eventually, having had the instrument panel trim off to see what space was available, I thought it possible to get a standard 2 inch gauge in there with a bit of modification, so as an experiment I bought a not too expensive gauge and set about it!
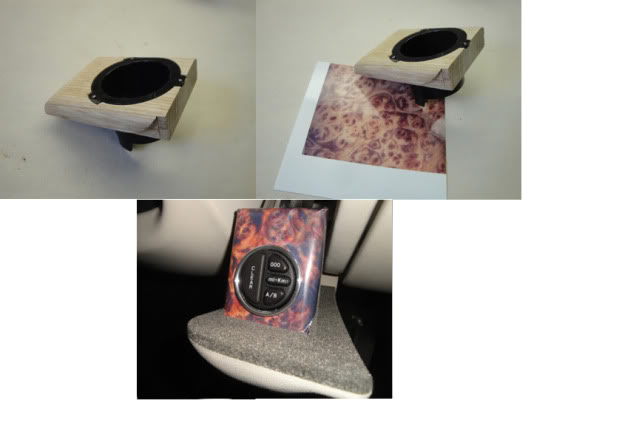
The first set of photos covers the first stage of progress. First item to go was the black bezel holding the glass in the gauge, as it would not be needed with the gauge fitted behind the panel. The bezel was thin alloy and crimped in place, taking only a couple of minutes to lever it off. To position the gauge so it would be flush with the back of the trim panel, I also removed some of the foam material as shown in the second frame. You can see that the Trip Switch and its holder are easily removed by carefully lifting the three small alloy tabs, then the gauge pressed into position and how it looked after the wood trim was replaced. Not a very suitable gauge face, but better than nothing at this stage!

So having proved the feasibility of getting a 2 inch gauge in there, albeit not fixed to the back of the trim panel, the next stage was to replace the gauge face with one matching the fuel and temperature gauges.
I did this by scanning the picture of the Jaguar oil pressure gauge from the RealGauge fitting instructions into Photoshop and suitably re-arranging some of it, re-sizing it, airbrushing out the original gauge needle and so on. I printed copies of it at home during the experimental stage, but the final print was done by the local photography shop to get the highest and most permanent finish on a matt photo paper. So with a proper gauge face, it now looked like this.

I then had to fit the sensor and run its wiring, all of which is covered in great detail by WhiteXKR's RealGauge instructions at his JagWrangler website.
The power to the new gauge was tapped off the Green/White ignition switched supply in the Black multiconnector to the Instrument Panel and its earth/ground was similarly connected to the Black wire in the Trip Switch harness. Finally, the gauge illumination wiring was tapped into the lighting circuit for the Trip Switch.
The last stage was to re position the Trip Switch and my preferred position was in a special, little panel that I made up to fit into the top of the Sunglasses Stowage. Unfortunately, none of the offcuts in my come-in-handy wood store were burr elm to match the dash board, so I made it from a piece of ash, shown here and then veneered it with a photo of the passenger airbag cover!
The Trip Switch harness extension (A proper one is needed here, Steve, if there were enough interest!) was run neatly below the instrument panel, above the steel rail there and then down to the new position. The housing for the sunglass stowage needs to be drilled and rubber grommeted in the back to allow the harness to feed in to a slot in the edge of the new wooden panel, into the stowage and to the back of the switch.
Although the gauge was only held in place by friction, it was all pretty secure and an adequate arrrangement that’s not too difficult for the average enthusiast to fit. With patience and care, a good fit is achieved.
By the way, I can't imagine anyone fitting an oil pressure gauge without also fitting the RealGauge system for the Temperature Gauge, however, RealGauge is not a prerequisite to fitting a basic gauge in this fashion, although there would be no low oil pressure audible alarm without it.
Finishing at that provides a fairly simple, OE-looking way of providing oil pressure indication in satnav cars for the average owner who enjoys this sort of mod, but there is another option suitable for those with a few more workshop resources!
If there was a gauge of the same external dimensions as the Trip Meter Switch Pack, it would allow the gauge to be fixed properly to the trim panel just like the switch. So I stripped the gauge down to its basic parts, and it was apparent that the 2 inch casing was much larger than needed by the working bits.
I took a short length of 1 1/2 inch diameter plastic pipe that proved quite large enough to take the works and, of course, was the same diameter as the switch pack! Then I carved up the original gauge casing to leave only the base, to which I re-attached the gauge works. I used a small lathe to get the tube to the right length and provide a recess for the glass. I then attached it to the original base using that glue that melts and welds polystyrene type plastics. I trimmed away the unnecessary bits, added a flange made from an old CD, drilled a new hole in the base for the light fitting, then finally gave the whole thing a coat of matt black paint. A new perspex front cover was also machined in the lathe, plus a perspex support for the dial. All that, plus the gauge reassembled (without the unnecessary screws in the gauge face!), is shown in this set of photos:

This gauge was then fitted to the trim panel using the three alloy tabs and wired up as described earlier. I haven't gone into the detailed dimensions for this new gauge case, partly because they're likely to vary according to the gauge being modified and partly because if you can undertake this sort of job, you'll be well able to sort out the details to suit yourself. I'm just trying to show what's possible! That said, of course I'm always happy to answer any queries and if anyone wants the jpg file of my final gauge face, I can forward that by pm.

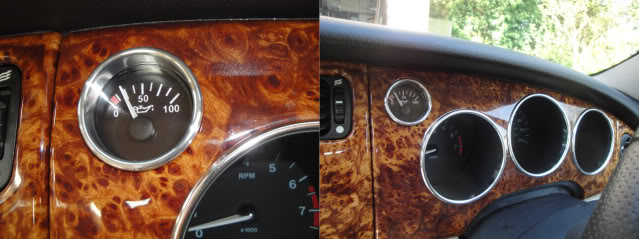
My final touch was to turn up a polished aluminium ring to match the ones on the main instruments to give the final dash arrangement shown here.
I’m really pleased with the way this all turned out and I hope it encourages others with satnav to have a go and get a useful gauge that’s a bit different, yet doesn’t look added!
Finally, thanks again to Steve and Jim for setting up the RealGauge Prize Draw that set me off down this road!
First I had to decide where to put the gauge and then to purchase one suitable for that location.
I don't like accessories to look as if they've been added - an OE look is essential to me, so the options are rather limited. In fact the only place I found suitable was where Jaguar put the Trip Meter Switch Pack. Its position on the dashboard is a reasonable one for visibility, though less so the higher the steering wheel is positioned, but even this choice was not straightforward as the aperture is only 1 1/2 inches diameter and I couldn't find a suitable gauge of that size.
Eventually, having had the instrument panel trim off to see what space was available, I thought it possible to get a standard 2 inch gauge in there with a bit of modification, so as an experiment I bought a not too expensive gauge and set about it!
The first set of photos covers the first stage of progress. First item to go was the black bezel holding the glass in the gauge, as it would not be needed with the gauge fitted behind the panel. The bezel was thin alloy and crimped in place, taking only a couple of minutes to lever it off. To position the gauge so it would be flush with the back of the trim panel, I also removed some of the foam material as shown in the second frame. You can see that the Trip Switch and its holder are easily removed by carefully lifting the three small alloy tabs, then the gauge pressed into position and how it looked after the wood trim was replaced. Not a very suitable gauge face, but better than nothing at this stage!
So having proved the feasibility of getting a 2 inch gauge in there, albeit not fixed to the back of the trim panel, the next stage was to replace the gauge face with one matching the fuel and temperature gauges.
I did this by scanning the picture of the Jaguar oil pressure gauge from the RealGauge fitting instructions into Photoshop and suitably re-arranging some of it, re-sizing it, airbrushing out the original gauge needle and so on. I printed copies of it at home during the experimental stage, but the final print was done by the local photography shop to get the highest and most permanent finish on a matt photo paper. So with a proper gauge face, it now looked like this.
I then had to fit the sensor and run its wiring, all of which is covered in great detail by WhiteXKR's RealGauge instructions at his JagWrangler website.
The power to the new gauge was tapped off the Green/White ignition switched supply in the Black multiconnector to the Instrument Panel and its earth/ground was similarly connected to the Black wire in the Trip Switch harness. Finally, the gauge illumination wiring was tapped into the lighting circuit for the Trip Switch.
The last stage was to re position the Trip Switch and my preferred position was in a special, little panel that I made up to fit into the top of the Sunglasses Stowage. Unfortunately, none of the offcuts in my come-in-handy wood store were burr elm to match the dash board, so I made it from a piece of ash, shown here and then veneered it with a photo of the passenger airbag cover!
The Trip Switch harness extension (A proper one is needed here, Steve, if there were enough interest!) was run neatly below the instrument panel, above the steel rail there and then down to the new position. The housing for the sunglass stowage needs to be drilled and rubber grommeted in the back to allow the harness to feed in to a slot in the edge of the new wooden panel, into the stowage and to the back of the switch.
Although the gauge was only held in place by friction, it was all pretty secure and an adequate arrrangement that’s not too difficult for the average enthusiast to fit. With patience and care, a good fit is achieved.
By the way, I can't imagine anyone fitting an oil pressure gauge without also fitting the RealGauge system for the Temperature Gauge, however, RealGauge is not a prerequisite to fitting a basic gauge in this fashion, although there would be no low oil pressure audible alarm without it.
Finishing at that provides a fairly simple, OE-looking way of providing oil pressure indication in satnav cars for the average owner who enjoys this sort of mod, but there is another option suitable for those with a few more workshop resources!
If there was a gauge of the same external dimensions as the Trip Meter Switch Pack, it would allow the gauge to be fixed properly to the trim panel just like the switch. So I stripped the gauge down to its basic parts, and it was apparent that the 2 inch casing was much larger than needed by the working bits.
I took a short length of 1 1/2 inch diameter plastic pipe that proved quite large enough to take the works and, of course, was the same diameter as the switch pack! Then I carved up the original gauge casing to leave only the base, to which I re-attached the gauge works. I used a small lathe to get the tube to the right length and provide a recess for the glass. I then attached it to the original base using that glue that melts and welds polystyrene type plastics. I trimmed away the unnecessary bits, added a flange made from an old CD, drilled a new hole in the base for the light fitting, then finally gave the whole thing a coat of matt black paint. A new perspex front cover was also machined in the lathe, plus a perspex support for the dial. All that, plus the gauge reassembled (without the unnecessary screws in the gauge face!), is shown in this set of photos:
This gauge was then fitted to the trim panel using the three alloy tabs and wired up as described earlier. I haven't gone into the detailed dimensions for this new gauge case, partly because they're likely to vary according to the gauge being modified and partly because if you can undertake this sort of job, you'll be well able to sort out the details to suit yourself. I'm just trying to show what's possible! That said, of course I'm always happy to answer any queries and if anyone wants the jpg file of my final gauge face, I can forward that by pm.
My final touch was to turn up a polished aluminium ring to match the ones on the main instruments to give the final dash arrangement shown here.
I’m really pleased with the way this all turned out and I hope it encourages others with satnav to have a go and get a useful gauge that’s a bit different, yet doesn’t look added!
Finally, thanks again to Steve and Jim for setting up the RealGauge Prize Draw that set me off down this road!
Last edited by JimC64; 11-01-2012 at 10:05 PM. Reason: INCREASE FONT SIZE
#3
11-01-2012, 04:04 PM

Veteran Member
I think we are all very lucky that you won the RealGauge prize and decided to pay back the debt via this posting. This was a very informative and innovative way to install the gauge kit. The results are pleasing to the eye to say the least.
Kudos to you sir!
p.s. as an owner of the full RealGauge upgrade I was most intrigued by your fix for the gauge face match. Might have to try that myself.
Kudos to you sir!
p.s. as an owner of the full RealGauge upgrade I was most intrigued by your fix for the gauge face match. Might have to try that myself.
#4
11-01-2012, 07:18 PM
Veteran Member
I too am very impressed; it does look factory installed. I have already added a voltmeter and oil pressure gage to my rear view mirror but will be upgrading my upper and lower s/c pulley next year and have been thinking about adding a boost gage. This may be the solution I was looking for at to where to locate that gage. Thanks for sharing.
Mark
Mark
#5
11-01-2012, 07:30 PM

Join Date: Oct 2007
Location: PHX some of the time
Posts: 117,410
Received 6,320 Likes
on
5,507 Posts
#6
11-01-2012, 07:38 PM

#7
11-01-2012, 07:57 PM
Senior Member
Trending Topics
#9
11-01-2012, 09:05 PM
Veteran Member
#10
11-01-2012, 09:47 PM
Veteran Member
Is that finished radius in the veneer already there as soon as you pop out the switch?
What arrangements did you use to attach the sender as most gauge manufactures allow for 1/8 NPT, M10x1 or M10x1.5 but not M10x1.25 threads?
FWIW, some of the big auto store chains sell low end gauge sets in 1.5 inch diameter. They are the lowest end of their lines, but if all that is required is the mechanism and needle, then they might be a reasonable start to the project.
Also ebay:
oil gauge 1 1 2 | eBay
Last edited by plums; 11-01-2012 at 09:58 PM.
#11
11-01-2012, 10:11 PM
Veteran Member
Join Date: Nov 2006
Location: Glasgow, Scotland UK
Posts: 47,302
Received 9,010 Likes
on
4,113 Posts

#12
11-02-2012, 04:52 AM
First, many thanks for all the generous comments.
Yes, Plums, that radius is original and the ally ring I turned up is a gentle press fit into it.
I fitted the sensor using the adaptor that came with the RealGauge kit. Maybe I was lucky that my sensor fitted the taper threaded hole exactly, or maybe WhiteXKR just knows best! Because it all fitted together, I never queried the actual thread sizes.
I fitted the sensor using the adaptor that came with the RealGauge kit. Maybe I was lucky that my sensor fitted the taper threaded hole exactly, or maybe WhiteXKR just knows best! Because it all fitted together, I never queried the actual thread sizes.
Last edited by astromorg; 11-02-2012 at 04:55 AM.
The following users liked this post:
plums (11-02-2012)
#13
11-02-2012, 05:13 AM

#14
11-02-2012, 06:40 AM
Veteran Member
I had searched extensively before having my own tee adapters machined, and there is no aftermarket source that I am aware of, unless you cobble together your own from a mess of fittings an adapters.
If anyone needs the tee adapter, please contact me...I will sell them with a hardware kit, but they are not currently on my website. $65.

#16
11-02-2012, 07:12 AM
Veteran Member
There is an alternative if a remote mount is desired.
It is a turbo oil line kit for certain makes of turbos. It has a M10x1.25 banjo fitting at the engine end and a three way 1/8 NPT tee at the other. One of the legs is taken up by a AN-4 adapter for the line itself. Some of the kits have a M10x1.25 female to 1/8 NPT bushing included. That is where the original oil switch would go. The best ones also have a restrictor so that the oil flow is slowed if the line bursts.
It is a turbo oil line kit for certain makes of turbos. It has a M10x1.25 banjo fitting at the engine end and a three way 1/8 NPT tee at the other. One of the legs is taken up by a AN-4 adapter for the line itself. Some of the kits have a M10x1.25 female to 1/8 NPT bushing included. That is where the original oil switch would go. The best ones also have a restrictor so that the oil flow is slowed if the line bursts.
#17
11-02-2012, 07:33 AM
Veteran Member
#18
11-02-2012, 08:15 AM
Veteran Member
There is an alternative if a remote mount is desired.
It is a turbo oil line kit for certain makes of turbos. It has a M10x1.25 banjo fitting at the engine end and a three way 1/8 NPT tee at the other. One of the legs is taken up by a AN-4 adapter for the line itself. Some of the kits have a M10x1.25 female to 1/8 NPT bushing included. That is where the original oil switch would go. The best ones also have a restrictor so that the oil flow is slowed if the line bursts.
It is a turbo oil line kit for certain makes of turbos. It has a M10x1.25 banjo fitting at the engine end and a three way 1/8 NPT tee at the other. One of the legs is taken up by a AN-4 adapter for the line itself. Some of the kits have a M10x1.25 female to 1/8 NPT bushing included. That is where the original oil switch would go. The best ones also have a restrictor so that the oil flow is slowed if the line bursts.
This certainly can work, but it is hard to find a good position to mount the remote adapter within reach of the oil pressure switch connector. I played around with mounting arrangements for this approach for a while and ended up damaging sensors on two separate occasions due to movement of the engine and suspension. That is why I went to a custom designed tee for RealGauge. It also removes the risk of an added hose to fail.
#19
11-02-2012, 01:07 PM
The switch itself is 1.5 dia and the housing it clips into is 1.65 dia. The flange is about 2 1/8. Total depth of the switch assembly is 2 1/8. My gauge is 2 1/4 deep and that still leaves enough room for the wiring connections.
The following users liked this post:
mjlaris (11-02-2012)