
RealGauge Prize Installation Experiences
#1
 09-30-2012, 02:47 PM

I ran the vacuum cleaner through the bedrooms, prepared some veg for the evening meal and as a reward I was given time off for good behaviour (Thanks Liz!), so out to the workshop at last to get the RealGauge Prize installed! I've already posted a few early thoughts at
https://www.jaguarforums.com/forum/x...rogress-81545/
so this picks up at that point, when you're in the workshop, the RealGauge kit is laid out neatly on the workbench, tools - as listed thoughtfully by WhiteXKR - are at the ready and the car awaits its upgrade!
As is the current vogue, I'll start with a health warning! Don't try this upgrade if you're colourblind! You will get the wiring wrong!
As I mentioned in the previous post, the instructions for this installation, published by WhiteXKR on his Jagwrangler website, are so good and detailed, it would be an insult to him (and potentially confusing to you) if I were to try and offer a better version with alternative photos, directions, etc - I promise you, you won't need them!
So I'll limit that aspect to a couple of hopefully helpful comments only.
The first of these is that before you disconnect the battery, ensure you open the driver's door so the window glass is down, allowing you to open and shut the door as you may wish while doing the job, and adjust the seat and steering wheel to optimum positions to give best access.
And don't shut your keys in the boot! Best leave it open!
Removal of the knee panel and wood trim around the instrument panel is easily done, referring to the video link in the instructions if you need help with this stage.
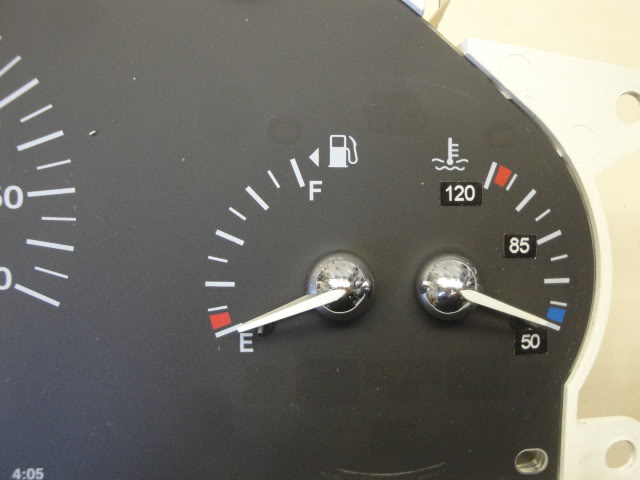
Then, with the actual instrument panel itself on the work bench, you can make your first personal decision. Will you add some of the stick-on numbers to the gauge face so you will know the actual value of any temperature readings in future?
I've delayed this decision because while I want some numbers there to make it a proper gauge, I feel it looks a bit out of balance with the fuel gauge if that remains with just an F and an E, so I'd like to think about adding at least a 1/2 reading, or maybe 35 (as in litres) there.
Plenty of time to think about that! What do you think? I should also say I'm a little nervous about the glossy numbers on the matt background. Any chance of matt black numerals?
or

The opening of the back of the instrument panel to enable the disconnection of the wiring to the temperature gauge and its refitting is as straightforward as the instruction's photos suggest.
The only additional safeguard I took was to avoid touching any of the exposed printed circuit board to minimize any static damage - this may have been lip service only, as I didn't have an earth/ground bonding wrist band or the like, but I made some effort!
Similarly with the RealGauge circuit board itself, that comes packed in anti-static wrapping. Perhaps WhiteXKR could say if there is a potential problem here or not; I really don't know!
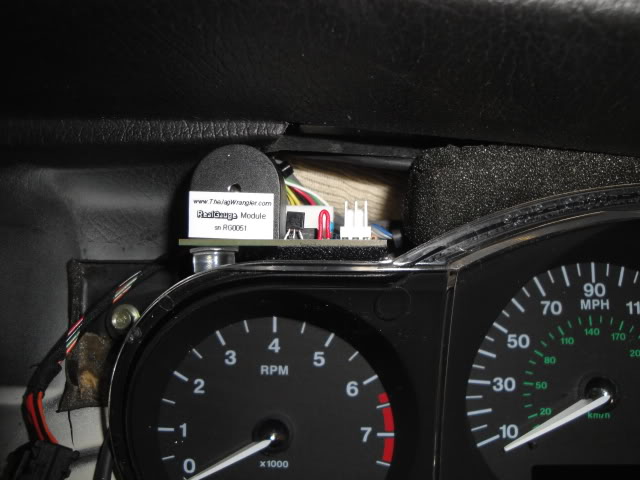
When you get the instrument panel back in, you realise what a close fit the new module is, Velcroed to the top of the panel casing, between the panel, the wood veneered dashboard and the top of the dash, so it important to follow the instructions exactly with regard to the positioning of the module - hard up against the flange of the instrument panel and close up to the curved section - this strange instruction will become clear when you have the bits in front of you!!
Also make sure you get the stick-on Velcro pad the right way round to suit how the module must sit on the panel. If you do have to remove the module, don't ry to rip the Velcro apart - the top Velcro layer will start to pull away from the circuit board and may damage it.
Instead, use something like a 6 inch steel rule or a feeler gauge to push between the two layers to separate them.
So now the module is attached to the instrument panel, the original gauge connector is plugged into its new socket and the whole instrument panel is back where it belongs with all the new wiring run iaw the instructions.
Time to connect it to the original panel wiring looms.
This is where colour blindness would cause havoc, otherwise continue as per the instructions and all will be well! The wire ends have even been correctly stripped for you!
For those not familiar with the wire splicing system provided in the kit, it will be a revelation to them! I've only met the less than perfect Scotchlok system before but these Posi-Tap fittings are a joy to use and invaluable for those of us who indulge in wiring modifications.
Rumour had it that they were available only in the USA but a quick search online shows them now to be on sale here - but not cheap!
For the interest of those who like to know such things, the wires that the module wires tap into provide the following functions: a battery power supply, an earth/ground connection, the Trip Cycle switch, oil pressure on/off, engine speed and coolant temperature.
Now before putting the wood trim and knee panel back in, I now reconnected the battery and watched the self test procedure.
It all seemed to go as expected although at one point the gauge reading seemed stuck at 3/4 Hot, but in a short while everything went to zero.
I was also thrown for a minute by ten beeps every time I turned the ignition on and thought it must mean there would be a high temperature alarm check on each start up.
Then I noticed Err on the Climate Control panel and realised it was alarming because the ambient temperature sensor fan was still disconnected as the knee panel was not yet fitted. This fault message self cleared idc.
With all the trim items back, the job is complete. Taking plenty of time to do the job well, it should be possible for an average guy to get this all done in a couple or three hours.
The quality of the parts in the kit is of a very high standard and the instructions are so precise that you can take this project on with confidence even if you're not the most experienced in this type of modification! It's a very satisfying feeling having done the job.
Now for a performance check.
Before starting any of this installation, I took the trouble to connect up my AutoEnginuity scanner and record coolant temperature and temperature gauge reading every minute from a cold start for thirty minutes. I now did the same with the new module functioning.
Broadly speaking, in both scenarios, the engine temperature rose steadily from an ambient of 18C to 91C in 15 minutes.
Then at 91C, the temperature remained steady for about 6 minutes, which I surmised was the thermostat opening and closing until the whole coolant content came up to 91C (Spec is start opening at 80/84C and fully open 96C.)
The temperature then continued to rise to 93C at which point the fans cut in and the temperature stayed steady at 92/93C for a further ten minutes, after which I switched off. So with a consistent actual engine temperature record for comparison, how did the fitted gauge perform?
Before fitting the module, the panel temperature gauge rose steadily to the halfway mark reaching it in 12 minutes at a real temperature of 85C. As expected, it never moved again during the remaining 18 minutes of the trial, that included temperatures of up to 93C!
With the RealGauge module in place, the needle hit the halfway mark in the same time and at the same temperature (85C) as before, but then continued to a fraction short of the next marker point, at a real temperature of 91C, where it remained until the thermostat was wide open and then, as the real temperature rose to 92/93C, the gauge moved up to the first marker above the halfway mark, where it stayed until I turned off.
Later, in less controlled conditions, I let the temperature rise until the fans cut in and then drove around the locality for a while.
Even at an ambient of 18C, it took three or four miles of 30/40 mph running to get the temperature to start coming back towards the halfway mark. However, after 10 miles of running at 40-50mph, the gauge never dropped as far as the halfway mark. I'd be interested to know what the general running temperatures are for other XK8 owners.
After four years of 'on the mark' running, even though I know the gauge is now accurate, its a little disconcerting always seeing the gauge at that bit above halfway!!
As you know, I have the satnav option fitted, so the oil pressure gauge upgrade, which is part of the Prize, is not applicable to my XK8. However, I'm still looking at away round this and will come back with another post in a while on that topic for those in the same predicament!
I remain so thankful to Steve and Jim for providing the kit for the Prize and then organising the draw that Lady Luck decided I should win! I hope my recording of my experience of fitting it is some help and consolation to others who have or will invest in it!
Finally, let me just give another health warning!! The novelty of having a gauge that moves during changing conditions of normal driving is a very tempting thing to look at more than you ever did before! Please don't look at it just when you should be looking out front or you could find yourself writing a post for the Forum on how to replace all sorts of bits and pieces at the front end!!
https://www.jaguarforums.com/forum/x...rogress-81545/
so this picks up at that point, when you're in the workshop, the RealGauge kit is laid out neatly on the workbench, tools - as listed thoughtfully by WhiteXKR - are at the ready and the car awaits its upgrade!
As is the current vogue, I'll start with a health warning! Don't try this upgrade if you're colourblind! You will get the wiring wrong!
As I mentioned in the previous post, the instructions for this installation, published by WhiteXKR on his Jagwrangler website, are so good and detailed, it would be an insult to him (and potentially confusing to you) if I were to try and offer a better version with alternative photos, directions, etc - I promise you, you won't need them!
So I'll limit that aspect to a couple of hopefully helpful comments only.
The first of these is that before you disconnect the battery, ensure you open the driver's door so the window glass is down, allowing you to open and shut the door as you may wish while doing the job, and adjust the seat and steering wheel to optimum positions to give best access.
And don't shut your keys in the boot! Best leave it open!
Removal of the knee panel and wood trim around the instrument panel is easily done, referring to the video link in the instructions if you need help with this stage.
Then, with the actual instrument panel itself on the work bench, you can make your first personal decision. Will you add some of the stick-on numbers to the gauge face so you will know the actual value of any temperature readings in future?
I've delayed this decision because while I want some numbers there to make it a proper gauge, I feel it looks a bit out of balance with the fuel gauge if that remains with just an F and an E, so I'd like to think about adding at least a 1/2 reading, or maybe 35 (as in litres) there.
Plenty of time to think about that! What do you think? I should also say I'm a little nervous about the glossy numbers on the matt background. Any chance of matt black numerals?
or
The opening of the back of the instrument panel to enable the disconnection of the wiring to the temperature gauge and its refitting is as straightforward as the instruction's photos suggest.
The only additional safeguard I took was to avoid touching any of the exposed printed circuit board to minimize any static damage - this may have been lip service only, as I didn't have an earth/ground bonding wrist band or the like, but I made some effort!
Similarly with the RealGauge circuit board itself, that comes packed in anti-static wrapping. Perhaps WhiteXKR could say if there is a potential problem here or not; I really don't know!
When you get the instrument panel back in, you realise what a close fit the new module is, Velcroed to the top of the panel casing, between the panel, the wood veneered dashboard and the top of the dash, so it important to follow the instructions exactly with regard to the positioning of the module - hard up against the flange of the instrument panel and close up to the curved section - this strange instruction will become clear when you have the bits in front of you!!
Also make sure you get the stick-on Velcro pad the right way round to suit how the module must sit on the panel. If you do have to remove the module, don't ry to rip the Velcro apart - the top Velcro layer will start to pull away from the circuit board and may damage it.
Instead, use something like a 6 inch steel rule or a feeler gauge to push between the two layers to separate them.
So now the module is attached to the instrument panel, the original gauge connector is plugged into its new socket and the whole instrument panel is back where it belongs with all the new wiring run iaw the instructions.
Time to connect it to the original panel wiring looms.
This is where colour blindness would cause havoc, otherwise continue as per the instructions and all will be well! The wire ends have even been correctly stripped for you!
For those not familiar with the wire splicing system provided in the kit, it will be a revelation to them! I've only met the less than perfect Scotchlok system before but these Posi-Tap fittings are a joy to use and invaluable for those of us who indulge in wiring modifications.
Rumour had it that they were available only in the USA but a quick search online shows them now to be on sale here - but not cheap!
For the interest of those who like to know such things, the wires that the module wires tap into provide the following functions: a battery power supply, an earth/ground connection, the Trip Cycle switch, oil pressure on/off, engine speed and coolant temperature.
Now before putting the wood trim and knee panel back in, I now reconnected the battery and watched the self test procedure.
It all seemed to go as expected although at one point the gauge reading seemed stuck at 3/4 Hot, but in a short while everything went to zero.
I was also thrown for a minute by ten beeps every time I turned the ignition on and thought it must mean there would be a high temperature alarm check on each start up.
Then I noticed Err on the Climate Control panel and realised it was alarming because the ambient temperature sensor fan was still disconnected as the knee panel was not yet fitted. This fault message self cleared idc.
With all the trim items back, the job is complete. Taking plenty of time to do the job well, it should be possible for an average guy to get this all done in a couple or three hours.
The quality of the parts in the kit is of a very high standard and the instructions are so precise that you can take this project on with confidence even if you're not the most experienced in this type of modification! It's a very satisfying feeling having done the job.
Now for a performance check.
Before starting any of this installation, I took the trouble to connect up my AutoEnginuity scanner and record coolant temperature and temperature gauge reading every minute from a cold start for thirty minutes. I now did the same with the new module functioning.
Broadly speaking, in both scenarios, the engine temperature rose steadily from an ambient of 18C to 91C in 15 minutes.
Then at 91C, the temperature remained steady for about 6 minutes, which I surmised was the thermostat opening and closing until the whole coolant content came up to 91C (Spec is start opening at 80/84C and fully open 96C.)
The temperature then continued to rise to 93C at which point the fans cut in and the temperature stayed steady at 92/93C for a further ten minutes, after which I switched off. So with a consistent actual engine temperature record for comparison, how did the fitted gauge perform?
Before fitting the module, the panel temperature gauge rose steadily to the halfway mark reaching it in 12 minutes at a real temperature of 85C. As expected, it never moved again during the remaining 18 minutes of the trial, that included temperatures of up to 93C!
With the RealGauge module in place, the needle hit the halfway mark in the same time and at the same temperature (85C) as before, but then continued to a fraction short of the next marker point, at a real temperature of 91C, where it remained until the thermostat was wide open and then, as the real temperature rose to 92/93C, the gauge moved up to the first marker above the halfway mark, where it stayed until I turned off.
Later, in less controlled conditions, I let the temperature rise until the fans cut in and then drove around the locality for a while.
Even at an ambient of 18C, it took three or four miles of 30/40 mph running to get the temperature to start coming back towards the halfway mark. However, after 10 miles of running at 40-50mph, the gauge never dropped as far as the halfway mark. I'd be interested to know what the general running temperatures are for other XK8 owners.
After four years of 'on the mark' running, even though I know the gauge is now accurate, its a little disconcerting always seeing the gauge at that bit above halfway!!
As you know, I have the satnav option fitted, so the oil pressure gauge upgrade, which is part of the Prize, is not applicable to my XK8. However, I'm still looking at away round this and will come back with another post in a while on that topic for those in the same predicament!
I remain so thankful to Steve and Jim for providing the kit for the Prize and then organising the draw that Lady Luck decided I should win! I hope my recording of my experience of fitting it is some help and consolation to others who have or will invest in it!
Finally, let me just give another health warning!! The novelty of having a gauge that moves during changing conditions of normal driving is a very tempting thing to look at more than you ever did before! Please don't look at it just when you should be looking out front or you could find yourself writing a post for the Forum on how to replace all sorts of bits and pieces at the front end!!
Last edited by JimC64; 09-30-2012 at 08:26 PM. Reason: create line breaks
The following 10 users liked this post by astromorg:
Angus (10-01-2012),
Arthur Dent (10-06-2012),
GGG (09-30-2012),
Gus (09-30-2012),
Jag Pilot (02-10-2013),
and 5 others liked this post.
#2
09-30-2012, 08:28 PM
Veteran Member
Join Date: Nov 2006
Location: Glasgow, Scotland UK
Posts: 47,302
Received 9,007 Likes
on
4,113 Posts

#3
10-01-2012, 04:39 PM
Veteran Member
Thanks for posting this wonderfully detailed thread !
I am sure it will be helpful to many folks, plus it is extremely valuable to me to see my customer's perspectives to help me build better products.
I wanted to address some of your points:
-Assembly challange for the colourblind....good point. The hope was using colors exclusively would make things easier....but that may not always be the case. A couple of other users also asked me to add connector pin numbers as a backup to the color coding. I will add that as an instruction manual update shortly. In the meantime, if anyone needs the connector pin numbering, just ask me.
-Glossy vs. matte labels. The gauges are inset, so this is not a huge problem, but the labels might catch a bit of glare under some lighting conditions. I am investigating matte materials, and if I am successful finding an appropriate one, I will provide replacement labels to any customers who desire them at no charge. From feedback to date, many customers have opted not to use tha labels to keep the upgrade totally discreet.
-Interesting idea to add spare labels to the fuel gauge...that never crossed my mind!
-Static Risk. All modern electronics can be damaged by sufficient static discharge. That being said, automobile electronics (which includes the gauge cluster as well as the RealGauge module) is designed in such a way as to minimize the suceptability. The Jaguar interior (leather seats) also tends not to build up large charges the way some vehicles with syntheithic fabric seat do. Common sense handling: do not scuff across a carpet and discharge the board through a doorknob , handing the boards by edges, etc, will also help mitigate the risk. Based on the return rate due to failure of my various modules (about 0.5%) I believe that no special practices are required.
-Thanks for finding that PosiTaps are available in the Europe....good info.
-Your cooling system seems like it is running as it should by the temperatures you reported.
Thanks again for taking the time to post this excellent report!!!
Please let us know what you decide to do for oil pressure!
I am sure it will be helpful to many folks, plus it is extremely valuable to me to see my customer's perspectives to help me build better products.
I wanted to address some of your points:
-Assembly challange for the colourblind....good point. The hope was using colors exclusively would make things easier....but that may not always be the case. A couple of other users also asked me to add connector pin numbers as a backup to the color coding. I will add that as an instruction manual update shortly. In the meantime, if anyone needs the connector pin numbering, just ask me.
-Glossy vs. matte labels. The gauges are inset, so this is not a huge problem, but the labels might catch a bit of glare under some lighting conditions. I am investigating matte materials, and if I am successful finding an appropriate one, I will provide replacement labels to any customers who desire them at no charge. From feedback to date, many customers have opted not to use tha labels to keep the upgrade totally discreet.
-Interesting idea to add spare labels to the fuel gauge...that never crossed my mind!
-Static Risk. All modern electronics can be damaged by sufficient static discharge. That being said, automobile electronics (which includes the gauge cluster as well as the RealGauge module) is designed in such a way as to minimize the suceptability. The Jaguar interior (leather seats) also tends not to build up large charges the way some vehicles with syntheithic fabric seat do. Common sense handling: do not scuff across a carpet and discharge the board through a doorknob
, handing the boards by edges, etc, will also help mitigate the risk. Based on the return rate due to failure of my various modules (about 0.5%) I believe that no special practices are required.-Thanks for finding that PosiTaps are available in the Europe....good info.
-Your cooling system seems like it is running as it should by the temperatures you reported.
Thanks again for taking the time to post this excellent report!!!
Please let us know what you decide to do for oil pressure!
The following 3 users liked this post by WhiteXKR:
#4
10-01-2012, 05:22 PM

Join Date: Oct 2007
Location: PHX some of the time
Posts: 117,265
Received 6,307 Likes
on
5,495 Posts
#5
10-01-2012, 06:59 PM
Veteran Member
Join Date: Nov 2006
Location: Glasgow, Scotland UK
Posts: 47,302
Received 9,007 Likes
on
4,113 Posts

Thanks for coming back into this thread Steve.
I for one am very impressed with the fact that you take the comments onboard and look to react immediately.
That coupled with your pro active approach in the first place, will just win you more fans & undoubtedly more business.
It looks like this is fast becoming the gift that just keeps on giving.....All good.
#7
10-01-2012, 08:13 PM
Veteran Member
As you know, I have the satnav option fitted, so the oil pressure gauge upgrade, which is part of the Prize, is not applicable to my XK8. However, I'm still looking at away round this and will come back with another post in a while on that topic for those in the same predicament!
I just completed this mod over the weekend and now have a real coolant temperature gage on my dash as well as a real voltmeter and oil pressure gage in my rear view mirror. Everything works great and I love having the gages. As an engineer, I like having actual data to monitor when running equipment.
I will be posting details of this mod and several other recent mods within the next few days but felt that info regarding this particular mod fit well in your post.
Mark
Trending Topics
#8
10-06-2012, 11:59 AM
Senior Member
Hi all!
As we finally got some beautiful autumn days here in Norway, I have installed my RealGauge temp annd oil press option. A couple of notes:
First of all, the instructions are excellent. Very detailed. Just be sure you follow them to the letter. I have a tendency to be somewhat fast and cut some corners. That seldom pays. I lost my driving licence and got a heavy fine some years ago being fast, but that is another story,
Temp mod:
A fairly easy install. You will need a powerful lightsource to identify the correct wires. A magnifier also helps, especially to read the pin numbers on the connections. I have one you put around your head. That way you have both hands free to work. Just remember to take it off before meeting your neighbour. It looks a kind of wierd. I also got the beeps turning on the ignition due to scuttle panel connectors not connected.
Oil press mod:
I put my cars front end on two ramps. That gives you ample of space to work underneath. The space to work when installing the oil press sensor is very cramped. I could in no way get my torque wrench in there, so everything is tightened by judgement. As written in the instructions, do not tighten to much. Removing the oil filter would give you more room, but then you would have to drain the oil first. Feeding the cable from the engine compartment into cabin is very fiddely. The idea with a long tie wrap is smart. Mine got stuck several times and I culd not see it inside. But then, with help of a strong light, there it was, stuck inside on the left side. Pulling through was no problem.
To summerize: Temp mod, very easy, Oil press mod: Somewhat more complicated and time consumning. As said numerous times, follow the instructions and be patient.
Lots of thanks to you Steve.
The following users liked this post:
WhiteXKR (10-06-2012)
#9
10-08-2012, 12:14 AM

Perhaps I can add a little bit here as well. After 3 hours in the garage this afternoon, I too have my RealGauge installed! My installation experiences are as so ably described by Astromorg, with the exception of an accidental selection of the wrong red wire. But that was soon put right after following the included debugging suggestions, so now I can only expess in my own words my appreciation to Steve (WhiteXKR) for his excellent product.
If there is anyone still undecided on this product thinking it might be too difficult, please do yourself a favor and order it right away. The instructions are clear, and the individual tasks don't require more than just a common aptitude with tools.
Steve
If there is anyone still undecided on this product thinking it might be too difficult, please do yourself a favor and order it right away. The instructions are clear, and the individual tasks don't require more than just a common aptitude with tools.
Steve
#10
10-08-2012, 02:36 AM
Veteran Member
Join Date: Nov 2006
Location: Glasgow, Scotland UK
Posts: 47,302
Received 9,007 Likes
on
4,113 Posts


Thread
Thread Starter
Forum
Replies
Last Post
aholbro1
XJ XJ6 / XJR6 ( X300 )
17
08-05-2021 05:02 AM
Currently Active Users Viewing This Thread: 1 (0 members and 1 guests)