When you click on links to various merchants on this site and make a purchase, this can result in this site earning a commission. Affiliate programs and affiliations include, but are not limited to, the eBay Partner Network.
Looks promising, but if that doesn't work - it's not for me to suggest but ............. there's lots on here, including many who live in the US, who are impressed by your skill and determination, and who would probably be happy to take a delivery and then ship it on to the UK.
As I say, not for me ..................................
Draining, the breather is working better now I cleaned it.
As the original jag recommended oil is no longer available I went for this, I used an old Halfords bottle to do the filling.
I had a quick try to push in the big bushes with my vice but was not big enough so I dropped into my local MOT garage and used their press to push them in easily. I used the strap to rotate to get perfect alignment.
I started the reassembly then had to strip it all down again as I forgot this bracket.
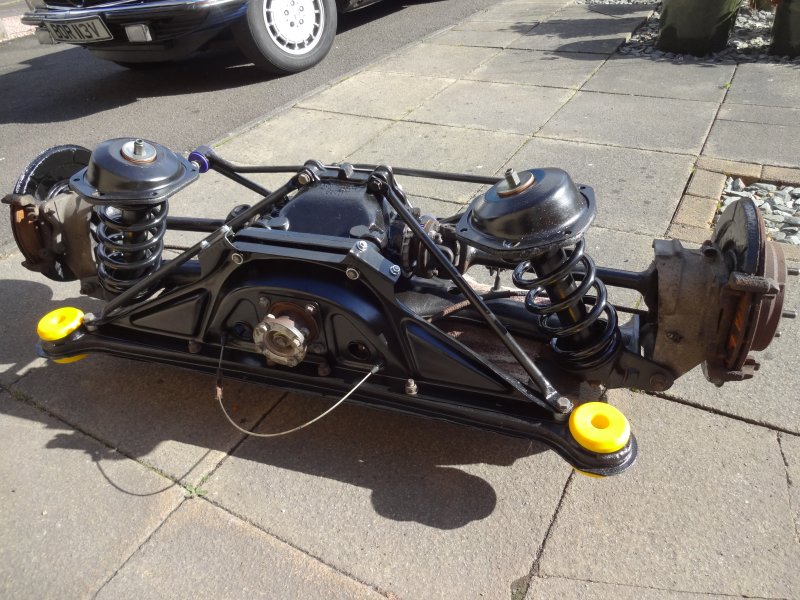
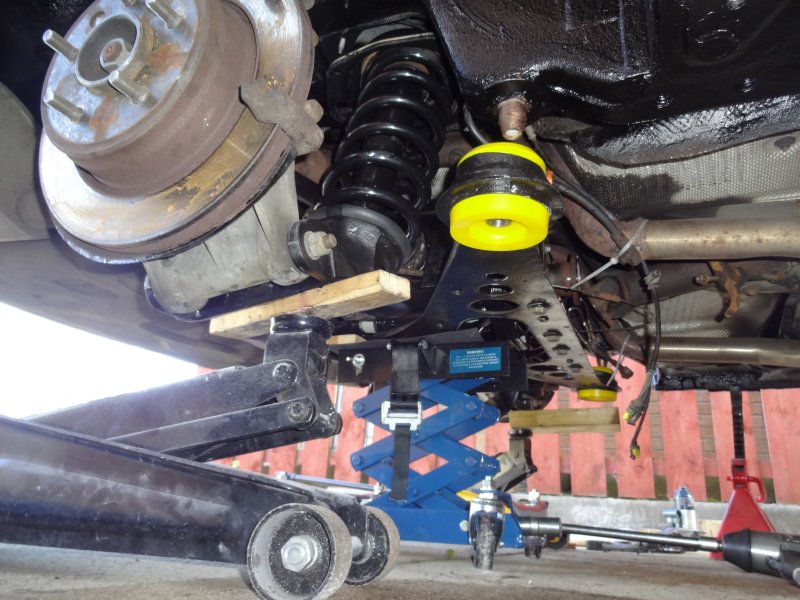
I then dropped the diff back onto the arms and reattached the pendulum.
Then bolted on the two A frames.
Then the stabiliser arms and the diff front plate.
Next I topped off the diff oil again as some had leaked out of the breather.
Anti roll bar and drop links next.
Then I used a vice to push in the strut bushes and bolted it on.
Next were the axel shafts, the nuts are use once 11/16th and it seems to be almost impossible to get a socket on cleanly to set the torque.
Then onto the hub carrier bolts, remember to align the witness marks you made before taking them off as they set the rear toe. I also attached the shocks but ran out of time for the springs and top mounts.
Then I remembered that I needed to put the shock top mount studs back onto the car with some thread lock, that's it for today.
Last edited by RaceDiagnostics; 09-24-2015 at 01:54 PM.
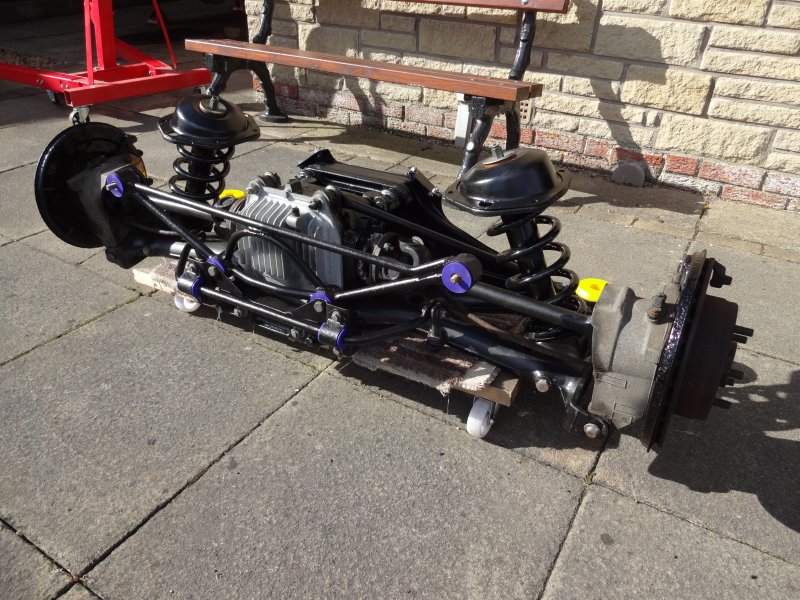
I compressed the springs and got them fitted to the shocks, they needed a bit more compression than taking them off, I guess all the mounts had expanded a bit, then splashed some engine enamel on the disc guards.
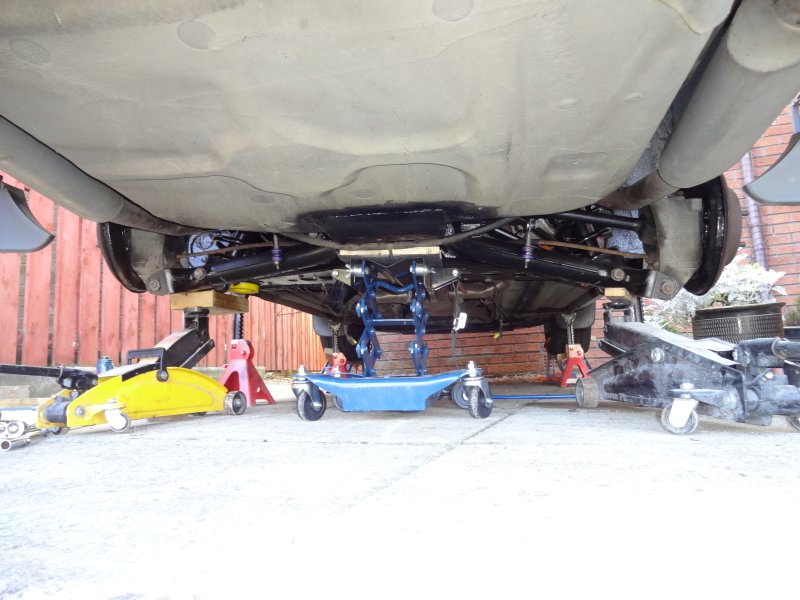
I then used my engine hoist to transfer the assembly from the dolly to the scissor jack and rolled it under the car via the wheel arch. I also used a couple of trolley jacks to spread the load as I was not sure of the total weight and the limit for the scissor jack was 200kg.
Next was a lot, a hell of a lot of fettling , first to get the shock top mounts to fit on the studs, then to get the exhaust hanger to fit on the studs I added, then to get the front mounts to fit and the at least 45 mins for each of the two top monostrut bolts to go all they way through to the captive nuts. In all it was a hell of a job single handed.
These were the last two to go in that gave the most trouble.
Taking a break now before I get all the ancillaries bolted back together.
After all that I got a bit of a fright when there were four bolts left over, then I remembered I used studs on the exhaust hangers so these were surplus. ops:
Dropped the car to the ground and took it for a test drive, perfect!
It turned out to be a fairly expensive job in the end, �720 all in and about ~ 60 to 70 hours over a two week period. However I still need to get a couple of good second hand brackets which I expect will be around �100 or so, I have had to reuse my perforated ones for the time being. Saving of �100 could have been made if I had used standard bushes rather than poly. If I had had this work done at a garage then it would have cost thousands and would not have been done to the same level of quality.
Cost Breakdown
Poly bush set �200
2 x Cross brace �75
Various nuts and bolts �50
2 x Drop link �25
2 x Springs �100
2 shock bush �30
Paint blasting �50
Diff oil �15
Dinitrol unde rseal �25
Epoxy paint �15
Brake line pinch tool �10
Scissor jack �90
Female torx set �15
RD, The best write up ever on this job. You made it look uncomplicated and doable.
Thanks from all of us DIY'ers. Not looking forward to doing it but sure feel a lot more confident when the time comes for me or to help someone else.
Well done RD, another great piece which deserves being a sticky and I'm sure will be. You have a great knack for presentation with pics and description, many thanks,
Many thanks for taking the time and trouble to post this repair. I was thinking of stripping down the rear axle and refurbing - but thought I would be mad to do so on the driveway. Your post has given me confidence to tackle this (although not just yet, cause I became a Grandad today!) - cheers Mately!
Excellent work ! I have the same project in my future as well.
I did the same thing to my previous car, a 1992 Merc 230CE a few years ago. I used a motorbike lift to get the rear subframe assembley removed. It worked nicely.
I stopped off at the garage today to get the rear tracking adjusted.....
...and was surprised to see a couple of things, first, the front caster had gone out of spec since the last time I had it checked, just after putting in the new shock top mounts about a year ago, disappointing but no big deal.
Second the rear camber had improved on both sides by about 20 seconds but not by enough to bring the left rear into spec but again I am not too worried about this, the only abnormal tyre wear I have on the rear is in the middle of the tread despite running low pressures.
I am into day 4 of my own rear subframe refurb and I wanted to thank RD and Scoobie and the forum in general for sharing their experiences and knowledge - it makes a huge difference when you can see how others have done things.
So far it's gone pretty smoothly and I had the unit out and broken down by end of day 3.
Hope I can remember how this goes back together!
I lowered the subframe from the car by bolting a piece of wood to my trolley jack and then bolting the wood to the subframe. Remove the four bolts on the bottom of the A frame, you will find 2 short and 2 longer bolts but they all share the same thread size. I used the 2 longer bolts to attach the subframe to the block of wood and hence the trolley jack. It made the whole thing pretty stable and balanced and I was able to lower the subframe and move it from my car to the garage without a problem. I will take a photo when I put it back to show how I did it.
I've spent this morning removing the A frame bushes. I followed Scoobie's advice and cut out the centre with a jigsaw and then cut out a 1cm strip of the bushing free it up.
Sorry about the focus but you get the idea.
First one took 2 hours as I was nervous about cutting into the subframe but the second one only took 45 mins once I was clearer about the profile of the bush I was cutting into. You can see in the photo the cross section of the piece I took out.
One came out easily but the other was seized solid in both the bushing and the wishbone sleeves. I managed to free it up by heating the fulcrum bolt and dousing with Plusgas a few times. Hitting it with an impact wrench and a drift and hammer on the end of the bolt eventually freed it off. There was a small amount of pitting on the fulcrum bolt but it cleaned up easily on a wire wheel and now both arms rotate freely on the bolts. I could easily imagine if the corrosion was more severe it would be a real battle to get these out.
I ended up taking the rotors and brake bracket of to lower the weight. I also used a Harbor Freight hydraulic cart to lower the assembly. Worked perfectly.
Thanks for great story and great pictures! !
I remove today the rear frame and after thinking and reading, ( I take the rear mufflers off the rubbers and lower the unit so I can remove the bolts(10mm) of the center mufflers with a ratchet with easily.
best regards, Frans (the netherlands)

 09-24-2015, 09:49 AM


 ops:
ops: