
Rear wheel bearing install
#61
 04-04-2018, 01:33 PM

Veteran Member
Just a side note: When installing the hub onto the axle splines, do not grease the axle or splines. I don't know why, but that is in accordance with the maintenance manual. Oddly, when replacing my left side hub assembly I found that a friggin' Jaguar dealer had previously replaced the assembly "and" greased everything.
I tell ya: we can't trust anyone to repair our cars correctly. We're on our own out here. Thank God for this forum!
I tell ya: we can't trust anyone to repair our cars correctly. We're on our own out here. Thank God for this forum!
The following users liked this post:
Johnken (04-04-2018)
#62
04-04-2018, 02:53 PM
I have yet to reassemble mine but I think the strategy will be :
1. Press both outer shells into the hub carrier. I'll probably use the threaded studding, the old bearings with a slot cut in them, and a large metal washer to "pull" them in but a press would be a more efficient and quicker method.
2. Install the seal and inner bearing on one end of the sleeve and pack with grease.
3. Slide that into the hub carrier.
4. Slide on the large spacer and the thin spacer.
5 Put lots of grease on the second inner bearing and tap that on using a suitable socket.
6. Install the rubber seal over that second bearing.
Don't forget the two spacers that fit on each end of the "sleeve". They are different sizes and should be fitted in the same place that they were removed from.
Also - if it's not too late - the bolt that holds all this lot together is "eccentric" and should be fitted exactly as it was when removed.
#63
04-04-2018, 04:39 PM
Veteran Member
I think "pack the bearings" is just a technical and professional way of saying "squidge a load of the correct grease into the two halves of the bearing before you push it all together again". Yes- the two halves will fall apart and its in the gap between those two halves that you want plenty of grease.
The inner and outer bearings and rubber seals are very slightly different sizes, so it shouldn't be possible to get them the wrong way round.
The inner and outer bearings and rubber seals are very slightly different sizes, so it shouldn't be possible to get them the wrong way round.
#64
04-04-2018, 05:09 PM

Veteran Member
+1 with David. Once someone on this site spoke about this, it may have been RJ I'm not sure, based on that I put the grease in a plastic bag, drop the bearing in and work the bearing to distribute the grease.
Question for expert: Can you put too much grease on a bearing (within reason of course)?
Z, you may have one of those little squeeze tubes. My first idea would never work with that. If I had that I'd distribute it along the outer circumference of the bearing , drop it in the race, spin it a few times, repeat 1 or 2x to get it spread out and into every nook.
john
#65
04-04-2018, 05:17 PM
Veteran Member
David, You sure made me smile about the ABS ring. I spent what felt like hours studying it wondering how in the world it would turn on top of the tacky rubber seal. It just doesn't make sense.
I actually assembled my 1st one without the seal. Um, the bearings last about 2 months without that seal folks - lesson learned for me .
.
It works, don't second guess yourself anyone who reads this in the future. The pressure of it up against the axle spline ensure it turns. Even though it makes no logical sense looking at it as you assemble it.
John
I actually assembled my 1st one without the seal. Um, the bearings last about 2 months without that seal folks - lesson learned for me
. It works, don't second guess yourself anyone who reads this in the future. The pressure of it up against the axle spline ensure it turns. Even though it makes no logical sense looking at it as you assemble it.
John
#66
04-04-2018, 11:16 PM
John, yes you can over grease the bearings which will cause “churning.” The end result is the bearing wearing out prematurely. Here is a link explaining what can happen:
Bearing Failure Due to Over Lubrication | Bel-Ray Company, Inc
Bearing Failure Due to Over Lubrication | Bel-Ray Company, Inc
#67
04-05-2018, 05:54 AM

Join Date: Oct 2007
Location: PHX some of the time
Posts: 117,265
Received 6,307 Likes
on
5,495 Posts
The following users liked this post:
Johnken (04-06-2018)
#68
04-05-2018, 12:17 PM
Ok guys,
I've mentalized everything in my head and would like to run it over with you to make sure I do this right. Sorry Devon, your description is hard to visualize for an amateur like me...I need pics to go along side it...also bear in mind, I didn't had a chance to see the bearings while intact as they all fell out the floor along with the hub, so I am trying to do this step by step...correct me if my steps are wrong:
Exhibit 1: Press in the "Outer bearing"? no grease?, I am not sure what these are called, but the have different sizes so I can tell which one comes from which side.
Exhibit 2: The same as one on the other side...no grease
Exhibit 3: Rubber seals goes in the hub...any grease?
Exhibit 4: The larger inner bearing goes in next, grease this one generously?
Exhibit 5: the big spacer goes in next, follow by the small spacer?? or where does the small spacer goes?
Exhibit 5: insert the hub into the carrier and then the smaller inner bearing. Lastly, another rubber seal before the ring gear.
I have a valvoline durablend grease, would this suffice or I need a better grease?
Besides the outer bearing, would I need the press to press in all the bearings?
#69
04-05-2018, 12:19 PM
#70
04-05-2018, 01:45 PM
Veteran Member
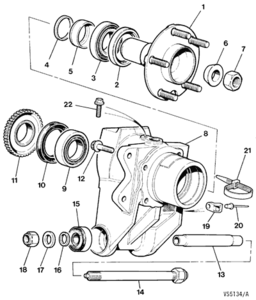
Yes - pretty much correct.
Press both outer bearing shells into the hub carrier. (so that's the outer parts of '3' and '9' into '8')
Then fit rubber seal '2' and the inner part of bearing '3' on to the hub.
put some grease on the roller part of '3' and push into the hub carrier.
Fit large spacer '5' and thin spacer '4' on to the hub.
Grease, and then press the inner part of '9' on to the protruding hub.
Press the seal '10' on to the bearing '9'
Press the ABS ring '11' on to the hub.
Put it back on the half-shaft splines and fit the cone spacer '6' and a NEW nut '7'
Job done !!

Last edited by DevonDavid; 04-05-2018 at 01:48 PM.
#71
04-06-2018, 12:53 AM
Yes - pretty much correct.
Press both outer bearing shells into the hub carrier. (so that's the outer parts of '3' and '9' into '8')
Then fit rubber seal '2' and the inner part of bearing '3' on to the hub.
put some grease on the roller part of '3' and push into the hub carrier.
Fit large spacer '5' and thin spacer '4' on to the hub.
Grease, and then press the inner part of '9' on to the protruding hub.
Press the seal '10' on to the bearing '9'
Press the ABS ring '11' on to the hub.
Put it back on the half-shaft splines and fit the cone spacer '6' and a NEW nut '7'
Job done !!
Attachment 212581
#72
04-06-2018, 02:58 AM
Veteran Member

#73
04-06-2018, 09:24 AM
Veteran Member
David, wow, nice job on the illustration. Before I saw this, I was concerned we had not discussed the orientation of the big spacer.
Z, the taper faces the inside bearing.
I sure wish I had this diagram back when I did mine. I appreciate it.
John
Z, the taper faces the inside bearing.
I sure wish I had this diagram back when I did mine. I appreciate it.
John
Last edited by Johnken; 04-06-2018 at 09:26 AM.
The following users liked this post:
piper 888 (10-22-2020)
#74
04-06-2018, 06:13 PM
Does this make sense ??
(Can somebody double-check my homework please - I think I got it right but would value a second opinion !!!!)
Attachment 212591
(Can somebody double-check my homework please - I think I got it right but would value a second opinion !!!!)
Attachment 212591
I am ready to tackle the job now....let's hope I don't run into anymore problems
So couple more questions:
1. Would my Valvoline Bearing grease would work? or do I need a more specific brand (Timken)?
2. How would you get the bearings in? would I need a press to do that?
Sorry for the million questions, I am just being extra careful as this is my first big job ever.
Last edited by zidjan; 04-06-2018 at 08:09 PM.
#75
04-06-2018, 09:11 PM
Veteran Member
Valvoline is just fine.
Re the press. Thinking back. . .The race (bearing outer shell was pressed in. Not too much force needed at all, but it sure got the job done fast and reliably.
The outer seal and hub is pressed into outer bearing. I forget if outer bearing is pressed into hub before or after the bearing is in the hub carrier. Probably doesn't matter either way.
You will press the inner bearing, and it's much much easier to put the inner seal in place with a press.
My ABS ring was pressed on with my hand. Maybe yours sits more tightly I don't know.
Z, I think you just bought the press. Don't make the same mistake I did my first assembly.
You always need to support the bearing from behind if your pressing something into it.
John
The following users liked this post:
zidjan (04-07-2018)
#76
04-07-2018, 04:13 AM
Veteran Member
#77
04-09-2018, 07:54 AM
Veteran Member
Changed out the right hub on Friday. After reading through this thread again, I'm quite happy to pay a little more and just get a rebuilt assembly. Installing the hub assembly is really a snap. Getting the parking brake bits back into place was, once again, the biggest chore. And of course, I still have a scored-up, brand new, drilled-n-slotted brake rotor (just shoot me).
Good news though: Kitty "is" back on the road, and those very affordable parking brake shoes I posted fit and work quite well. For $16 they are a no-brainer if you're thinking of replacing yours.
Good news though: Kitty "is" back on the road, and those very affordable parking brake shoes I posted fit and work quite well. For $16 they are a no-brainer if you're thinking of replacing yours.
The following users liked this post:
Johnken (04-09-2018)
#78
04-09-2018, 09:51 AM
Changed out the right hub on Friday. After reading through this thread again, I'm quite happy to pay a little more and just get a rebuilt assembly. Installing the hub assembly is really a snap. Getting the parking brake bits back into place was, once again, the biggest chore. And of course, I still have a scored-up, brand new, drilled-n-slotted brake rotor (just shoot me).
Good news though: Kitty "is" back on the road, and those very affordable parking brake shoes I posted fit and work quite well. For $16 they are a no-brainer if you're thinking of replacing yours.
Good news though: Kitty "is" back on the road, and those very affordable parking brake shoes I posted fit and work quite well. For $16 they are a no-brainer if you're thinking of replacing yours.
#79
04-09-2018, 10:12 AM
Veteran Member
I used Jag Spares International out of Britain:
Jag Spares International - XK8 1996-2005
The rebuilt assembly cost me just under $250 delivered to Maryland.
There are domestic sources for rebuilt units as well, and you might be able to find one for around $200 delivered. The rebuilt hub these guys sold me a few years ago now has at least 50K miles on it with no problems, so I stuck with them this time around as well.
BTW: They supposedly rebuild the spindle bearings as well as the hub bearings, so you can take them off the worry list as well. The ABS reluctor ring is installed, so it's ready to go onto the car with no additions as soo as the assembly arrives. This last piece was especially good news for me as "BOTH" ABS rings had been sliding around the hubs' splined ends by the time I got to them. They showed a fair amount of scoring and I'm not sure I could have gotten them firmly afixed to a new hub. So along with getting rid the unbelievable bearing noise and scraping disc brake rotor, all my ABS and transmission warnings are gone as well. I put 200 miles on her this weekend with a single hiccup.
The following users liked this post:
Johnken (04-09-2018)
#80
04-09-2018, 10:29 AM
Veteran Member