
Visor Mirror Repair (Video) FAQ
#41
 07-25-2013, 04:34 PM


Senior Member
I don't have a problem with the mirror, that's just fine. My problem is the entire visor came off on the part that is screwed into the car, I detached the visor entirely now. I see a large center hole and two small holes on each side of it where the screws should screw in. Will this be a problem to tightly screw it back up in the same holes again and will it hold tightly? Before it came off entirely it was flopping down a bit, didn't snap up tightly as the other side.
Last edited by SteveJacks; 07-25-2013 at 04:37 PM.
#43
08-05-2013, 04:02 PM
Veteran Member
I avoided the need for glue by using a small hard rubber "bumper" with adhesive on the back. It is the kind that goes on the back of cabinet doors. I simply packed that down into the opening with the adhesive facing down toward the spring and folded up on the surrounding plastic sides. The rubber fills the void and keeps the springs in place without the need for glue or risk of ruining your visor.
#44
08-08-2013, 12:24 PM
Senior Member
This thread motivated me to fix the flappy mirror doors on my visors... however, I'm guessing the process is entirely different based on year? I have a '97 and there were no screws anywhere.
I'm very happy now because I finally got to use my package of JB Weld (to hold the little spring u's from popping back out). I've had this package for about 10 years because I never could find a need for it!!!
I'm very happy now because I finally got to use my package of JB Weld (to hold the little spring u's from popping back out). I've had this package for about 10 years because I never could find a need for it!!!
#45
11-02-2013, 03:54 PM

Junior Member
#46
12-14-2015, 08:24 PM
#47
03-29-2016, 05:19 PM

Senior Member
Went ahead and used this repair today!
Excellent and thank you!
UPDATE!
Well things are not what I thought they would be after doing this repair.
I was able to easily get the spring pieces back in place and used some epoxy to hold them there. Yes, they had fallen out just as described on both visor mirrors.
Went to check the repair later in the evening and unfortunately, I still have a floppy problem.
The problem seems to stem from the little cam-lobe on the mirror door and / or the pressure available from the spring.
The spring now holds the door open easily but when closed, there is still about half an inch of looseness to the door that allows it to hang down.
There are only two ways that I can see to fix this:
1) Break the springs out of the assemblies again and close the spring slightly to apply more pressure.
This is a heartbreaker because I tried this with one assembly after I had already put the epoxy on it and the whole plastic holder broke off. I am now forced with finding a new solution to even holding the spring back onto the visor.
2) Put something on the lobe to increase its size. Maybe applying a little epoxy to each side of the lobe somehow that builds it up a little higher. This would achieve the same result which is taking out any gap between the spring and the lobe.
So for anyone that is going forward with this repair, you might want to try some sort of temporary fix with the springs to insure that the lid closes tightly and stays there before finally locking the springs in with epoxy. Or you could easily compress the spring a little bit before gluing them in place just to be on the safe side.
Right now, I need to figure out how to fix this with springs that have already been glued back in place
Last edited by razorboy; 03-30-2016 at 09:50 AM.
#48
03-31-2016, 09:04 PM

As is my ilk...nothing on my cars works like it should. I followed the instructions, opened up the mirror assembly and found only one metal clip and it was already in the slot. The 2nd clip was MIA.
I made a replica clip out of the spring portion of an old panel clip...was able to reshape it with pliers to match the existing clip. Install it and...NG, didn't work, mirror still flapping.
I think it has to do with the plastic cams on the flap being worn and not contacting the spring. I guess I'll go the velcro fix or pay $116. for a used replacement visor.
#49
04-01-2016, 10:00 AM
Senior Member
Its a bit frustrating for sure but at the moment, I am not ready to throw in the towel.
The issue I face is that I haven't found any way yet to hold the springs in place with enough strength to offset the tension that the spring needs to apply to hold the lid closed.
Tried using some plastic specific epoxy last night and when I tried it this morning, the bond immediately broke as I tried to rotate the lid. It did feel tight at first though.
I believe the tip of the spring should touch the nub for the lid when the lid is removed. Maybe there is a little more play than that on a factory original but with the spring tip touching that nub, there is definitely enough pressure on the lobe to keep it closed when assembled.
I believe now that I need to find a mechanical solution to hold the springs in place. Epoxy, by itself, is not strong enough to keep pressure on that spring assembly. Going to try using a small piece of sheet metal today to make an "L" shaped bracket to go over the spring and secure to the mirror housing. Not sure yet how that will be bonded in place but there definitely needs to be something structural behind the spring to hold it in place or else there will never be enough tension on the spring to hold the lid closed.
Stay tuned
#50
04-01-2016, 02:48 PM
Senior Member
Progress report,
Ok, I took a couple of pics while I was working on this. Hopefully this will help someone else in the future if it ends up working out for me.
So the floppy door has two possibilities and on my mirrors, both of them existed. The springs that keep tension on the mirror door had cracked their sockets and had fallen out. Initially, I followed the post here and simply used epoxy to hold them back in place. This worked only partially. As far as I could tell, those little springs need to sit close to the nub for the door to keep constant pressure on the little door cam-lobe. Look at the two pics here showing one that was from the initial repair and then the second pic showing where I think the tip of the spring should live.
Where the spring tip sat on the first repair
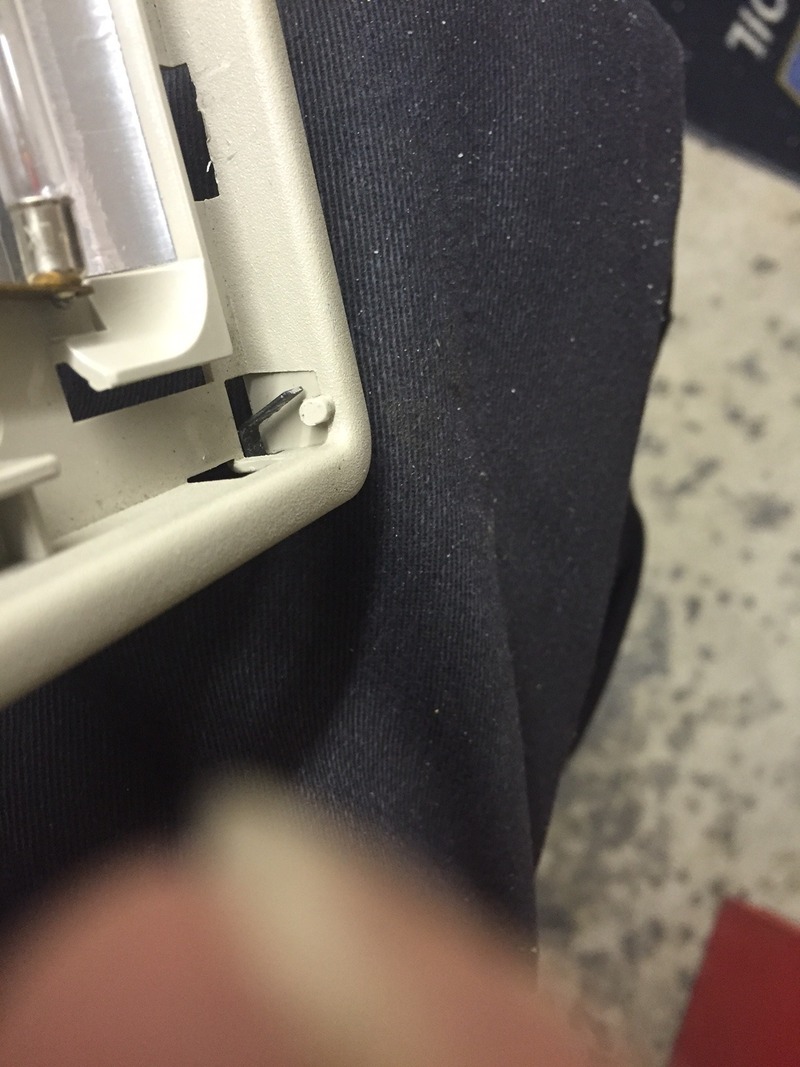
Where the spring tip sits on the second repair

You can see in the second picture that the spring tip is right up to the nub. This ensures that the spring will always put pressure on the little cam lobe of the door sealing it tight when you close it.
Now the big problem I faced was that there was no type of glue or epoxy that would hold the tension of the spring when you opened and closed the door. Everything I tried simply cracked out when I used the door - it needed a mechanical fix.
This looks way overkill I know but we will see if it works. I cut a small strip of sheet metal to make an "L" bracket to fold over the side of the mirror housing. I then drilled 2 small holes and used some solid copper wire to solder to the L bracket. Drilled companion holes in the mirror housing and then cut the copper wire back until it sat just on the other side of the plastic housing. Once I was good on that, I used my plastic epoxy to dope up the whole assembly.

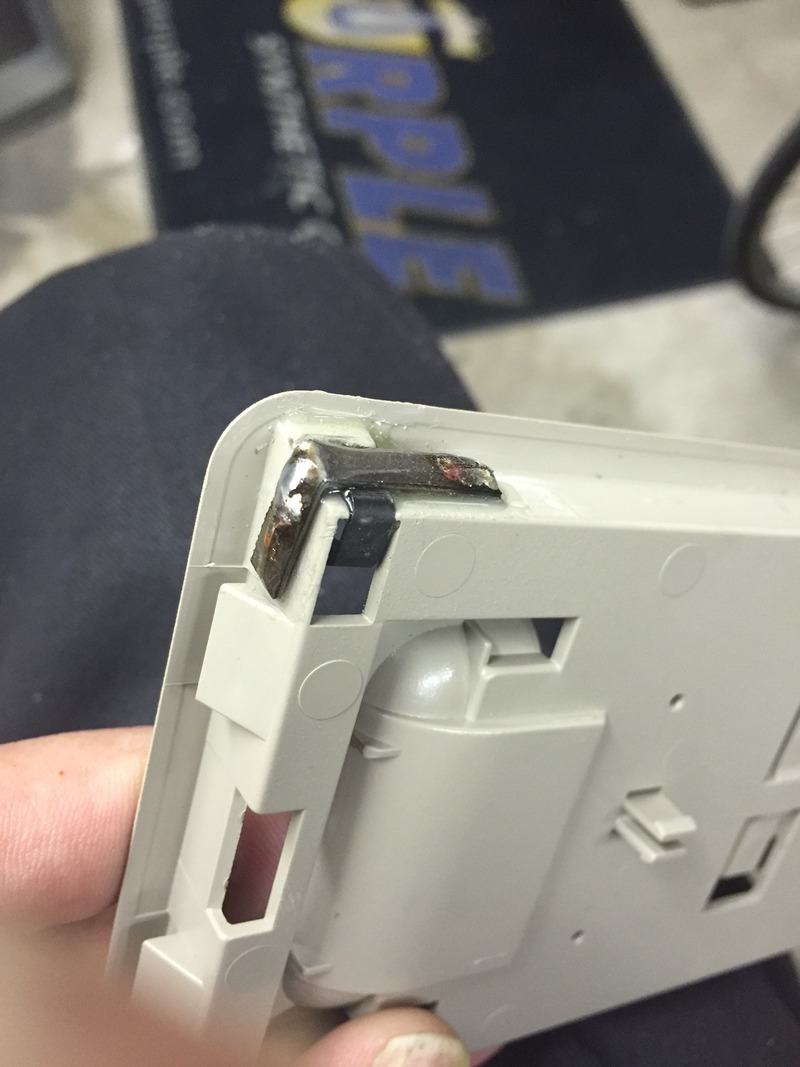
Its not pretty but it doesn't have to be as it is hidden.
The idea is that the spring pushes against the L bracket instead of epoxy which distributes the load pressure across a larger surface area. The little pins I added allows that pressure to be transferred to the plastic housing taking further strain off of the epoxy joint.
Hopefully, all of these things combined will allow the spring to stay tight to the cam lobe and keep the door shut.
Only time will tell now
#51
04-02-2016, 10:50 AM
Senior Member
Hey Lads,
So my repairs worked!
No drooping and it locks solidly in either closed or open position.
So my repair was way more involved than I hope anyone else has to do. The reason it was so involved was because I had epoxied the springs in place without really knowing what the position of them should be. After that, I had to break the repair apart which ultimately broke the holders for the springs right out of the part.
If all you are doing is putting the springs back in the existing holders, just make sure that the tip of the spring touches the nub for the mirror door. This ensures that the spring is always in compression against the little lobe on the door. If you don't you will have a sagging door and the door also will not stay open all of the way.
My repairs resulted in tight doors that don't creak or crack so the repair should last for the remaining life of the car. It was fiddly but with the option being used visors at over 100.00 a piece that can end up with the exact same problem, the choice was clear.
Hope this helps other out who are having the same issue.
BTW - Regardless of how much you have to repair these, use a epoxy designed for plastic. It flows well and fills holes with a pretty strong bond but make sure you check it before it cures completely. It might get into areas you don't want and if you catch it soon enough, it is still soft enough to use a pen knife to cut it away.


#52
06-28-2016, 03:27 PM
I must add, since I had the visor off to fix it I thought the light was no longer working since I removed it from the car, thankfully the guy in the video explained at the end that you must have the visor back in place in the car in order for it to make the connection. I thought I had broke it. Sure a lot of people aren't aware of that fact.
#53
10-13-2019, 01:13 PM
Hint...pinch the clips with pliers before reinstalling to ensure they hold the vanity mirror cover securely.
My clips where sitting loose as described and easy to re-install with epoxy but the covers still opened a bit. So I quickly pulled then out and squeezed with pliers and pushed back in. Now tight and secure.
My clips where sitting loose as described and easy to re-install with epoxy but the covers still opened a bit. So I quickly pulled then out and squeezed with pliers and pushed back in. Now tight and secure.

Thread
Thread Starter
Forum
Replies
Last Post
Jaguar Forums Editor
Jaguar Press release
1
09-30-2020 06:53 AM
Jaguar Forums Editor
Jaguar Press release
0
09-14-2015 11:18 PM
Jaguar Forums Editor
Jaguar Press release
0
09-04-2015 09:18 AM
Currently Active Users Viewing This Thread: 1 (0 members and 1 guests)