Voltage Reduction Kit to Reduce Hydraulic Pressure
#61
 04-18-2011, 09:16 PM

SEKISUI 5760 THERMAL ADHESIVE TAPE PAD 6"x1" 2 STRIPS | eBay
#62
04-19-2011, 07:25 AM

Junior Member
Join Date: Apr 2011
Location: Atlanta
Posts: 5
Likes: 0
Received 0 Likes
on
0 Posts
Actually, pulling the existing connector apart can be pretty tough. At first I thought the plastic connector was just tight, but it's actually the pins themselves. They are like normal spade connectors, and if you've ever tired to pull spade connectors apart you might have noticed how tight they can be. When you're unplugging the connector in the trunk you're disconnecting two spade connectors at the same time. The key is to just jiggle, jiggle, jiggle. You won't be able to pull the connector straight apart. You have to move it from sided to side, pulling it apart as you jiggle it.
Having said that, yeah... it's a ten minute job.
I learned some stuff making this first batch, so the next batch is going to look a little different. Instead of having an 18 inch pair of wires with the resistor soldered a few inches from one end, I'm going to Make the white wire only 2 or three inches long. There will be two black wires, one from each connector down to the resistor. The two black wires will be shrink-wrapped securely. The kit will include a strip of double-sided thermal tape, which will be used to fasten the resistor to the top of the metal rack that holds the CD changer, nav system, amplifier, and hydraulic pump. The rack will act as a heat sink, keeping the resistor cooler. The tape is specifically designed to hold heat sinks to the device that is generating heat, so it's supposed to be able to withstand high temperatures and conduct heat efficiently. I'll post a picture of one before I start making them, and if you are one of the TWELVE people who are on the list to buy one, You can pick between the old style and the new style.
Speaking of the twelve... I originally bought enough parts to make 10 units (it was supposed to be 20, but I screwed up. That's another story) Those 10 were all spoken for in the first day or two. I then ordered enough parts to finish the next ten. I already have 12 people on the waiting list, so I went ahead and ordered parts to make a third batch of ten. If you're one of the people on the waiting list you should have your resistor next week.
Here's the waiting list. If I left your name off please let me know. I've gotten a little confused between user names, real names, email addresses, and in some cases, business names.
JPHAR123
rjag
pophen
DrPerlJam
CatMan
Silverstone
Platinummaker
80sRule
bassmania
and three non-members who emailed me
I did not see my name on the list. For some reason I cannot sent a PM and instead posted my request on the thread (see post #36).
If all are accounted for then please put me for the next batch.
My e-mail address is ivan@thecarnut.com
Ivan
#63
04-19-2011, 08:44 AM
Hi Sam,
I did not see my name on the list. For some reason I cannot sent a PM and instead posted my request on the thread (see post #36).
If all are accounted for then please put me for the next batch.
My e-mail address is ivan@thecarnut.com
Ivan
I did not see my name on the list. For some reason I cannot sent a PM and instead posted my request on the thread (see post #36).
If all are accounted for then please put me for the next batch.
My e-mail address is ivan@thecarnut.com
Ivan
#64
04-19-2011, 06:16 PM
#66
04-20-2011, 08:08 AM
#67
04-20-2011, 06:36 PM
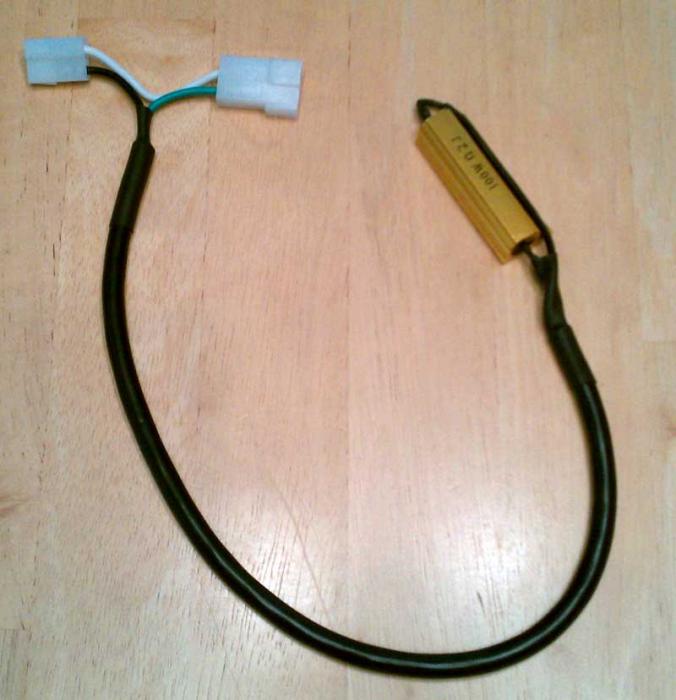
I received enough parts to make a prototype of "Pressure Reducing Resistor version 2.0". I learned a little bit from version 1.0 and I decided to make some improvements. Instead of putting the resistor physically in series with the wires, I decided to branch it off. That will make it easier to use the double-sided thermal tape to tape it to the equipment rack. Electrically it is identical to v. 1.0, but I think this will make for a slightly easier installation. The incoming and outgoing connectors are only a couple of inches apart now. The wires are jacketed from one end to the other, instead of merely being twisted together like on the first version. And there is shrink-wrap tubing on both ends of the jacket to give it a finished look. The shrink wrap is the kind with adhesive in the middle, so it's not going to move once shrunk.
I don't like that I use a black wire going down to the resistor and a green one coming back, but that's what color wires were in the cable, so that's what I had to use. The white wire stays continuous throughout the circuit, and it can only be plugged in one way, so there's no risk of getting the wires crossed. Version 2.0 will also include a piece of the thermal tape.
I can still make version 1.0 if that's what you prefer. THESE ARE NOT SHIPPING YET. I'm still waiting for the resistors. They should be here one day this week.
#68
04-20-2011, 07:36 PM

Veteran Member
#69
04-23-2011, 05:21 PM
Senior Member
Hi Sam, I received today your voltage reduction kit, also received the thermal tape you recommended. I like to say that your kit quality and craftsmanship looks superior as any of the OEM electrical wiring I have seen in this car. Plan to install it tomorrow, let you know results. Thanks!!!!
#71
04-25-2011, 12:09 PM
The following users liked this post:
Felipe Pr (04-25-2011)
#73
04-25-2011, 07:33 PM
Interesting... I used the thermal tape on my car earlier this evening. I guess I was expecting some sort or metallic double-sided tape, but it's not like that at all. It looks like a sheet of wax paper with a sticker on it. You peel the sticker off of the wax paper and stick the sticker on the resistor. Then you peel the sticker off of the resistor and it leaves behind a super-thin layer of really sticky glue-like stuff. There is nothing to the tape except the glue, which makes sense, I guess, if the goal is to have the best possible thermal conductivity. If there was a layer of foil or something like that in the middle, then it would require two layers of the glue, which would probably reduce the thermal conductivity.
So when you get your kit, the little white sticker is actually the thermal tape. Don't throw it away.
So when you get your kit, the little white sticker is actually the thermal tape. Don't throw it away.

#75
04-26-2011, 08:10 PM

#76
04-26-2011, 10:08 PM
Here's a video which shows how to install the resistor harness. I also updated the first post in this thread so that new members don't have to wade through 4 pages of posts. As you can see it's very simple.
YouTube - Resistor Installation.mp4
YouTube - Resistor Installation.mp4
#77
04-27-2011, 06:25 AM
Veteran Member
[edit] Issue gone away. Thank you, Sam
Sam,
This is very helpful. It is really important though that someone installing the resistor have some information about heat, testing, engine-on v. engine-off operation, etc.
Someone viewing the video as is, and not getting the kit from you, would not be aware such info exists. That worries me. Could you add a section maybe just sending the viewer to www.scorekeeper.com/jaguar/jaguar01.htm ?
Last edited by Dennis07; 04-27-2011 at 08:00 AM.
#78
05-11-2011, 12:00 PM
OK, here's the deal. I shipped #37 yesterday. I just assembled the last three. I think I sold one to everyone who requested one, but if you slipped through the cracks please let me know. If you haven't gotten yours yet (other than the one I shipped yesterday, you know who you are) please let me know so I can track it.
After these three are gone I'm not going to be making any more. I kept improving on them and the final version took me 20 minutes to make. I really wasn't making any money on the deal when you throw in the cost of shipping, packaging, etc. I wasn't doing it to make money, but my time is worth something and I didn't realize that so many people would want them. If there's really a demand for them then I might teach my son to make them (he's 22, so he can handle a soldering iron) and let him make them in batches of 10. I'll up the price to $30 and give him the profits. Don't worry, I'd do a QA check. On the ones I've shipped I've been putting a meter to them to make sure the resistance is within tolerance.
After these three are gone I'm not going to be making any more. I kept improving on them and the final version took me 20 minutes to make. I really wasn't making any money on the deal when you throw in the cost of shipping, packaging, etc. I wasn't doing it to make money, but my time is worth something and I didn't realize that so many people would want them. If there's really a demand for them then I might teach my son to make them (he's 22, so he can handle a soldering iron) and let him make them in batches of 10. I'll up the price to $30 and give him the profits. Don't worry, I'd do a QA check. On the ones I've shipped I've been putting a meter to them to make sure the resistance is within tolerance.
#79
05-11-2011, 02:04 PM
Veteran Member
As quoted by Sam
If there's really a demand for them then I might teach my son to make them (he's 22, so he can handle a soldering iron) and let him make them in batches of 10. I'll up the price to $30 and give him the profits.
If there's really a demand for them then I might teach my son to make them (he's 22, so he can handle a soldering iron) and let him make them in batches of 10. I'll up the price to $30 and give him the profits.
#80
05-11-2011, 02:09 PM

For the couple of bucks and few minutes time it takes to install this resistor everyone in this forum should should take advantage of the "Rev's" concerns for us. As said the only hard part is pull apart the old connector. Mine was a little slippery so pair of pliers helped. Thanks again Sam. Jack